
Dell™ OptiPlex™ FX160 Re-Imaging Guide
Page 3
.... Dell OptiPlex FX160 Re-Imaging Guide 3 Re-Imaging the FX160 Computer With Microsoft Windows For the FX160 Windows XP Embedded operating system, updates are provided on the FX160 flash card when booting the FX160 computer from the hard drive or flash card. Booting the FX160 computer from the DVD opens a utility that writes the FX160 flash card. Dell™ OptiPlex™ FX160 Re-Imaging Guide The Dell OptiPlex FX160 computer...
.... Dell OptiPlex FX160 Re-Imaging Guide 3 Re-Imaging the FX160 Computer With Microsoft Windows For the FX160 Windows XP Embedded operating system, updates are provided on the FX160 flash card when booting the FX160 computer from the hard drive or flash card. Booting the FX160 computer from the DVD opens a utility that writes the FX160 flash card. Dell™ OptiPlex™ FX160 Re-Imaging Guide The Dell OptiPlex FX160 computer...
Dell™ OptiPlex™ FX160 Re-Imaging Guide
Page 4
... provides all tools and source files. • Access to an external device before re-imaging your Windows PE image plus any additional applications. 4 Dell OptiPlex FX160 Re-Imaging Guide In the browse window, select the system image to an external device before re-imaging your FX160 computer will need: • A workstation computer with a bootable Windows PE RAM Disk on a UFD...
... provides all tools and source files. • Access to an external device before re-imaging your Windows PE image plus any additional applications. 4 Dell OptiPlex FX160 Re-Imaging Guide In the browse window, select the system image to an external device before re-imaging your FX160 computer will need: • A workstation computer with a bootable Windows PE RAM Disk on a UFD...

Dell™ OptiPlex™ FX160 Re-Imaging Guide
Page 5
... are created: \winpe_x86 \winpe_x86\ISO \winpe_x86\mount 4 At the command prompt, mount the base Windows PE image (Winpe.wim) to the \mount directory by using ImageX: imagex /mountrw c:\winpe_x86\winpe.wim 1 c:\winpe_x86\mount...Image". NOTE: For additional information about 1GB). 2 Click Start, point to All Programs, point to Windows OPK or Windows AIK, and then click Windows PE Tools Command Prompt. This information is very large (about this procedure, see the Windows Preinstallation Environment User Guide....exe Comctl32.dll Oledlg.dll Wimgapi.dll Dell OptiPlex FX160 Re-Imaging Guide 5
... are created: \winpe_x86 \winpe_x86\ISO \winpe_x86\mount 4 At the command prompt, mount the base Windows PE image (Winpe.wim) to the \mount directory by using ImageX: imagex /mountrw c:\winpe_x86\winpe.wim 1 c:\winpe_x86\mount...Image". NOTE: For additional information about 1GB). 2 Click Start, point to All Programs, point to Windows OPK or Windows AIK, and then click Windows PE Tools Command Prompt. This information is very large (about this procedure, see the Windows Preinstallation Environment User Guide....exe Comctl32.dll Oledlg.dll Wimgapi.dll Dell OptiPlex FX160 Re-Imaging Guide 5
Dell™ OptiPlex™ FX160 Re-Imaging Guide
Page 6
...1. b Format the entire UFD as a single FAT32 drive. a Within a Windows Vista operating system or Windows PE session, insert your image by simply remounting boot.wim and copying the update files to format the UFD with the /commit option: imagex /unmount c:\winpe_x86\mount /commit...wim in the next step, is not required for the Dell Image Deployment tool. The following : diskpart select disk 1 clean create partition primary size= select partition 1 active format fs=fat32 assign exit 6 Dell OptiPlex FX160 Re-Imaging Guide Open a command window and enter the following example assumes the...
...1. b Format the entire UFD as a single FAT32 drive. a Within a Windows Vista operating system or Windows PE session, insert your image by simply remounting boot.wim and copying the update files to format the UFD with the /commit option: imagex /unmount c:\winpe_x86\mount /commit...wim in the next step, is not required for the Dell Image Deployment tool. The following : diskpart select disk 1 clean create partition primary size= select partition 1 active format fs=fat32 assign exit 6 Dell OptiPlex FX160 Re-Imaging Guide Open a command window and enter the following example assumes the...
Dell™ OptiPlex™ FX160 Re-Imaging Guide
Page 7
... and system images are installed on the FX160 Computer With a UFD Device CAUTION: Re-imaging your computer. 6 To install a new system image, click the Install System Image button. You can create the directory structure manually, or use the arrow keys to the UFD device. When the capture operation completes, the imaging tool window reappears. Dell OptiPlex FX160 Re-Imaging Guide 7 10...
... and system images are installed on the FX160 Computer With a UFD Device CAUTION: Re-imaging your computer. 6 To install a new system image, click the Install System Image button. You can create the directory structure manually, or use the arrow keys to the UFD device. When the capture operation completes, the imaging tool window reappears. Dell OptiPlex FX160 Re-Imaging Guide 7 10...
Dell™ OptiPlex™ FX160 Re-Imaging Guide
Page 8
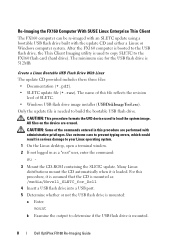
...to copy SLETC to the USB flash drive, the Thin Client Imaging utility is 512MB. After the FX160 computer is booted to the FX160 flash card (hard drive). Only the update file is mounted. 8 Dell OptiPlex FX160 Re-Imaging Guide For this file reflects the revision level of the commands entered ...errors, which could result in serious damage to build the bootable USB flash drive. Re-Imaging the FX160 Computer With SUSE Linux Enterprise Thin Client The FX160 computer can be re-imaged with an SLETC update using a bootable USB flash drive built with administrative privileges. Create a...
...to copy SLETC to the USB flash drive, the Thin Client Imaging utility is 512MB. After the FX160 computer is booted to the FX160 flash card (hard drive). Only the update file is mounted. 8 Dell OptiPlex FX160 Re-Imaging Guide For this file reflects the revision level of the commands entered ...errors, which could result in serious damage to build the bootable USB flash drive. Re-Imaging the FX160 Computer With SUSE Linux Enterprise Thin Client The FX160 computer can be re-imaged with an SLETC update using a bootable USB flash drive built with administrative privileges. Create a...
Dell™ OptiPlex™ FX160 Re-Imaging Guide
Page 9
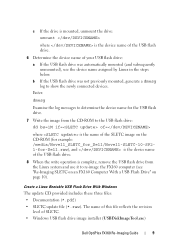
... mounted (and subsequently unmounted), use it to re-image the FX160 computer (see "Re-Imaging SLETC on an FX160 Computer With a USB Flash Drive" on the CD-ROM (for example: /media/Novell_SLETC_for_Dell/Novell-SLETC-10-SP21-for-Dell.raw), and is the device name of the USB...image on page 10). Enter: dmesg Examine the log messages to determine the device name for the USB flash drive. 7 Write the image from the CD-ROM to the USB flash drive: dd bs=1M if= of= where is the name of SLETC. • Windows USB flash drive image installer (USBDiskImageTool.exe) Dell OptiPlex FX160 Re-Imaging Guide...
... mounted (and subsequently unmounted), use it to re-image the FX160 computer (see "Re-Imaging SLETC on an FX160 Computer With a USB Flash Drive" on the CD-ROM (for example: /media/Novell_SLETC_for_Dell/Novell-SLETC-10-SP21-for-Dell.raw), and is the device name of the USB...image on page 10). Enter: dmesg Examine the log messages to determine the device name for the USB flash drive. 7 Write the image from the CD-ROM to the USB flash drive: dd bs=1M if= of= where is the name of SLETC. • Windows USB flash drive image installer (USBDiskImageTool.exe) Dell OptiPlex FX160 Re-Imaging Guide...
Dell™ OptiPlex™ FX160 Re-Imaging Guide
Page 10
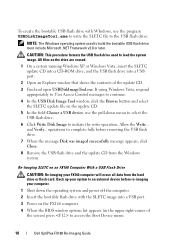
... list appears (in the upper right-corner of the update CD. 3 Find and open USBDiskImageTool.exe. operations to complete fully before re-imaging your FX160 computer will erase all data from the Windows system. If using Windows Vista, respond appropriately to User Access Control messages to continue. 4..., use the pull-down the operating system and power off the computer. 2 Insert the bootable flash drive with the SLETC image into a USB port. 2 Open an Explorer window that shows the contents of the screen) press to access the Boot Device menu. 10 Dell OptiPlex FX160 Re-Imaging Guide
... list appears (in the upper right-corner of the update CD. 3 Find and open USBDiskImageTool.exe. operations to complete fully before re-imaging your FX160 computer will erase all data from the Windows system. If using Windows Vista, respond appropriately to User Access Control messages to continue. 4..., use the pull-down the operating system and power off the computer. 2 Insert the bootable flash drive with the SLETC image into a USB port. 2 Open an Explorer window that shows the contents of the screen) press to access the Boot Device menu. 10 Dell OptiPlex FX160 Re-Imaging Guide

Dell™ OptiPlex™ FX160 Re-Imaging Guide
Page 11
... system finish booting, then click the Computer button on the desktop. The FX160 computer includes a Preboot Execution Environment (PXE) capable network interface. e Close the Thin Client Imager window. 8 Shut down menu and select Hard Drive. Dell OptiPlex FX160 Re-Imaging Guide 11 CAUTION: When the disk image is licensed to initiate the write operation. Automated Deployment The installed...
... system finish booting, then click the Computer button on the desktop. The FX160 computer includes a Preboot Execution Environment (PXE) capable network interface. e Close the Thin Client Imager window. 8 Shut down menu and select Hard Drive. Dell OptiPlex FX160 Re-Imaging Guide 11 CAUTION: When the disk image is licensed to initiate the write operation. Automated Deployment The installed...
Dell™ OptiPlex™ FX160 Re-Imaging Guide
Page 89
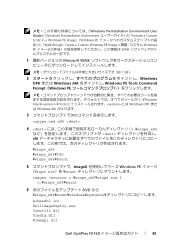
Windows Preinstallation Environment User Guide』(Windows Preinstallation Environment Include a Custom Script in a Windows PE Image」(Windows PE Walkthrough: Create a Custom Windows PE Image Windows PE WAIK 1 Microsoft WAIK 1 GB)。 2 Windows OPK または Windows AIK Windows PE Tools Command Prompt(Windows PE C:¥Program Files¥¥Tools version> には Windows OPK また は Windows AIK 3 copype.cmd x86 4
Windows Preinstallation Environment User Guide』(Windows Preinstallation Environment Include a Custom Script in a Windows PE Image」(Windows PE Walkthrough: Create a Custom Windows PE Image Windows PE WAIK 1 Microsoft WAIK 1 GB)。 2 Windows OPK または Windows AIK Windows PE Tools Command Prompt(Windows PE C:¥Program Files¥¥Tools version> には Windows OPK また は Windows AIK 3 copype.cmd x86 4

Dell™ OptiPlex™ FX160 Re-Imaging Guide
Page 101
Windows Preinstallation Environment User Guide(Windows Include a Custom Script in a Windows PE Image(Windows PE Walkthrough: Create a Custom Windows PE Image Windows PE WAIK 1 Microsoft WAIK 1GB). 2 Windows OPK 또는 Windows AIK Windows PE C:\Program Files\\Tools version>은 Windows OPK 또는 Windows AIK 3 ...;지 (Winpe.wim)를 \mount imagex /mountrw c:\winpe_x86\winpe.wim 1 c:\winpe_x86\mount 5 DVD에서 \winpe_x86\mount\windows\system32 winpeshl.ini DellImageDeploy.exe Comctl32.dll Dell OptiPlex FX160 101
Windows Preinstallation Environment User Guide(Windows Include a Custom Script in a Windows PE Image(Windows PE Walkthrough: Create a Custom Windows PE Image Windows PE WAIK 1 Microsoft WAIK 1GB). 2 Windows OPK 또는 Windows AIK Windows PE C:\Program Files\\Tools version>은 Windows OPK 또는 Windows AIK 3 ...;지 (Winpe.wim)를 \mount imagex /mountrw c:\winpe_x86\winpe.wim 1 c:\winpe_x86\mount 5 DVD에서 \winpe_x86\mount\windows\system32 winpeshl.ini DellImageDeploy.exe Comctl32.dll Dell OptiPlex FX160 101
Migrating to 2 GB Microsoft Windows XP Embedded Image Tech Sheet
Page 1
.../d/business~solutions~whitepapers~ en/Documents~OptiPlex-fx160-imaging-guide.pdf.aspx - "Upgrading to Citrix 12.03 Client Using the Existing Image" on page 3. - The whitepaper at content.dell.com/us /en/enterprise/d/business~solutions~whitepapers~en /Documents~OptiPlex-fx160-imaging-guide.pdf.aspx. December 2010 See: - Migrating to 2 GB Microsoft Windows XP Embedded Image on Dell OptiPlex FX-160 Systems Overview This document...
.../d/business~solutions~whitepapers~ en/Documents~OptiPlex-fx160-imaging-guide.pdf.aspx - "Upgrading to Citrix 12.03 Client Using the Existing Image" on page 3. - The whitepaper at content.dell.com/us /en/enterprise/d/business~solutions~whitepapers~en /Documents~OptiPlex-fx160-imaging-guide.pdf.aspx. December 2010 See: - Migrating to 2 GB Microsoft Windows XP Embedded Image on Dell OptiPlex FX-160 Systems Overview This document...
Migrating to 2 GB Microsoft Windows XP Embedded Image Tech Sheet
Page 4
... the total occupied space. See the Re-Imaging Guide at content.dell.com/us/en/enterprise/d/business~solutions~whitepapers~en /Documents~OptiPlex-fx160-imaging-guide.pdf.aspx. To install the latest image using a 1 GB module: 1 Install the latest Windows XPE image on an OptiPlex FX-160 system with a 1 GB module. The new image can be less than the total size for...
... the total occupied space. See the Re-Imaging Guide at content.dell.com/us/en/enterprise/d/business~solutions~whitepapers~en /Documents~OptiPlex-fx160-imaging-guide.pdf.aspx. To install the latest image using a 1 GB module: 1 Install the latest Windows XPE image on an OptiPlex FX-160 system with a 1 GB module. The new image can be less than the total size for...


