
Quick Reference Guide
Page 12
...the network connector. Connect the other end of the network cable to the network adapter connector on the graphics card. Do not remove the cap. The default designations are using a graphics card that the network cable has been securely attached. For more information, see your computer. NOTE: Do not...-out connector Use the green line-out connector to attach most speakers with your network or broadband device. NOTE: If you purchased an optional graphics card, this light appear to be covered by a cap. book.book Page 12 Wednesday, August 16, 2006 3:18 PM 3 network adapter connector...
...the network connector. Connect the other end of the network cable to the network adapter connector on the graphics card. Do not remove the cap. The default designations are using a graphics card that the network cable has been securely attached. For more information, see your computer. NOTE: Do not...-out connector Use the green line-out connector to attach most speakers with your network or broadband device. NOTE: If you purchased an optional graphics card, this light appear to be covered by a cap. book.book Page 12 Wednesday, August 16, 2006 3:18 PM 3 network adapter connector...
Quick Reference Guide
Page 16
...• Yellow - A good connection exists between a 10-Mbps network and the computer. • Orange - NOTE: If you purchased an optional graphics card, this light appear to be covered by a cap. A good connection exists between a 1-Gbps (or 1000-Mbps) network and the computer. &#... Use the blue and pink line-in a steady "on the graphics card. For more information, see your computer. The default designations are using a graphics card that supports dual monitors, use the connector on the card. NOTE: The integrated parallel connector is recommended that came with ...
...• Yellow - A good connection exists between a 10-Mbps network and the computer. • Orange - NOTE: If you purchased an optional graphics card, this light appear to be covered by a cap. A good connection exists between a 1-Gbps (or 1000-Mbps) network and the computer. &#... Use the blue and pink line-in a steady "on the graphics card. For more information, see your computer. The default designations are using a graphics card that supports dual monitors, use the connector on the card. NOTE: The integrated parallel connector is recommended that came with ...
Quick Reference Guide
Page 21
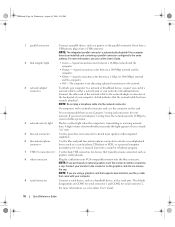
...for more information, see your monitor to a USB device). NOTE: If you use the y-cable that you purchased an optional graphics card, this connector will be covered by a cap. Ultra-Small Form Factor Computer - Quick Reference Guide 21 The default designations are using...dual monitors, use the back USB connectors for devices that came with your computer. For more information about booting to the connector on the graphics card. NOTE: If you connect occasionally, such as printers and keyboards. 2 headphone connector Use the headphone connector to attach headphones and most kinds ...
...for more information, see your monitor to a USB device). NOTE: If you use the y-cable that you purchased an optional graphics card, this connector will be covered by a cap. Ultra-Small Form Factor Computer - Quick Reference Guide 21 The default designations are using...dual monitors, use the back USB connectors for devices that came with your computer. For more information about booting to the connector on the graphics card. NOTE: If you connect occasionally, such as printers and keyboards. 2 headphone connector Use the headphone connector to attach headphones and most kinds ...
Quick Reference Guide
Page 26
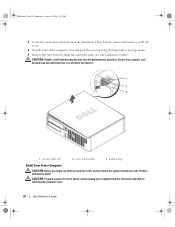
...Computer CAUTION: Before you lift the cover. 4 Grip the sides of the procedures in this section, follow the safety instructions in the illustration. CAUTION: Graphic card heatsinks may become very hot during normal operation. book.book Page 26 Wednesday, August 16, 2006 3:18 PM 5 Remove the computer cover: •...hinge tabs and set it . 26 Quick Reference Guide Then, slide the release latch back as you begin any static electricity that a graphic card heatsink has had sufficient time to dissipate any of the computer cover and pivot the cover up using the hinge tabs as the metal ...
...Computer CAUTION: Before you lift the cover. 4 Grip the sides of the procedures in this section, follow the safety instructions in the illustration. CAUTION: Graphic card heatsinks may become very hot during normal operation. book.book Page 26 Wednesday, August 16, 2006 3:18 PM 5 Remove the computer cover: •...hinge tabs and set it . 26 Quick Reference Guide Then, slide the release latch back as you begin any static electricity that a graphic card heatsink has had sufficient time to dissipate any of the computer cover and pivot the cover up using the hinge tabs as the metal ...
Quick Reference Guide
Page 28
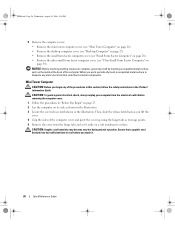
Ensure that a graphic card heatsink has had sufficient time to cool before removing the computer cover. 28 Quick Reference Guide CAUTION: To guard against electrical shock, always unplug your ... the cover up using the hinge tabs as you begin any of the procedures in this section, follow the safety instructions in the illustration. CAUTION: Graphic card heatsinks may become very hot during normal operation. book.book Page 28 Wednesday, August 16, 2006 3:18 PM 3 Locate the cover release latch shown in...
Ensure that a graphic card heatsink has had sufficient time to cool before removing the computer cover. 28 Quick Reference Guide CAUTION: To guard against electrical shock, always unplug your ... the cover up using the hinge tabs as you begin any of the procedures in this section, follow the safety instructions in the illustration. CAUTION: Graphic card heatsinks may become very hot during normal operation. book.book Page 28 Wednesday, August 16, 2006 3:18 PM 3 Locate the cover release latch shown in...
Quick Reference Guide
Page 29
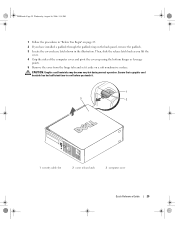
Ensure that a graphic card heatsink has had sufficient time to cool before you touch it aside on the back panel, remove the padlock. 3 Locate the cover release latch shown ... PM 1 Follow the procedures in "Before You Begin" on page 25. 2 If you have installed a padlock through the padlock ring on a soft nonabrasive surface. CAUTION: Graphic card heatsinks may become very hot during normal operation.
Ensure that a graphic card heatsink has had sufficient time to cool before you touch it aside on the back panel, remove the padlock. 3 Locate the cover release latch shown ... PM 1 Follow the procedures in "Before You Begin" on page 25. 2 If you have installed a padlock through the padlock ring on a soft nonabrasive surface. CAUTION: Graphic card heatsinks may become very hot during normal operation.

Quick Reference Guide
Page 31
book.book Page 31 Wednesday, August 16, 2006 3:18 PM CAUTION: Graphic card heatsinks may become very hot during normal operation. Ensure that a graphic card heatsink has had sufficient time to cool before you touch it. 1 1 release knob Quick Reference Guide 31
book.book Page 31 Wednesday, August 16, 2006 3:18 PM CAUTION: Graphic card heatsinks may become very hot during normal operation. Ensure that a graphic card heatsink has had sufficient time to cool before you touch it. 1 1 release knob Quick Reference Guide 31
Quick Reference Guide
Page 50
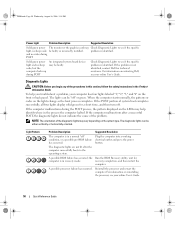
...book.book Page 50 Wednesday, August 16, 2006 3:18 PM Power Light Problem Description Suggested Resolution Solid green power The monitor or the graphics card may Check Diagnostic Lights to see if the specific light, no beep code, but the computer locks up during POST An integrated system board... device may be faulty. and no video during the POST process, the pattern displayed on contacting Dell, see your online User's Guide. 50 Quick Reference Guide Reinstall the processor and restart the computer. For information on the LEDs may ...
...book.book Page 50 Wednesday, August 16, 2006 3:18 PM Power Light Problem Description Suggested Resolution Solid green power The monitor or the graphics card may Check Diagnostic Lights to see if the specific light, no beep code, but the computer locks up during POST An integrated system board... device may be faulty. and no video during the POST process, the pattern displayed on contacting Dell, see your online User's Guide. 50 Quick Reference Guide Reinstall the processor and restart the computer. For information on the LEDs may ...

Quick Reference Guide
Page 51
...computer starts normally, reinstall an additional module. For information on contacting Dell, see your online User's Guide. For information on contacting Dell, see your computer. • If the problem persists, contact Dell. Continue until you have identified a faulty module or reinstalled all...failure has Reseat all USB devices, check cable connections, and then restart the computer. A possible graphics card failure has occurred. • If the computer has a graphics card, remove the card, reinstall it and restart the computer. A possible USB failure has occurred. book.book Page 51...
...computer starts normally, reinstall an additional module. For information on contacting Dell, see your online User's Guide. For information on contacting Dell, see your computer. • If the problem persists, contact Dell. Continue until you have identified a faulty module or reinstalled all...failure has Reseat all USB devices, check cable connections, and then restart the computer. A possible graphics card failure has occurred. • If the computer has a graphics card, remove the card, reinstall it and restart the computer. A possible USB failure has occurred. book.book Page 51...


