
Quick Reference
Page 28
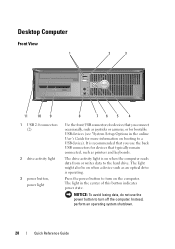
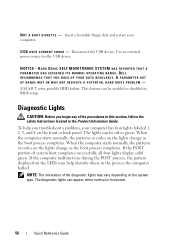
... use the power button to turn on when the computer reads data from or writes data to a USB device). The light might also be on booting to the hard drive. Desktop Computer Front View 1 2 3 11 10 9 1 USB 2.0 connectors (2) 2 drive activity light 3 power button, power light 8 76 5 4 Use the front USB connectors...
... use the power button to turn on when the computer reads data from or writes data to a USB device). The light might also be on booting to the hard drive. Desktop Computer Front View 1 2 3 11 10 9 1 USB 2.0 connectors (2) 2 drive activity light 3 power button, power light 8 76 5 4 Use the front USB connectors...

Quick Reference
Page 39
... Options" in the center of speakers. 9 microphone connector Use the microphone connector to attach a personal computer microphone for bootable USB devices (see "Diagnostic Lights" on booting to turn off the computer.
... Options" in the center of speakers. 9 microphone connector Use the microphone connector to attach a personal computer microphone for bootable USB devices (see "Diagnostic Lights" on booting to turn off the computer.
Quick Reference
Page 49
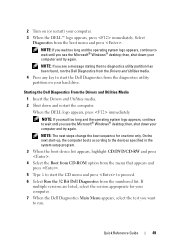
...shut down your computer and try again. then, shut down and restart the computer. NOTE: The next steps change the boot sequence for your computer. 7 When the Dell Diagnostics Main Menu appears, select the test you want to wait until you see the Microsoft® Windows® desktop;... until you wait too long and the operating system logo appears, continue to run the Dell Diagnostics from the Drivers and Utilities media. 4 Press any key to start the Dell Diagnostics from the boot menu and press . Select Diagnostics from the diagnostics utility partition on (or restart) your...
...shut down your computer and try again. then, shut down and restart the computer. NOTE: The next steps change the boot sequence for your computer. 7 When the Dell Diagnostics Main Menu appears, select the test you want to wait until you see the Microsoft® Windows® desktop;... until you wait too long and the operating system logo appears, continue to run the Dell Diagnostics from the Drivers and Utilities media. 4 Press any key to start the Dell Diagnostics from the boot menu and press . Select Diagnostics from the diagnostics utility partition on (or restart) your...
Quick Reference
Page 54
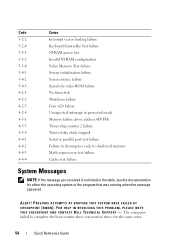
... above address 0FFFFh Timer-chip counter 2 failure Time-of-day clock stopped Serial or parallel port test failure Failure to decompress code to complete the boot routine three consecutive times for either the operating system or the program that was running when the message appeared. PREVIOUS ATTEMPTS AT...
... above address 0FFFFh Timer-chip counter 2 failure Time-of-day clock stopped Serial or parallel port test failure Failure to decompress code to complete the boot routine three consecutive times for either the operating system or the program that was running when the message appeared. PREVIOUS ATTEMPTS AT...
Quick Reference
Page 55
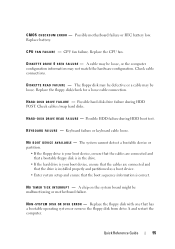
.... Keyboard failure or keyboard cable loose. The system cannot detect a bootable device or partition. • If the floppy drive is your boot device, ensure that the cables are connected and that a bootable floppy disk is in the drive. • If the hard drive is your...low. Check cables /swap hard disks. Possible HDD failure during HDD POST. Replace the floppy disk with one that the boot sequence information is installed properly and partitioned as a boot device. • Enter system setup and ensure that has a bootable operating system or remove the floppy disk from drive A...
.... Keyboard failure or keyboard cable loose. The system cannot detect a bootable device or partition. • If the floppy drive is your boot device, ensure that the cables are connected and that a bootable floppy disk is in the drive. • If the hard drive is your...low. Check cables /swap hard disks. Possible HDD failure during HDD POST. Replace the floppy disk with one that the boot sequence information is installed properly and partitioned as a boot device. • Enter system setup and ensure that has a bootable operating system or remove the floppy disk from drive A...
Quick Reference
Page 56
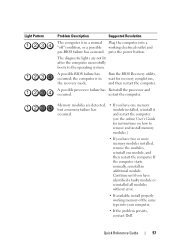
... feature can be off or green. Insert a bootable floppy disk and restart your computer has four lights labeled 1, 2, 3, and 4 on the lights change as the boot process completes. N O T A B O O T D I S K E T T E - Use an external power source for the USB device. NOTICE - When the computer starts .... If the POST portion of the procedures in this section, follow the safety instructions located in the Product Information Guide. DELL RECOMMENDS THAT YOU BACK UP YOUR DATA REGULARLY. The lights can appear either vertical or horizontal. 56 Quick Reference Guide Diagnostic...
... feature can be off or green. Insert a bootable floppy disk and restart your computer has four lights labeled 1, 2, 3, and 4 on the lights change as the boot process completes. N O T A B O O T D I S K E T T E - Use an external power source for the USB device. NOTICE - When the computer starts .... If the POST portion of the procedures in this section, follow the safety instructions located in the Product Information Guide. DELL RECOMMENDS THAT YOU BACK UP YOUR DATA REGULARLY. The lights can appear either vertical or horizontal. 56 Quick Reference Guide Diagnostic...
Quick Reference
Page 57
...into a "off" condition, or a possible working memory of the same type into your computer. • If the problem persists, contact Dell. the computer is in the recovery mode. If the computer starts normally, reinstall an additional module. A possible BIOS failure has occurred; ...Memory modules are not lit after the computer successfully boots to remove and install memory modules.) • If you have two or more memory modules installed, remove the modules, reinstall one...
...into a "off" condition, or a possible working memory of the same type into your computer. • If the problem persists, contact Dell. the computer is in the recovery mode. If the computer starts normally, reinstall an additional module. A possible BIOS failure has occurred; ...Memory modules are not lit after the computer successfully boots to remove and install memory modules.) • If you have two or more memory modules installed, remove the modules, reinstall one...
Quick Reference
Page 60
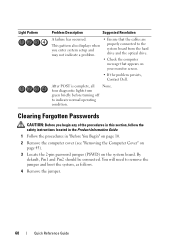
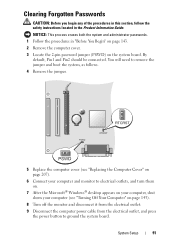
After POST is complete, all None. four diagnostic lights turn green briefly before turning off to remove the jumper and boot the system, as follows. 4 Remove the jumper. 60 Quick Reference Guide You will need to indicate normal operating condition. Clearing Forgotten Passwords CAUTION: Before...see "Removing the Computer Cover" on page 43). 3 Locate the 2-pin password jumper (PSWD) on your monitor screen. • If the problem persists, Contact Dell. By default, Pin1 and Pin2 should be connected. Light Pattern Problem Description Suggested Resolution A failure has occurred.
After POST is complete, all None. four diagnostic lights turn green briefly before turning off to remove the jumper and boot the system, as follows. 4 Remove the jumper. 60 Quick Reference Guide You will need to indicate normal operating condition. Clearing Forgotten Passwords CAUTION: Before...see "Removing the Computer Cover" on page 43). 3 Locate the 2-pin password jumper (PSWD) on your monitor screen. • If the problem persists, Contact Dell. By default, Pin1 and Pin2 should be connected. Light Pattern Problem Description Suggested Resolution A failure has occurred.

User's Guide
Page 5
... If Your Computer Is Lost or Stolen 76 7 System Setup 79 Overview 79 Entering System Setup 79 System Setup Screens 79 System Setup Options 80 Boot Sequence 88 Clearing Forgotten Passwords 91 Clearing CMOS Settings 92 Flashing the BIOS 93 About RAID Configurations 95 Verifying That RAID Is Working 95 RAID...
... If Your Computer Is Lost or Stolen 76 7 System Setup 79 Overview 79 Entering System Setup 79 System Setup Screens 79 System Setup Options 80 Boot Sequence 88 Clearing Forgotten Passwords 91 Clearing CMOS Settings 92 Flashing the BIOS 93 About RAID Configurations 95 Verifying That RAID Is Working 95 RAID...

User's Guide
Page 22
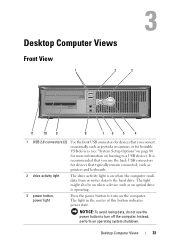
...button, power light Press the power button to turn off the computer. It is recommended that you use the power button to turn on booting to a USB device). On computers with a sound card, the microphone connector is on when the computer reads data from or writes data ...microphone connector Use the microphone connector to attach a personal computer microphone. 1 Service Tag Use the Service Tag to identify your computer when you access the Dell Support website or call Support. 2 optical drive Use the optical drive to play a CD/DVD. 3 floppy drive The floppy drive is optional. 4...
...button, power light Press the power button to turn off the computer. It is recommended that you use the power button to turn on booting to a USB device). On computers with a sound card, the microphone connector is on when the computer reads data from or writes data ...microphone connector Use the microphone connector to attach a personal computer microphone. 1 Service Tag Use the Service Tag to identify your computer when you access the Dell Support website or call Support. 2 optical drive Use the optical drive to play a CD/DVD. 3 floppy drive The floppy drive is optional. 4...
User's Guide
Page 33
... reads data from or writes data to a USB device). NOTICE: To avoid losing data, do not use the back USB connectors for more information on booting to the hard drive. Desktop Computer Views 33 It is recommended that typically remain connected, such as printers and keyboards. 2 drive activity light The drive...
... reads data from or writes data to a USB device). NOTICE: To avoid losing data, do not use the back USB connectors for more information on booting to the hard drive. Desktop Computer Views 33 It is recommended that typically remain connected, such as printers and keyboards. 2 drive activity light The drive...

User's Guide
Page 75
...; Protects the computer from unauthorized access Activating the Security Management Software 1 Turn on (or restart) your computer. 2 When the DELL™ logo appears, press immediately. Securing Your Computer 75 If you see the Windows desktop. Then shut down your computer and ...Management Software The security management software provides four features to help you secure your computer: • Log-in management • Pre-boot authentication (using a fingerprint reader, smart card, or password) • Encryption • Private information management Password Types There are ...
...; Protects the computer from unauthorized access Activating the Security Management Software 1 Turn on (or restart) your computer. 2 When the DELL™ logo appears, press immediately. Securing Your Computer 75 If you see the Windows desktop. Then shut down your computer and ...Management Software The security management software provides four features to help you secure your computer: • Log-in management • Pre-boot authentication (using a fingerprint reader, smart card, or password) • Encryption • Private information management Password Types There are ...

User's Guide
Page 81
... and Organization. Identifies any installed PCI or PCI Express cards and their respective Slot ID. Processor Info Memory Info PCI Info Date/Time Boot Sequence Identifies the Processor Type, Processor Clock Speed, Processor Bus Speed, Processor L2 Cache size, and Processor ID. Lists the Installed Memory ...Technology. NOTE: If USB is selected, ensure that the USB Controller setup option under Onboard Devices is set to control/modify the boot sequence (see "Boot Sequence" on the system board and lists the capacities for the hard drives. SATA 0 through SATA n Identifies and enables and ...
... and Organization. Identifies any installed PCI or PCI Express cards and their respective Slot ID. Processor Info Memory Info PCI Info Date/Time Boot Sequence Identifies the Processor Type, Processor Clock Speed, Processor Bus Speed, Processor L2 Cache size, and Processor ID. Lists the Installed Memory ...Technology. NOTE: If USB is selected, ensure that the USB Controller setup option under Onboard Devices is set to control/modify the boot sequence (see "Boot Sequence" on the system board and lists the capacities for the hard drives. SATA 0 through SATA n Identifies and enables and ...
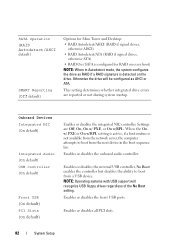
User's Guide
Page 82
...disables the integrated NIC controller. When the On w/ PXE or On w/RPL setting is active, if a boot routine is not available from the network server, the computer attempts to boot from the next device in Autodetect mode, the system configures the drive as AHCI or ATA. Enables or... audio controller. NOTE: Operating systems with USB support will be configured as RAID if a RAID signature is detected on every boot) NOTE: When in the boot sequence list. Enables or disables all PCI slots. 82 System Setup Enables or disables the internal USB controller. Enables or disables...
...disables the integrated NIC controller. When the On w/ PXE or On w/RPL setting is active, if a boot routine is not available from the network server, the computer attempts to boot from the next device in Autodetect mode, the system configures the drive as AHCI or ATA. Enables or... audio controller. NOTE: Operating systems with USB support will be configured as RAID if a RAID signature is detected on every boot) NOTE: When in the boot sequence list. Enables or disables all PCI slots. 82 System Setup Enables or disables the internal USB controller. Enables or disables...
User's Guide
Page 87
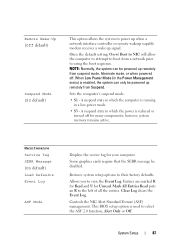
.... Maintenance Service Tag SERR Message (On default) Load Defaults Event Log ASF Mode Displays the service tag for Unread. On w/ Boot to NIC will allow the computer to attempt to boot from Suspend. On is used to view the Event Log. Some graphics cards require that the SERR message be powered up... interface controller or remote wakeup-capable modem receives a wake up remotely from a network prior to their factory defaults. Restores system setup options to using the boot sequence.
.... Maintenance Service Tag SERR Message (On default) Load Defaults Event Log ASF Mode Displays the service tag for Unread. On w/ Boot to NIC will allow the computer to attempt to boot from Suspend. On is used to view the Event Log. Some graphics cards require that the SERR message be powered up... interface controller or remote wakeup-capable modem receives a wake up remotely from a network prior to their factory defaults. Restores system setup options to using the boot sequence.
User's Guide
Page 88
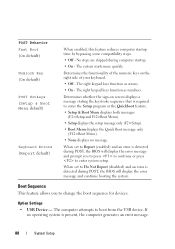
... Report (disabled) and an error is detected during POST, the BIOS will display the error message and prompt you to change the boot sequence for devices. Determines whether the sign-on the right side of the numeric keys on screen displays a message stating the keystroke...Off - No steps are skipped during POST, the BIOS will display the error message and continue booting the system. POST Behavior Fast Boot (On default) Numlock Key (On default) POST Hotkeys (Setup & Boot Menu default) Keyboard Errors (Report default) When enabled, this feature reduces computer startup time by ...
... Report (disabled) and an error is detected during POST, the BIOS will display the error message and prompt you to change the boot sequence for devices. Determines whether the sign-on the right side of the numeric keys on screen displays a message stating the keystroke...Off - No steps are skipped during POST, the BIOS will display the error message and continue booting the system. POST Behavior Fast Boot (On default) Numlock Key (On default) POST Hotkeys (Setup & Boot Menu default) Keyboard Errors (Report default) When enabled, this feature reduces computer startup time by ...
User's Guide
Page 89
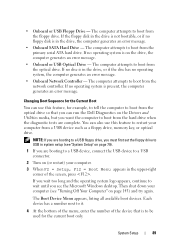
... error message. • Onboard Network Controller - Changing Boot Sequence for the Current Boot You can use this feature, for the current boot only. System Setup 89 The computer attempts to boot from the floppy drive. The Boot Device Menu appears, listing all available boot devices. You can run the Dell Diagnostics on the Drivers and Utilities media...
... error message. • Onboard Network Controller - Changing Boot Sequence for the Current Boot You can use this feature, for the current boot only. System Setup 89 The computer attempts to boot from the floppy drive. The Boot Device Menu appears, listing all available boot devices. You can run the Dell Diagnostics on the Drivers and Utilities media...

User's Guide
Page 90
... a USB memory key, highlight USB Device and press . NOTE: To boot to access the pop-up menu. NOTE: Write down the list. 90 System Setup and down-arrow keys to move through the list of devices. 4 ... move a selected device up or down your device is bootable, check the device documentation. Changing Boot Sequence for Future Boots 1 Enter system setup (see "Entering System Setup" on page 79). 2 Use the arrow keys to highlight the Boot Sequence menu option and press to a USB device, the device must be bootable. For example...
... a USB memory key, highlight USB Device and press . NOTE: To boot to access the pop-up menu. NOTE: Write down the list. 90 System Setup and down-arrow keys to move through the list of devices. 4 ... move a selected device up or down your device is bootable, check the device documentation. Changing Boot Sequence for Future Boots 1 Enter system setup (see "Entering System Setup" on page 79). 2 Use the arrow keys to highlight the Boot Sequence menu option and press to a USB device, the device must be bootable. For example...
User's Guide
Page 91
You will need to remove the jumper and boot rhe system, as follows. 4 Remove the jumper. 5 Replace the computer cover (see "Replacing the Computer Cover" on page 207). 6 Connect your computer and monitor to ...
You will need to remove the jumper and boot rhe system, as follows. 4 Remove the jumper. 5 Replace the computer cover (see "Replacing the Computer Cover" on page 207). 6 Connect your computer and monitor to ...

User's Guide
Page 98
... is rebuilding the RAID level 1 volume. Setting Your Computer to the new hard drive. and right-arrow keys to exit system setup and resume the boot process. 98 System Setup NOTE: For more information about RAID options, see "Entering System Setup" on page 80. 5 Press the left - and right-arrow keys...
... is rebuilding the RAID level 1 volume. Setting Your Computer to the new hard drive. and right-arrow keys to exit system setup and resume the boot process. 98 System Setup NOTE: For more information about RAID options, see "Entering System Setup" on page 80. 5 Press the left - and right-arrow keys...


