
Service Manual
Page 3
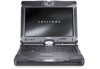
......43 4.9.2 Installing the Palm Rest ...45 Page 3 of Contents 1 XT2 XFR FEATURES ...6 1.1 XT2 XFR USER MODES ...6 1.1.1 Notebook Mode...6 1.1.2 Tablet Mode ...7 1.2 XT2 XFR BUTTONS ...8 1.2.1 Tablet Buttons...8 1.2.2 Scroll Buttons ...8 1.3 XT2 XFR INTERFACE...9 1.3.1 Windows Vista/XP XT2 XFR Interface Comparison 9 1.3.2 Windows Vista...9 1.3.3 Windows XP...12 1.4 XT2 XFR SETTINGS ...13 1.4.1 Installation ...13 1.4.2 Windows™ XP vs. Dell™ Latitude™ XT2 XFR Service Manual Table of 94 Version A00-01
......43 4.9.2 Installing the Palm Rest ...45 Page 3 of Contents 1 XT2 XFR FEATURES ...6 1.1 XT2 XFR USER MODES ...6 1.1.1 Notebook Mode...6 1.1.2 Tablet Mode ...7 1.2 XT2 XFR BUTTONS ...8 1.2.1 Tablet Buttons...8 1.2.2 Scroll Buttons ...8 1.3 XT2 XFR INTERFACE...9 1.3.1 Windows Vista/XP XT2 XFR Interface Comparison 9 1.3.2 Windows Vista...9 1.3.3 Windows XP...12 1.4 XT2 XFR SETTINGS ...13 1.4.1 Installation ...13 1.4.2 Windows™ XP vs. Dell™ Latitude™ XT2 XFR Service Manual Table of 94 Version A00-01
Service Manual
Page 25
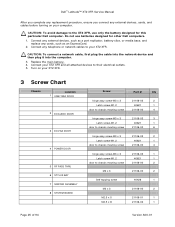
....5 x 5 M2.5 x 8 21106-01 1 21106-02 1 Page 25 of 94 Version A00-01 Dell™ Latitude™ XT2 XFR Service Manual After you complete any replacement procedure, ensure you connect any external devices, cards, and cables before turning on... your XT2 XFR. 3 Screw Chart Chassis Location 1 USB/1394 DOOR 2 IO/AUDIO DOOR 3 IO/VGA DOOR 4 POWER DOOR 5 RF PASS THRU 6 STYLUS BAY 7 SNIFFER ASSEMBLY 8 SYSTEM BOARD Screw Part...
....5 x 5 M2.5 x 8 21106-01 1 21106-02 1 Page 25 of 94 Version A00-01 Dell™ Latitude™ XT2 XFR Service Manual After you complete any replacement procedure, ensure you connect any external devices, cards, and cables before turning on... your XT2 XFR. 3 Screw Chart Chassis Location 1 USB/1394 DOOR 2 IO/AUDIO DOOR 3 IO/VGA DOOR 4 POWER DOOR 5 RF PASS THRU 6 STYLUS BAY 7 SNIFFER ASSEMBLY 8 SYSTEM BOARD Screw Part...
Service Manual
Page 27
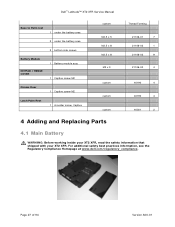
Dell™ Latitude™ XT2 XFR Service Manual Base to Palm rest 1 under the battery area 2 under the battery area 3 bottom side screws Battery Module KEYPAD / HINGE COVER 1 Battery module assy 1 ...-01 7 21106-02 1 21106-02 9 21106-00 4 40190 4 40190 4 40301 2 4 Adding and Replacing Parts 4.1 Main Battery WARNING: Before working inside your XT2 XFR, read the safety information that shipped with your XT2 XFR. For additional safety best practices information, see the Regulatory Compliance Homepage at www.dell.com/regulatory_compliance. Page 27 of 94 Version A00-01
Dell™ Latitude™ XT2 XFR Service Manual Base to Palm rest 1 under the battery area 2 under the battery area 3 bottom side screws Battery Module KEYPAD / HINGE COVER 1 Battery module assy 1 ...-01 7 21106-02 1 21106-02 9 21106-00 4 40190 4 40190 4 40301 2 4 Adding and Replacing Parts 4.1 Main Battery WARNING: Before working inside your XT2 XFR, read the safety information that shipped with your XT2 XFR. For additional safety best practices information, see the Regulatory Compliance Homepage at www.dell.com/regulatory_compliance. Page 27 of 94 Version A00-01
Service Manual
Page 55
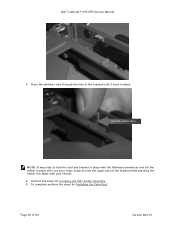
Set flat scribe here. Perform the steps for Installing the Palm Rest. Dell™ Latitude™ XT2 XFR Service Manual 3. To complete perform the steps for Installing the WiFi Sniffer Assembly. 5. Page 55 of the bracket while pressing the switch into place with the flathead screwdriver and set the switch in place. Press the switches clips through the hole in the bracket until it locks in place then use your index finger to hold the upper part of 94 Version A00-01 NOTE: It may help to hold the tool and bracket in place with your thumb. 4.
Set flat scribe here. Perform the steps for Installing the Palm Rest. Dell™ Latitude™ XT2 XFR Service Manual 3. To complete perform the steps for Installing the WiFi Sniffer Assembly. 5. Page 55 of the bracket while pressing the switch into place with the flathead screwdriver and set the switch in place. Press the switches clips through the hole in the bracket until it locks in place then use your index finger to hold the upper part of 94 Version A00-01 NOTE: It may help to hold the tool and bracket in place with your thumb. 4.

Service Manual
Page 76
...to 20 minutes. When the test completes, record the test results and then press any key to return to run a complete test on your part. This option lists the most common symptoms. NOTE: It is recommended that you want to perform a more thorough check of devices in the ... Test requires no interaction on a symptom of the problem. Custom Test Use to test a specific device or customize the tests to complete. Dell™ Latitude™ XT2 XFR Service Manual thirty minutes or more to be run. Page 76 of tracing a problem quickly. Run Express Test first to select tests based ...
...to 20 minutes. When the test completes, record the test results and then press any key to return to run a complete test on your part. This option lists the most common symptoms. NOTE: It is recommended that you want to perform a more thorough check of devices in the ... Test requires no interaction on a symptom of the problem. Custom Test Use to test a specific device or customize the tests to complete. Dell™ Latitude™ XT2 XFR Service Manual thirty minutes or more to be run. Page 76 of tracing a problem quickly. Run Express Test first to select tests based ...
Service Manual
Page 78
... down the exact message. OPERATING SYSTEM NOT FOUND - Contact Dell Support. 6.2 Solving Problems CAUTION: Before you set your computer: • If you added or removed a part before the problem started, review the installation procedures and ensure that the part is correctly installed. • If a peripheral device does.... This message may have to restart your antivirus software to use . ENSURE THAT MICROSOFT WINDOWS RECOGNIZES THE DRIVE - Dell™ Latitude™ XT2 XFR Service Manual drive letter :\ IS NOT ACCESSIBLE. Insert a bootable floppy disk, CD, or DVD.
... down the exact message. OPERATING SYSTEM NOT FOUND - Contact Dell Support. 6.2 Solving Problems CAUTION: Before you set your computer: • If you added or removed a part before the problem started, review the installation procedures and ensure that the part is correctly installed. • If a peripheral device does.... This message may have to restart your antivirus software to use . ENSURE THAT MICROSOFT WINDOWS RECOGNIZES THE DRIVE - Dell™ Latitude™ XT2 XFR Service Manual drive letter :\ IS NOT ACCESSIBLE. Insert a bootable floppy disk, CD, or DVD.
Service Manual
Page 83
... instructions that shipped with a PCI graphics card installed, removal of the Display is required for the Dell Technical Update service, go to support.dell.com. Only Part of the card is free and can be defective. To enroll for troubleshooting purposes. See Diagnostic Lights..., the card is Readable CONNECT AN EXTERNAL MONITOR - 1. CHECK THE DIAGNOSTIC LIGHTS - Windows XP: 1. Windows Vista: 1. Dell™ Latitude™ XT2 XFR Service Manual RUN THE HARDWARE TROUBLESHOOTER - If the external monitor works, the computer display or video controller may be customized for Color...
... instructions that shipped with a PCI graphics card installed, removal of the Display is required for the Dell Technical Update service, go to support.dell.com. Only Part of the card is free and can be defective. To enroll for troubleshooting purposes. See Diagnostic Lights..., the card is Readable CONNECT AN EXTERNAL MONITOR - 1. CHECK THE DIAGNOSTIC LIGHTS - Windows XP: 1. Windows Vista: 1. Dell™ Latitude™ XT2 XFR Service Manual RUN THE HARDWARE TROUBLESHOOTER - If the external monitor works, the computer display or video controller may be customized for Color...


