
Owner's Manual
Page 3
... Your Computer...5 Turning Off Your Computer...6 After Working Inside Your Computer...7 2 Removing and Installing Components 9 Recommended Tools...9 System Overview...9 Inside View - Front...9 Removing the SD Card...10 Installing the SD Card...11 Removing ......20 Removing the Display Panel...21 Installing the Display Panel...21 Removing the Coin-Cell Battery...22 Installing the Coin-Cell Battery...22 Removing the Speakers...23
... Your Computer...5 Turning Off Your Computer...6 After Working Inside Your Computer...7 2 Removing and Installing Components 9 Recommended Tools...9 System Overview...9 Inside View - Front...9 Removing the SD Card...10 Installing the SD Card...11 Removing ......20 Removing the Display Panel...21 Installing the Display Panel...21 Removing the Coin-Cell Battery...22 Installing the Coin-Cell Battery...22 Removing the Speakers...23
Owner's Manual
Page 10
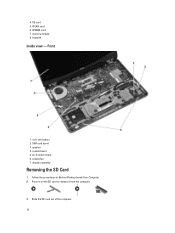
memory module 8. wi-fi switch board 6. Follow the procedures in on the SD card to release it from the computer. 3. Press in Before Working Inside Your Computer. 2. 4. WLAN card 6. WWAN card 7. heatsink Inside view - SD card 5. system board 5. display assembly Removing the SD Card 1. Front 1. speaker 4. coin-cell battery 2. Slide the SD card out of the computer. 10 system fan 7. SIM card board 3.
memory module 8. wi-fi switch board 6. Follow the procedures in on the SD card to release it from the computer. 3. Press in Before Working Inside Your Computer. 2. 4. WLAN card 6. WWAN card 7. heatsink Inside view - SD card 5. system board 5. display assembly Removing the SD Card 1. Front 1. speaker 4. coin-cell battery 2. Slide the SD card out of the computer. 10 system fan 7. SIM card board 3.

Owner's Manual
Page 23
... the computer and connect it to the computer. 2. Removing the Display-Hinge Cover 1. Remove the screws that secure the speakers to the computer. Removing the Speakers 1. Perform the following steps as shown in Before Working Inside Your Computer. 2. Install: a) palmrest b) keyboard c) keyboard trim d) base cover e) battery f) SD card 4. Follow the procedures in Before...
... the computer and connect it to the computer. 2. Removing the Display-Hinge Cover 1. Remove the screws that secure the speakers to the computer. Removing the Speakers 1. Perform the following steps as shown in Before Working Inside Your Computer. 2. Install: a) palmrest b) keyboard c) keyboard trim d) base cover e) battery f) SD card 4. Follow the procedures in Before...

Owner's Manual
Page 27
... Computer. Remove: a) SD card b) battery c) base cover d) mSATA e) keyboard trim f) keyboard g) palmrest h) speaker 27 b) SD card c) base cover d) keyboard trim e) keyboard f) palmrest g) display-hinge cover 3. Connect the system-fan cable to the computer. 3. Follow the procedures in Before Working Inside Your Computer. 2. Installing the System Fan 1. Disconnect the system fan cable and...
... Computer. Remove: a) SD card b) battery c) base cover d) mSATA e) keyboard trim f) keyboard g) palmrest h) speaker 27 b) SD card c) base cover d) keyboard trim e) keyboard f) palmrest g) display-hinge cover 3. Connect the system-fan cable to the computer. 3. Follow the procedures in Before Working Inside Your Computer. 2. Installing the System Fan 1. Disconnect the system fan cable and...

Owner's Manual
Page 29
...speaker f) palmrest g) keyboard h) keyboard trim i) mSATA j) base cover k) battery l) SD card 5. Removing the Power Connector 1. Remove the power connector from the system board and remove the screw that secures the power connector to the system board. 3. Follow the procedures in its slot. 2. Insert the power connector in After Working...board. 4. Tighten the screw that secures the power connector to the computer. Follow the procedures in Before Working Inside Your Computer. 2. Disconnect the power-connector cable from the computer. Installing the Power Connector 1. ...
...speaker f) palmrest g) keyboard h) keyboard trim i) mSATA j) base cover k) battery l) SD card 5. Removing the Power Connector 1. Remove the power connector from the system board and remove the screw that secures the power connector to the system board. 3. Follow the procedures in its slot. 2. Insert the power connector in After Working...board. 4. Tighten the screw that secures the power connector to the computer. Follow the procedures in Before Working Inside Your Computer. 2. Disconnect the power-connector cable from the computer. Installing the Power Connector 1. ...


