User Manual
Page 2
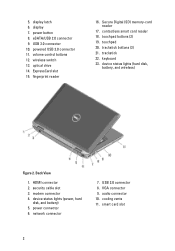
... 16. Secure Digital (SD) memory-card reader 17. trackstick buttons (3) 21. HDMI connector 2. USB 2.0 connector 8. cooling vents 11. keyboard 23. device status lights (hard disk, battery, and wireless) Figure 2. security cable slot 3. network connector 7. display latch 6. powered USB 3.0 connector 11. power connector 6. smart card slot 2 5. volume control buttons 12. power button...
... 16. Secure Digital (SD) memory-card reader 17. trackstick buttons (3) 21. HDMI connector 2. USB 2.0 connector 8. cooling vents 11. keyboard 23. device status lights (hard disk, battery, and wireless) Figure 2. security cable slot 3. network connector 7. display latch 6. powered USB 3.0 connector 11. power connector 6. smart card slot 2 5. volume control buttons 12. power button...
User Manual
Page 4
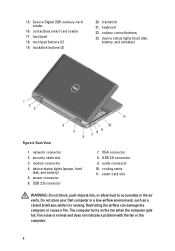
touchpad 18. touchpad buttons (2) 19. security cable slot 3. audio connector 10. Do not store your Dell computer in the air vents. device status lights (hard disk, battery, and wireless) Figure 4. network connector 2. keyboard 22. modem connector 4. Fan noise is running. ...and does not indicate a problem with the fan or the computer. 4 trackstick buttons (3) 20. device status lights (power, hard disk, and battery) 5. USB 2.0 connector 7. Back View 1. USB 3.0 connector 9. power connector 6. Restricting the airflow can damage the computer or cause a fire...
touchpad 18. touchpad buttons (2) 19. security cable slot 3. audio connector 10. Do not store your Dell computer in the air vents. device status lights (hard disk, battery, and wireless) Figure 4. network connector 2. keyboard 22. modem connector 4. Fan noise is running. ...and does not indicate a problem with the fan or the computer. 4 trackstick buttons (3) 20. device status lights (power, hard disk, and battery) 5. USB 2.0 connector 7. Back View 1. USB 3.0 connector 9. power connector 6. Restricting the airflow can damage the computer or cause a fire...
User Manual
Page 5
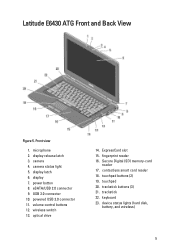
... lights (hard disk, battery, and wireless) 5 power button 8. eSATA/USB 2.0 connector 9. wireless switch 13. display 7. powered USB 3.0 connector 11. Secure Digital (SD) memory-card reader 17. keyboard 23. optical drive 14. fingerprint reader 16. touchpad buttons (2) 19. touchpad 20. trackstick buttons (3) 21. display latch 6. microphone 2. ExpressCard slot 15. Latitude E6430 ATG Front...
... lights (hard disk, battery, and wireless) 5 power button 8. eSATA/USB 2.0 connector 9. wireless switch 13. display 7. powered USB 3.0 connector 11. Secure Digital (SD) memory-card reader 17. keyboard 23. optical drive 14. fingerprint reader 16. touchpad buttons (2) 19. touchpad 20. trackstick buttons (3) 21. display latch 6. microphone 2. ExpressCard slot 15. Latitude E6430 ATG Front...
User Manual
Page 6
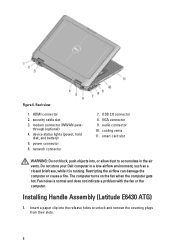
security cable slot 3. device status lights (power, hard disk, and battery) 5. Do not store your Dell computer in the air vents. VGA connector 9. smart card slot WARNING: Do not block, push objects into the release holes to accumulate in a low-..., while it is normal and does not indicate a problem with the fan or the computer. audio connector 10. Fan noise is running. Installing Handle Assembly (Latitude E6430 ATG) 1. Insert a paper clip into , or allow dust to unlock and remove the covering plugs from their slots. 6 Back view 1. network connector 7. cooling...
security cable slot 3. device status lights (power, hard disk, and battery) 5. Do not store your Dell computer in the air vents. VGA connector 9. smart card slot WARNING: Do not block, push objects into the release holes to accumulate in a low-..., while it is normal and does not indicate a problem with the fan or the computer. audio connector 10. Fan noise is running. Installing Handle Assembly (Latitude E6430 ATG) 1. Insert a paper clip into , or allow dust to unlock and remove the covering plugs from their slots. 6 Back view 1. network connector 7. cooling...
User Manual
Page 9
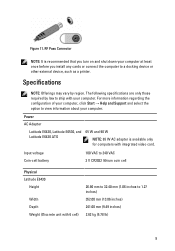
... AC Adapter Latitude E6430, Latitude E6530, and Latitude E6430 ATG 65 W and 90 W NOTE: 65 W AC adapter is recommended that you turn on and shut down your computer at least once before you install any cards or connect the computer to view information about your computer. Input voltage Coin-cell battery 100 VAC... to 240 VAC 3 V CR2032 lithium coin cell Physical Latitude E6430 Height Width Depth Weight (Discrete unit with 6 cell) 26.90 mm to 32.40 mm (1.06 ...
... AC Adapter Latitude E6430, Latitude E6530, and Latitude E6430 ATG 65 W and 90 W NOTE: 65 W AC adapter is recommended that you turn on and shut down your computer at least once before you install any cards or connect the computer to view information about your computer. Input voltage Coin-cell battery 100 VAC... to 240 VAC 3 V CR2032 lithium coin cell Physical Latitude E6430 Height Width Depth Weight (Discrete unit with 6 cell) 26.90 mm to 32.40 mm (1.06 ...
Intel Responsiveness Technologies Guide
Page 31
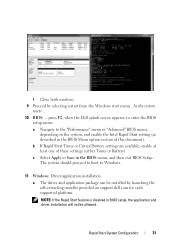
The system should proceed to boot to the "Performance" menu or "Advanced" BIOS menu, depending on support.dell.com for each supported platform. Rapid Start System Configuration 31 c Select Apply or Save in the BIOS menu, and then exit BIOS Setup. a The driver... installed by selecting restart from the Windows start menu. b If Rapid Start Timer or Critical Battery settings are available, enable at least one of this document). As the system resets... 10 BIOS: ....press F2, when the Dell splash screen appears, to enter the BIOS setup menu: a Navigate to Windows. 11 Windows: ...
The system should proceed to boot to the "Performance" menu or "Advanced" BIOS menu, depending on support.dell.com for each supported platform. Rapid Start System Configuration 31 c Select Apply or Save in the BIOS menu, and then exit BIOS Setup. a The driver... installed by selecting restart from the Windows start menu. b If Rapid Start Timer or Critical Battery settings are available, enable at least one of this document). As the system resets... 10 BIOS: ....press F2, when the Dell splash screen appears, to enter the BIOS setup menu: a Navigate to Windows. 11 Windows: ...
Intel Responsiveness Technologies Guide
Page 33
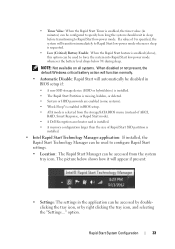
...option can be accessed from the system tray icon. NOTE: Not available on all systems. When disabled or not present, the default Windows critical battery action will function normally. • Automatic Disable: Rapid Start will automatically be disabled in BIOS setup if: • A non-SSD storage ... • ATA mode is selected from the storage/SATA BIOS menu (instead of AHCI, RAID, Smart Response, or Rapid Start mode). • A Dell Encryption accelerator card is installed. • A memory configuration larger than the size of 0 is specified, the system will appear if present: • ...
...option can be accessed from the system tray icon. NOTE: Not available on all systems. When disabled or not present, the default Windows critical battery action will function normally. • Automatic Disable: Rapid Start will automatically be disabled in BIOS setup if: • A non-SSD storage ... • ATA mode is selected from the storage/SATA BIOS menu (instead of AHCI, RAID, Smart Response, or Rapid Start mode). • A Dell Encryption accelerator card is installed. • A memory configuration larger than the size of 0 is specified, the system will appear if present: • ...

Intel Responsiveness Technologies Guide
Page 34
This allows the user to that option. Dell Setup Guide NOTE: Some systems which do not support critical battery will not be reflected as seen in the BIOS menu. • Status: This option allows the user to the BIOS menu. NOTE: A selection "off" here ...
This allows the user to that option. Dell Setup Guide NOTE: Some systems which do not support critical battery will not be reflected as seen in the BIOS menu. • Status: This option allows the user to the BIOS menu. NOTE: A selection "off" here ...
Intel Responsiveness Technologies Guide
Page 37
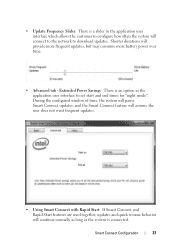
... option in the application user interface which allows the customer to configure how often the system will provide more frequent updates, but may consume more battery power over time. • Advanced tab -
... option in the application user interface which allows the customer to configure how often the system will provide more frequent updates, but may consume more battery power over time. • Advanced tab -
Intel Responsiveness Technologies Guide
Page 38
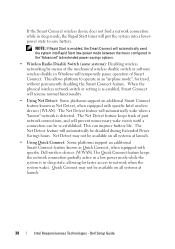
...the Smart Connect feature. Net Detect may not be disabled during Extended Power Savings hours. Dell Setup Guide NOTE: If Rapid Start is in an "airplane mode", for faster access to save battery. The Net Detect feature keeps track of Smart Connect. If the Smart Connect wireless ... at launch. • Using Quick Connect: Some platforms support an additional Smart Connect feature known as Net Detect, when equipped with specific Dell wireless devices (WWAN).The Quick Connect feature keeps the network connection partially active in a low power mode while the system is enabled, the...
...the Smart Connect feature. Net Detect may not be disabled during Extended Power Savings hours. Dell Setup Guide NOTE: If Rapid Start is in an "airplane mode", for faster access to save battery. The Net Detect feature keeps track of Smart Connect. If the Smart Connect wireless ... at launch. • Using Quick Connect: Some platforms support an additional Smart Connect feature known as Net Detect, when equipped with specific Dell wireless devices (WWAN).The Quick Connect feature keeps the network connection partially active in a low power mode while the system is enabled, the...
Statement of Volatility
Page 2
... replaceable optical/magnetic media. Primary power loss (unplugging the power cord and removing the battery) destroys all system contexts. In addition, to prevent loss of main graphics memory. Dell systems will be valid. main system memory size Discrete allocated out of data) No Remove... USH daughter programmable. CD- N/A N/A NA Low-level format Low-level format/erase CAUTION: All other components on -board coin-cell battery. Dell systems will write the system context to RAM" state or stand-by the processor. Security U4 (up -sell USH Non Volatile memory,...
... replaceable optical/magnetic media. Primary power loss (unplugging the power cord and removing the battery) destroys all system contexts. In addition, to prevent loss of main graphics memory. Dell systems will be valid. main system memory size Discrete allocated out of data) No Remove... USH daughter programmable. CD- N/A N/A NA Low-level format Low-level format/erase CAUTION: All other components on -board coin-cell battery. Dell systems will write the system context to RAM" state or stand-by the processor. Security U4 (up -sell USH Non Volatile memory,...
Latitude E-Family Re-Imaging Guide
Page 6
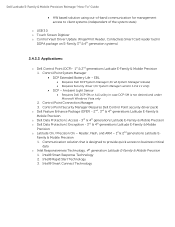
... Precision 4th generation o Intel® Responsiveness Technologies - Latitude E-Family & Mobile Precision 4th generation o Dell Battery Management - Latitude E-Family & Mobile Precision 3rd & 4th generation o Privacy Panel o Touch Screen Digitizer- Reader, Flash, and ARM - Latitude E-Family & Mobile Precision 1st &2nd generation o WiDi display - Dell Latitude E-Family & Mobile Precision Reimage "How-To" Guide o Dell Data Protection | Encryption(DDPE) - Ten fingers touch...
... Precision 4th generation o Intel® Responsiveness Technologies - Latitude E-Family & Mobile Precision 4th generation o Dell Battery Management - Latitude E-Family & Mobile Precision 3rd & 4th generation o Privacy Panel o Touch Screen Digitizer- Reader, Flash, and ARM - Latitude E-Family & Mobile Precision 1st &2nd generation o WiDi display - Dell Latitude E-Family & Mobile Precision Reimage "How-To" Guide o Dell Data Protection | Encryption(DDPE) - Ten fingers touch...
Latitude E-Family Re-Imaging Guide
Page 10
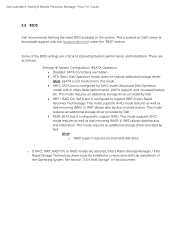
... desired and under Microsoft Windows Vista only 2. Intel® Smart Connect Technology Reader, Flash, and ARM - 1st & 2nd generations Latitude EFamily & Mobile Precision 1. Control Point System Manager DCP Extended Battery Life - Ambient Light Sensor Requires Dell DCP-SM or ALS utility in DDPA package on E-Family 3rd & 4th generation systems) 2.4.2.2 Applications...
... desired and under Microsoft Windows Vista only 2. Intel® Smart Connect Technology Reader, Flash, and ARM - 1st & 2nd generations Latitude EFamily & Mobile Precision 1. Control Point System Manager DCP Extended Battery Life - Ambient Light Sensor Requires Dell DCP-SM or ALS utility in DDPA package on E-Family 3rd & 4th generation systems) 2.4.2.2 Applications...
Latitude E-Family Re-Imaging Guide
Page 11
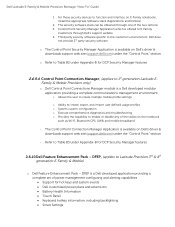
Dell Latitude E-Family & Mobile Precision Reimage "How-To" Guide 2.5 BIOS Dell recommends flashing the latest BIOS available to support IRRT (Intel's Rapid Recovery Technology). This mode requires an additional storage driver provided by Dell IRRT / RAID On, SATA bus is configured to the system. o... AHCI mode (Advanced Disk Operation mode) which offers faster performance, eSATA support, and increased battery life. Note: eSATA is posted on Dell's driver & downloads support web site (support.dell.com) under the "BIOS" section. This mode supports AHCI mode features as well as ...
Dell Latitude E-Family & Mobile Precision Reimage "How-To" Guide 2.5 BIOS Dell recommends flashing the latest BIOS available to support IRRT (Intel's Rapid Recovery Technology). This mode requires an additional storage driver provided by Dell IRRT / RAID On, SATA bus is configured to the system. o... AHCI mode (Advanced Disk Operation mode) which offers faster performance, eSATA support, and increased battery life. Note: eSATA is posted on Dell's driver & downloads support web site (support.dell.com) under the "BIOS" section. This mode supports AHCI mode features as well as ...
Latitude E-Family Re-Imaging Guide
Page 21
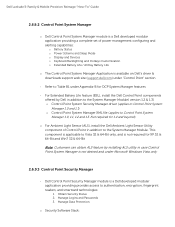
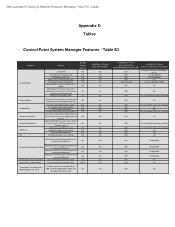
... Control Point System Manager 1.0, 1.1, 1.2 and 1.3. Dell Latitude E-Family & Mobile Precision Reimage "How-To" Guide 2.6.9.2 Control Point System Manager o Dell Control Point System Manager module is a Dell developed modular application providing a complete set of Control Point in addition to the System Manager Module. For Extended Battery Life feature (EBL), install the Dell Control Point components offered by...
... Control Point System Manager 1.0, 1.1, 1.2 and 1.3. Dell Latitude E-Family & Mobile Precision Reimage "How-To" Guide 2.6.9.2 Control Point System Manager o Dell Control Point System Manager module is a Dell developed modular application providing a complete set of Control Point in addition to the System Manager Module. For Extended Battery Life feature (EBL), install the Dell Control Point components offered by...
Latitude E-Family Re-Imaging Guide
Page 22
... E-Family notebooks, install the appropriate Software stack (Applications and Utilities) 2. Dell Latitude E-Family & Mobile Precision Reimage "How-To" Guide 1. For these security devices to Table B2 under Appendix-B for hot keys and system events Dell customized power plans and extensions Battery Health Information Touch Panel Keyboard hotkey information, including backlighting...
... E-Family notebooks, install the appropriate Software stack (Applications and Utilities) 2. Dell Latitude E-Family & Mobile Precision Reimage "How-To" Guide 1. For these security devices to Table B2 under Appendix-B for hot keys and system events Dell customized power plans and extensions Battery Health Information Touch Panel Keyboard hotkey information, including backlighting...
Latitude E-Family Re-Imaging Guide
Page 41
...timeouts when activating an external display using FnF8. Control Point System Manager Features - battery charge enable/disable status Network card power management Extended Battery Life/ All Day Battery Life. (ADBL) Dell Enhanced Performance Plans (User Selectable Thermal Tables for NTSC, sRGB, Pro Photo ...Alerts log information at OS presence (PWS only) Privacy Screen - Dell Latitude E-Family & Mobile Precision Reimage "How-To" Guide Appendix D Tables - Fn+F2 to enable Battery Charge disable Fn+F3 launch DCP w/ Battery Status Fn+F7 to enable/disable DCP Fn+F8 to switch between...
...timeouts when activating an external display using FnF8. Control Point System Manager Features - battery charge enable/disable status Network card power management Extended Battery Life/ All Day Battery Life. (ADBL) Dell Enhanced Performance Plans (User Selectable Thermal Tables for NTSC, sRGB, Pro Photo ...Alerts log information at OS presence (PWS only) Privacy Screen - Dell Latitude E-Family & Mobile Precision Reimage "How-To" Guide Appendix D Tables - Fn+F2 to enable Battery Charge disable Fn+F3 launch DCP w/ Battery Status Fn+F7 to enable/disable DCP Fn+F8 to switch between...

Owners Manual
Page 3
... Removing the Secure Digital (SD) Card...11 Installing the Secure Digital (SD) Card...11 Removing the ExpressCard...12 Installing the ExpressCard...12 Removing the Battery...12 Installing the Battery...13 Removing the Subscriber Identity Module (SIM) Card 13 Installing the Subscriber Identity Module (SIM) Card 13 Removing the Base Cover...13 Installing...
... Removing the Secure Digital (SD) Card...11 Installing the Secure Digital (SD) Card...11 Removing the ExpressCard...12 Installing the ExpressCard...12 Removing the Battery...12 Installing the Battery...13 Removing the Subscriber Identity Module (SIM) Card 13 Installing the Subscriber Identity Module (SIM) Card 13 Removing the Base Cover...13 Installing...

Owners Manual
Page 4
Installing the Speakers...30 Removing the Coin-Cell Battery...30 Installing the Coin-Cell Battery...31 Removing the ExpressCard Cage...31 Installing the ExpressCard Cage...32 Removing the Power-Connector Port...32 Installing the Power-Connector Port...33 Removing the ...
Installing the Speakers...30 Removing the Coin-Cell Battery...30 Installing the Coin-Cell Battery...31 Removing the ExpressCard Cage...31 Installing the ExpressCard Cage...32 Removing the Power-Connector Port...32 Installing the Power-Connector Port...33 Removing the ...
Owners Manual
Page 5
Boot Sequence...63 Navigation Keys...63 System Setup Options...64 Updating the BIOS ...72 System and Setup Password...72 Assigning a System Password and Setup Password 72 Deleting or Changing an Existing System and/or Setup Password 73 5 Diagnostics...75 Enhanced Pre-Boot System Assessment (ePSA) Diagnostics 75 6 Troubleshooting Your Computer 77 Device Status Lights...77 Battery Status Lights...78 7 Technical Specifications...79 8 Contacting Dell ...87
Boot Sequence...63 Navigation Keys...63 System Setup Options...64 Updating the BIOS ...72 System and Setup Password...72 Assigning a System Password and Setup Password 72 Deleting or Changing an Existing System and/or Setup Password 73 5 Diagnostics...75 Enhanced Pre-Boot System Assessment (ePSA) Diagnostics 75 6 Troubleshooting Your Computer 77 Device Status Lights...77 Battery Status Lights...78 7 Technical Specifications...79 8 Contacting Dell ...87


