User Manual
Page 2
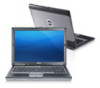
... 21. keyboard 22. HDMI connector 2. power connector 6. USB 2.0 connector 8. cooling vents 11. Restricting the airflow can damage the computer or cause a fire. 13. Back View 1. power and battery status lights 5. network connector 7. The computer turns on the fan when the computer gets hot. ExpressCard slot 14. Do not store your Dell computer...
... 21. keyboard 22. HDMI connector 2. power connector 6. USB 2.0 connector 8. cooling vents 11. Restricting the airflow can damage the computer or cause a fire. 13. Back View 1. power and battery status lights 5. network connector 7. The computer turns on the fan when the computer gets hot. ExpressCard slot 14. Do not store your Dell computer...
User Manual
Page 3
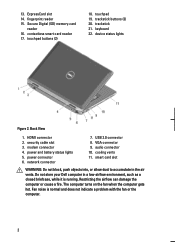
... reader 17. device status lights 3 display latch 2. trackstick 22. camera 5. HDMI connector 9. USB 2.0 connector 11. optical drive 13. camera status light 6. volume control buttons 24. Latitude E6520 Front And Back View Figure 3. ExpressCard slot 15. keyboard 23.
... reader 17. device status lights 3 display latch 2. trackstick 22. camera 5. HDMI connector 9. USB 2.0 connector 11. optical drive 13. camera status light 6. volume control buttons 24. Latitude E6520 Front And Back View Figure 3. ExpressCard slot 15. keyboard 23.
User Manual
Page 5
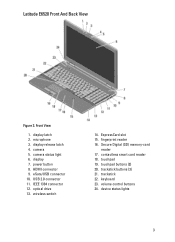
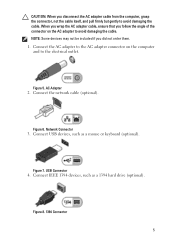
Connect the network cable (optional). Connect IEEE 1394 devices, such as a mouse or keyboard (optional). Figure 7. Figure 8. 1394 Connector 5 When you wrap the AC adapter cable, ensure that you disconnect the AC adapter cable from the computer, grasp the ...
Connect the network cable (optional). Connect IEEE 1394 devices, such as a mouse or keyboard (optional). Figure 7. Figure 8. 1394 Connector 5 When you wrap the AC adapter cable, ensure that you disconnect the AC adapter cable from the computer, grasp the ...

Owners Manual
Page 5
... Sink 49 17 Bluetooth Card 51 Removing the Bluetooth Card 51 Installing the Bluetooth Card 53 18 Keyboard Trim 55 Removing the Keyboard Trim 55 Installing the Keyboard Trim 56 19 Keyboard 57 Removing the Keyboard 57 Installing the Keyboard 60 20 Modem Card 61 Removing the Modem Card 61 Installing the Modem Card 63 21...
... Sink 49 17 Bluetooth Card 51 Removing the Bluetooth Card 51 Installing the Bluetooth Card 53 18 Keyboard Trim 55 Removing the Keyboard Trim 55 Installing the Keyboard Trim 56 19 Keyboard 57 Removing the Keyboard 57 Installing the Keyboard 60 20 Modem Card 61 Removing the Modem Card 61 Installing the Modem Card 63 21...
Owners Manual
Page 55
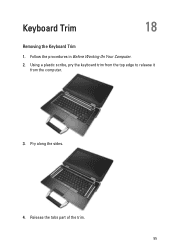
Using a plastic scribe, pry the keyboard trim from the top edge to release it from the computer. 3. Release the tabs part of the trim. 55 Follow the procedures in Before Working On Your Computer. 2. Pry along the sides. 4. Keyboard Trim 18 Removing the Keyboard Trim 1.
Using a plastic scribe, pry the keyboard trim from the top edge to release it from the computer. 3. Release the tabs part of the trim. 55 Follow the procedures in Before Working On Your Computer. 2. Pry along the sides. 4. Keyboard Trim 18 Removing the Keyboard Trim 1.

Owners Manual
Page 56
Follow the procedures in After Working Inside Your Computer. 56 Installing the Keyboard Trim 1. Gently lift the keyboard trim to release it into place. 2. Align the keyboard trim with the keyboard and gently snap it from the computer. 5.
Follow the procedures in After Working Inside Your Computer. 56 Installing the Keyboard Trim 1. Gently lift the keyboard trim to release it into place. 2. Align the keyboard trim with the keyboard and gently snap it from the computer. 5.
Owners Manual
Page 57
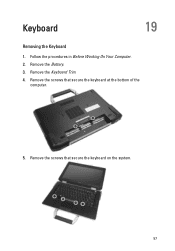
Remove the Keyboard Trim. 4. Remove the screws that secure the keyboard at the bottom of the computer. 5. Remove the Battery. 3. Follow the procedures in Before Working On Your Computer. 2. Remove the screws that secure the keyboard on the system. 57 Keyboard 19 Removing the Keyboard 1.
Remove the Keyboard Trim. 4. Remove the screws that secure the keyboard at the bottom of the computer. 5. Remove the Battery. 3. Follow the procedures in Before Working On Your Computer. 2. Remove the screws that secure the keyboard on the system. 57 Keyboard 19 Removing the Keyboard 1.
Owners Manual
Page 58
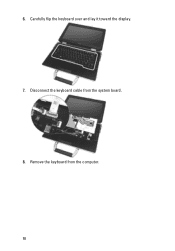
Remove the keyboard from the system board. 8. Carefully flip the keyboard over and lay it toward the display. 7. 6. Disconnect the keyboard cable from the computer. 58
Remove the keyboard from the system board. 8. Carefully flip the keyboard over and lay it toward the display. 7. 6. Disconnect the keyboard cable from the computer. 58

Owners Manual
Page 59
Remove the tape securing the keyboard cable from the keyboard. 10. Unlock the cable holder. 59 9.
Remove the tape securing the keyboard cable from the keyboard. 10. Unlock the cable holder. 59 9.
Owners Manual
Page 60
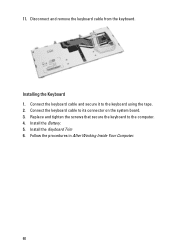
Disconnect and remove the keyboard cable from the keyboard. Replace and tighten the screws that secure the keyboard to the keyboard using the tape. 2. Install the Keyboard Trim 6. Connect the keyboard cable and secure it to the computer. 4. Connect the keyboard cable to its connector on the system board. 3. Install the Battery. 5. Follow the procedures in After Working Inside Your Computer. 60 Installing the Keyboard 1. 11.
Disconnect and remove the keyboard cable from the keyboard. Replace and tighten the screws that secure the keyboard to the keyboard using the tape. 2. Install the Keyboard Trim 6. Connect the keyboard cable and secure it to the computer. 4. Connect the keyboard cable to its connector on the system board. 3. Install the Battery. 5. Follow the procedures in After Working Inside Your Computer. 60 Installing the Keyboard 1. 11.
Owners Manual
Page 61
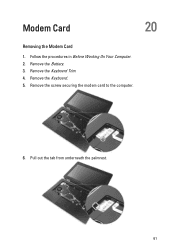
Remove the Keyboard Trim. 4. Modem Card 20 Removing the Modem Card 1. Remove the Keyboard. 5. Pull out the tab from underneath the palmrest. 61 Remove the screw securing the modem card to the computer. 6. Follow the procedures in Before Working On Your Computer. 2. Remove the Battery. 3.
Remove the Keyboard Trim. 4. Modem Card 20 Removing the Modem Card 1. Remove the Keyboard. 5. Pull out the tab from underneath the palmrest. 61 Remove the screw securing the modem card to the computer. 6. Follow the procedures in Before Working On Your Computer. 2. Remove the Battery. 3.
Owners Manual
Page 63
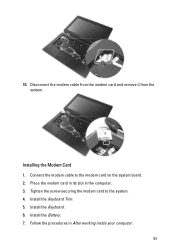
Install the Battery. 7. Follow the procedures in the computer. 3. Installing the Modem Card 1. Place the modem card in its slot in After working inside your computer. 63 Connect the modem cable to the system. 4. Install the Keyboard Trim. 5. Install the Keyboard. 6. Tighten the screw securing the modem card to the modem card on the system board. 2. Disconnect the modem cable from the modem card and remove it from the system. 10.
Install the Battery. 7. Follow the procedures in the computer. 3. Installing the Modem Card 1. Place the modem card in its slot in After working inside your computer. 63 Connect the modem cable to the system. 4. Install the Keyboard Trim. 5. Install the Keyboard. 6. Tighten the screw securing the modem card to the modem card on the system board. 2. Disconnect the modem cable from the modem card and remove it from the system. 10.
Owners Manual
Page 65
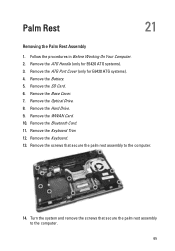
...Keyboard. 13. Palm Rest 21 Removing the Palm Rest Assembly 1. Remove the SD Card. 6. Remove the Hard Drive. 9. Turn the system and remove the screws that secure the palm rest assembly to the computer. 65 Follow the procedures in Before Working On Your Computer. 2. Remove the ATG Port Cover (only for E6420... ATG systems). 3. Remove the Optical Drive. 8. Remove the ATG Handle (only for E6420 ATG systems). 4. Remove the screws that secure the palm rest assembly to the computer. ...
...Keyboard. 13. Palm Rest 21 Removing the Palm Rest Assembly 1. Remove the SD Card. 6. Remove the Hard Drive. 9. Turn the system and remove the screws that secure the palm rest assembly to the computer. 65 Follow the procedures in Before Working On Your Computer. 2. Remove the ATG Port Cover (only for E6420... ATG systems). 3. Remove the Optical Drive. 8. Remove the ATG Handle (only for E6420 ATG systems). 4. Remove the screws that secure the palm rest assembly to the computer. ...
Owners Manual
Page 68
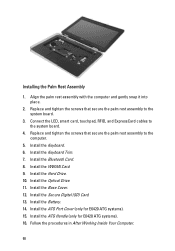
...RFID, and ExpressCard cables to the system board. 3. Install the Keyboard Trim. 7. Install the Bluetooth Card. 8. Install the Battery. 14. Install the ATG Port Cover (only for E6420 ATG systems). 16. Install the ATG Handle (only for E6420 ATG systems). 15. Align the palm rest assembly with the ...computer and gently snap it into place. 2. Install the Optical Drive. 11. Replace and tighten the screws that secure the palm rest assembly to the system board. 4. Install the Keyboard. 6. Install the ...
...RFID, and ExpressCard cables to the system board. 3. Install the Keyboard Trim. 7. Install the Bluetooth Card. 8. Install the Battery. 14. Install the ATG Port Cover (only for E6420 ATG systems). 16. Install the ATG Handle (only for E6420 ATG systems). 15. Align the palm rest assembly with the ...computer and gently snap it into place. 2. Install the Optical Drive. 11. Replace and tighten the screws that secure the palm rest assembly to the system board. 4. Install the Keyboard. 6. Install the ...
Owners Manual
Page 69
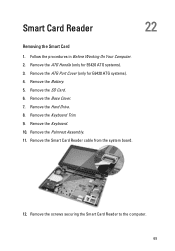
Remove the Battery. 5. Remove the SD Card. 6. Remove the Hard Drive. 8. Remove the Keyboard Trim. 9. Remove the screws securing the Smart Card Reader to the computer. 69 Remove the ATG Port Cover (only for E6420 ATG systems). 3. Remove the Base Cover. 7. Remove the Palmrest Assembly. 11. Follow the procedures in Before Working On Your Computer. 2. Remove the Smart Card Reader cable from the system board. 12. Smart Card Reader 22 Removing the Smart Card 1. Remove the ATG Handle (only for E6420 ATG systems). 4. Remove the Keyboard. 10.
Remove the Battery. 5. Remove the SD Card. 6. Remove the Hard Drive. 8. Remove the Keyboard Trim. 9. Remove the screws securing the Smart Card Reader to the computer. 69 Remove the ATG Port Cover (only for E6420 ATG systems). 3. Remove the Base Cover. 7. Remove the Palmrest Assembly. 11. Follow the procedures in Before Working On Your Computer. 2. Remove the Smart Card Reader cable from the system board. 12. Smart Card Reader 22 Removing the Smart Card 1. Remove the ATG Handle (only for E6420 ATG systems). 4. Remove the Keyboard. 10.
Owners Manual
Page 71
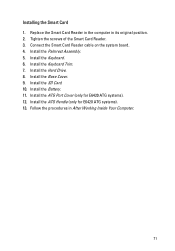
... Working Inside Your Computer. 71 Install the Keyboard. 6. Install the Keyboard Trim. 7. Install the Battery. 11. Tighten the screws of the Smart Card Reader. 3. Install the SD Card. 10. Install the ATG Port Cover (only for E6420 ATG systems). 13. Install the ATG Handle (only for E6420 ATG systems). 12. Install the Hard Drive...
... Working Inside Your Computer. 71 Install the Keyboard. 6. Install the Keyboard Trim. 7. Install the Battery. 11. Tighten the screws of the Smart Card Reader. 3. Install the SD Card. 10. Install the ATG Port Cover (only for E6420 ATG systems). 13. Install the ATG Handle (only for E6420 ATG systems). 12. Install the Hard Drive...

Owners Manual
Page 73
Media Board 23 Removing The Media Board 1. Follow the procedures in Before Working On Your Computer. 2. Remove the ATG Port Cover (only for E6420 ATG systems). 3. Remove the Keyboard Trim. 12. Remove the Optical Drive. 7. Remove the Palmrest Assembly. 14. Remove the Hard Drive. 9. Remove the SD Card. 6. Disconnect the... media board cable from the system board. 15. Remove the WWAN Card. 10. Remove the Base Cover. 8. Remove the Keyboard. 13. Remove the screws that secure the media board to the computer. 73 Remove the ATG Handle (only for...
Media Board 23 Removing The Media Board 1. Follow the procedures in Before Working On Your Computer. 2. Remove the ATG Port Cover (only for E6420 ATG systems). 3. Remove the Keyboard Trim. 12. Remove the Optical Drive. 7. Remove the Palmrest Assembly. 14. Remove the Hard Drive. 9. Remove the SD Card. 6. Disconnect the... media board cable from the system board. 15. Remove the WWAN Card. 10. Remove the Base Cover. 8. Remove the Keyboard. 13. Remove the screws that secure the media board to the computer. 73 Remove the ATG Handle (only for...
Owners Manual
Page 75
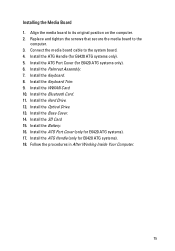
... only). 6. Connect the media board cable to its original position on the computer. 2. Install the ATG Port Cover (for E6420 ATG systems). 17. Install the Keyboard Trim. 9. Install the Hard Drive. 12. Install the Keyboard. 8. Install the Bluetooth Card. 11. Align the media board to the system board. 4. Install the Optical Drive. 13...
... only). 6. Connect the media board cable to its original position on the computer. 2. Install the ATG Port Cover (for E6420 ATG systems). 17. Install the Keyboard Trim. 9. Install the Hard Drive. 12. Install the Keyboard. 8. Install the Bluetooth Card. 11. Align the media board to the system board. 4. Install the Optical Drive. 13...
Owners Manual
Page 77
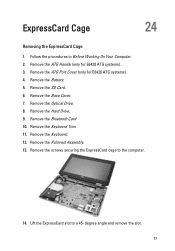
... Card 10. Lift the ExpressCard slot to the computer. 14. Remove the Battery. 5. Remove the SD Card. 6. Remove the Keyboard Trim. 11. Remove the Keyboard. 12. Remove the screws securing the ExpressCard cage to a 45-degree angle and remove the slot. 77 Follow the procedures in Before... Working On Your Computer. 2. Remove the ATG Handle (only for E6420 ATG systems). 4. Remove the Base Cover. 7. Remove the Palmrest Assembly...
... Card 10. Lift the ExpressCard slot to the computer. 14. Remove the Battery. 5. Remove the SD Card. 6. Remove the Keyboard Trim. 11. Remove the Keyboard. 12. Remove the screws securing the ExpressCard cage to a 45-degree angle and remove the slot. 77 Follow the procedures in Before... Working On Your Computer. 2. Remove the ATG Handle (only for E6420 ATG systems). 4. Remove the Base Cover. 7. Remove the Palmrest Assembly...

Owners Manual
Page 78
.... 6. Install the Optical Drive. 9. Install the Secure Digital (SD) Card. 11. Install the Keyboard. 5. Install the Battery. 12. Install the ATG Port Cover (only for E6420 ATG systems). 14. Install the ATG Handle (only for E6420 ATG systems). 13. Follow the procedures in After working inside your computer. 78 Install the Palm rest...
.... 6. Install the Optical Drive. 9. Install the Secure Digital (SD) Card. 11. Install the Keyboard. 5. Install the Battery. 12. Install the ATG Port Cover (only for E6420 ATG systems). 14. Install the ATG Handle (only for E6420 ATG systems). 13. Follow the procedures in After working inside your computer. 78 Install the Palm rest...


