Setup Guide
Page 70
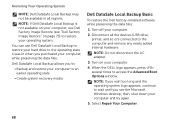
...operating system. Dell DataSafe Local Backup allows you see "Dell Factory Image Restore" on your computer, use Dell DataSafe Local Backup to restore your hard drive to an earlier operating state • Create system recovery media Dell DataSafe Local Backup Basic To restore the Dell factory-installed ...Boot Options window. Turn off your computer and try again. 5. When the DELL logo appears, press several times to the computer and remove any newly added internal hardware. You can use Dell Factory Image Restore (see the Microsoft Windows desktop; Disconnect all regions. then...
...operating system. Dell DataSafe Local Backup allows you see "Dell Factory Image Restore" on your computer, use Dell DataSafe Local Backup to restore your hard drive to an earlier operating state • Create system recovery media Dell DataSafe Local Backup Basic To restore the Dell factory-installed ...Boot Options window. Turn off your computer and try again. 5. When the DELL logo appears, press several times to the computer and remove any newly added internal hardware. You can use Dell Factory Image Restore (see the Microsoft Windows desktop; Disconnect all regions. then...
Setup Guide
Page 73
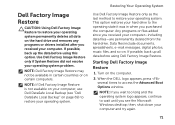
... on the computer. 2. Turn on . then, shut down your operating system. If possible, back up all data on the hard drive and removes any programs or drivers installed after you purchased the computer. Use Dell Factory Image Restore only as the last method to restore your computer and try again. 71 This option restores...
... on the computer. 2. Turn on . then, shut down your operating system. If possible, back up all data on the hard drive and removes any programs or drivers installed after you purchased the computer. Use Dell Factory Image Restore only as the last method to restore your computer and try again. 71 This option restores...
Setup Guide
Page 79
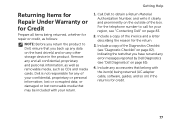
..., such as follows: NOTE: Before you return the product to call for your region, see "Contacting Dell" on page 83. 2. Remove any accessories that you back up any data on the hard drive(s) and on any of the box. Include a copy of the invoice and a letter describing the reason for any ...other storage device in the product. Include any and all items being returned (AC adapter cable, software, guides, and so on page 65). 4. lost removable media that ...
..., such as follows: NOTE: Before you return the product to call for your region, see "Contacting Dell" on page 83. 2. Remove any accessories that you back up any data on the hard drive(s) and on any of the box. Include a copy of the invoice and a letter describing the reason for any ...other storage device in the product. Include any and all items being returned (AC adapter cable, software, guides, and so on page 65). 4. lost removable media that ...
Service Manual
Page 5
11 Wireless Mini-Card(s 45 Removing the Mini-Card(s 45 Replacing the Mini-Card(s 47 12 Hard Drive 49 Removing the Hard Drive 49 Replacing the Hard Drive 51 A Subwoofer 53 Removing the Subwoofer 53 Replacing the Subwoofer 54 13 Status Light Board 57 Removing the Status Light Board 57 Replacing the Status Light Board 58 14 Speakers 61 Removing the Speakers 61 Replacing the Speakers 62 15 Thermal Fan 65 Removing the Thermal Fan 65 Contents 5
11 Wireless Mini-Card(s 45 Removing the Mini-Card(s 45 Replacing the Mini-Card(s 47 12 Hard Drive 49 Removing the Hard Drive 49 Replacing the Hard Drive 51 A Subwoofer 53 Removing the Subwoofer 53 Replacing the Subwoofer 54 13 Status Light Board 57 Removing the Status Light Board 57 Replacing the Status Light Board 58 14 Speakers 61 Removing the Speakers 61 Replacing the Speakers 62 15 Thermal Fan 65 Removing the Thermal Fan 65 Contents 5
Service Manual
Page 49
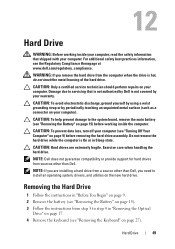
... for hard drives from a source other than Dell, you remove the hard drive from step 3 to install an operating system, drivers, and utilities on the new hard drive. Removing the Hard Drive 1 Follow the instructions in "Before You Begin" on page 9. 2 Remove the battery (see "Removing the Battery" on your computer. WARNING: If you need to step 4 in Sleep state. CAUTION: Hard drives are installing a hard drive...
... for hard drives from a source other than Dell, you remove the hard drive from step 3 to install an operating system, drivers, and utilities on the new hard drive. Removing the Hard Drive 1 Follow the instructions in "Before You Begin" on page 9. 2 Remove the battery (see "Removing the Battery" on your computer. WARNING: If you need to step 4 in Sleep state. CAUTION: Hard drives are installing a hard drive...
Service Manual
Page 50
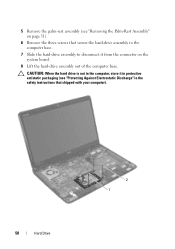
CAUTION: When the hard drive is not in the computer, store it in protective antistatic packaging (see "Removing the Palm-Rest Assembly" on the system board. 8 Lift the hard-drive assembly out of the computer base. 5 Remove the palm-rest assembly (see "Protecting Against Electrostatic Discharge" in the safety instructions that secure the hard-drive assembly to the computer base. 7 Slide the hard-drive assembly to disconnect it from the connector on page 31). 6 Remove the three screws that shipped with your computer). 50 Hard Drive 2 1
CAUTION: When the hard drive is not in the computer, store it in protective antistatic packaging (see "Removing the Palm-Rest Assembly" on the system board. 8 Lift the hard-drive assembly out of the computer base. 5 Remove the palm-rest assembly (see "Protecting Against Electrostatic Discharge" in the safety instructions that secure the hard-drive assembly to the computer base. 7 Slide the hard-drive assembly to disconnect it from the connector on page 31). 6 Remove the three screws that shipped with your computer). 50 Hard Drive 2 1
Service Manual
Page 51
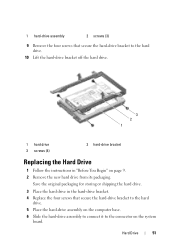
1 hard-drive assembly 2 screws (3) 9 Remove the four screws that secure the hard-drive bracket to the hard drive. 5 Place the hard-drive assembly on the computer base. 6 Slide the hard-drive assembly to connect it to the hard drive. 10 Lift the hard-drive bracket off the hard drive. 3 2 1 1 hard drive 3 screws (4) 2 hard-drive bracket Replacing the Hard Drive 1 Follow the instructions in "Before You Begin" on the system board. Hard Drive 51 Save the original...
1 hard-drive assembly 2 screws (3) 9 Remove the four screws that secure the hard-drive bracket to the hard drive. 5 Place the hard-drive assembly on the computer base. 6 Slide the hard-drive assembly to connect it to the hard drive. 10 Lift the hard-drive bracket off the hard drive. 3 2 1 1 hard drive 3 screws (4) 2 hard-drive bracket Replacing the Hard Drive 1 Follow the instructions in "Before You Begin" on the system board. Hard Drive 51 Save the original...
Service Manual
Page 70
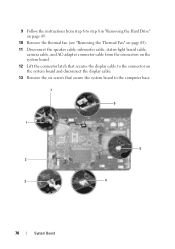
9 Follow the instructions from step 6 to step 8 in "Removing the Hard Drive" on page 49. 10 Remove the thermal fan (see "Removing the Thermal Fan" on page 65). 11 Disconnect the speaker cable, subwoofer cable, status-light board cable, camera cable, and AC-adapter connector cable from the connectors on the system board. 12 Lift the connector latch that secures the display cable to the connector on the system board and disconnect the display cable. 13 Remove the six screws that secure the system board to the computer base. 7 6 1 5 2 3 4 70 System Board
9 Follow the instructions from step 6 to step 8 in "Removing the Hard Drive" on page 49. 10 Remove the thermal fan (see "Removing the Thermal Fan" on page 65). 11 Disconnect the speaker cable, subwoofer cable, status-light board cable, camera cable, and AC-adapter connector cable from the connectors on the system board. 12 Lift the connector latch that secures the display cable to the connector on the system board and disconnect the display cable. 13 Remove the six screws that secure the system board to the computer base. 7 6 1 5 2 3 4 70 System Board

Service Manual
Page 72
... Coin-Cell Battery" on page 75). 17 Remove the thermal cooling assembly (see "Removing the Thermal Cooling Assembly" on page 81). 18 Remove the processor (see "Replacing the Keyboard" on page 85). Replacing the System Board 1 Follow the instructions in "Before You Begin" on page 9. 2 Replace the...the Thermal Fan" on page 66). 12 Follow the instructions from step 5 to step 7 in "Replacing the Hard Drive" on page 51. 13 Replace the palm-rest assembly (see "Replacing the Palm-Rest Assembly" on page 35). 14 Replace the keyboard (see "Removing the Processor Module" on page 29). 72 System Board
... Coin-Cell Battery" on page 75). 17 Remove the thermal cooling assembly (see "Removing the Thermal Cooling Assembly" on page 81). 18 Remove the processor (see "Replacing the Keyboard" on page 85). Replacing the System Board 1 Follow the instructions in "Before You Begin" on page 9. 2 Replace the...the Thermal Fan" on page 66). 12 Follow the instructions from step 5 to step 7 in "Replacing the Hard Drive" on page 51. 13 Replace the palm-rest assembly (see "Replacing the Palm-Rest Assembly" on page 35). 14 Replace the keyboard (see "Removing the Processor Module" on page 29). 72 System Board


