Setup Guide
Page 5
... Up Your Computer 5 Connect the AC Adapter 6 Connect the Network Cable (Optional 7 Press the Power Button 8 Set Up the Operating System 9 Create System Recovery Media (Recommended 10 Enable or Disable Wireless (Optional 12 Set Up Wireless Display (Optional 14 Connect to the Internet (Optional 16 Using Your Inspiron Laptop 18 Right View Features... Display Features 40 Touch Screen Gestures (Optional 42 Removing and Replacing the Top Cover (Optional 44 Removing and Replacing the Battery 48 Software Features 50 Dell DataSafe Online Backup 51...
... Up Your Computer 5 Connect the AC Adapter 6 Connect the Network Cable (Optional 7 Press the Power Button 8 Set Up the Operating System 9 Create System Recovery Media (Recommended 10 Enable or Disable Wireless (Optional 12 Set Up Wireless Display (Optional 14 Connect to the Internet (Optional 16 Using Your Inspiron Laptop 18 Right View Features... Display Features 40 Touch Screen Gestures (Optional 42 Removing and Replacing the Top Cover (Optional 44 Removing and Replacing the Battery 48 Software Features 50 Dell DataSafe Online Backup 51...
Setup Guide
Page 8
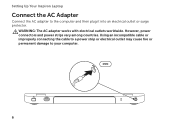
Setting Up Your Inspiron Laptop Connect the AC Adapter Connect the AC adapter to your computer. 6 However, power connectors and power strips vary among countries. WARNING: The AC adapter works with electrical outlets worldwide. Using an incompatible cable or improperly connecting the cable to a power strip or electrical outlet may cause fire or permanent damage to the computer and then plug it into an electrical outlet or surge protector.
Setting Up Your Inspiron Laptop Connect the AC Adapter Connect the AC adapter to your computer. 6 However, power connectors and power strips vary among countries. WARNING: The AC adapter works with electrical outlets worldwide. Using an incompatible cable or improperly connecting the cable to a power strip or electrical outlet may cause fire or permanent damage to the computer and then plug it into an electrical outlet or surge protector.
Setup Guide
Page 13
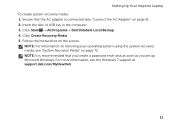
.... 11 Click Create Recovery Media. 5. Click Start → All Programs→ Dell DataSafe Local Backup. 4. NOTE: For information on page 72. Follow the instructions on page 6). 2. NOTE: It is connected (see "Connect the AC Adapter" on the screen. Setting Up Your Inspiron Laptop To create system recovery media: 1. Insert the disc or USB key...
.... 11 Click Create Recovery Media. 5. Click Start → All Programs→ Dell DataSafe Local Backup. 4. NOTE: For information on page 72. Follow the instructions on page 6). 2. NOTE: It is connected (see "Connect the AC Adapter" on the screen. Setting Up Your Inspiron Laptop To create system recovery media: 1. Insert the disc or USB key...
Setup Guide
Page 27
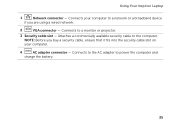
Attaches a commercially available security cable to a network or a broadband device if you buy a security cable, ensure that it fits into the security cable slot on your computer to the computer. Connects your computer. 4 AC adapter connector - Connects to the AC adapter to a monitor or projector. 3 Security cable slot - Using Your Inspiron Laptop 1 Network connector - Connects to power the computer and charge the battery. 25 NOTE: Before you are using a wired network. 2 VGA connector -
Attaches a commercially available security cable to a network or a broadband device if you buy a security cable, ensure that it fits into the security cable slot on your computer to the computer. Connects your computer. 4 AC adapter connector - Connects to the AC adapter to a monitor or projector. 3 Security cable slot - Using Your Inspiron Laptop 1 Network connector - Connects to power the computer and charge the battery. 25 NOTE: Before you are using a wired network. 2 VGA connector -
Setup Guide
Page 29
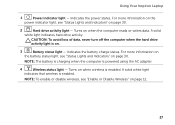
Indicates the battery charge status. Turns on page 30. Using Your Inspiron Laptop 1 Power indicator light - For more information on the battery status light, see "Status Lights and Indicators" on when wireless is enabled. A solid white light ... reads or writes data. CAUTION: To avoid loss of data, never turn off the computer when the hard drive activity light is powered using the AC adapter. 4 Wireless status light -
Indicates the battery charge status. Turns on page 30. Using Your Inspiron Laptop 1 Power indicator light - For more information on the battery status light, see "Status Lights and Indicators" on when wireless is enabled. A solid white light ... reads or writes data. CAUTION: To avoid loss of data, never turn off the computer when the hard drive activity light is powered using the AC adapter. 4 Wireless status light -
Setup Guide
Page 30
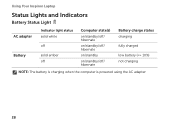
Using Your Inspiron Laptop Status Lights and Indicators Battery Status Light AC adapter Battery Indicator light status solid white off solid amber off Computer state(s) on/standby/off/ hibernate on/standby/off/ hibernate on/standby on/standby/off/ hibernate Battery charge status charging fully charged low battery (
Using Your Inspiron Laptop Status Lights and Indicators Battery Status Light AC adapter Battery Indicator light status solid white off solid amber off Computer state(s) on/standby/off/ hibernate on/standby/off/ hibernate on/standby on/standby/off/ hibernate Battery charge status charging fully charged low battery (
Setup Guide
Page 46
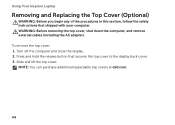
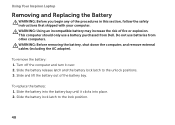
...Inspiron Laptop Removing and Replacing the Top Cover (Optional) WARNING: Before you begin any of the procedures in this section, follow the safety instructions that secures the top cover to the display back cover. 3. WARNING: Before removing the top cover, shut down the computer, and remove external cables (including the AC adapter...). Turn off the computer and close the display. 2. Press and hold the release button that shipped with your computer. Slide and lift the top cover. NOTE: You can purchase additional replaceable top covers at dell.com. 44 To ...
...Inspiron Laptop Removing and Replacing the Top Cover (Optional) WARNING: Before you begin any of the procedures in this section, follow the safety instructions that secures the top cover to the display back cover. 3. WARNING: Before removing the top cover, shut down the computer, and remove external cables (including the AC adapter...). Turn off the computer and close the display. 2. Press and hold the release button that shipped with your computer. Slide and lift the top cover. NOTE: You can purchase additional replaceable top covers at dell.com. 44 To ...
Setup Guide
Page 50
... with your computer. To remove the battery: 1. To replace the battery: 1. Slide the battery lock latch to the unlock positions. 3. Using Your Inspiron Laptop Removing and Replacing the Battery WARNING: Before you begin any of fire or explosion. Slide the battery release latch and the battery lock latch...clicks into the battery bay until it over. 2. WARNING: Before removing the battery, shut down the computer, and remove external cables (including the AC adapter). This computer should only use batteries from Dell. Do not use a battery purchased from other computers.
... with your computer. To remove the battery: 1. To replace the battery: 1. Slide the battery lock latch to the unlock positions. 3. Using Your Inspiron Laptop Removing and Replacing the Battery WARNING: Before you begin any of fire or explosion. Slide the battery release latch and the battery lock latch...clicks into the battery bay until it over. 2. WARNING: Before removing the battery, shut down the computer, and remove external cables (including the AC adapter). This computer should only use batteries from Dell. Do not use a battery purchased from other computers.
Setup Guide
Page 57
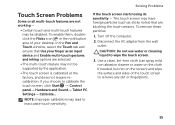
... panel→ Hardware and Sound→ Tablet PC Settings→ Calibrate... If the touch screen starts losing its sensitivity - To remove these particles: 1. Disconnect the AC adapter from the wall outlet. Solving Problems Touch Screen Problems Some or all multi-touch features are not working - • Certain touch and multi-touch features...
... panel→ Hardware and Sound→ Tablet PC Settings→ Calibrate... If the touch screen starts losing its sensitivity - To remove these particles: 1. Disconnect the AC adapter from the wall outlet. Solving Problems Touch Screen Problems Some or all multi-touch features are not working - • Certain touch and multi-touch features...
Setup Guide
Page 58
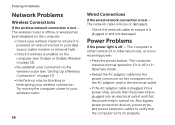
...the wireless router (see "Enable or Disable Wireless" on . Power Problems If the power light is plugged in hibernate mode. • Reseat the AC adapter cable into the power connector on properly. Also bypass power protection devices, power strips, and power extension cables to ensure it is off - Check... the network cable to verify that the computer turns on the computer, into the AC adapter, and to the electrical outlet. • If the AC adapter cable is plugged into a power strip, ensure that the power strip is plugged into an electrical outlet and that ...
...the wireless router (see "Enable or Disable Wireless" on . Power Problems If the power light is plugged in hibernate mode. • Reseat the AC adapter cable into the power connector on properly. Also bypass power protection devices, power strips, and power extension cables to ensure it is off - Check... the network cable to verify that the computer turns on the computer, into the AC adapter, and to the electrical outlet. • If the AC adapter cable is plugged into a power strip, ensure that the power strip is plugged into an electrical outlet and that ...
Setup Guide
Page 59
... creating interference by testing it with another device, such as a lamp. • Check the AC adapter cable connections. An unwanted signal is on. • If the problem persists, contact Dell (see "Contacting Dell" on page 83). If the power light is solid white and the computer is breathing white...; Press the power button until the computer turns off and then turn it back on. • If the problem persists, contact Dell (see "Contacting Dell" on page 83). Solving Problems • Ensure that the electrical outlet is not responding, press the power button until the computer ...
... creating interference by testing it with another device, such as a lamp. • Check the AC adapter cable connections. An unwanted signal is on. • If the problem persists, contact Dell (see "Contacting Dell" on page 83). If the power light is solid white and the computer is breathing white...; Press the power button until the computer turns off and then turn it back on. • If the problem persists, contact Dell (see "Contacting Dell" on page 83). Solving Problems • Ensure that the electrical outlet is not responding, press the power button until the computer ...
Setup Guide
Page 60
...files and exit any open programs you experience other memory problems - • Run Dell Diagnostics (see "Dell Diagnostics" on page 65). • If the problem persists, contact Dell (see "Contacting Dell" on page 83). Select the program that is firmly connected to the computer and..., install additional memory (see the Service Manual at support.dell.com/manuals). • Reseat the memory module(s) into the connector(s) (see the Service Manual at support.dell.com/manuals). • If the problem persists, contact Dell (see if that the AC adapter cable is no longer responding 4.
...files and exit any open programs you experience other memory problems - • Run Dell Diagnostics (see "Dell Diagnostics" on page 65). • If the problem persists, contact Dell (see "Contacting Dell" on page 83). Select the program that is firmly connected to the computer and..., install additional memory (see the Service Manual at support.dell.com/manuals). • Reseat the memory module(s) into the connector(s) (see the Service Manual at support.dell.com/manuals). • If the problem persists, contact Dell (see if that the AC adapter cable is no longer responding 4.
Setup Guide
Page 70
...and remove any newly added internal hardware. Turn off your computer and try again. 5. NOTE: Do not disconnect the AC adapter. 3. then, shut down your computer. 2. Dell DataSafe Local Backup allows you to: • Backup and restore your computer to restore your operating system. Disconnect all the... system logo appears, continue to access the Advanced Boot Options window. Select Repair Your Computer. 68 Restoring Your Operating System NOTE: Dell DataSafe Local Backup may not be available in when you purchased your computer, while preserving the data files. Turn on ) connected ...
...and remove any newly added internal hardware. Turn off your computer and try again. 5. NOTE: Do not disconnect the AC adapter. 3. then, shut down your computer. 2. Dell DataSafe Local Backup allows you to: • Backup and restore your computer to restore your operating system. Disconnect all the... system logo appears, continue to access the Advanced Boot Options window. Select Repair Your Computer. 68 Restoring Your Operating System NOTE: Dell DataSafe Local Backup may not be available in when you purchased your computer, while preserving the data files. Turn on ) connected ...
Setup Guide
Page 79
...on page 82), indicating the tests that you have run and any error messages reported by Dell Diagnostics (see "Contacting Dell" on any other storage device in the product. Include any of your region, see "Dell Diagnostics" on the outside of the invoice and a letter describing the reason for the ...and personal information, as well as removable media, such as follows: NOTE: Before you back up any and all items being returned (AC adapter cable, software, guides, and so on) if the return is not responsible for your confidential, proprietary or personal information; For the telephone number...
...on page 82), indicating the tests that you have run and any error messages reported by Dell Diagnostics (see "Contacting Dell" on any other storage device in the product. Include any of your region, see "Dell Diagnostics" on the outside of the invoice and a letter describing the reason for the ...and personal information, as well as removable media, such as follows: NOTE: Before you back up any and all items being returned (AC adapter cable, software, guides, and so on) if the return is not responsible for your confidential, proprietary or personal information; For the telephone number...

Setup Guide
Page 91
Input voltage 100-240 VAC Input current (maximum) 1.5 A/1.6 A/1.7 A/ 2.3 A/2.5 A Specifications AC Adapter Input frequency 50-60 Hz Output power 65 W/90 W/130 W Output current: 65 W 3.34 A 90 W 4.62 A 130 W 6.7 A Rated output voltage 19.5 VDC Temperature range: ... to 70°C (-40° to 1.34 inches) 418.4 mm (16.47 inches) 286.80 mm (11.29 inches) 3.28 kg (7.23 lb) AC Adapter NOTE: Use only AC adapters specified for use with your computer. See the safety information that shipped with your computer. Physical Height Width Depth Weight (with 6-cell battery and...
Input voltage 100-240 VAC Input current (maximum) 1.5 A/1.6 A/1.7 A/ 2.3 A/2.5 A Specifications AC Adapter Input frequency 50-60 Hz Output power 65 W/90 W/130 W Output current: 65 W 3.34 A 90 W 4.62 A 130 W 6.7 A Rated output voltage 19.5 VDC Temperature range: ... to 70°C (-40° to 1.34 inches) 418.4 mm (16.47 inches) 286.80 mm (11.29 inches) 3.28 kg (7.23 lb) AC Adapter NOTE: Use only AC adapters specified for use with your computer. See the safety information that shipped with your computer. Physical Height Width Depth Weight (with 6-cell battery and...
Service Manual
Page 7
... Removing the Camera Module 101 Replacing the Camera Module 102 23 Hinge Cover 105 Removing the Hinge Cover 105 Replacing the Hinge Cover 108 24 AC-Adapter Connector 111 Removing the AC-Adapter Connector 111 Replacing the AC-Adapter Connector 112 Contents 7
... Removing the Camera Module 101 Replacing the Camera Module 102 23 Hinge Cover 105 Removing the Hinge Cover 105 Replacing the Hinge Cover 108 24 AC-Adapter Connector 111 Removing the AC-Adapter Connector 111 Replacing the AC-Adapter Connector 112 Contents 7

Service Manual
Page 25
...;System and SecuritySystem. To confirm the amount of memory installed in damage to the computer. 6 Turn on page 16), or connect the AC adapter to your computer and an electrical outlet. 2 1 1 tab 2 notch 4 Replace the module cover (see "Replacing the Module Cover" on page 22). 5 Replace the battery (see...
...;System and SecuritySystem. To confirm the amount of memory installed in damage to the computer. 6 Turn on page 16), or connect the AC adapter to your computer and an electrical outlet. 2 1 1 tab 2 notch 4 Replace the module cover (see "Replacing the Module Cover" on page 22). 5 Replace the battery (see...
Service Manual
Page 70
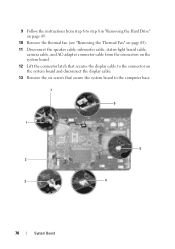
9 Follow the instructions from step 6 to step 8 in "Removing the Hard Drive" on page 49. 10 Remove the thermal fan (see "Removing the Thermal Fan" on page 65). 11 Disconnect the speaker cable, subwoofer cable, status-light board cable, camera cable, and AC-adapter connector cable from the connectors on the system board. 12 Lift the connector latch that secures the display cable to the connector on the system board and disconnect the display cable. 13 Remove the six screws that secure the system board to the computer base. 7 6 1 5 2 3 4 70 System Board
9 Follow the instructions from step 6 to step 8 in "Removing the Hard Drive" on page 49. 10 Remove the thermal fan (see "Removing the Thermal Fan" on page 65). 11 Disconnect the speaker cable, subwoofer cable, status-light board cable, camera cable, and AC-adapter connector cable from the connectors on the system board. 12 Lift the connector latch that secures the display cable to the connector on the system board and disconnect the display cable. 13 Remove the six screws that secure the system board to the computer base. 7 6 1 5 2 3 4 70 System Board

Service Manual
Page 71
1 AC-adapter connector cable 3 status light cable connector 5 subwoofer cable connector 7 camera cable connector 2 screws (6) 4 speaker cable connector 6 dispaly cable connector 14 Lift the system board to disconnect the connector on the system board from the connector on the I/O board. 1 1 system board 15 Turn the system-board assembly over. System Board 71
1 AC-adapter connector cable 3 status light cable connector 5 subwoofer cable connector 7 camera cable connector 2 screws (6) 4 speaker cable connector 6 dispaly cable connector 14 Lift the system board to disconnect the connector on the system board from the connector on the I/O board. 1 1 system board 15 Turn the system-board assembly over. System Board 71

Service Manual
Page 72
... the six screws that secure the system board to the computer base. 9 Connect the speaker cable, subwoofer cable, status-light board cable, camera cable, and AC-adapter cable to the connectors on the system board. 10 Slide the display cable into the connector on the system board and press down on the...
... the six screws that secure the system board to the computer base. 9 Connect the speaker cable, subwoofer cable, status-light board cable, camera cable, and AC-adapter cable to the connectors on the system board. 10 Slide the display cable into the connector on the system board and press down on the...


