Inspiron 17 M731R Owners Manual
Page 3
Contents Before Working Inside Your Computer Before You Begin Recommended Tools Safety Instructions After Working Inside Your Computer Removing the Battery Procedure Replacing the Battery Procedure Removing the Optical Drive Prerequisites Procedure Replacing the Optical Drive Procedure Postrequisites Removing the Keyboard Prerequisites Procedure Replacing the Keyboard Procedure Postrequisites Removing the Base Cover Prerequisites Procedure Replacing the Base Cover Procedure Postrequisites 9 9 9 10 11 12 12 13 13 14 14 14 16 16 16 17 17 17 19 19 19 20 20 20 21 21 21 Contents | 3
Contents Before Working Inside Your Computer Before You Begin Recommended Tools Safety Instructions After Working Inside Your Computer Removing the Battery Procedure Replacing the Battery Procedure Removing the Optical Drive Prerequisites Procedure Replacing the Optical Drive Procedure Postrequisites Removing the Keyboard Prerequisites Procedure Replacing the Keyboard Procedure Postrequisites Removing the Base Cover Prerequisites Procedure Replacing the Base Cover Procedure Postrequisites 9 9 9 10 11 12 12 13 13 14 14 14 16 16 16 17 17 17 19 19 19 20 20 20 21 21 21 Contents | 3
Inspiron 17 M731R Owners Manual
Page 4
... Memory Module(s) 23 Procedure 23 Postrequisites 23 Removing the Hard Drive 24 Prerequisites 24 Procedure 24 Replacing the Hard Drive 26 Procedure 26 Postrequisites 26 Removing the Coin-Cell Battery 27 Prerequisites 27 Procedure 27 Replacing the Coin-Cell Battery 28 Procedure 28 Postrequisites 28 Removing the Palm Rest 29 Prerequisites 29 Procedure 29 Replacing the Palm Rest 32 Procedure 32 Postrequisites 32 Removing the Wireless Card...
... Memory Module(s) 23 Procedure 23 Postrequisites 23 Removing the Hard Drive 24 Prerequisites 24 Procedure 24 Replacing the Hard Drive 26 Procedure 26 Postrequisites 26 Removing the Coin-Cell Battery 27 Prerequisites 27 Procedure 27 Replacing the Coin-Cell Battery 28 Procedure 28 Postrequisites 28 Removing the Palm Rest 29 Prerequisites 29 Procedure 29 Replacing the Palm Rest 32 Procedure 32 Postrequisites 32 Removing the Wireless Card...
Inspiron 17 M731R Owners Manual
Page 7
Removing the Camera Module 65 Prerequisites 65 Procedure 66 Replacing the Camera Module 67 Procedure 67 Postrequisites 67 Removing the Power-Adapter Port 68 Prerequisites 68 Procedure 69 Replacing the Power-Adapter Port 70 Procedure 70 Postrequisites 70 Flashing the BIOS 71 Contents | 7
Removing the Camera Module 65 Prerequisites 65 Procedure 66 Replacing the Camera Module 67 Procedure 67 Postrequisites 67 Removing the Power-Adapter Port 68 Prerequisites 68 Procedure 69 Replacing the Power-Adapter Port 70 Procedure 70 Postrequisites 70 Flashing the BIOS 71 Contents | 7
Inspiron 17 M731R Owners Manual
Page 9
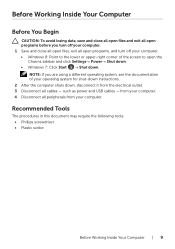
... before you are using a different operating system, see the documentation of the screen to open programs, and turn off your computer. • Windows 8: Point to the lower or upper-right corner of your operating system for shut-down instructions. 2 After the computer shuts down . from your computer. 4 Disconnect all peripherals from the electrical outlet. 3 Disconnect all cables - Recommended Tools...
... before you are using a different operating system, see the documentation of the screen to open programs, and turn off your computer. • Windows 8: Point to the lower or upper-right corner of your operating system for shut-down instructions. 2 After the computer shuts down . from your computer. 4 Disconnect all peripherals from the electrical outlet. 3 Disconnect all cables - Recommended Tools...
Inspiron 17 M731R Owners Manual
Page 10
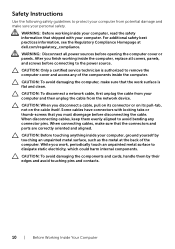
... and ports are correctly oriented and aligned. CAUTION: Only a certified service technician is flat and clean. When disconnecting cables, keep them by touching an unpainted metal surface, such as the metal at dell.com/regulatory_compliance. WARNING: Disconnect all covers, panels, and screws before opening the computer cover or panels. CAUTION: To disconnect a network cable, first unplug the cable from your computer. When connecting cables, make sure...
... and ports are correctly oriented and aligned. CAUTION: Only a certified service technician is flat and clean. When disconnecting cables, keep them by touching an unpainted metal surface, such as the metal at dell.com/regulatory_compliance. WARNING: Disconnect all covers, panels, and screws before opening the computer cover or panels. CAUTION: To disconnect a network cable, first unplug the cable from your computer. When connecting cables, make sure...
Inspiron 17 M731R Owners Manual
Page 22
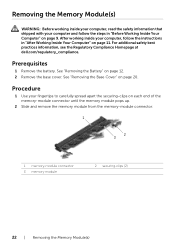
... 11. See "Removing the Battery" on page 20. See "Removing the Base Cover" on page 12. 2 Remove the base cover. Procedure 1 Use your fingertips to carefully spread apart the securing-clips on each end of the memory-module connector until the memory module pops up. 2 Slide and remove the memory module from the memory-module connector. 1 2 3 1 memory-module connector 3 memory module 2 securing-clips (2) 22 | Removing the Memory Module(s) Removing the Memory Module(s) WARNING: Before working inside your computer...
... 11. See "Removing the Battery" on page 20. See "Removing the Base Cover" on page 12. 2 Remove the base cover. Procedure 1 Use your fingertips to carefully spread apart the securing-clips on each end of the memory-module connector until the memory module pops up. 2 Slide and remove the memory module from the memory-module connector. 1 2 3 1 memory-module connector 3 memory module 2 securing-clips (2) 22 | Removing the Memory Module(s) Removing the Memory Module(s) WARNING: Before working inside your computer...
Inspiron 17 M731R Owners Manual
Page 23
Postrequisites 1 Replace the base cover. After working inside your computer, follow the steps in "After Working Inside Your Computer" on page 11. Procedure 1 Align the notch on the memory module with your computer and follow the instructions in "Before Working Inside Your Computer" on page 9. See "Replacing the Battery" on page 21. 2 Replace the battery. For additional safety best practices information, see the...
Postrequisites 1 Replace the base cover. After working inside your computer, follow the steps in "After Working Inside Your Computer" on page 11. Procedure 1 Align the notch on the memory module with your computer and follow the instructions in "Before Working Inside Your Computer" on page 9. See "Replacing the Battery" on page 21. 2 Replace the battery. For additional safety best practices information, see the...
Inspiron 17 M731R Owners Manual
Page 25
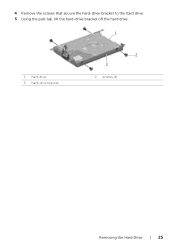
4 Remove the screws that secure the hard-drive bracket to the hard drive. 5 Using the pull-tab, lift the hard-drive bracket off the hard drive. 1 1 hard drive 3 hard-drive bracket 2 3 2 screws (4) Removing the Hard Drive | 25
4 Remove the screws that secure the hard-drive bracket to the hard drive. 5 Using the pull-tab, lift the hard-drive bracket off the hard drive. 1 1 hard drive 3 hard-drive bracket 2 3 2 screws (4) Removing the Hard Drive | 25
Inspiron 17 M731R Owners Manual
Page 27
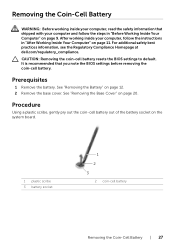
CAUTION: Removing the coin-cell battery resets the BIOS settings to default. After working inside your computer and follow the instructions in "Before Working Inside Your Computer" on page 9. See "Removing the Battery" on page 20. Removing the Coin-Cell Battery WARNING: Before working inside your computer, read the safety information that you note the BIOS settings before removing the coin-cell battery. It is recommended that shipped with...
CAUTION: Removing the coin-cell battery resets the BIOS settings to default. After working inside your computer and follow the instructions in "Before Working Inside Your Computer" on page 9. See "Removing the Battery" on page 20. Removing the Coin-Cell Battery WARNING: Before working inside your computer, read the safety information that you note the BIOS settings before removing the coin-cell battery. It is recommended that shipped with...

Inspiron 17 M731R Owners Manual
Page 32
... "Replacing the Battery" on the connector latches to secure the cables. 5 Close the display and turn the computer over. 6 Replace the screws that secure the palm rest to the computer base. 4 Slide the touchpad cable and the power-button cable into place. 3 Replace the screws that secure the palm rest to the computer base. Postrequisites 1 Replace the keyboard. Replacing the Palm Rest WARNING: Before working inside...
... "Replacing the Battery" on the connector latches to secure the cables. 5 Close the display and turn the computer over. 6 Replace the screws that secure the palm rest to the computer base. 4 Slide the touchpad cable and the power-button cable into place. 3 Replace the screws that secure the palm rest to the computer base. Postrequisites 1 Replace the keyboard. Replacing the Palm Rest WARNING: Before working inside...
Inspiron 17 M731R Owners Manual
Page 35
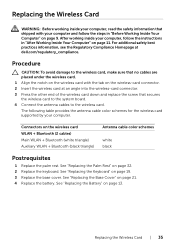
... the wireless-card connector. 3 Press the other end of the wireless card down and replace the screw that secures the wireless card to the system board. 4 Connect the antenna cables to the wireless card, make sure that no cables are placed under the wireless card. 1 Align the notch on the wireless card with your computer and follow the instructions in "Before Working Inside Your Computer" on page 13. See "Replacing the Battery...
... the wireless-card connector. 3 Press the other end of the wireless card down and replace the screw that secures the wireless card to the system board. 4 Connect the antenna cables to the wireless card, make sure that no cables are placed under the wireless card. 1 Align the notch on the wireless card with your computer and follow the instructions in "Before Working Inside Your Computer" on page 13. See "Replacing the Battery...
Inspiron 17 M731R Owners Manual
Page 38
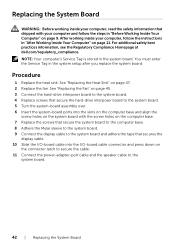
... at dell.com/regulatory_compliance. You must enter the Service Tag in system setup after you replace the system board. See "Removing the Keyboard" on page 33. 38 | Removing the System Board See "Removing the Coin-Cell Battery" on page 27. 6 Follow the instructions from step 1 to step 3 in "Removing the Hard Drive" on page 14. 3 Remove the base cover. See "Removing the Memory Module(s)" on page 29. 9 Remove the wireless card. Prerequisites 1 Remove the battery. See "Removing...
... at dell.com/regulatory_compliance. You must enter the Service Tag in system setup after you replace the system board. See "Removing the Keyboard" on page 33. 38 | Removing the System Board See "Removing the Coin-Cell Battery" on page 27. 6 Follow the instructions from step 1 to step 3 in "Removing the Hard Drive" on page 14. 3 Remove the base cover. See "Removing the Memory Module(s)" on page 29. 9 Remove the wireless card. Prerequisites 1 Remove the battery. See "Removing...
Inspiron 17 M731R Owners Manual
Page 42
... 45. 3 Connect the hard-drive interposer board to the system board. 4 Replace screws that secure the hard-drive interposer board to the system board. 5 Turn the system-board assembly over. 6 Insert the system-board ports into the I /O-board cable into the slots on the computer base and align the screw holes on the system board with your computer and follow the instructions in the system board. You must enter the Service Tag...
... 45. 3 Connect the hard-drive interposer board to the system board. 4 Replace screws that secure the hard-drive interposer board to the system board. 5 Turn the system-board assembly over. 6 Insert the system-board ports into the I /O-board cable into the slots on the computer base and align the screw holes on the system board with your computer and follow the instructions in the system board. You must enter the Service Tag...

Inspiron 17 M731R Owners Manual
Page 62
... Board" on page 38. 10 Remove the display assembly. See "Removing the Wireless Card" on page 33. 9 Follow step 1 to step 3 in "Removing the Hard Drive" on page 24. 4 Remove the base cover. See "Removing the Palm Rest" on page 59. 62 | Removing the Display Panel See "Removing the Base Cover" on page 53. 11 Remove the display bezel. See "Removing the Display Assembly" on page 20. 5 Remove the memory module(s). Removing the Display Panel WARNING: Before working...
... Board" on page 38. 10 Remove the display assembly. See "Removing the Wireless Card" on page 33. 9 Follow step 1 to step 3 in "Removing the Hard Drive" on page 24. 4 Remove the base cover. See "Removing the Palm Rest" on page 59. 62 | Removing the Display Panel See "Removing the Base Cover" on page 53. 11 Remove the display bezel. See "Removing the Display Assembly" on page 20. 5 Remove the memory module(s). Removing the Display Panel WARNING: Before working...
Inspiron 17 M731R Owners Manual
Page 65
... keyboard. For additional safety best practices information, see the Regulatory Compliance Homepage at dell.com/regulatory_compliance. See "Removing the Memory Module(s)" on page 9. See "Removing the Base Cover" on page 38. 10 Remove the display assembly. See "Removing the Wireless Card" on page 33. 9 Follow step 1 to step 3 in "Removing the Hard Drive" on page 62. See "Removing the Display Panel" on page 24. 4 Remove the base cover. Prerequisites 1 Remove the battery...
... keyboard. For additional safety best practices information, see the Regulatory Compliance Homepage at dell.com/regulatory_compliance. See "Removing the Memory Module(s)" on page 9. See "Removing the Base Cover" on page 38. 10 Remove the display assembly. See "Removing the Wireless Card" on page 33. 9 Follow step 1 to step 3 in "Removing the Hard Drive" on page 62. See "Removing the Display Panel" on page 24. 4 Remove the base cover. Prerequisites 1 Remove the battery...

Inspiron 17 M731R Owners Manual
Page 66
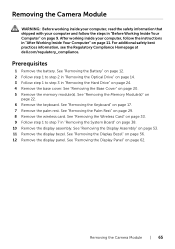
Procedure 1 Disconnect the camera cable from the camera module. 2 Remove the screw that secures the camera module to the display back-cover. 3 Lift the camera module off the display back-cover. 4 1 2 3 1 screw 3 display back-cover 2 camera module 4 camera cable 66 | Removing the Camera Module
Procedure 1 Disconnect the camera cable from the camera module. 2 Remove the screw that secures the camera module to the display back-cover. 3 Lift the camera module off the display back-cover. 4 1 2 3 1 screw 3 display back-cover 2 camera module 4 camera cable 66 | Removing the Camera Module
Inspiron 17 M731R Owners Manual
Page 68
... wireless card. See "Removing the Keyboard" on page 24. 4 Remove the base cover. See "Removing the Palm Rest" on page 38. 10 Remove the display assembly. See "Removing the Wireless Card" on page 33. 9 Follow step 1 to step 3 in "Removing the Hard Drive" on page 17. 7 Remove the palm rest. See "Removing the Base Cover" on page 53. 68 | Removing the Power-Adapter Port See "Removing the Display Assembly" on page 20. 5 Remove the memory module(s). Prerequisites 1 Remove...
... wireless card. See "Removing the Keyboard" on page 24. 4 Remove the base cover. See "Removing the Palm Rest" on page 38. 10 Remove the display assembly. See "Removing the Wireless Card" on page 33. 9 Follow step 1 to step 3 in "Removing the Hard Drive" on page 17. 7 Remove the palm rest. See "Removing the Base Cover" on page 53. 68 | Removing the Power-Adapter Port See "Removing the Display Assembly" on page 20. 5 Remove the memory module(s). Prerequisites 1 Remove...
Inspiron 17 M731R Quick Start Guide
Page 2
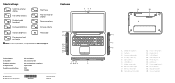
... in China. 2013-08 1 23 7 19 20 4 5 6 1. Camera‑status light 4. Security‑cable slot 5. Media‑card reader 8. Regulatory label 20. Optical drive 6. USB 3.0 ports (2) 15. Headset port 13. HDMI port 17. Camera 3. USB 2.0 port 7. Power‑status light 12. Service Tag label Battery‑status light 10. Power button 19. Wireless-status light 9. Digital microphone 2. Hard-drive activity light 11. Shortcut keys Switch to external display Turn off/on wireless Disable/enable touchpad Decrease brightness Play/Pause Play next track or...
... in China. 2013-08 1 23 7 19 20 4 5 6 1. Camera‑status light 4. Security‑cable slot 5. Media‑card reader 8. Regulatory label 20. Optical drive 6. USB 3.0 ports (2) 15. Headset port 13. HDMI port 17. Camera 3. USB 2.0 port 7. Power‑status light 12. Service Tag label Battery‑status light 10. Power button 19. Wireless-status light 9. Digital microphone 2. Hard-drive activity light 11. Shortcut keys Switch to external display Turn off/on wireless Disable/enable touchpad Decrease brightness Play/Pause Play next track or...
Inspiron 17 M731R Specifications (Accessibility Compliant)
Page 3
Communications Network adapter Wireless Video Controller: Integrated Memory: Integrated External display support Audio Controller Speaker Speaker output: Average Peak Internal microphone Volume controls Storage Interface Hard drives Configuration Optical drive Media-card reader Type Cards supported 10/100 Mbps Ethernet controller integrated on system board • Wi-Fi 802.11 b/g/n • Bluetooth 4.0 • AMD Radeon HD 8510G with A8 APU • AMD Radeon HD 8610G with A10 APU System shared memory HDMI port Realtek ALC3223 Two speakers 2 watt 2.5 watt Digital microphone in camera ...
Communications Network adapter Wireless Video Controller: Integrated Memory: Integrated External display support Audio Controller Speaker Speaker output: Average Peak Internal microphone Volume controls Storage Interface Hard drives Configuration Optical drive Media-card reader Type Cards supported 10/100 Mbps Ethernet controller integrated on system board • Wi-Fi 802.11 b/g/n • Bluetooth 4.0 • AMD Radeon HD 8510G with A8 APU • AMD Radeon HD 8610G with A10 APU System shared memory HDMI port Realtek ALC3223 Two speakers 2 watt 2.5 watt Digital microphone in camera ...
Inspiron 17 M731R Specifications (Accessibility Compliant)
Page 4
Display Type Resolution Dimensions (Active Area): Height Width Diagonal Refresh rate Operating angle Pixel pitch Controls Keyboard Type Shortcut keys Camera Resolution: Still image Video (maximum) Diagonal viewing angle Touchpad Resolution: Horizontal Vertical Dimensions: Width Height 17.3-inch HD+ WLED with TrueLife 1600 x 900 8.46 in (214.81 mm) 15.04 in (381.89 mm) 17.30 in (56 mm) To type the...
Display Type Resolution Dimensions (Active Area): Height Width Diagonal Refresh rate Operating angle Pixel pitch Controls Keyboard Type Shortcut keys Camera Resolution: Still image Video (maximum) Diagonal viewing angle Touchpad Resolution: Horizontal Vertical Dimensions: Width Height 17.3-inch HD+ WLED with TrueLife 1600 x 900 8.46 in (214.81 mm) 15.04 in (381.89 mm) 17.30 in (56 mm) To type the...


