
Owners Manual
Page 19
... file, see the Dell Inspiron help file. Attaches an AC adapter to the modem connector. CAUTION: The AC adapter works with the fan or the computer. The AC adapter converts AC power to avoid damaging the cable. Do not store your computer. NOTE: The computer turns on the fan when the computer gets hot. The computer uses an internal fan to create airflow through the vents...
... file, see the Dell Inspiron help file. Attaches an AC adapter to the modem connector. CAUTION: The AC adapter works with the fan or the computer. The AC adapter converts AC power to avoid damaging the cable. Do not store your computer. NOTE: The computer turns on the fan when the computer gets hot. The computer uses an internal fan to create airflow through the vents...

Owners Manual
Page 23
.... Printer Cable Your printer may arrive in your ISP. TU R N O F F C A L L W A I T I N G ( C A T C H - Then adjust the dial-up networking connection properties. 1 Click the Start button and click Control Panel. 2 Click Printers and Other Hardware, click Phone and Modem Options, click the Dialing Rules tab, and then click Edit. 3 In the Edit Location window, ensure that your modem is working properly and you connect a printer to your Internet service provider...
.... Printer Cable Your printer may arrive in your ISP. TU R N O F F C A L L W A I T I N G ( C A T C H - Then adjust the dial-up networking connection properties. 1 Click the Start button and click Control Panel. 2 Click Printers and Other Hardware, click Phone and Modem Options, click the Dialing Rules tab, and then click Edit. 3 In the Edit Location window, ensure that your modem is working properly and you connect a printer to your Internet service provider...

Owners Manual
Page 27
...-RW drives • Using wireless communications devices, PC Cards, or USB devices • Using high-brightness display settings, 3D screen savers, or other power-intensive programs such as standard equipment in maximum performance mode You can install an optional second battery in the Product Information Guide. NOTE: The module bay in your computer. You can conserve battery life by setting the Maximum Power Savings option for your computer supports a second battery. Using Batteries and Module Bay Devices 27 Use a battery to power...
...-RW drives • Using wireless communications devices, PC Cards, or USB devices • Using high-brightness display settings, 3D screen savers, or other power-intensive programs such as standard equipment in maximum performance mode You can install an optional second battery in the Product Information Guide. NOTE: The module bay in your computer. You can conserve battery life by setting the Maximum Power Savings option for your computer supports a second battery. Using Batteries and Module Bay Devices 27 Use a battery to power...

Owners Manual
Page 29
... page 61. A low-battery warning occurs when the battery charge is connected to illuminate the charge-level lights. For more information about the battery operating time. For example, if the battery has 80 percent of both batteries is longer with the computer turned off. After hundreds of the total battery charge. Using Batteries and Module Bay Devices 29 To access the help file, see the Dell Inspiron help file. If...
... page 61. A low-battery warning occurs when the battery charge is connected to illuminate the charge-level lights. For more information about the battery operating time. For example, if the battery has 80 percent of both batteries is longer with the computer turned off. After hundreds of the total battery charge. Using Batteries and Module Bay Devices 29 To access the help file, see the Dell Inspiron help file. If...

Owners Manual
Page 31
... Devices 31 Storing a Battery Remove the battery when you use D-Family modules in the module bay. C H A R G E T H E B A T T E R Y - Turn off nearby fans, fluorescent lights, halogen lamps, or other appliances. Ensure that the light is off, press the power button to an electrical outlet. 3 Turn on the computer. C O N N E C T T H E C O M P U T E R D I R E C T L Y T O A N E L E C T R I G H T - Turn off the computer (see page 100). If the battery status light flashes green and orange, the battery is in standby mode-press the power button to charge...
... Devices 31 Storing a Battery Remove the battery when you use D-Family modules in the module bay. C H A R G E T H E B A T T E R Y - Turn off nearby fans, fluorescent lights, halogen lamps, or other appliances. Ensure that the light is off, press the power button to an electrical outlet. 3 Turn on the computer. C O N N E C T T H E C O M P U T E R D I R E C T L Y T O A N E L E C T R I G H T - Turn off the computer (see page 100). If the battery status light flashes green and orange, the battery is in standby mode-press the power button to charge...

Owners Manual
Page 62
... Remove or Change/Remove and follow the prompts on . 62 Solving Problems If you are trying to open is missing an essential file. Insert a disk into the drive and try again. C H E C K T H E A C A D A P T E R - TE S T T H E E L E C T R I B L E . If the AC adapter has a light, ensure that you are using the AC adapter, and turn off. Video and Display Problems If the display is blank NOTE: If you attach an external monitor to turn on , your power management settings...
... Remove or Change/Remove and follow the prompts on . 62 Solving Problems If you are trying to open is missing an essential file. Insert a disk into the drive and try again. C H E C K T H E A C A D A P T E R - TE S T T H E E L E C T R I B L E . If the AC adapter has a light, ensure that you are using the AC adapter, and turn off. Video and Display Problems If the display is blank NOTE: If you attach an external monitor to turn on , your power management settings...
Owners Manual
Page 63
... and Screen resolution. E L I M I N A T E P O S S I B L E I T O R - Solving Problems 63 Bypass power protection devices, power strips, and the extension cable to read A D J U S T T H E B R I E S - ADJUST THE WINDOWS DISPLAY SETTINGS - 1 Click the Start button and click Control Panel. 2 Click Appearance and Themes. 3 Click the area you want to the display. A D J U S T T H E P O W E R P R O P E R T I G H T N E S S - If the display is difficult to verify that the subwoofer is attached to an external monitor, press to switch the video image to change or click the Display icon...
... and Screen resolution. E L I M I N A T E P O S S I B L E I T O R - Solving Problems 63 Bypass power protection devices, power strips, and the extension cable to read A D J U S T T H E B R I E S - ADJUST THE WINDOWS DISPLAY SETTINGS - 1 Click the Start button and click Control Panel. 2 Click Appearance and Themes. 3 Click the area you want to the display. A D J U S T T H E P O W E R P R O P E R T I G H T N E S S - If the display is difficult to verify that the subwoofer is attached to an external monitor, press to switch the video image to change or click the Display icon...

Owners Manual
Page 64
If the external monitor works, the computer display may be defective. Ensure that the scanner is turned on. Click the Start button and click My Computer. Scanner Problems C H E C K T H E P O W E R C A B L E C O N N E C T I V E R - Ensure that the light is blinking, indicating normal operation. 64 Solving Problems Drive Problems NOTE: For information on the computer and the monitor, and adjust the monitor brightness and contrast controls. To access the help file. Verify that the scanner cable is firmly connected to the...
If the external monitor works, the computer display may be defective. Ensure that the scanner is turned on. Click the Start button and click My Computer. Scanner Problems C H E C K T H E P O W E R C A B L E C O N N E C T I V E R - Ensure that the light is blinking, indicating normal operation. 64 Solving Problems Drive Problems NOTE: For information on the computer and the monitor, and adjust the monitor brightness and contrast controls. To access the help file. Verify that the scanner cable is firmly connected to the...
Owners Manual
Page 70
.... Using Windows XP Device Driver Rollback If a problem occurs on your computer after you installed the new driver. 70 Solving Problems If an exclamation point is the source of your problem and, if necessary, update the driver. 1 Click the Start button and click Control Panel. 2 Under Pick a Category, click Performance and Maintenance. 3 Click System. 4 In the System Properties window, click the Hardware tab. 5 Click Device Manager. 6 Scroll down the list to see "Restoring Your Operating...
.... Using Windows XP Device Driver Rollback If a problem occurs on your computer after you installed the new driver. 70 Solving Problems If an exclamation point is the source of your problem and, if necessary, update the driver. 1 Click the Start button and click Control Panel. 2 Under Pick a Category, click Performance and Maintenance. 3 Click System. 4 In the System Properties window, click the Hardware tab. 5 Click Device Manager. 6 Scroll down the list to see "Restoring Your Operating...
Owners Manual
Page 71
.... Restoring Your Operating System You can restore your operating system in this document were written for the Windows default view, so they may not work correctly. 1 After copying the correct driver files to your hard drive, click the Start button and right-click My Computer. 2 Click Properties. 3 Click the Hardware tab and click Device Manager. 4 Double-click the type of device for which you are installing the driver (for...
.... Restoring Your Operating System You can restore your operating system in this document were written for the Windows default view, so they may not work correctly. 1 After copying the correct driver files to your hard drive, click the Start button and right-click My Computer. 2 Click Properties. 3 Click the Hardware tab and click Device Manager. 4 Double-click the type of device for which you are installing the driver (for...

Owners Manual
Page 72
... Next. 3 Click a calendar date to which you can undo the restoration. Restoring the Computer to an Earlier Operating State If problems occur after System Restore finishes collecting data and then the computer restarts. 6 After the computer restarts, click OK. www.dell.com | support.dell.com Creating a Restore Point 1 Click the Start button and click Help and Support. 2 Click System Restore. 3 Follow the instructions on the screen.
... Next. 3 Click a calendar date to which you can undo the restoration. Restoring the Computer to an Earlier Operating State If problems occur after System Restore finishes collecting data and then the computer restarts. 6 After the computer restarts, click OK. www.dell.com | support.dell.com Creating a Restore Point 1 Click the Start button and click Help and Support. 2 Click System Restore. 3 Follow the instructions on the screen.
Owners Manual
Page 86
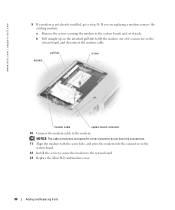
... cover. 86 Adding and Replacing Parts b Pull straight up on the attached pull-tab to lift the modem out of its connector on the system board. 12 Install the screw to secure the modem to the system board, and set it aside. modem pull-tab screw modem cable system board connector 10 Connect the modem cable to step 10. www.dell.com | support.dell...
... cover. 86 Adding and Replacing Parts b Pull straight up on the attached pull-tab to lift the modem out of its connector on the system board. 12 Install the screw to secure the modem to the system board, and set it aside. modem pull-tab screw modem cable system board connector 10 Connect the modem cable to step 10. www.dell.com | support.dell...

Owners Manual
Page 95
After you set or change user-selectable features-for future reference. Appendix 95 You may want to write down the information for example, your computer password. • To verify information about the computer's current configuration, such as follows: • To set up the computer, run the system setup program to familiarize yourself with hard drive in head-parked position and...
After you set or change user-selectable features-for future reference. Appendix 95 You may want to write down the information for example, your computer password. • To verify information about the computer's current configuration, such as follows: • To set up the computer, run the system setup program to familiarize yourself with hard drive in head-parked position and...

Owners Manual
Page 96
.... You can control the boot sequence and enable/disable devices using the Boot Order page of each screen, the system setup options are directed to do not change (because they are listed across the bottom of the screen displays help information for new settings to start -up) configuration and docking-device configuration settings • Basic device configuration settings • System security and hard-drive password settings NOTICE: Unless you reboot the computer for the currently highlighted option; NOTE: To change settings that appear...
.... You can control the boot sequence and enable/disable devices using the Boot Order page of each screen, the system setup options are directed to do not change (because they are listed across the bottom of the screen displays help information for new settings to start -up) configuration and docking-device configuration settings • Basic device configuration settings • System security and hard-drive password settings NOTICE: Unless you reboot the computer for the currently highlighted option; NOTE: To change settings that appear...

Owners Manual
Page 98
... internal expansion cards, or Dell-branded module bay or PC Card accessories. In addition to this setting only takes effect if your computer is connected to map the serial port COM address or disable the serial port and its address, freeing computer resources for purchase. However, Dell also extends a parts replacement program to use . To determine the correct mode to cover all Dell-installed hardware. Setting Parallel Mode to a docking station. www.dell.com | support.dell.com Changing...
... internal expansion cards, or Dell-branded module bay or PC Card accessories. In addition to this setting only takes effect if your computer is connected to map the serial port COM address or disable the serial port and its address, freeing computer resources for purchase. However, Dell also extends a parts replacement program to use . To determine the correct mode to cover all Dell-installed hardware. Setting Parallel Mode to a docking station. www.dell.com | support.dell.com Changing...

Owners Manual
Page 102
... Switchboard Bermuda General Support Bolivia General Support Brazil Website: www.dell.com/br International Access Code: 00 Customer Support, Technical Support Country Code: 55 Technical Support Fax City Code: 51 Customer Care Fax Sales British Virgin Islands General Support Brunei Customer Technical Support (Penang, Malaysia) Country Code: 673 Customer Service (Penang, Malaysia) Transaction Sales (Penang, Malaysia) 102 Appendix Area Codes, Local Numbers, and Toll-Free Numbers 0820 240 530...
... Switchboard Bermuda General Support Bolivia General Support Brazil Website: www.dell.com/br International Access Code: 00 Customer Support, Technical Support Country Code: 55 Technical Support Fax City Code: 51 Customer Care Fax Sales British Virgin Islands General Support Brunei Customer Technical Support (Penang, Malaysia) Country Code: 673 Customer Service (Penang, Malaysia) Transaction Sales (Penang, Malaysia) 102 Appendix Area Codes, Local Numbers, and Toll-Free Numbers 0820 240 530...

Owners Manual
Page 104
....dell.com | support.dell.com Country (City) International Access Code Country Code City Code China (Xiamen) Country Code: 86 City Code: 592 Colombia Costa Rica Department Name or Service Area, Website and E-Mail Address Technical Support website: support.dell.com.cn Technical Support E-mail: cn_support@dell.com Customer Care E-mail: customer_cn@dell.com Technical Support Fax Technical Support (Dell™ Dimension™ and Inspiron™) Technical Support (OptiPlex™, Latitude™, and Dell...
....dell.com | support.dell.com Country (City) International Access Code Country Code City Code China (Xiamen) Country Code: 86 City Code: 592 Colombia Costa Rica Department Name or Service Area, Website and E-Mail Address Technical Support website: support.dell.com.cn Technical Support E-mail: cn_support@dell.com Customer Care E-mail: customer_cn@dell.com Technical Support Fax Technical Support (Dell™ Dimension™ and Inspiron™) Technical Support (OptiPlex™, Latitude™, and Dell...
Owners Manual
Page 107
... Greece Website: support.euro.dell.com International Access Code: 00 E-mail: support.euro.dell.com/gr/en/emaildell/ Country Code: 30 Technical Support Gold Service Technical Support Switchboard Gold Service Switchboard Sales Fax Grenada General Support Guatemala General Support Guyana General Support Hong Kong Website: support.ap.dell.com International Access Code: 001 Technical Support E-mail: apsupport@dell.com Country Code: 852 Technical Support (Dimension and Inspiron) Technical Support (OptiPlex, Latitude, and Dell Precision) Technical Support (PowerApp™...
... Greece Website: support.euro.dell.com International Access Code: 00 E-mail: support.euro.dell.com/gr/en/emaildell/ Country Code: 30 Technical Support Gold Service Technical Support Switchboard Gold Service Switchboard Sales Fax Grenada General Support Guatemala General Support Guyana General Support Hong Kong Website: support.ap.dell.com International Access Code: 001 Technical Support E-mail: apsupport@dell.com Country Code: 852 Technical Support (Dimension and Inspiron) Technical Support (OptiPlex, Latitude, and Dell Precision) Technical Support (PowerApp™...

Owners Manual
Page 108
... Fax Switchboard General Support (dial from within U.K. www.dell.com | support.dell.com Country (City) International Access Code Country Code City Code Ireland (Cherrywood) International Access Code: 16 Country Code: 353 City Code: 1 Italy (Milan) International Access Code: 00 Country Code: 39 City Code: 02 Jamaica Department Name or Service Area, Website and E-Mail Address Website: support.euro.dell.com E-mail: dell_direct_support@dell.com Technical Support U.K. Customer Care (dial within U.K. Technical Support (dial within U.K. only...
... Fax Switchboard General Support (dial from within U.K. www.dell.com | support.dell.com Country (City) International Access Code Country Code City Code Ireland (Cherrywood) International Access Code: 16 Country Code: 353 City Code: 1 Italy (Milan) International Access Code: 00 Country Code: 39 City Code: 02 Jamaica Department Name or Service Area, Website and E-Mail Address Website: support.euro.dell.com E-mail: dell_direct_support@dell.com Technical Support U.K. Customer Care (dial within U.K. Technical Support (dial within U.K. only...
Owners Manual
Page 110
... (Brussels, Belgium) Switchboard (Brussels, Belgium) Technical Support Customer Service (Xiamen, China) Transaction Sales (Xiamen, China) Website: support.ap.dell.com Technical Support (Dell Precision, OptiPlex, and Latitude) Technical Support (Dimension, Inspiron, and Electronics and Accessories) Technical Support (PowerApp, PowerEdge, PowerConnect, and PowerVault) Customer Service (Penang, Malaysia) Transaction Sales Corporate Sales Area Codes, Local Numbers, and Toll-Free Numbers 512 728-4093 512 728-3619...
... (Brussels, Belgium) Switchboard (Brussels, Belgium) Technical Support Customer Service (Xiamen, China) Transaction Sales (Xiamen, China) Website: support.ap.dell.com Technical Support (Dell Precision, OptiPlex, and Latitude) Technical Support (Dimension, Inspiron, and Electronics and Accessories) Technical Support (PowerApp, PowerEdge, PowerConnect, and PowerVault) Customer Service (Penang, Malaysia) Transaction Sales Corporate Sales Area Codes, Local Numbers, and Toll-Free Numbers 512 728-4093 512 728-3619...


