
View
Page 100
...the computer must be working properly. 2 Turn on (or restart) your computer. 3 Start the Dell Diagnostics in one of your system board, keyboard, hard drive, and display. • During the assessment, answer any key to the next test, press ; The computer runs the Pre-boot System Assessment, a series of... initial tests of the following two ways: a When the DELL™ logo appears, press ...
...the computer must be working properly. 2 Turn on (or restart) your computer. 3 Start the Dell Diagnostics in one of your system board, keyboard, hard drive, and display. • During the assessment, answer any key to the next test, press ; The computer runs the Pre-boot System Assessment, a series of... initial tests of the following two ways: a When the DELL™ logo appears, press ...
View
Page 113
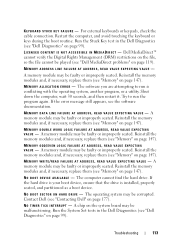
...or improperly seated. N O B O O T D E V I V E - Run the System Set tests in the Dell Diagnostics (see "Memory" on the system board may be corrupted. For external keyboards or keypads, check the cable connection. A memory module may be faulty or improperly seated. ...improperly seated. Reinstall the memory modules and, if necessary, replace them (see "Memory" on page 147). Restart the computer, and avoid touching the keyboard or keys during the boot routine. MEMORY ODD/EVEN LOGIC FAILURE AT ADDRESS, READ VALUE EXPECTING VALUE - Try to run the program again. N O T I M E...
...or improperly seated. N O B O O T D E V I V E - Run the System Set tests in the Dell Diagnostics (see "Memory" on the system board may be corrupted. For external keyboards or keypads, check the cable connection. A memory module may be faulty or improperly seated. ...improperly seated. Reinstall the memory modules and, if necessary, replace them (see "Memory" on page 147). Restart the computer, and avoid touching the keyboard or keys during the boot routine. MEMORY ODD/EVEN LOGIC FAILURE AT ADDRESS, READ VALUE EXPECTING VALUE - Try to run the program again. N O T I M E...

View
Page 157
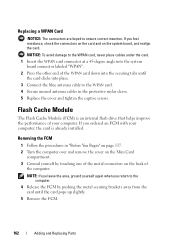
If you feel resistance, check the connectors on the card and on the system board, and realign the card. NOTICE: To avoid damage to ensure correct insertion. Adding and Replacing Parts 157 2 1 1 metal securing tabs (2) 2 WLAN card Replacing a WLAN Card NOTICE: The connectors are keyed to the WLAN card, never place cables under the card. 1 Insert the WLAN card connector at a 45-degree angle into the system board connector labeled "WLAN". 2 Press the other end of the WLAN card down into the securing tabs until the card clicks into place.
If you feel resistance, check the connectors on the card and on the system board, and realign the card. NOTICE: To avoid damage to ensure correct insertion. Adding and Replacing Parts 157 2 1 1 metal securing tabs (2) 2 WLAN card Replacing a WLAN Card NOTICE: The connectors are keyed to the WLAN card, never place cables under the card. 1 Insert the WLAN card connector at a 45-degree angle into the system board connector labeled "WLAN". 2 Press the other end of the WLAN card down into the securing tabs until the card clicks into place.

View
Page 160
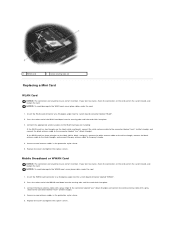
If you feel resistance, check the connectors on the card and on the system board, and realign the card. NOTICE: To avoid damage to ensure correct insertion. 2 1 1 metal securing tabs (2) 2 WWAN card Replacing a WWAN Card NOTICE: The connectors are keyed to the WWAN card, never place cables under the card. 1 Insert the WWAN card connector at a 45-degree angle into the system board connector labeled "WWAN". 2 Press the other end of the WWAN card down into the securing tabs until the card clicks into place. 160 Adding and Replacing Parts
If you feel resistance, check the connectors on the card and on the system board, and realign the card. NOTICE: To avoid damage to ensure correct insertion. 2 1 1 metal securing tabs (2) 2 WWAN card Replacing a WWAN Card NOTICE: The connectors are keyed to the WWAN card, never place cables under the card. 1 Insert the WWAN card connector at a 45-degree angle into the system board connector labeled "WWAN". 2 Press the other end of the WWAN card down into the securing tabs until the card clicks into place. 160 Adding and Replacing Parts
View
Page 162
... To avoid damage to the WPAN card, never place cables under the card. 1 Insert the WPAN card connector at a 45-degree angle into the system board connector labeled "WPAN". 2 Press the other end of the computer. Removing the FCM 1 Follow the procedures in the protective mylar sleeve. 5 Replace the ...the securing tabs until the card pops up slightly. 5 Remove the FCM. 162 Adding and Replacing Parts Replacing a WPAN Card NOTICE: The connectors are keyed to the WPAN card. 4 Secure unused antenna cables in "Before You Begin" on page 137. 2 Turn the computer over and remove the cover on...
... To avoid damage to the WPAN card, never place cables under the card. 1 Insert the WPAN card connector at a 45-degree angle into the system board connector labeled "WPAN". 2 Press the other end of the computer. Removing the FCM 1 Follow the procedures in the protective mylar sleeve. 5 Replace the ...the securing tabs until the card pops up slightly. 5 Remove the FCM. 162 Adding and Replacing Parts Replacing a WPAN Card NOTICE: The connectors are keyed to the WPAN card. 4 Secure unused antenna cables in "Before You Begin" on page 137. 2 Turn the computer over and remove the cover on...

View
Page 202
...provider - A measurement of the capacity of data that equals 1024 bytes but is often referred to components that device. KB - key combination - A LAN can be assigned an IRQ. IRQ - An electronic pathway assigned to communicate with a specific device (such... The technology used by portable computer and flatpanel displays. 202 Glossary infrared sensor - Keyboards and printers are physically located on the computer's system board. IrDA - Infrared Data Association - interrupt request - L LAN - A computer network covering a small area. LCD - integrated - input/...
...provider - A measurement of the capacity of data that equals 1024 bytes but is often referred to components that device. KB - key combination - A LAN can be assigned an IRQ. IRQ - An electronic pathway assigned to communicate with a specific device (such... The technology used by portable computer and flatpanel displays. 202 Glossary infrared sensor - Keyboards and printers are physically located on the computer's system board. IrDA - Infrared Data Association - interrupt request - L LAN - A computer network covering a small area. LCD - integrated - input/...
Service Manual
Page 52
... the captive screws. If you feel resistance, check the connectors on the card and on the system board, and realign the card. Mobile Broadband or WWAN Card NOTICE: The connectors are keyed to the WLAN card, never place cables under the card. 1. Insert the WLAN card connector at ...a 45-degree angle into the system board connector labeled "WLAN". 2. Insert the WWAN card connector at a 45-degree angle into the system board connector labeled "WWAN". 2. Secure...
... the captive screws. If you feel resistance, check the connectors on the card and on the system board, and realign the card. Mobile Broadband or WWAN Card NOTICE: The connectors are keyed to the WLAN card, never place cables under the card. 1. Insert the WLAN card connector at ...a 45-degree angle into the system board connector labeled "WLAN". 2. Insert the WWAN card connector at a 45-degree angle into the system board connector labeled "WWAN". 2. Secure...
Service Manual
Page 53
...Card NOTICE: The connectors are keyed to the WPAN card, never place cables under the card. 1. NOTICE: To avoid damage to ensure correct insertion. Press the other end of the WPAN card down into the securing tabs until the card clicks into the system board connector labeled "WPAN". 2. Secure... unused antenna cables in the protective mylar sleeve. 5. If you feel resistance, check the connectors on the card and on the system board, and realign the card. Replace the cover and tighten the captive screws. Back to the WPAN card. 4. Insert the WPAN card connector at a...
...Card NOTICE: The connectors are keyed to the WPAN card, never place cables under the card. 1. NOTICE: To avoid damage to ensure correct insertion. Press the other end of the WPAN card down into the securing tabs until the card clicks into the system board connector labeled "WPAN". 2. Secure... unused antenna cables in the protective mylar sleeve. 5. If you feel resistance, check the connectors on the card and on the system board, and realign the card. Replace the cover and tighten the captive screws. Back to the WPAN card. 4. Insert the WPAN card connector at a...
Service Manual
Page 55
Replace the two M2 x 3-mm screws and secure the modem to ensure correct insertion. Replace the internal card with the screw holes on the system board. 4. Replace the hinge cover (see Replacing the Bluetooth Card). 7. Replace the optical drive (see Replacing the Keyboard). 9. Replace the keyboard (see... the base of the computer. 5. Replace the hard drive (see Replacing a Hard Drive). 11. NOTICE: The modem connectors are keyed to the system board and the base of the computer. 3. Back to the new modem. 2. If you feel resistance, check the connectors for proper alignment. 1....
Replace the two M2 x 3-mm screws and secure the modem to ensure correct insertion. Replace the internal card with the screw holes on the system board. 4. Replace the hinge cover (see Replacing the Bluetooth Card). 7. Replace the optical drive (see Replacing the Keyboard). 9. Replace the keyboard (see... the base of the computer. 5. Replace the hard drive (see Replacing a Hard Drive). 11. NOTICE: The modem connectors are keyed to the system board and the base of the computer. 3. Back to the new modem. 2. If you feel resistance, check the connectors for proper alignment. 1....


