Quick Reference Guide
Page 4
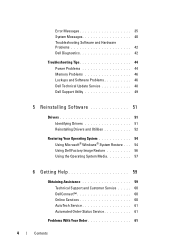
... System Messages 40 Troubleshooting Software and Hardware Problems 42 Dell Diagnostics 42 Troubleshooting Tips 44 Power Problems 44 Memory Problems 46 Lockups and Software Problems 46 Dell Technical Update Service 48 Dell Support Utility 49 5 Reinstalling Software 51 Drivers 51 Identifying Drivers 51 Reinstalling Drivers and Utilities 52 Restoring Your Operating System 54 Using Microsoft® Windows® System Restore . . . 54 Using Dell Factory Image Restore 56 Using the Operating System Media 57 6 Getting Help 59 Obtaining Assistance 59 Technical Support and Customer...
... System Messages 40 Troubleshooting Software and Hardware Problems 42 Dell Diagnostics 42 Troubleshooting Tips 44 Power Problems 44 Memory Problems 46 Lockups and Software Problems 46 Dell Technical Update Service 48 Dell Support Utility 49 5 Reinstalling Software 51 Drivers 51 Identifying Drivers 51 Reinstalling Drivers and Utilities 52 Restoring Your Operating System 54 Using Microsoft® Windows® System Restore . . . 54 Using Dell Factory Image Restore 56 Using the Operating System Media 57 6 Getting Help 59 Obtaining Assistance 59 Technical Support and Customer...
Quick Reference Guide
Page 16
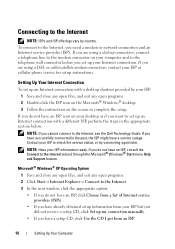
... the Internet, see the Dell Technology Guide. NOTE: Have your ISP information ready. Setting Up Your Internet Connection To set up my connection manually. • If you have a service outage. If you are using a DSL or cable/satellite modem connection, contact your ISP or cellular phone service for setup instructions. If you have successfully connected in the appropriate section below. NOTE: If you need a modem or network connection and an Internet service provider...
... the Internet, see the Dell Technology Guide. NOTE: Have your ISP information ready. Setting Up Your Internet Connection To set up my connection manually. • If you have a service outage. If you are using a DSL or cable/satellite modem connection, contact your ISP or cellular phone service for setup instructions. If you have successfully connected in the appropriate section below. NOTE: If you need a modem or network connection and an Internet service provider...

Quick Reference Guide
Page 34
... down the beep code. 2 Run the Dell™ Diagnostics to identify a more memory modules are detected installed, remove the modules, reinstall one module (see your computer beeps during start-up if the monitor cannot display errors or problems. This series of beeps, called a beep code, identifies a problem. If your Service Manual at support.dell.com). 3 If the problem persists, contact Dell. 3 Possible system Contact Dell. Code Description (repetitive short beeps) Suggested Remedy 1 BIOS checksum Contact Dell.
... down the beep code. 2 Run the Dell™ Diagnostics to identify a more memory modules are detected installed, remove the modules, reinstall one module (see your computer beeps during start-up if the monitor cannot display errors or problems. This series of beeps, called a beep code, identifies a problem. If your Service Manual at support.dell.com). 3 If the problem persists, contact Dell. 3 Possible system Contact Dell. Code Description (repetitive short beeps) Suggested Remedy 1 BIOS checksum Contact Dell.
Quick Reference Guide
Page 41
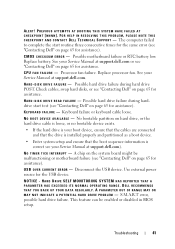
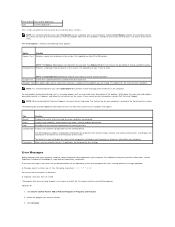
... hard drive failure during harddrive start routine three consecutive times for the same error (see "Contacting Dell" on page 65 for assistance). N O B O O T D E V I L U R E - A chip on the system board might be enabled or disabled in BIOS setup. S.M.A.R.T error, possible hard drive failure. Troubleshooting 41 Keyboard failure or keyboard cable loose. NOTICE - DELL RECOMMENDS THAT YOU BACK UP YOUR DATA REGULARLY. CMOS CHECKSUM ERROR - Replace battery. Check cables, swap hard disks, or see your Service Manual at support.dell.com). Use external power...
... hard drive failure during harddrive start routine three consecutive times for the same error (see "Contacting Dell" on page 65 for assistance). N O B O O T D E V I L U R E - A chip on the system board might be enabled or disabled in BIOS setup. S.M.A.R.T error, possible hard drive failure. Troubleshooting 41 Keyboard failure or keyboard cable loose. NOTICE - DELL RECOMMENDS THAT YOU BACK UP YOUR DATA REGULARLY. CMOS CHECKSUM ERROR - Replace battery. Check cables, swap hard disks, or see your Service Manual at support.dell.com). Use external power...
Quick Reference Guide
Page 42
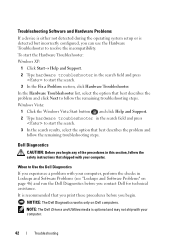
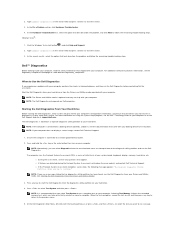
... the operating system setup or is detected but incorrectly configured, you can use the Hardware Troubleshooter to Use the Dell Diagnostics If you experience a problem with your computer, perform the checks in Lockups and Software Problems (see "Lockups and Software Problems" on Dell computers. In the Hardware Troubleshooter list, select the option that best describes the problem and follow the remaining troubleshooting steps. Windows Vista: 1 Click the Windows Vista Start button , and click Help and Support. 2 Type hardware troubleshooter in...
... the operating system setup or is detected but incorrectly configured, you can use the Hardware Troubleshooter to Use the Dell Diagnostics If you experience a problem with your computer, perform the checks in Lockups and Software Problems (see "Lockups and Software Problems" on Dell computers. In the Hardware Troubleshooter list, select the option that best describes the problem and follow the remaining troubleshooting steps. Windows Vista: 1 Click the Windows Vista Start button , and click Help and Support. 2 Type hardware troubleshooter in...
Quick Reference Guide
Page 43
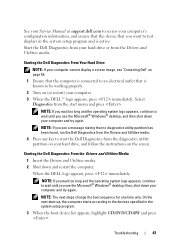
... the Dell Diagnostics from the Drivers and Utilities media. 4 Press any key to start the Dell Diagnostics from your computer cannot display a screen image, see the Microsoft® Windows® desktop; Troubleshooting 43 See your Service Manual at support.dell.com to review your computer's configuration information, and ensure that the device that you want to test displays in the system setup program. 3 When the boot device list appears, highlight CD/DVD/CD-RW...
... the Dell Diagnostics from the Drivers and Utilities media. 4 Press any key to start the Dell Diagnostics from your computer cannot display a screen image, see the Microsoft® Windows® desktop; Troubleshooting 43 See your Service Manual at support.dell.com to review your computer's configuration information, and ensure that the device that you want to test displays in the system setup program. 3 When the boot device list appears, highlight CD/DVD/CD-RW...
Quick Reference Guide
Page 45
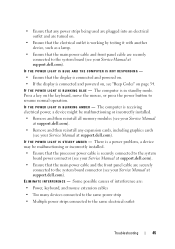
...; Power, keyboard, and mouse extension cables • Too many devices connected to the same power strip • Multiple power strips connected to resume normal operation. • Ensure that any expansion cards, including graphics cards (see your Service Manual at support.dell.com). There is a power problem, a device may be malfunctioning or incorrectly installed. • Remove and then reinstall all memory modules (see your Service Manual at support.dell.com). • Remove and then reinstall any power strips being used are...
...; Power, keyboard, and mouse extension cables • Too many devices connected to the same power strip • Multiple power strips connected to resume normal operation. • Ensure that any expansion cards, including graphics cards (see your Service Manual at support.dell.com). There is a power problem, a device may be malfunctioning or incorrectly installed. • Remove and then reinstall all memory modules (see your Service Manual at support.dell.com). • Remove and then reinstall any power strips being used are...
Quick Reference Guide
Page 48
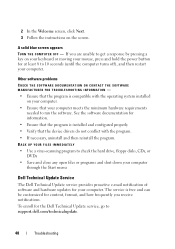
... Update service, go to check the hard drive, floppy disks, CDs, or DVDs • Save and close any open files or programs and shut down your computer through the Start menu Dell Technical Update Service The Dell Technical Update service provides proactive e-mail notification of software and hardware updates for your computer. 2 In the Welcome screen, click Next. 3 Follow the instructions on your keyboard or moving your mouse, press and hold the power button...
... Update service, go to check the hard drive, floppy disks, CDs, or DVDs • Save and close any open files or programs and shut down your computer through the Start menu Dell Technical Update Service The Dell Technical Update service provides proactive e-mail notification of software and hardware updates for your computer. 2 In the Welcome screen, click Next. 3 Follow the instructions on your keyboard or moving your mouse, press and hold the power button...
Quick Reference Guide
Page 58
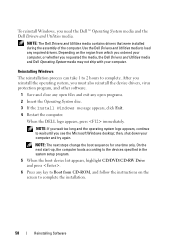
... steps change the boot sequence for one time only. then, shut down your computer. On the next start-up, the computer boots according to the devices specified in the system setup program. 5 When the boot device list appears, highlight CD/DVD/CD-RW Drive and press . 6 Press any key to Boot from CD-ROM, and follow the instructions on the region from which you ordered your...
... steps change the boot sequence for one time only. then, shut down your computer. On the next start-up, the computer boots according to the devices specified in the system setup program. 5 When the boot device list appears, highlight CD/DVD/CD-RW Drive and press . 6 Press any key to Boot from CD-ROM, and follow the instructions on the region from which you ordered your...
Service Manual
Page 7
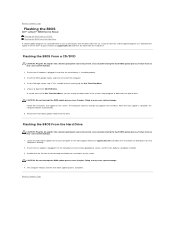
... to boot from the CD. Insert the BIOS-update media, and turn on the screen. Doing so may cause system damage. 1. The computer continues to prevent a loss of times to Contents Page Flashing the BIOS Dell™ Latitude™ E6500 Service Manual Flashing the BIOS From a CD/DVD Flashing the BIOS From the Hard Drive If a BIOS-update program CD is properly installed. 3. Remove the flash BIOS update media from the Dell™ Support website at support.dell.com and follow the instructions...
... to boot from the CD. Insert the BIOS-update media, and turn on the screen. Doing so may cause system damage. 1. The computer continues to prevent a loss of times to Contents Page Flashing the BIOS Dell™ Latitude™ E6500 Service Manual Flashing the BIOS From a CD/DVD Flashing the BIOS From the Hard Drive If a BIOS-update program CD is properly installed. 3. Remove the flash BIOS update media from the Dell™ Support website at support.dell.com and follow the instructions...
Service Manual
Page 10
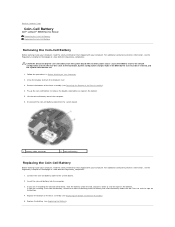
... are installing a new coin-cell battery, remove the adhesive backing from the system board with no other power source causes the BIOS to reset to the default configuration and sets the real-time clock to the build date. Lift the coin-cell battery out of the base assembly (see the Regulatory Compliance Homepage at : www.dell.com/regulatory_compliance. 1. System configuration changes made in Before Working on...
... are installing a new coin-cell battery, remove the adhesive backing from the system board with no other power source causes the BIOS to reset to the default configuration and sets the real-time clock to the build date. Lift the coin-cell battery out of the base assembly (see the Regulatory Compliance Homepage at : www.dell.com/regulatory_compliance. 1. System configuration changes made in Before Working on...

Service Manual
Page 38
... B 8 GB DIMM A and DIMM B Windows XP Windows Vista X X X X X X X X X X Your computer has two user-accessible SODIMM sockets, referred to as a connector on Your Computer. 2. To remove the DIMM B module, spread away the retaining clips from Dell are covered under your computer may contain an additional module for improved system memory performance. Back to Contents Page Memory Dell™ Latitude™ E6500 Service Manual Removing a Memory Module Replacing a Memory Module Operation of the computer. If the...
... B 8 GB DIMM A and DIMM B Windows XP Windows Vista X X X X X X X X X X Your computer has two user-accessible SODIMM sockets, referred to as a connector on Your Computer. 2. To remove the DIMM B module, spread away the retaining clips from Dell are covered under your computer may contain an additional module for improved system memory performance. Back to Contents Page Memory Dell™ Latitude™ E6500 Service Manual Removing a Memory Module Replacing a Memory Module Operation of the computer. If the...
Service Manual
Page 40
.... Back to the system board. No error message indicates this failure. 5. As the computer boots, it using procedures in place. If a memory module is installed into the socket connector at the side edges, align the slot in the module edge connector with the key in the computer: l In the Microsoft® Windows Vista® operating system, click Start ® Help and Support ® Computer Information. Insert...
.... Back to the system board. No error message indicates this failure. 5. As the computer boots, it using procedures in place. If a memory module is installed into the socket connector at the side edges, align the slot in the module edge connector with the key in the computer: l In the Microsoft® Windows Vista® operating system, click Start ® Help and Support ® Computer Information. Insert...
Service Manual
Page 48
...and unroute the power cable. 20. Remove the bottom of the base assembly (see Removing the Bottom of the base assembly to Contents Page Power Module Dell™ Latitude™ E6500 Service Manual Removing the Power Module Replacing the Power Module Removing the Power Module Before working inside your computer. Remove the coin-cell battery (see Removing the LED Cover). 8. Remove the LED cover (see Removing the Coin-Cell Battery). 5. Remove the keyboard (see Removing the Fan). 11. Speaker and Fingerprint Reader Cover). 10. Remove the fan (see Removing the Keyboard). 9.
...and unroute the power cable. 20. Remove the bottom of the base assembly (see Removing the Bottom of the base assembly to Contents Page Power Module Dell™ Latitude™ E6500 Service Manual Removing the Power Module Replacing the Power Module Removing the Power Module Before working inside your computer. Remove the coin-cell battery (see Removing the LED Cover). 8. Remove the LED cover (see Removing the Coin-Cell Battery). 5. Remove the keyboard (see Removing the Fan). 11. Speaker and Fingerprint Reader Cover). 10. Remove the fan (see Removing the Keyboard). 9.
Service Manual
Page 56
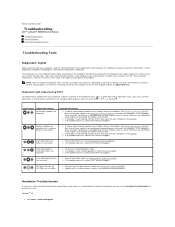
... (see Removing the Display Assembly). l Reseat any installed graphics cards. Hardware Troubleshooter If a device is either On , Off , or Flashing . If the computer starts normally, continue to install additional memory modules (one module (see the Dell™ Technology Guide on the Dell Support website at a time) until you can use the Hardware Troubleshooter to Contents Page Troubleshooting Dell™ Latitude™ E6500 Service Manual Troubleshooting Tools Solving Problems Dell Technical Update Service Troubleshooting Tools Diagnostic Lights Before working memory of...
... (see Removing the Display Assembly). l Reseat any installed graphics cards. Hardware Troubleshooter If a device is either On , Off , or Flashing . If the computer starts normally, continue to install additional memory modules (one module (see the Dell™ Technology Guide on the Dell Support website at a time) until you can use the Hardware Troubleshooter to Contents Page Troubleshooting Dell™ Latitude™ E6500 Service Manual Troubleshooting Tools Solving Problems Dell Technical Update Service Troubleshooting Tools Diagnostic Lights Before working memory of...
Service Manual
Page 57
...: "Booting Dell Diagnostic Utility Partition. Starting the Dell Diagnostics From Your Hard Drive Before running the Dell Diagnostics, enter system setup to follow the remaining troubleshooting steps. NOTE: If your system board, keyboard, display, memory, hard drive, etc. ¡ During the assessment, answer any key to run the Dell Diagnostics from the Drivers and Utilities media provided with your computer, perform the checks in system setup and is located on a separate diagnostic utility partition on your hard drive. The...
...: "Booting Dell Diagnostic Utility Partition. Starting the Dell Diagnostics From Your Hard Drive Before running the Dell Diagnostics, enter system setup to follow the remaining troubleshooting steps. NOTE: If your system board, keyboard, display, memory, hard drive, etc. ¡ During the assessment, answer any key to run the Dell Diagnostics from the Drivers and Utilities media provided with your computer, perform the checks in system setup and is located on a separate diagnostic utility partition on your hard drive. The...
Service Manual
Page 59
... or more . Custom Test Use to test a specific device or customize the tests to run from System Setup, memory, and various internal tests, and displays the information in the device list in the system. NOTE: It is selected, the following tabs provide additional information for all components installed on the screen. Errors Displays error conditions encountered, error codes, and the problem description. Configuration Displays the hardware configuration for running when the...
... or more . Custom Test Use to test a specific device or customize the tests to run from System Setup, memory, and various internal tests, and displays the information in the device list in the system. NOTE: It is selected, the following tabs provide additional information for all components installed on the screen. Errors Displays error conditions encountered, error codes, and the problem description. Configuration Displays the hardware configuration for running when the...

Service Manual
Page 64
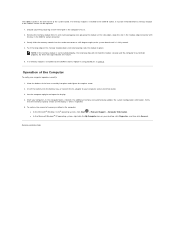
... your mouse, press and hold the power button for information. Power Problems Before working inside your computer. l Reseat the memory modules (see Memory) to get a response by your computer on the screen. For more information about the type of Windows. 2. l If necessary, uninstall and then reinstall the program. l Ensure that your computer meets the minimum hardware requirements needed to see the Setup and Quick Reference Guide for...
... your mouse, press and hold the power button for information. Power Problems Before working inside your computer. l Reseat the memory modules (see Memory) to get a response by your computer on the screen. For more information about the type of Windows. 2. l If necessary, uninstall and then reinstall the program. l Ensure that your computer meets the minimum hardware requirements needed to see the Setup and Quick Reference Guide for...
Service Manual
Page 65
... computer. See the Setup and Quick Reference Guide for interference. If the power light is green and the computer is not receiving power. l Bypass power strips, power extension cables, and other media players may override the Windows volume setting. Adjust the Windows volume control Click or double-click the speaker icon in MP3 and other power protection devices to the same electrical outlet Sound and Speaker Problems Before working by testing it...
... computer. See the Setup and Quick Reference Guide for interference. If the power light is green and the computer is not receiving power. l Bypass power strips, power extension cables, and other media players may override the Windows volume setting. Adjust the Windows volume control Click or double-click the speaker icon in MP3 and other power protection devices to the same electrical outlet Sound and Speaker Problems Before working by testing it...
Service Manual
Page 66
... support.dell.com. Try different settings for content, format, and how frequently you want to support.dell.com. Click the area you receive notifications. Only part of software and hardware updates for troubleshooting purposes. Dell Technical Update Service The Dell Technical Update service provides proactive e-mail notification of the display is required for your graphics card, go to Contents Page Windows Vista: 1. Adjust Resolution and Colors settings, as needed. If the external monitor works, the computer display or video controller...
... support.dell.com. Try different settings for content, format, and how frequently you want to support.dell.com. Click the area you receive notifications. Only part of software and hardware updates for troubleshooting purposes. Dell Technical Update Service The Dell Technical Update service provides proactive e-mail notification of the display is required for your graphics card, go to Contents Page Windows Vista: 1. Adjust Resolution and Colors settings, as needed. If the external monitor works, the computer display or video controller...


