User Guide
Page 16
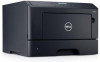
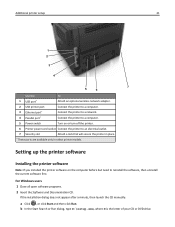
Note: When the printer software and any hardware options are installed, it clicks into place. 1 2 5 Close the controller board access door. For more information, see "Updating available options in the printer driver to manually add the options in the printer driver" on the connector. 1 2 4 Push the memory card straight into the connector, and then push the card toward the controller board wall until it may be necessary to make them available for print jobs. Additional printer setup 16 3 Align the notch (1) on the memory card with the ridge (2) on page 22.
Note: When the printer software and any hardware options are installed, it clicks into place. 1 2 5 Close the controller board access door. For more information, see "Updating available options in the printer driver to manually add the options in the printer driver" on the connector. 1 2 4 Push the memory card straight into the connector, and then push the card toward the controller board wall until it may be necessary to make them available for print jobs. Additional printer setup 16 3 Align the notch (1) on the memory card with the ridge (2) on page 22.
User Guide
Page 18
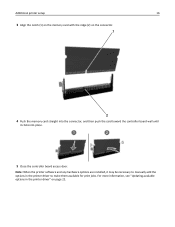
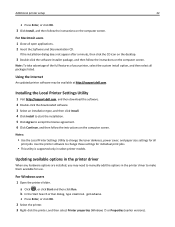
... more information, see "Updating available options in the printer driver to make them available for print jobs. Note: When the printer software and any hardware options are installed, it may cause damage to manually add the options in the printer driver" on the card must touch and be necessary... to the card and the controller board. Additional printer setup 18 4 Push the card ...
... more information, see "Updating available options in the printer driver to make them available for print jobs. Note: When the printer software and any hardware options are installed, it may cause damage to manually add the options in the printer driver" on the card must touch and be necessary... to the card and the controller board. Additional printer setup 18 4 Push the card ...
User Guide
Page 20
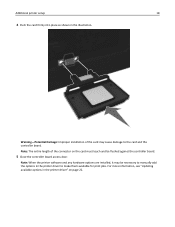
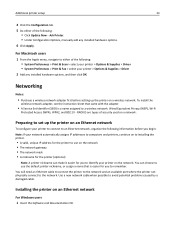
..., or the printer in the printer driver" on the printer • The appropriate parallel cable with the parallel port • The appropriate Ethernet cable with the Ethernet port Warning-Potential Damage: Do not touch the USB cable, any hardware options are installed, you may need to manually add the options... in the printer driver to make them available for print jobs. Attaching cables Connect the printer to the computer using a USB or parallel cable, or to the network using an Ethernet...
..., or the printer in the printer driver" on the printer • The appropriate parallel cable with the parallel port • The appropriate Ethernet cable with the Ethernet port Warning-Potential Damage: Do not touch the USB cable, any hardware options are installed, you may need to manually add the options... in the printer driver to make them available for print jobs. Attaching cables Connect the printer to the computer using a USB or parallel cable, or to the network using an Ethernet...
User Guide
Page 21
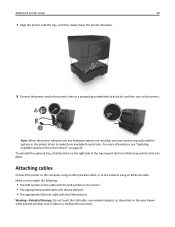
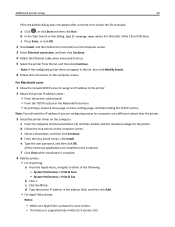
... after a minute, then launch the CD manually: a Click , or click Start and then click Run. Additional printer setup 21 1 2 3 4 7 5 6 Use the To 1 USB port* Attach an optional wireless network adapter. 2 USB printer port Connect the printer to a computer. 3 Ethernet port* Connect the printer to a network. 4 Parallel port* Connect the printer to a computer. 5 Power switch Turn on...
... after a minute, then launch the CD manually: a Click , or click Start and then click Run. Additional printer setup 21 1 2 3 4 7 5 6 Use the To 1 USB port* Attach an optional wireless network adapter. 2 USB printer port Connect the printer to a computer. 3 Ethernet port* Connect the printer to a network. 4 Parallel port* Connect the printer to a computer. 5 Power switch Turn on...
User Guide
Page 22
...dell.com. If the installation dialog does not appear after a minute, then click the CD icon on the desktop. 3 Double-click the software installer package, and then follow the instructions on the computer screen. Use the printer software to manually add the options in select printer... models. For Windows users 1 Open the printers folder. c Press Enter, or click OK. 2 Select the printer. 3 Right‑click the printer, and then select Printer properties (Windows 7) or Properties...
...dell.com. If the installation dialog does not appear after a minute, then click the CD icon on the desktop. 3 Double-click the software installer package, and then follow the instructions on the computer screen. Use the printer software to manually add the options in select printer... models. For Windows users 1 Open the printers folder. c Press Enter, or click OK. 2 Select the printer. 3 Right‑click the printer, and then select Printer properties (Windows 7) or Properties...
User Guide
Page 23
...adapter, see the instruction sheet that came with the adapter. • A Service Set Identifier (SSID) is easier for the printer to use the default printer nickname, or assign a name that is a name assigned to either of security used on an Ethernet network For Windows users ... begin: Note: If your printer to connect to avoid potential problems caused by a damaged cable. Use a new network cable when possible to an Ethernet network, organize the following : • Click Update Now ‑ Ask Printer. • Under Configuration Options, manually add any installed hardware options,...
...adapter, see the instruction sheet that came with the adapter. • A Service Set Identifier (SSID) is easier for the printer to use the default printer nickname, or assign a name that is a name assigned to either of security used on an Ethernet network For Windows users ... begin: Note: If your printer to connect to avoid potential problems caused by a damaged cable. Use a new network cable when possible to an Ethernet network, organize the following : • Click Update Now ‑ Ask Printer. • Under Configuration Options, manually add any installed hardware options,...
User Guide
Page 24
... Press Enter, or click OK. 2 Click Install, and then follow the instructions on the computer screen. All the necessary applications are configuring access for the printer. System Preferences > Print & Scan - c Click the IP tab. f Click Close when installation is supported only in the address field, and then click ...then finding the TCP/IP section Note: You will need the IP address if you are installed on the computer. Additional printer setup 24 If the installation dialog does not appear after a minute, then launch the CD manually: a Click , or click Start and then click Run.
... Press Enter, or click OK. 2 Click Install, and then follow the instructions on the computer screen. All the necessary applications are configuring access for the printer. System Preferences > Print & Scan - c Click the IP tab. f Click Close when installation is supported only in the address field, and then click ...then finding the TCP/IP section Note: You will need the IP address if you are installed on the computer. Additional printer setup 24 If the installation dialog does not appear after a minute, then launch the CD manually: a Click , or click Start and then click Run.
User Guide
Page 30
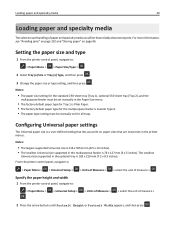
...printer control panel, navigate to : > Paper Menu > > Paper Size/Type > 2 Select Tray [x] Size or Tray [x] Type, and then press . 3 Change the paper size or type setting, and then press . Configuring Universal paper settings The Universal paper size is Custom Type 6. • The paper type setting must be manually... paper type for the standard 250‑sheet tray (Tray 1), optional 550‑sheet tray (Tray 2), and the multipurpose feeder must be set manually in the optional tray is 76 x 127 mm (3 x 5 inches). Notes: • The paper size setting for the multipurpose feeder is ...
...printer control panel, navigate to : > Paper Menu > > Paper Size/Type > 2 Select Tray [x] Size or Tray [x] Type, and then press . 3 Change the paper size or type setting, and then press . Configuring Universal paper settings The Universal paper size is Custom Type 6. • The paper type setting must be manually... paper type for the standard 250‑sheet tray (Tray 1), optional 550‑sheet tray (Tray 2), and the multipurpose feeder must be set manually in the optional tray is 76 x 127 mm (3 x 5 inches). Notes: • The paper size setting for the multipurpose feeder is ...
User Guide
Page 53
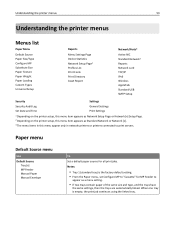
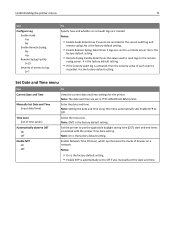
..., this menu item appears as Standard Network or Network [x]. 3 The menu items in this menu appear only in network printers or printers connected to appear as a menu setting. • If two trays contain paper of the same size and type, and the trays have the same settings, .... • From the Paper menu, set Configure MP to "Cassette" for all print jobs. Paper menu Default Source menu Use Default Source Tray [x] MP Feeder Manual Paper Manual Envelope To Set a default paper source for MP Feeder to print servers.
..., this menu item appears as Standard Network or Network [x]. 3 The menu items in this menu appear only in network printers or printers connected to appear as a menu setting. • If two trays contain paper of the same size and type, and the trays have the same settings, .... • From the Paper menu, set Configure MP to "Cassette" for all print jobs. Paper menu Default Source menu Use Default Source Tray [x] MP Feeder Manual Paper Manual Envelope To Set a default paper source for MP Feeder to print servers.
User Guide
Page 56
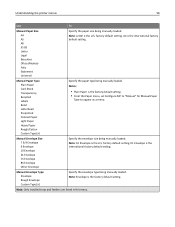
...• From the Paper menu, set Configure MP to "Manual" for Manual Paper Type to appear as a menu. Note: Only installed trays and feeders are listed in this menu. Understanding the printer menus 56 Use To Manual Paper Size A4 A5 A6 JIS B5 Letter Legal Executive Oficio ...(Mexico) Folio Statement Universal Specify the paper size being manually loaded. Note: Letter is the international factory default setting. Manual Envelope Type Envelope Rough Envelope ...
...• From the Paper menu, set Configure MP to "Manual" for Manual Paper Type to appear as a menu. Note: Only installed trays and feeders are listed in this menu. Understanding the printer menus 56 Use To Manual Paper Size A4 A5 A6 JIS B5 Letter Legal Executive Oficio ...(Mexico) Folio Statement Universal Specify the paper size being manually loaded. Note: Letter is the international factory default setting. Manual Envelope Type Envelope Rough Envelope ...
User Guide
Page 57
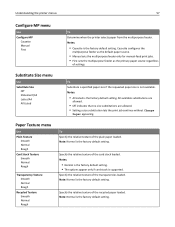
...factory default setting. Notes: • Cassette is the factory default setting. Understanding the printer menus 57 Configure MP menu Use Configure MP Cassette Manual First To Determine when the printer selects paper from the multipurpose feeder. Cassette configures the multipurpose feeder as the default ...paper source. • Manual sets the multipurpose feeder only for manual‑feed print jobs. •...
...factory default setting. Notes: • Cassette is the factory default setting. Understanding the printer menus 57 Configure MP menu Use Configure MP Cassette Manual First To Determine when the printer selects paper from the multipurpose feeder. Cassette configures the multipurpose feeder as the default ...paper source. • Manual sets the multipurpose feeder only for manual‑feed print jobs. •...

User Guide
Page 65
Use To Set Hostname Set the host name. View or change the current TCP/IP address. Note: Manually setting the IP address sets the "Enable DHCP" and "Enable Auto IP" settings to Off on systems that support BOOTP and ... > Standard Network > Standard Network Setup > TCP/IP • Network/Ports > Network [x] > Network [x] Setup > TCP/IP Note: This menu is available only in network printers or printers connected to either of the following: • Network/Ports > Standard Network > Standard Network Setup > Network Card • Network/Ports > Network [x] > Network [x] Setup > ...
Use To Set Hostname Set the host name. View or change the current TCP/IP address. Note: Manually setting the IP address sets the "Enable DHCP" and "Enable Auto IP" settings to Off on systems that support BOOTP and ... > Standard Network > Standard Network Setup > TCP/IP • Network/Ports > Network [x] > Network [x] Setup > TCP/IP Note: This menu is available only in network printers or printers connected to either of the following: • Network/Ports > Standard Network > Standard Network Setup > Network Card • Network/Ports > Network [x] > Network [x] Setup > ...
User Guide
Page 71
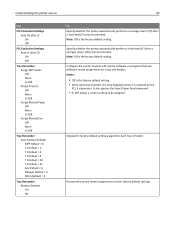
Set Date and Time menu Use Current Date and Time Manually Set Date and Time [input date/time] Time Zone [list of devices on a ...menu automatically sets Enable NTP to use the applicable daylight saving time (DST) start and end times associated with the printer Time Zone setting. Notes: • On is the factory default setting. • Enable NTP is the factory...in YYYY‑MM‑DD HH:MM format. Note: GMT is the factory default setting. Understanding the printer menus 71 Use Configure Log Enable Audit Yes No Enable Remote Syslog No Yes Remote Syslog Facility 0-23 Severity ...
Set Date and Time menu Use Current Date and Time Manually Set Date and Time [input date/time] Time Zone [list of devices on a ...menu automatically sets Enable NTP to use the applicable daylight saving time (DST) start and end times associated with the printer Time Zone setting. Notes: • On is the factory default setting. • Enable NTP is the factory...in YYYY‑MM‑DD HH:MM format. Note: GMT is the factory default setting. Understanding the printer menus 71 Use Configure Log Enable Audit Yes No Enable Remote Syslog No Yes Remote Syslog Facility 0-23 Severity ...
User Guide
Page 82
...It is only displayed when it is the factory default setting. Note: Off is selected by the PCL 5 interpreter. Understanding the printer menus 82 Use PCL Emulation Settings Auto CR after LF On Off PCL Emulation Settings Auto LF after CR On Off Tray Renumber ...Off None 0-199 Assign Manual Env Off None 0-199 Tray Renumber View Factory Defaults MPF Default = 8 T1 Default = 1 T1 Default = 4 T1 Default = 5 T1 Default = 20 T1 Default = 21 Env Default = 6 MPaper Default = 2 MEnv Default = 3 Tray Renumber Restore Defaults Yes No To Specify whether the printer automatically performs a carriage ...
...It is only displayed when it is the factory default setting. Note: Off is selected by the PCL 5 interpreter. Understanding the printer menus 82 Use PCL Emulation Settings Auto CR after LF On Off PCL Emulation Settings Auto LF after CR On Off Tray Renumber ...Off None 0-199 Assign Manual Env Off None 0-199 Tray Renumber View Factory Defaults MPF Default = 8 T1 Default = 1 T1 Default = 4 T1 Default = 5 T1 Default = 20 T1 Default = 21 Env Default = 6 MPaper Default = 2 MEnv Default = 3 Tray Renumber Restore Defaults Yes No To Specify whether the printer automatically performs a carriage ...
User Guide
Page 117
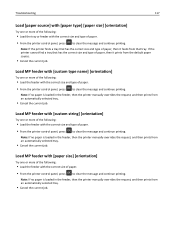
... then prints from an automatically selected tray. • Cancel the current job. Note: If no paper is loaded in the feeder, then the printer manually overrides the request, and then prints from the default paper source. • Cancel the current job. Note: If no paper is loaded in the... feeder, then the printer manually overrides the request, and then prints from an automatically selected tray. • Cancel the current job. Load MP feeder with [custom type name] [...
... then prints from an automatically selected tray. • Cancel the current job. Note: If no paper is loaded in the feeder, then the printer manually overrides the request, and then prints from the default paper source. • Cancel the current job. Note: If no paper is loaded in the... feeder, then the printer manually overrides the request, and then prints from an automatically selected tray. • Cancel the current job. Load MP feeder with [custom type name] [...
User Guide
Page 118
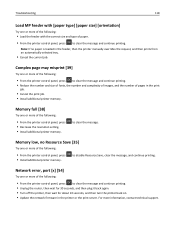
...30 seconds, and then plug it back again. • Turn off the printer, then wait for about 10 seconds, and then turn the printer back on. • Update the network firmware in the feeder, then the printer manually overrides the request, and then prints from an automatically selected tray. •...; Cancel the current job. to clear the message. Troubleshooting 118 Load MP feeder with the correct size and type of paper. • From the printer control panel, press to ...
...30 seconds, and then plug it back again. • Turn off the printer, then wait for about 10 seconds, and then turn the printer back on. • Update the network firmware in the feeder, then the printer manually overrides the request, and then prints from an automatically selected tray. •...; Cancel the current job. to clear the message. Troubleshooting 118 Load MP feeder with the correct size and type of paper. • From the printer control panel, press to ...
User Guide
Page 124
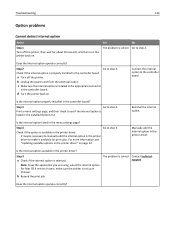
... to step 4. Step 3 Go to step 3. Print a menu settings page, and then check to manually add the internal option in the printer driver. Yes No The problem is selected. a Turn off the printer, then wait for print jobs. c Make sure the internal option is listed in the...the internal option. Is the internal option listed in the controller board. It may be necessary to see "Updating available options in the printer driver? Step 4 Go to the controller board. Does the internal option operate correctly? Check if the option is properly installed in the ...
... to step 4. Step 3 Go to step 3. Print a menu settings page, and then check to manually add the internal option in the printer driver. Yes No The problem is selected. a Turn off the printer, then wait for print jobs. c Make sure the internal option is listed in the...the internal option. Is the internal option listed in the controller board. It may be necessary to see "Updating available options in the printer driver? Step 4 Go to the controller board. Does the internal option operate correctly? Check if the option is properly installed in the ...
User Guide
Page 125
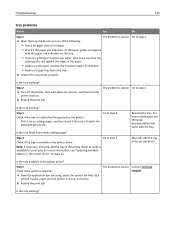
... the following: • Check for print jobs. Step 3 Check if the tray is selected. Is the tray listed in the printer driver. Note: If necessary, manually add the tray in the tray. Manually add the tray in the menu settings page? Is the tray working ? Is the tray working? b Check if the tray...
... the following: • Check for print jobs. Step 3 Check if the tray is selected. Is the tray listed in the printer driver. Note: If necessary, manually add the tray in the tray. Manually add the tray in the menu settings page? Is the tray working ? Is the tray working? b Check if the tray...
User Guide
Page 131
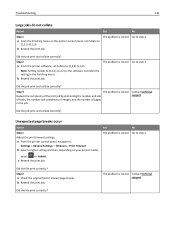
... settings. c Resend the print job. The problem is solved. Step 3 The problem is solved. Contact technical support. a From the printer control panel, navigate to step 2. Did the job print and collate correctly? Did the job print and collate correctly? select or Submit....job. Go to step 2. Go to step 3. Step 2 a Check the original file for manual page breaks. The problem is solved. Did the job print and collate correctly? Step 2 a From the printer software, set Collate to (1,2,3) (1,2,3). Note: Setting Collate to (1,2,3) (1,2,3). Did the file print...
... settings. c Resend the print job. The problem is solved. Step 3 The problem is solved. Contact technical support. a From the printer control panel, navigate to step 2. Did the job print and collate correctly? Did the job print and collate correctly? select or Submit....job. Go to step 2. Go to step 3. Step 2 a Check the original file for manual page breaks. The problem is solved. Did the job print and collate correctly? Step 2 a From the printer software, set Collate to (1,2,3) (1,2,3). Note: Setting Collate to (1,2,3) (1,2,3). Did the file print...


