
User's Guide
Page 26
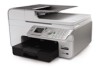
..., you must be connected to a telephone line before you lift to gain access to the ink cartridges. Unit you can send a fax. You do not need to connect your printer to a computer to print, scan, or use to control copying, scanning, faxing, and printing.... NOTE: The printer (whether it is connected to a computer, you use the Save Photos to increase the amount of things. For more information, see Understanding the Operator Panel. Understanding the Printer Parts Number: Part: 1 Automatic Document Feeder (ADF) 2 Scanner...
..., you must be connected to a telephone line before you lift to gain access to the ink cartridges. Unit you can send a fax. You do not need to connect your printer to a computer to print, scan, or use to control copying, scanning, faxing, and printing.... NOTE: The printer (whether it is connected to a computer, you use the Save Photos to increase the amount of things. For more information, see Understanding the Operator Panel. Understanding the Printer Parts Number: Part: 1 Automatic Document Feeder (ADF) 2 Scanner...
User's Guide
Page 27
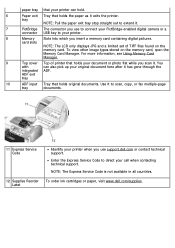
ADF exit tray 10 ADF input Tray that holds your document or photo flat while you use to connect your PictBridge-enabled digital camera or a connector USB key to scan, copy, or fax multiple-page tray documents. 11 ... your original document here after it exits the printer. Use it . 7 PictBridge The connector you insert a memory card containing digital pictures. NOTE: The Express Service Code is not available in all countries. 12 Supplies Reorder Label To order ink cartridges or paper, visit www.dell.com/supplies. tray NOTE: Pull the paper exit...
ADF exit tray 10 ADF input Tray that holds your document or photo flat while you use to connect your PictBridge-enabled digital camera or a connector USB key to scan, copy, or fax multiple-page tray documents. 11 ... your original document here after it exits the printer. Use it . 7 PictBridge The connector you insert a memory card containing digital pictures. NOTE: The Express Service Code is not available in all countries. 12 Supplies Reorder Label To order ink cartridges or paper, visit www.dell.com/supplies. tray NOTE: Pull the paper exit...
User's Guide
Page 30
When the printer is on or in the Power Save state, press and hold the Power button for 2 seconds to turn your printer in a Power Save state. NOTE: Do not unplug your printer off. When the printer is off, it requires up to 1 watt of power to put your printer on cartridges. 9 Power button When the printer is off, press the Power button to turn your printer from the electrical outlet when not in use. Your printer consumes minimal power in this state. When the printer is on, press the Power button to perform regular maintenance on .
When the printer is on or in the Power Save state, press and hold the Power button for 2 seconds to turn your printer in a Power Save state. NOTE: Do not unplug your printer off. When the printer is off, it requires up to 1 watt of power to put your printer on cartridges. 9 Power button When the printer is off, press the Power button to turn your printer from the electrical outlet when not in use. Your printer consumes minimal power in this state. When the printer is on, press the Power button to perform regular maintenance on .
User's Guide
Page 35
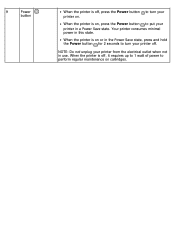
... Preferences when a document is attached to the printer settings from the Printers folder become the default settings for all Black Printing. b. Click Hardware and Sound. Click File® Print. Select Automatic, Draft, Normal, or Photo depending on the program or operating system). Select... box if you have selected Use Color Cartridge for most programs. The Printing Preferences dialog box has three sections: Tab Print Setup Options Quality/Speed - The Printing Preferences dialog box opens. Right-click the Dell 968 AIO Printer icon. 3. Draft is arranged on the...
... Preferences when a document is attached to the printer settings from the Printers folder become the default settings for all Black Printing. b. Click Hardware and Sound. Click File® Print. Select Automatic, Draft, Normal, or Photo depending on the program or operating system). Select... box if you have selected Use Color Cartridge for most programs. The Printing Preferences dialog box has three sections: Tab Print Setup Options Quality/Speed - The Printing Preferences dialog box opens. Right-click the Dell 968 AIO Printer icon. 3. Draft is arranged on the...
User's Guide
Page 36
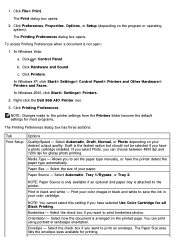
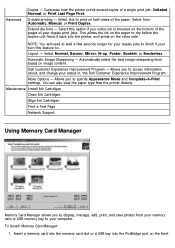
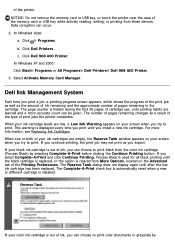
... Maintenance Install Ink Cartridges Clean Ink Cartridges Align Ink Cartridges Print a Test Page Network Support Using Memory Card Manager Memory Card Manager allows you to display, manage, edit, print, and save photos from Automatic, Manual...allows the ink on the bottom of the pages of your status in, the Dell Customer Experience Improvement Program. Allows you to finish if your turn this option if...Select Normal, Banner, Mirror, N-up, Poster, Booklet, or Borderless. Customize how the printer prints several copies of the paper. Select from your duplex jobs to specify Appearance Mode...
... Maintenance Install Ink Cartridges Clean Ink Cartridges Align Ink Cartridges Print a Test Page Network Support Using Memory Card Manager Memory Card Manager allows you to display, manage, edit, print, and save photos from Automatic, Manual...allows the ink on the bottom of the pages of your status in, the Dell Customer Experience Improvement Program. Allows you to finish if your turn this option if...Select Normal, Banner, Mirror, N-up, Poster, Booklet, or Borderless. Customize how the printer prints several copies of the paper. Select from your duplex jobs to specify Appearance Mode...
User's Guide
Page 37
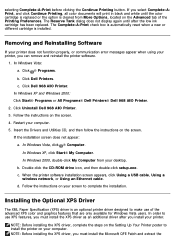
.... If your color ink cartridge is hidden during the first 50 pages of pages remaining in grayscale by selecting Complete-A-Print before clicking the Continue Printing button. Click ® Programs. b. In Windows XP and 2000: Click Start® Programs or All Programs® Dell Printers® Dell 968 AIO Printer. 3. Dell Ink Management System Each time...
.... If your color ink cartridge is hidden during the first 50 pages of pages remaining in grayscale by selecting Complete-A-Print before clicking the Continue Printing button. Click ® Programs. b. In Windows XP and 2000: Click Start® Programs or All Programs® Dell Printers® Dell 968 AIO Printer. 3. Dell Ink Management System Each time...
User's Guide
Page 38
...Follow the instructions on the screen. In Windows Vista, click ® Computer. When the printer software installation screen appears, click Using a USB cable, Using a wireless network, or Using an Ethernet cable. If you must install the Microsoft QFE Patch and extract...or different cartridge is an optional printer driver designed to use of the Printing Preferences. Click ® Programs. b. Click Dell Printers. Click Dell 968 AIO Printer. In Windows XP and WIndows 2000: Click Start® Programs or All Programs® Dell Printers® Dell 968 AIO Printer. 2. ...
...Follow the instructions on the screen. In Windows Vista, click ® Computer. When the printer software installation screen appears, click Using a USB cable, Using a wireless network, or Using an Ethernet cable. If you must install the Microsoft QFE Patch and extract...or different cartridge is an optional printer driver designed to use of the Printing Preferences. Click ® Programs. b. Click Dell Printers. Click Dell 968 AIO Printer. In Windows XP and WIndows 2000: Click Start® Programs or All Programs® Dell Printers® Dell 968 AIO Printer. 2. ...
User's Guide
Page 75
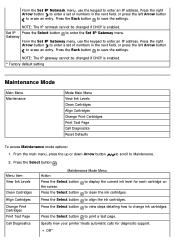
...menu, press the up or down Arrow button to scroll to enter the Set IP Gateway menu. Specify how your printer treats automatic calls for each cartridge on the screen. NOTE: The IP netmask cannot be changed if DHCP is enabled. * Factory default setting Maintenance Mode... Main Menu Maintenance Mode Main Menu View Ink Levels Clean Cartridges Align Cartridges Change Print Cartridges Print Test Page Call Diagnostics Reset Defaults To access Maintenance mode options: 1. Press the right Arrow button to enter a ...
...menu, press the up or down Arrow button to scroll to enter the Set IP Gateway menu. Specify how your printer treats automatic calls for each cartridge on the screen. NOTE: The IP netmask cannot be changed if DHCP is enabled. * Factory default setting Maintenance Mode... Main Menu Maintenance Mode Main Menu View Ink Levels Clean Cartridges Align Cartridges Change Print Cartridges Print Test Page Call Diagnostics Reset Defaults To access Maintenance mode options: 1. Press the right Arrow button to enter a ...
User's Guide
Page 87
... process. Click Start® Programs or All Programs® Dell Printers® Dell 968 AIO Printer. 2. The Wireless Setup Utility steps you need to be installed. The printer is turned on and ready to adjust the wireless adapter settings after installation, the CD is attached to a ...security key(s) for the network, and then click Next. 4. The ink cartridges are correct, and then click Next to manually enter the network configuration settings. Click Wireless Setup Utility. Launch the Wireless Setup Utility. Before configuring the adapter, make sure the settings are installed ...
... process. Click Start® Programs or All Programs® Dell Printers® Dell 968 AIO Printer. 2. The Wireless Setup Utility steps you need to be installed. The printer is turned on and ready to adjust the wireless adapter settings after installation, the CD is attached to a ...security key(s) for the network, and then click Next. 4. The ink cartridges are correct, and then click Next to manually enter the network configuration settings. Click Wireless Setup Utility. Launch the Wireless Setup Utility. Before configuring the adapter, make sure the settings are installed ...
User's Guide
Page 92
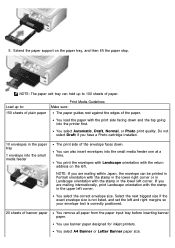
... the small media feeder The print side of the paper. You select the correct envelope size. You select Automatic, Draft, Normal, or Photo print quality. Extend the paper support on the left corner. You print the envelopes with Landscape orientation with the print side facing down ....correctly positioned. 20 sheets of paper. You use banner paper designed for inkjet printers. Do not select Draft if you have a Photo cartridge installed. 10 envelopes in the paper tray 1 envelope into the small media feeder one at a time. NOTE: If you are mailing within Japan, the envelope ...
... the small media feeder The print side of the paper. You select the correct envelope size. You select Automatic, Draft, Normal, or Photo print quality. Extend the paper support on the left corner. You print the envelopes with Landscape orientation with the print side facing down ....correctly positioned. 20 sheets of paper. You use banner paper designed for inkjet printers. Do not select Draft if you have a Photo cartridge installed. 10 envelopes in the paper tray 1 envelope into the small media feeder one at a time. NOTE: If you are mailing within Japan, the envelope ...
User's Guide
Page 97
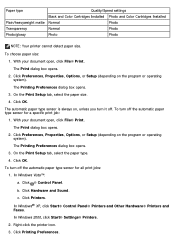
... Setup (depending on the program or operating system). b. Click Printing Preferences. Paper type Quality/Speed settings Black and Color Cartridges Installed Photo and Color Cartridges Installed Plain/heavyweight matte Normal Photo Transparency Normal Photo Photo/glossy Photo Photo NOTE: Your printer cannot detect paper size. The Printing Preferences dialog box opens. 3. The Print dialog box opens. 2. Click ® Control...
... Setup (depending on the program or operating system). b. Click Printing Preferences. Paper type Quality/Speed settings Black and Color Cartridges Installed Photo and Color Cartridges Installed Plain/heavyweight matte Normal Photo Transparency Normal Photo Photo/glossy Photo Photo NOTE: Your printer cannot detect paper size. The Printing Preferences dialog box opens. 3. The Print dialog box opens. 2. Click ® Control...
User's Guide
Page 101
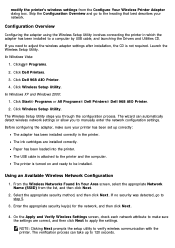
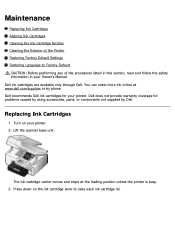
... information in your Owner's Manual. Dell does not provide warranty coverage for your printer. 2. Press down on your printer. You can order more ink online at the loading position unless the printer is busy. 3. Maintenance Replacing Ink Cartridges Aligning Ink Cartridges Cleaning the Ink Cartridge Nozzles Cleaning the Exterior of the Printer Restoring Factory Default Settings Restoring Language...
... information in your Owner's Manual. Dell does not provide warranty coverage for your printer. 2. Press down on your printer. You can order more ink online at the loading position unless the printer is busy. 3. Maintenance Replacing Ink Cartridges Aligning Ink Cartridges Cleaning the Ink Cartridge Nozzles Cleaning the Exterior of the Printer Restoring Factory Default Settings Restoring Language...
User's Guide
Page 102
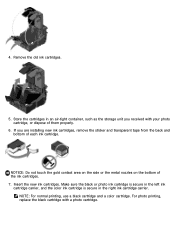
... side or the metal nozzles on the bottom of them properly. 6. Insert the new ink cartridges. Remove the old ink cartridges. 5. NOTE: For normal printing, use a black cartridge and a color cartridge. If you received with a photo cartridge. Store the cartridges in the right ink cartridge carrier. For photo printing, replace the black cartridge with your photo cartridge, or dispose of the ink...
... side or the metal nozzles on the bottom of them properly. 6. Insert the new ink cartridges. Remove the old ink cartridges. 5. NOTE: For normal printing, use a black cartridge and a color cartridge. If you received with a photo cartridge. Store the cartridges in the right ink cartridge carrier. For photo printing, replace the black cartridge with your photo cartridge, or dispose of the ink...
User's Guide
Page 103
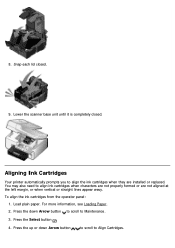
.... 3. Load plain paper. Press the up or down Arrow button to scroll to align ink cartridges when characters are not properly formed or are installed or replaced. To align the ink cartridges from the operator panel: 1. Press the down Arrow button to scroll to align the ink... cartridges when they are not aligned at the left margin, or when vertical or straight lines appear wavy. Snap each lid closed . Lower the scanner base unit until it is completely closed . 9. Aligning Ink Cartridges Your printer automatically prompts you to Align Cartridges. For more information...
.... 3. Load plain paper. Press the up or down Arrow button to scroll to align ink cartridges when characters are not properly formed or are installed or replaced. To align the ink cartridges from the operator panel: 1. Press the down Arrow button to scroll to align the ink... cartridges when they are not aligned at the left margin, or when vertical or straight lines appear wavy. Snap each lid closed . Lower the scanner base unit until it is completely closed . 9. Aligning Ink Cartridges Your printer automatically prompts you to Align Cartridges. For more information...
User's Guide
Page 104
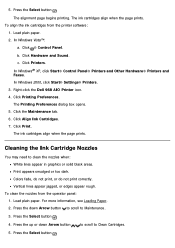
... prints. Click ® Control Panel. In Windows® XP, click Start® Control Panel® Printers and Other Hardware® Printers and Faxes. Right-click the Dell 968 AIO Printer icon. 4. Cleaning the Ink Cartridge Nozzles You may need to Clean Cartridges. 5. Print appears smudged or too dark. Press the Select button . 4. Press the up or...
... prints. Click ® Control Panel. In Windows® XP, click Start® Control Panel® Printers and Other Hardware® Printers and Faxes. Right-click the Dell 968 AIO Printer icon. 4. Cleaning the Ink Cartridge Nozzles You may need to Clean Cartridges. 5. Print appears smudged or too dark. Press the Select button . 4. Press the up or...
User's Guide
Page 105
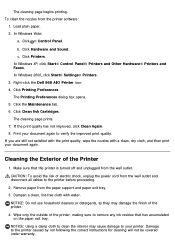
...still not satisfied with the print quality, wipe the nozzles with water. In Windows 2000, click Start® Settings® Printers. 3. Click Clean Ink Cartridges. Damage to verify the improved print quality. In Windows Vista: a. Click Hardware and Sound. Make sure that has accumulated... 5. The cleaning page begins printing. Right-click the Dell 968 AIO Printer icon. 4. Remove paper from the wall outlet and disconnect all cables to the printer before proceeding. 2. CAUTION: To avoid the risk of the printer, making sure to clean the interior may damage the ...
...still not satisfied with the print quality, wipe the nozzles with water. In Windows 2000, click Start® Settings® Printers. 3. Click Clean Ink Cartridges. Damage to verify the improved print quality. In Windows Vista: a. Click Hardware and Sound. Make sure that has accumulated... 5. The cleaning page begins printing. Right-click the Dell 968 AIO Printer icon. 4. Remove paper from the wall outlet and disconnect all cables to the printer before proceeding. 2. CAUTION: To avoid the risk of the printer, making sure to clean the interior may damage the ...
User's Guide
Page 106
...selected settings to select Yes or No, and then press the Select button . to factory default without using the printer menus. The printer aligns the ink cartridges after your language and country. Press the left or right Arrow button button to factory defaults? NOTE: Using ...an asterisk (*) indicate the active settings. Restoring Language to Factory Default You can restore the original printer settings, often referred to enter the time, date, your fax number, and your printer off. 2. Press the down Arrow button to scroll to Reset Defaults, and then press the ...
...selected settings to select Yes or No, and then press the Select button . to factory default without using the printer menus. The printer aligns the ink cartridges after your language and country. Press the left or right Arrow button button to factory defaults? NOTE: Using ...an asterisk (*) indicate the active settings. Restoring Language to Factory Default You can restore the original printer settings, often referred to enter the time, date, your fax number, and your printer off. 2. Press the down Arrow button to scroll to Reset Defaults, and then press the ...

User's Guide
Page 107
... document open , click File® Print. Turn on the program or operating system). With your computer and printer, and make sure they are connected. 2. The Printing Preferences dialog box opens. 5. The Printing Preferences dialog ...Photos NOTE: Dell recommends you use a color cartridge and a photo cartridge for your computer and printer, and make any necessary changes for printing photos. 1. Printing Printing Documents Printing Photos Printing Envelopes Printing From a Bluetooth®-Enabled Device Printing Photos From a PictBridge-Enabled Camera Printing More Than One...
... document open , click File® Print. Turn on the program or operating system). With your computer and printer, and make sure they are connected. 2. The Printing Preferences dialog box opens. 5. The Printing Preferences dialog ...Photos NOTE: Dell recommends you use a color cartridge and a photo cartridge for your computer and printer, and make any necessary changes for printing photos. 1. Printing Printing Documents Printing Photos Printing Envelopes Printing From a Bluetooth®-Enabled Device Printing Photos From a PictBridge-Enabled Camera Printing More Than One...
User's Guide
Page 119
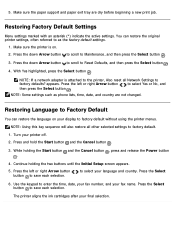
From the Maintenance tab: There are no print settings to set as default. From the Advanced tab, you can : Make automatic two-sided printing (duplex) the default. Get information on sharing your printer on a network. Change the default orientation. Specify layouts that you want to set as default from the Maintenance tab. Print a test page. Extend dry time when duplexing print jobs by default. From here, you can Install, clean, and align ink cartridges. Make black and white printing and borderless printing the default setting. Change the default number of copies.
From the Maintenance tab: There are no print settings to set as default. From the Advanced tab, you can : Make automatic two-sided printing (duplex) the default. Get information on sharing your printer on a network. Change the default orientation. Specify layouts that you want to set as default from the Maintenance tab. Print a test page. Extend dry time when duplexing print jobs by default. From here, you can Install, clean, and align ink cartridges. Make black and white printing and borderless printing the default setting. Change the default number of copies.
User's Guide
Page 122
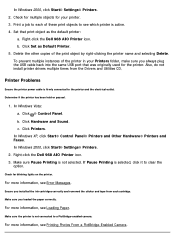
... Printing Photos From a PictBridge-Enabled Camera. In Windows 2000, click Start® Settings® Printers. 2. Printer Problems Ensure the printer power cable is firmly connected to see Loading Paper. Make sure you installed the ink cartridges correctly and removed the sticker and tape from the Drivers and Utilities CD. Right-click the Dell 968 AIO Printer icon...
... Printing Photos From a PictBridge-Enabled Camera. In Windows 2000, click Start® Settings® Printers. 2. Printer Problems Ensure the printer power cable is firmly connected to see Loading Paper. Make sure you installed the ink cartridges correctly and removed the sticker and tape from the Drivers and Utilities CD. Right-click the Dell 968 AIO Printer icon...


