Owner's Manual
Page 1
Dell™ Photo All-In-One Printer 924 Owner's Manual Look Inside For: • Ordering Supplies • Getting Started • Using the Printer • Understanding the Printer Software • Maintenance and Troubleshooting www.dell.com/supplies | support.dell.com
Dell™ Photo All-In-One Printer 924 Owner's Manual Look Inside For: • Ordering Supplies • Getting Started • Using the Printer • Understanding the Printer Software • Maintenance and Troubleshooting www.dell.com/supplies | support.dell.com
Owner's Manual
Page 2
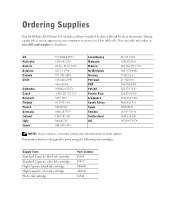
... to warn you of low ink levels. You can order ink online at www.dell.com/supplies or by phone. US Australia Austria Belgium Canada Chile Colombia Czech Denmark Finland France Germany Ireland Italy Japan 877-INK-2-YOU 1300 ...designed to detect the ink levels in the printer. Supply Item Standard Capacity black ink cartridge Standard Capacity color ink cartridge High Capacity black ink cartridge High Capacity color ink cartridge Photo ink cartridge Part number J5566 J5567 M4640 M4646 J4844 Ordering Supplies Your Dell Photo AIO Printer 924 includes software installed to print using the...
... to warn you of low ink levels. You can order ink online at www.dell.com/supplies or by phone. US Australia Austria Belgium Canada Chile Colombia Czech Denmark Finland France Germany Ireland Italy Japan 877-INK-2-YOU 1300 ...designed to detect the ink levels in the printer. Supply Item Standard Capacity black ink cartridge Standard Capacity color ink cartridge High Capacity black ink cartridge High Capacity color ink cartridge Photo ink cartridge Part number J5566 J5567 M4640 M4646 J4844 Ordering Supplies Your Dell Photo AIO Printer 924 includes software installed to print using the...

Owner's Manual
Page 5
... Type Sensor 17 Loading Paper 19 Print Media Guidelines 20 Placing Your Document on the Scanner Glass 21 2 Using the Printer Printing 23 Printing a Document 23 Printing Photos 24 Print Borderless Photos 25 Printing Photos From a PictBridge-Compatible Camera . . . . . 26 Copying 26 Copying Documents Using the Operator Panel 26 Copying Documents Using Your Computer...
... Type Sensor 17 Loading Paper 19 Print Media Guidelines 20 Placing Your Document on the Scanner Glass 21 2 Using the Printer Printing 23 Printing a Document 23 Printing Photos 24 Print Borderless Photos 25 Printing Photos From a PictBridge-Compatible Camera . . . . . 26 Copying 26 Copying Documents Using the Operator Panel 26 Copying Documents Using Your Computer...

Owner's Manual
Page 12
...carrier Carrier that holds two ink cartridges, one color and the other end of printer that holds your document or photo flat while you use to copy, fax, or scan it exits the printer. For more information, see "Replacing Ink Cartridges" on the printer you scan it. 4 Paper exit tray ...Tray that holds the paper as it . 12 About Your Printer www.dell.com | support.dell.com Part: Description: 1 Paper support Part that supports loaded paper. 2 Paper guide Guide that helps the paper feed into the printer properly. 3 Top cover Top of the USB cable plugs into your ...
...carrier Carrier that holds two ink cartridges, one color and the other end of printer that holds your document or photo flat while you use to copy, fax, or scan it exits the printer. For more information, see "Replacing Ink Cartridges" on the printer you scan it. 4 Paper exit tray ...Tray that holds the paper as it . 12 About Your Printer www.dell.com | support.dell.com Part: Description: 1 Paper support Part that supports loaded paper. 2 Paper guide Guide that helps the paper feed into the printer properly. 3 Top cover Top of the USB cable plugs into your ...

Owner's Manual
Page 16
www.dell.com | support.dell.com Copy Mode Menu: Submenu item: Settings: Copy Copy • Color* • Black Copies (use arrow buttons to specify quantity) Quality • Draft • Normal* • Photo Dark (use arrow buttons to specify darkness setting) Size • Letter* • Legal • B5 • A4 • A5 • 3x6 •...% • 150% • 175% • 200% • 4x6 • 5x7 • Letter • A4 •L • 2L • Hagaki * Factory default setting 16 About Your Printer
www.dell.com | support.dell.com Copy Mode Menu: Submenu item: Settings: Copy Copy • Color* • Black Copies (use arrow buttons to specify quantity) Quality • Draft • Normal* • Photo Dark (use arrow buttons to specify darkness setting) Size • Letter* • Legal • B5 • A4 • A5 • 3x6 •...% • 150% • 175% • 200% • 4x6 • 5x7 • Letter • A4 •L • 2L • Hagaki * Factory default setting 16 About Your Printer

Owner's Manual
Page 17
... an automatic paper type sensor that detects the following paper types: • Plain • Transparency • Glossy/photo If you back one of these paper types, the printer detects the paper type and automatically adjusts the Quality/Speed settings. Pressing the Menu button selects the currently displayed computer name. If you choose Scan...
... an automatic paper type sensor that detects the following paper types: • Plain • Transparency • Glossy/photo If you back one of these paper types, the printer detects the paper type and automatically adjusts the Quality/Speed settings. Pressing the Menu button selects the currently displayed computer name. If you choose Scan...
Owner's Manual
Page 18
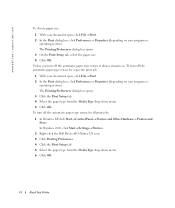
...the automatic paper type sensor for all print jobs: 1 In Windows XP, click Start→ Control Panel→ Printers and Other Hardware→ Printers and Faxes. www.dell.com | support.dell.com To choose paper size: 1 With your document open , click File→ Print. 2 In the Print ... Select the paper type from the Media Type drop-down menu. 5 Click OK. In Windows 2000, click Start→ Settings→ Printers. 2 Right-click the Dell Photo AIO Printer 924 icon. 3 Click Printing Preferences. 4 Click the Print Setup tab. 5 Select the paper type from the Media Type drop-down menu....
...the automatic paper type sensor for all print jobs: 1 In Windows XP, click Start→ Control Panel→ Printers and Other Hardware→ Printers and Faxes. www.dell.com | support.dell.com To choose paper size: 1 With your document open , click File→ Print. 2 In the Print ... Select the paper type from the Media Type drop-down menu. 5 Click OK. In Windows 2000, click Start→ Settings→ Printers. 2 Right-click the Dell Photo AIO Printer 924 icon. 3 Click Printing Preferences. 4 Click the Print Setup tab. 5 Select the paper type from the Media Type drop-down menu....

Owner's Manual
Page 20
...biggest size if the exact envelope size is in the upper left corner and printed with landscape orientation. 20 About Your Printer NOTE: For Japanese customers: If you have a Photo cartridge installed. • You remove any paper from the paper support before inserting banner paper. • You place ... You load the leading edge of the banner paper into the printer against the left edge of the letterhead entering the printer first and facing up. • You select Draft, Normal, or Photo print quality. www.dell.com | support.dell.com Print Media Guidelines Load up to do so will be ...
...biggest size if the exact envelope size is in the upper left corner and printed with landscape orientation. 20 About Your Printer NOTE: For Japanese customers: If you have a Photo cartridge installed. • You remove any paper from the paper support before inserting banner paper. • You place ... You load the leading edge of the banner paper into the printer against the left edge of the letterhead entering the printer first and facing up. • You select Draft, Normal, or Photo print quality. www.dell.com | support.dell.com Print Media Guidelines Load up to do so will be ...

Owner's Manual
Page 21
Placing Your Document on the Scanner Glass 1 Open the top cover. About Your Printer 21 NOTE: For best results, iron-on transfers should be fed one sheet at a time. • The rough side of the transfer faces up . • The transparencies are centered on the paper support, in between the...faces up. • The paper is centered on the paper support, in between the left and right paper guides. • You select Normal or Photo print quality. • The paper is loaded vertically against the right side of the paper support. • You follow the loading instructions on the ...
Placing Your Document on the Scanner Glass 1 Open the top cover. About Your Printer 21 NOTE: For best results, iron-on transfers should be fed one sheet at a time. • The rough side of the transfer faces up . • The transparencies are centered on the paper support, in between the...faces up. • The paper is centered on the paper support, in between the left and right paper guides. • You select Normal or Photo print quality. • The paper is loaded vertically against the right side of the paper support. • You follow the loading instructions on the ...

Owner's Manual
Page 24
...life of copies. www.dell.com | support.dell.com Printing Photos 1 Load the photo paper with the print (glossy) side facing up. For more information, see "Print Media Guidelines" on page 20. 2 Make sure you are using the Dell Picture Studio™ v2.0, select View All Printer Settings to 24 hours..., depending on page 49. 3 With your document open, click File→ Print. 4 To customize your photos from the drop-down menu. 6 Select the paper size, ...
...life of copies. www.dell.com | support.dell.com Printing Photos 1 Load the photo paper with the print (glossy) side facing up. For more information, see "Print Media Guidelines" on page 20. 2 Make sure you are using the Dell Picture Studio™ v2.0, select View All Printer Settings to 24 hours..., depending on page 49. 3 With your document open, click File→ Print. 4 To customize your photos from the drop-down menu. 6 Select the paper size, ...

Owner's Manual
Page 25
... the drop-down menu. 6 Select the Borderless check box, orientation of the photo, and the number of copies you have a color cartridge and a photo cartridge installed. Using the Printer 25 For more information, see "Replacing Ink Cartridges" on page 49. 3 With your document open, click File→ Print. 4 To customize your print settings...
... the drop-down menu. 6 Select the Borderless check box, orientation of the photo, and the number of copies you have a color cartridge and a photo cartridge installed. Using the Printer 25 For more information, see "Replacing Ink Cartridges" on page 49. 3 With your document open, click File→ Print. 4 To customize your print settings...

Owner's Manual
Page 26
...computer, and a PictBridge-compatible camera is connected to your printer, most functions accessed from your printer. 3 Turn on the front of the printer. These functions become available after you can use the printer operator panel or your computer. NOTE: For many digital cameras...the PictBridge-compatible camera from your printer's operator panel buttons are two USB mode selections: computer and printer (or PTP). www.dell.com | support.dell.com Printing Photos From a PictBridge-Compatible Camera Your printer supports PictBridge-compatible cameras. 1 Insert one end of the USB cable ...
...computer, and a PictBridge-compatible camera is connected to your printer, most functions accessed from your printer. 3 Turn on the front of the printer. These functions become available after you can use the printer operator panel or your computer. NOTE: For many digital cameras...the PictBridge-compatible camera from your printer's operator panel buttons are two USB mode selections: computer and printer (or PTP). www.dell.com | support.dell.com Printing Photos From a PictBridge-Compatible Camera Your printer supports PictBridge-compatible cameras. 1 Insert one end of the USB cable ...
Owner's Manual
Page 27
Copying Documents Using Your Computer 1 Turn on the display. . The Dell All-In-One Center opens. 7 Select the number of copies (1-99) and color setting from the drop-down menu. 8 Click See More Copy Settings to copy ...the document aligns with the arrow on the printer. For more information, see "Loading Paper" on the printer. Select the blank paper size. - For more information, see "Operator Panel Menus" on page 21. 5 Close the top cover. 6 Click Start→ Programs or All Programs→ Dell Printers→ Dell Photo AIO Printer 924→ Dell All-In-One Center.
Copying Documents Using Your Computer 1 Turn on the display. . The Dell All-In-One Center opens. 7 Select the number of copies (1-99) and color setting from the drop-down menu. 8 Click See More Copy Settings to copy ...the document aligns with the arrow on the printer. For more information, see "Loading Paper" on the printer. Select the blank paper size. - For more information, see "Operator Panel Menus" on page 21. 5 Close the top cover. 6 Click Start→ Programs or All Programs→ Dell Printers→ Dell Photo AIO Printer 924→ Dell All-In-One Center.
Owner's Manual
Page 28
... with the arrow on page 21. 5 Close the top cover. 6 Click Start→ Programs or All Programs→ Dell Printers→ Dell Photo AIO Printer 924→ Dell All-In-One Center. The Dell All-In-One Center opens. 7 Click Preview Now. 8 Adjust the dotted lines to fit around the portion of the image you want to print. 9 In the...
... with the arrow on page 21. 5 Close the top cover. 6 Click Start→ Programs or All Programs→ Dell Printers→ Dell Photo AIO Printer 924→ Dell All-In-One Center. The Dell All-In-One Center opens. 7 Click Preview Now. 8 Adjust the dotted lines to fit around the portion of the image you want to print. 9 In the...
Owner's Manual
Page 29
Choose a copy quality. - Using the Printer 29 Click this tab: Print Scan Image Enhancements Image Patterns To: • Select the paper size and...image. • Adjust the color correction curve (gamma) of your copy settings, click OK, and then click Copy Now. The Dell All-In-One Center opens. 2 Select a copy quantity and color. 3 Click See More Copy Settings to a black and white dot pattern (..., click the following tabs. Changing Copy Settings 1 Click Start→ Programs or All Programs→ Dell Printers→ Dell Photo AIO Printer 924→ Dell All-In-One Center.
Choose a copy quality. - Using the Printer 29 Click this tab: Print Scan Image Enhancements Image Patterns To: • Select the paper size and...image. • Adjust the color correction curve (gamma) of your copy settings, click OK, and then click Copy Now. The Dell All-In-One Center opens. 2 Select a copy quantity and color. 3 Click See More Copy Settings to a black and white dot pattern (..., click the following tabs. Changing Copy Settings 1 Click Start→ Programs or All Programs→ Dell Printers→ Dell Photo AIO Printer 924→ Dell All-In-One Center.
Owner's Manual
Page 30
...are connected. 2 Open the top cover. 3 Place the photo you want to scan face down menu. www.dell.com | support.dell.com Scanning You can also open the Dell All-In-One Center from the operator panel on your printer. The Dell All-In-One Center opens on page 21. 4 Close the top cover.... document aligns with the arrow on page 21. 4 Close the top cover. 5 Open the Dell All-In-One Center by clicking Start→ Programs or All Programs→ Dell Printers→ Dell Photo AIO Printer 924→ Dell All-In-One Center. On the next screen, click Add to locate and add your program to the list....
...are connected. 2 Open the top cover. 3 Place the photo you want to scan face down menu. www.dell.com | support.dell.com Scanning You can also open the Dell All-In-One Center from the operator panel on your printer. The Dell All-In-One Center opens on page 21. 4 Close the top cover.... document aligns with the arrow on page 21. 4 Close the top cover. 5 Open the Dell All-In-One Center by clicking Start→ Programs or All Programs→ Dell Printers→ Dell Photo AIO Printer 924→ Dell All-In-One Center. On the next screen, click Add to locate and add your program to the list....
Owner's Manual
Page 31
...Send scanned image to use. The Dell All-In-One Center opens on page 21. 4 Close the top cover. 5 Open the Dell All-In-One Center by clicking Start→ Programs or All Programs→ Dell Printers→ Dell Photo AIO Printer 924→ Dell All-In-One Center. On the next screen,...the Start button . in Scan mode, press the Start button . 5 Open the Dell All-In-One Center by clicking Start→ Programs or All Programs→ Dell Printers→ Dell Photo AIO Printer 924→ Dell All-In-One Center. When your scan destination. For more ... NOTE: If the program you ...
...Send scanned image to use. The Dell All-In-One Center opens on page 21. 4 Close the top cover. 5 Open the Dell All-In-One Center by clicking Start→ Programs or All Programs→ Dell Printers→ Dell Photo AIO Printer 924→ Dell All-In-One Center. On the next screen,...the Start button . in Scan mode, press the Start button . 5 Open the Dell All-In-One Center by clicking Start→ Programs or All Programs→ Dell Printers→ Dell Photo AIO Printer 924→ Dell All-In-One Center. When your scan destination. For more ... NOTE: If the program you ...

Owner's Manual
Page 32
...Yes. www.dell.com | support.dell.com 7 In the Scan section, click See More Scan Settings. 8 Click the Advanced button. 9 Click Display Advanced Scan Settings to change printer modes. After you finish scanning all pages. 14 When finished, click No. The photo or document ...is automatically selected. 32 Using the Printer Repeat until you find the one...
...Yes. www.dell.com | support.dell.com 7 In the Scan section, click See More Scan Settings. 8 Click the Advanced button. 9 Click Display Advanced Scan Settings to change printer modes. After you finish scanning all pages. 14 When finished, click No. The photo or document ...is automatically selected. 32 Using the Printer Repeat until you find the one...
Owner's Manual
Page 33
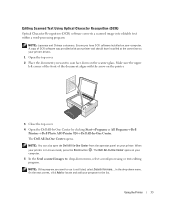
...you have installed at the same time as your computer. NOTE: You can also open the Dell All-In-One Center from the operator panel on the scanner glass. When your printer. Editing Scanned Text Using Optical Character Recognition (OCR) Optical Character Recognition (OCR) software converts...program to : drop-down menu. The Dell All-In-One Center opens on the printer. 3 Close the top cover. 4 Open the Dell All-In-One Center by clicking Start→ Programs or All Programs→ Dell Printers→ Dell Photo AIO Printer 924→ Dell All-In-One Center. On the next screen, click ...
...you have installed at the same time as your computer. NOTE: You can also open the Dell All-In-One Center from the operator panel on the scanner glass. When your printer. Editing Scanned Text Using Optical Character Recognition (OCR) Optical Character Recognition (OCR) software converts...program to : drop-down menu. The Dell All-In-One Center opens on the printer. 3 Close the top cover. 4 Open the Dell All-In-One Center by clicking Start→ Programs or All Programs→ Dell Printers→ Dell Photo AIO Printer 924→ Dell All-In-One Center. On the next screen, click ...
Owner's Manual
Page 34
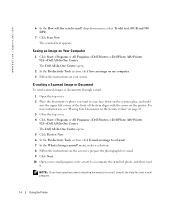
..."Placing Your Document on the Scanner Glass" on Your Computer 1 Click Start→ Programs or All Programs→ Dell Printers→ Dell Photo AIO Printer 924→ Dell All-In-One Center. The Dell All-In-One Center opens. 5 Click Preview Now. 6 In the Productivity Tools section, click E-mail an image to scan face... an Image on page 21. 3 Close the top cover. 4 Click Start→ Programs or All Programs→ Dell Printers→ Dell Photo AIO Printer 924→ Dell All-In-One Center. menu, make sure the upper left corner of the front of the item aligns with the arrow on the ...
..."Placing Your Document on the Scanner Glass" on Your Computer 1 Click Start→ Programs or All Programs→ Dell Printers→ Dell Photo AIO Printer 924→ Dell All-In-One Center. The Dell All-In-One Center opens. 5 Click Preview Now. 6 In the Productivity Tools section, click E-mail an image to scan face... an Image on page 21. 3 Close the top cover. 4 Click Start→ Programs or All Programs→ Dell Printers→ Dell Photo AIO Printer 924→ Dell All-In-One Center. menu, make sure the upper left corner of the front of the item aligns with the arrow on the ...


