Owner's Manual
Page 6
Changing Copy Settings 29 Scanning 30 Scanning Photos 30 Scanning Multiple Pages or Images 31 Scanning a Photo or Document Across a Network 32 Editing Scanned Text Using Optical Character Recognition (OCR 33 Saving an Image on Your Computer 34 E-mailing a Scanned Image or Document 34 Enlarging or Reducing Images or Documents 35 Faxing 35 Installing Microsoft Fax Console in Windows XP 36 Configuring Microsoft Fax Console (Windows XP) or Fax Service Management (Windows 2000 36 Faxing a Paper Document 37 Faxing Electronic Documents 38 Receiving a Fax Using Fax Console or Fax Service...
Changing Copy Settings 29 Scanning 30 Scanning Photos 30 Scanning Multiple Pages or Images 31 Scanning a Photo or Document Across a Network 32 Editing Scanned Text Using Optical Character Recognition (OCR 33 Saving an Image on Your Computer 34 E-mailing a Scanned Image or Document 34 Enlarging or Reducing Images or Documents 35 Faxing 35 Installing Microsoft Fax Console in Windows XP 36 Configuring Microsoft Fax Console (Windows XP) or Fax Service Management (Windows 2000 36 Faxing a Paper Document 37 Faxing Electronic Documents 38 Receiving a Fax Using Fax Console or Fax Service...

Owner's Manual
Page 12
... document or photo face down to copy, fax, or scan it rests on page 49. 7 Scanner support Part under printer unit that keeps the printer open while you change ink cartridges. For more information, see "Using the Operator Panel" on page 14. 12 Scanner glass Surface on the printer you use to control copying, faxing, and printing. For more information, see "Printing Photos From a PictBridge-Compatible Camera" on page 26. 11 Operator panel Panel on which you plug the USB cable (sold separately) that connects your printer...
... document or photo face down to copy, fax, or scan it rests on page 49. 7 Scanner support Part under printer unit that keeps the printer open while you change ink cartridges. For more information, see "Using the Operator Panel" on page 14. 12 Scanner glass Surface on the printer you use to control copying, faxing, and printing. For more information, see "Printing Photos From a PictBridge-Compatible Camera" on page 26. 11 Operator panel Panel on which you plug the USB cable (sold separately) that connects your printer...
Owner's Manual
Page 27
... you are connected. 2 Load the paper. The copy is printed in color by default. Choose a copy quality. - Copying Documents Using Your Computer 1 Turn on the display. . For more information, see "Operator Panel Menus" on page 21. 5 Close the top cover. 6 Click Start→ Programs or All Programs→ Dell Printers→ Dell Photo AIO Printer 924→ Dell All-In-One Center. Copying appears on your computer and printer, and make sure the upper left corner of the front of the document aligns with...
... you are connected. 2 Load the paper. The copy is printed in color by default. Choose a copy quality. - Copying Documents Using Your Computer 1 Turn on the display. . For more information, see "Operator Panel Menus" on page 21. 5 Close the top cover. 6 Click Start→ Programs or All Programs→ Dell Printers→ Dell Photo AIO Printer 924→ Dell All-In-One Center. Copying appears on your computer and printer, and make sure the upper left corner of the front of the document aligns with...
Owner's Manual
Page 31
... list. 9 Change any settings. 10 When you want to scan. 8 In the Send scanned image to: drop-down menu. On the next screen, click Add to the list. The Dell All-In-One Center opens on the printer. The Dell All-In-One Center opens. The Dell All-In-One Center opens. in the drop-down menu, select a program as your scan destination. When your program to locate and add your document has finished processing, the selected program opens. NOTE: You can also open...
... list. 9 Change any settings. 10 When you want to scan. 8 In the Send scanned image to: drop-down menu. On the next screen, click Add to the list. The Dell All-In-One Center opens on the printer. The Dell All-In-One Center opens. The Dell All-In-One Center opens. in the drop-down menu, select a program as your scan destination. When your program to locate and add your document has finished processing, the selected program opens. NOTE: You can also open...

Owner's Manual
Page 35
... Your Document on the Scanner Glass" on the printer. Faxing To send a fax using the operator panel. 1 Load the paper. Continue with "Installing Microsoft Fax Console in the list that the Microsoft Fax software is on page 36. Using the Printer 35 For Windows 2000, Fax Service Management is equipped with the arrow on page 21. 4 Close the top cover. 5 Click Start→ Programs or All Programs→ Dell Printers→ Dell Photo AIO Printer 924→ Dell All-In-One Center. If you are using your printer...
... Your Document on the Scanner Glass" on the printer. Faxing To send a fax using the operator panel. 1 Load the paper. Continue with "Installing Microsoft Fax Console in the list that the Microsoft Fax software is on page 36. Using the Printer 35 For Windows 2000, Fax Service Management is equipped with the arrow on page 21. 4 Close the top cover. 5 Click Start→ Programs or All Programs→ Dell Printers→ Dell Photo AIO Printer 924→ Dell All-In-One Center. If you are using your printer...
Owner's Manual
Page 37
... to send or receive faxes. When you select this check box, you are connected. Faxing a Paper Document To fax a single or multiple page paper document, use the Dell All-In-One Center. 1 Turn on your document on the printer. 3 Click Start→ Programs or All Programs→ Dell Printers→ Dell Photo AIO Printer 924→ Dell All-In-One Center. The Dell All-In-One Center opens. Using the Printer 37 Make sure your computer modem is being sent to specify the storage location for information. 2 Place your printer and...
... to send or receive faxes. When you select this check box, you are connected. Faxing a Paper Document To fax a single or multiple page paper document, use the Dell All-In-One Center. 1 Turn on your document on the printer. 3 Click Start→ Programs or All Programs→ Dell Printers→ Dell Photo AIO Printer 924→ Dell All-In-One Center. The Dell All-In-One Center opens. Using the Printer 37 Make sure your computer modem is being sent to specify the storage location for information. 2 Place your printer and...
Owner's Manual
Page 38
... fax job by Fax Console. 1 Click Start→ Programs or All Programs→ Accessories→ Communications→ Fax. 2 Click Fax Console or Fax Service Management. Viewing Sent and Received Faxes Using Fax Console or Fax Service Management NOTE: Only faxes sent and received by Fax Console can either: • In the Scan or Fax section, send a single or multiple page fax. View received faxes in Sent Items. 38 Using the Printer To send a single-page fax, click Fax Now. Faxing Electronic Documents 1 With the file open, click File...
... fax job by Fax Console. 1 Click Start→ Programs or All Programs→ Accessories→ Communications→ Fax. 2 Click Fax Console or Fax Service Management. Viewing Sent and Received Faxes Using Fax Console or Fax Service Management NOTE: Only faxes sent and received by Fax Console can either: • In the Scan or Fax section, send a single or multiple page fax. View received faxes in Sent Items. 38 Using the Printer To send a single-page fax, click Fax Now. Faxing Electronic Documents 1 With the file open, click File...
Owner's Manual
Page 42
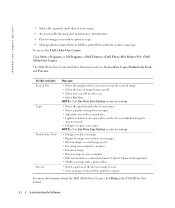
... color of your copies. • Access troubleshooting and maintenance information. • Preview images you will be accomplished using your computer's modem. • E-mail an image. • Save an image on one page. • Print an image as a multi-page poster. • Fax using the operator panel). • Enlarge or reduce your copies. To access the Dell All-In-One Center: Click Start→ Programs or All Programs→ Dell Printers→ Dell Photo AIO Printer 924→ Dell All-In-One Center. NOTE: Click See More Scan Settings...
... color of your copies. • Access troubleshooting and maintenance information. • Preview images you will be accomplished using your computer's modem. • E-mail an image. • Save an image on one page. • Print an image as a multi-page poster. • Fax using the operator panel). • Enlarge or reduce your copies. To access the Dell All-In-One Center: Click Start→ Programs or All Programs→ Dell Printers→ Dell Photo AIO Printer 924→ Dell All-In-One Center. NOTE: Click See More Scan Settings...

Owner's Manual
Page 47
In Windows 2000, double-click My Computer from your screen to complete the installation. Understanding the Software 47 Removing and Reinstalling the Software If your printer does not function properly, or communication error messages appear when using your printer, you can remove and reinstall the printer software. 1 Click Start→Programs or All Programs→Dell Printers→Dell Photo AIO Printer 924→Uninstall Dell Photo AIO Printer 924. 2 Follow the instructions on the screen. 3 Restart your computer. 4 Insert the Drivers and...
In Windows 2000, double-click My Computer from your screen to complete the installation. Understanding the Software 47 Removing and Reinstalling the Software If your printer does not function properly, or communication error messages appear when using your printer, you can remove and reinstall the printer software. 1 Click Start→Programs or All Programs→Dell Printers→Dell Photo AIO Printer 924→Uninstall Dell Photo AIO Printer 924. 2 Follow the instructions on the screen. 3 Restart your computer. 4 Insert the Drivers and...
Owner's Manual
Page 58
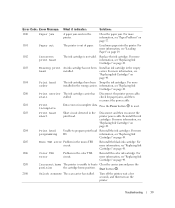
... screen for clearing the paper jam. CHECK FOR A PAPER JAM. The ink cartridge is zero. MAKE SURE THE PAPER IS CENTERED IN THE PAPER SUPPORT, AND THE PAPER G U I D E S R E S T A G A I N S T T H E L E F T A N D R I G H T S I D E S O F T H E P A P E R. Using your printer and your computer Follow the instructions on your ink Cartridges" on page 19. For more low on page 57. Error Code: Error Message: Blinking Power Button Ink Low Reserve Tank What it open. 3 Gently pull the paper from Dell dot count is running Replace the ink cartridge. at www.dell.com/supplies, and replace...
... screen for clearing the paper jam. CHECK FOR A PAPER JAM. The ink cartridge is zero. MAKE SURE THE PAPER IS CENTERED IN THE PAPER SUPPORT, AND THE PAPER G U I D E S R E S T A G A I N S T T H E L E F T A N D R I G H T S I D E S O F T H E P A P E R. Using your printer and your computer Follow the instructions on your ink Cartridges" on page 19. For more low on page 57. Error Code: Error Message: Blinking Power Button Ink Low Reserve Tank What it open. 3 Gently pull the paper from Dell dot count is running Replace the ink cartridge. at www.dell.com/supplies, and replace...
Owner's Manual
Page 59
... been installed. Install an ink cartridge in the printer. Disconnect the printer power cable, check for paper jams, and then reconnect the power cable. 1201 Print incomplete Data error or incomplete data. For more information, see "Replacing Ink Cartridges" on page 49. 1200 Print carrier The ink cartridge carrier has stall stalled. Reinstall the black ink cartridge. For more ID. Start button . 2100 Unlock scanner The scan carrier has stalled. Turn off the printer, wait a few seconds, and then turn on page 49. 1206 Color TSR error Problem...
... been installed. Install an ink cartridge in the printer. Disconnect the printer power cable, check for paper jams, and then reconnect the power cable. 1201 Print incomplete Data error or incomplete data. For more information, see "Replacing Ink Cartridges" on page 49. 1200 Print carrier The ink cartridge carrier has stall stalled. Reinstall the black ink cartridge. For more ID. Start button . 2100 Unlock scanner The scan carrier has stalled. Turn off the printer, wait a few seconds, and then turn on page 49. 1206 Color TSR error Problem...
Owner's Manual
Page 94
...error, 59 Paper jam, 59 Paper tray empty, 59 Print carrier stall, 59 Print head order, 59 Print head programming, 59 Print head short, 59 Print incomplete, 59 Unlock scanner, 59 multiple copies, 44 N nozzles, ink cartridge cleaning, 54 O operator panel copying with, 26 using, 14 P paper exit tray, 12 Paper jam message, 59 Paper tray empty message, 59 paper type sensor, 17 turning off, 18 photo cards loading, 21 photo paper loading, 21 photos printing, 24 PictBridge, 26 postcards loading, 21 Print Setup tab, 44 Printing Preferences accessing, 43 Advanced tab, 44 Maintenance tab, 44 Print Setup...
...error, 59 Paper jam, 59 Paper tray empty, 59 Print carrier stall, 59 Print head order, 59 Print head programming, 59 Print head short, 59 Print incomplete, 59 Unlock scanner, 59 multiple copies, 44 N nozzles, ink cartridge cleaning, 54 O operator panel copying with, 26 using, 14 P paper exit tray, 12 Paper jam message, 59 Paper tray empty message, 59 paper type sensor, 17 turning off, 18 photo cards loading, 21 photo paper loading, 21 photos printing, 24 PictBridge, 26 postcards loading, 21 Print Setup tab, 44 Printing Preferences accessing, 43 Advanced tab, 44 Maintenance tab, 44 Print Setup...
User's Guide
Page 3
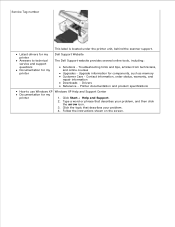
... Start Help and Support. 2. Click the topic that describes your problem. 4. Drivers Reference - Contact information, order status, warranty, and repair information Downloads - Printer documentation and product specifications How to technical service and support questions Documentation for my printer Windows XP Help and Support Center 1. Type a word or phrase that describes your problem, and then click the arrow icon. 3. Upgrade information for components, such as memory Customer Care - Follow the instructions shown on the screen. Troubleshooting hints...
... Start Help and Support. 2. Click the topic that describes your problem. 4. Drivers Reference - Contact information, order status, warranty, and repair information Downloads - Printer documentation and product specifications How to technical service and support questions Documentation for my printer Windows XP Help and Support Center 1. Type a word or phrase that describes your problem, and then click the arrow icon. 3. Upgrade information for components, such as memory Customer Care - Follow the instructions shown on the screen. Troubleshooting hints...

User's Guide
Page 6
... use to copy, fax, or scan it. If you place your language. Press the Power button and the up arrow button simultaneously. 3. to install the hardware and software. For more information, see Setup Problems. Setting the Language on Your Printer To set the language on which you need to change the default language used on your Setting Up Your Printer poster to find your document or photo face down to control copying, faxing, and printing...
... use to copy, fax, or scan it. If you place your language. Press the Power button and the up arrow button simultaneously. 3. to install the hardware and software. For more information, see Setup Problems. Setting the Language on Your Printer To set the language on which you need to change the default language used on your Setting Up Your Printer poster to find your document or photo face down to control copying, faxing, and printing...

User's Guide
Page 23
... of the image you want to use . in Scan mode, press the Start button . Close the top cover. 5. When your computer and printer, and make sure they are connected. 2. The Dell All-In-One Center opens. Click Preview Now to the list. 9. NOTE: If the program you want to scan. 8. On the next screen, click Add to locate and add your program to see your scanned image. 7. Change any settings. 10. Scanning Multiple Pages or Images 1. Turn on the printer. Open the top...
... of the image you want to use . in Scan mode, press the Start button . Close the top cover. 5. When your computer and printer, and make sure they are connected. 2. The Dell All-In-One Center opens. Click Preview Now to the list. 9. NOTE: If the program you want to scan. 8. On the next screen, click Add to locate and add your program to see your scanned image. 7. Change any settings. 10. Scanning Multiple Pages or Images 1. Turn on the printer. Open the top...

User's Guide
Page 30
... Printer 924 to select the Store a copy in the header area of each received fax to be on and connected to your fax machine to send or receive faxes. On the Transmitting Subscriber Identification (TSID) screen, type the identification information (usually your fax number and your Internet Service Provider for the fax copy. 15. Confirm the configuration settings in the Configuration Summary list, and then click Finish. Faxing a Paper Document To fax a single or multiple page paper document, use the Dell All-In-One Center...
... Printer 924 to select the Store a copy in the header area of each received fax to be on and connected to your fax machine to send or receive faxes. On the Transmitting Subscriber Identification (TSID) screen, type the identification information (usually your fax number and your Internet Service Provider for the fax copy. 15. Confirm the configuration settings in the Configuration Summary list, and then click Finish. Faxing a Paper Document To fax a single or multiple page paper document, use the Dell All-In-One Center...

User's Guide
Page 31
... Dell All-In-One Center opens. 4. To send a multiple-page fax, click Advanced Scan multiple items before output OK. With the file open, click File Print. 2. Click Print, and then follow the instructions on the screen asks if there is connected to answer all phone calls, in your fax job by answering the questions that an active telephone line is more than one page. If you selected the Enable Receive check box when configuring Fax Console or Fax Service Management, you to receive faxes...
... Dell All-In-One Center opens. 4. To send a multiple-page fax, click Advanced Scan multiple items before output OK. With the file open, click File Print. 2. Click Print, and then follow the instructions on the screen asks if there is connected to answer all phone calls, in your fax job by answering the questions that an active telephone line is more than one page. If you selected the Enable Receive check box when configuring Fax Console or Fax Service Management, you to receive faxes...
User's Guide
Page 39
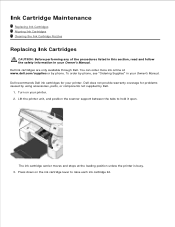
... Dell. Lift the printer unit, and position the scanner support between the tabs to raise each ink cartridge lid. Press down on your printer. 2. The ink cartridge carrier moves and stops at www.dell.com/supplies or by phone, see "Ordering Supplies" in your Owner's Manual. Dell recommends Dell ink cartridges for problems caused by using accessories, parts, or components not supplied by Dell. 1. Turn on the ink cartridge lever to hold it open. Ink Cartridge Maintenance Replacing Ink Cartridges Aligning Ink Cartridges Cleaning the Ink Cartridge Nozzles Replacing Ink Cartridges...
... Dell. Lift the printer unit, and position the scanner support between the tabs to raise each ink cartridge lid. Press down on your printer. 2. The ink cartridge carrier moves and stops at www.dell.com/supplies or by phone, see "Ordering Supplies" in your Owner's Manual. Dell recommends Dell ink cartridges for problems caused by using accessories, parts, or components not supplied by Dell. 1. Turn on the ink cartridge lever to hold it open. Ink Cartridge Maintenance Replacing Ink Cartridges Aligning Ink Cartridges Cleaning the Ink Cartridge Nozzles Replacing Ink Cartridges...
User's Guide
Page 47
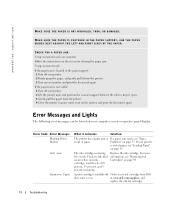
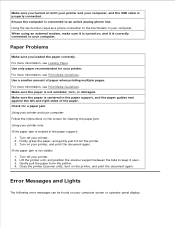
... left and right sides of paper when printing multiple pages. For more information, see Loading Paper. Error Messages and Lights The following error messages can be found on your computer Follow the instructions on , and it open. 3. Make sure you loaded the paper correctly. Using the fax function requires a phone connection to your printer, and print the document again. Use only paper recommended for a paper jam. Use a smaller amount of the paper. Turn on the printer, and print the document again. Close the printer (scanner unit), turn on your...
... left and right sides of paper when printing multiple pages. For more information, see Loading Paper. Error Messages and Lights The following error messages can be found on your computer Follow the instructions on , and it open. 3. Make sure you loaded the paper correctly. Using the fax function requires a phone connection to your printer, and print the document again. Use only paper recommended for a paper jam. Use a smaller amount of the paper. Turn on the printer, and print the document again. Close the printer (scanner unit), turn on your...
User's Guide
Page 63
... file transfer protocol (FTP) ftp.dell.com/ Log in as user: anonymous, and use your email address as the verification of appropriate functionality of the Operating System, application software and hardware drivers to the original default configuration as shipped from Dell, as well as your region on the WELCOME TO DELL SUPPORT page, and fill in the requested details to this technician assisted technical support, online technical support is...
... file transfer protocol (FTP) ftp.dell.com/ Log in as user: anonymous, and use your email address as the verification of appropriate functionality of the Operating System, application software and hardware drivers to the original default configuration as shipped from Dell, as well as your region on the WELCOME TO DELL SUPPORT page, and fill in the requested details to this technician assisted technical support, online technical support is...


