
Owner's Manual
Page 5
... Operator Panel 14 Operator Panel Menus 15 Understanding the Automatic Paper Type Sensor 17 Loading Paper 19 Print Media Guidelines 20 Placing Your Document on the Scanner Glass 21 2 Using the Printer Printing 23 Printing a Document 23 Printing Photos 24 Print Borderless Photos 25 Printing Photos From a PictBridge-Compatible Camera . . . . . 26 Copying 26 Copying Documents Using...
... Operator Panel 14 Operator Panel Menus 15 Understanding the Automatic Paper Type Sensor 17 Loading Paper 19 Print Media Guidelines 20 Placing Your Document on the Scanner Glass 21 2 Using the Printer Printing 23 Printing a Document 23 Printing Photos 24 Print Borderless Photos 25 Printing Photos From a PictBridge-Compatible Camera . . . . . 26 Copying 26 Copying Documents Using...
Owner's Manual
Page 6
Changing Copy Settings 29 Scanning 30 Scanning Photos 30 Scanning Multiple Pages or Images 31 Scanning a Photo or Document Across a Network 32 Editing ...Configuring Microsoft Fax Console (Windows XP) or Fax Service Management (Windows 2000 36 Faxing a Paper Document 37 Faxing Electronic Documents 38 Receiving a Fax Using Fax Console or Fax Service Management ...Fax Configuration 39 3 Understanding the Software Using the Dell All-In-One Center 41 Using Printing Preferences 43 Using Dell Picture Studio v2.0 45 Dell Ink Management System 45 Removing and Reinstalling the Software ...
Changing Copy Settings 29 Scanning 30 Scanning Photos 30 Scanning Multiple Pages or Images 31 Scanning a Photo or Document Across a Network 32 Editing ...Configuring Microsoft Fax Console (Windows XP) or Fax Service Management (Windows 2000 36 Faxing a Paper Document 37 Faxing Electronic Documents 38 Receiving a Fax Using Fax Console or Fax Service Management ...Fax Configuration 39 3 Understanding the Software Using the Dell All-In-One Center 41 Using Printing Preferences 43 Using Dell Picture Studio v2.0 45 Dell Ink Management System 45 Removing and Reinstalling the Software ...

Owner's Manual
Page 7
... Replacing Ink Cartridges 49 Aligning Ink Cartridges 53 Cleaning the Ink Cartridge Nozzles 54 5 Troubleshooting Setup Problems 55 Computer Problems 55 Printer Problems 56 General Problems 57 Faxing Problems 57 Paper Problems 57 Error Messages and Lights 58 Improving Print Quality 60 6 Contacting Dell Technical Assistance 61 Automated Order-Status Service 61 Contacting...
... Replacing Ink Cartridges 49 Aligning Ink Cartridges 53 Cleaning the Ink Cartridge Nozzles 54 5 Troubleshooting Setup Problems 55 Computer Problems 55 Printer Problems 56 General Problems 57 Faxing Problems 57 Paper Problems 57 Error Messages and Lights 58 Improving Print Quality 60 6 Contacting Dell Technical Assistance 61 Automated Order-Status Service 61 Contacting...

Owner's Manual
Page 9
..., use a surge suppressor, line conditioner, or uninterruptible power supply cord (UPS). • Do not use your printer in a wet environment, for instructions on or tripped over. • Use only the power cable provided with this...that nothing rests on your product's cables and that is designed to meet safety standards with the use of non-Dell-authorized components. • Refer to your Owner's Manual for example, near a bath tub, sink, or ... stepped on the proper way to clear paper jams. CAUTION: SAFETY INSTRUCTIONS 9 Dell disclaims liability associated with the use of specific...
..., use a surge suppressor, line conditioner, or uninterruptible power supply cord (UPS). • Do not use your printer in a wet environment, for instructions on or tripped over. • Use only the power cable provided with this...that nothing rests on your product's cables and that is designed to meet safety standards with the use of non-Dell-authorized components. • Refer to your Owner's Manual for example, near a bath tub, sink, or ... stepped on the proper way to clear paper jams. CAUTION: SAFETY INSTRUCTIONS 9 Dell disclaims liability associated with the use of specific...

Owner's Manual
Page 12
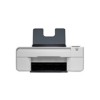
... holds the paper as it exits the printer. www.dell.com | support.dell.com Part: Description: 1 Paper support Part that supports loaded paper. 2 Paper guide Guide that helps the paper feed into the printer properly. 3 Top cover Top of printer that holds your document or photo flat while you scan it. 4 Paper exit tray Tray that holds two ink cartridges, one color and...
... holds the paper as it exits the printer. www.dell.com | support.dell.com Part: Description: 1 Paper support Part that supports loaded paper. 2 Paper guide Guide that helps the paper feed into the printer properly. 3 Top cover Top of printer that holds your document or photo flat while you scan it. 4 Paper exit tray Tray that holds two ink cartridges, one color and...

Owner's Manual
Page 14
For more information, see "Operator Panel Menus" on or off. 14 About Your Printer Turn your printer on page 15. • Scroll through the available menus. www.dell.com | support.dell.com Using the Operator Panel The operator panel buttons allow you press this button, the current option is illuminated. 1 Menu ... selected mode. Each time you to scan, copy, and customize documents. The printer is on when the Power button is saved and the next menu appears on the display. • Feed newly loaded paper. • Navigate menus and menu items. • Decrease/increase number of ...
For more information, see "Operator Panel Menus" on or off. 14 About Your Printer Turn your printer on page 15. • Scroll through the available menus. www.dell.com | support.dell.com Using the Operator Panel The operator panel buttons allow you press this button, the current option is illuminated. 1 Menu ... selected mode. Each time you to scan, copy, and customize documents. The printer is on when the Power button is saved and the next menu appears on the display. • Feed newly loaded paper. • Navigate menus and menu items. • Decrease/increase number of ...

Owner's Manual
Page 15
... in Scan mode, pressing this button opens the Dell All-In-One Center (if your printer is connected to the next menu available. Determine the amount of ink remaining in each menu. Operator Panel Menus When you press the Menu button , .... Start the copying or scanning process. Press the Arrow buttons to the default settings. About Your Printer 15 Use the 5 Error light 6 Cancel button 7 Start button 8 Ink Drop To Alert you to errors such as paper out, paper jam, or low ink. • Cancel a scan, print, or copy job in progress. • Cancel...
... in Scan mode, pressing this button opens the Dell All-In-One Center (if your printer is connected to the next menu available. Determine the amount of ink remaining in each menu. Operator Panel Menus When you press the Menu button , .... Start the copying or scanning process. Press the Arrow buttons to the default settings. About Your Printer 15 Use the 5 Error light 6 Cancel button 7 Start button 8 Ink Drop To Alert you to errors such as paper out, paper jam, or low ink. • Cancel a scan, print, or copy job in progress. • Cancel...

Owner's Manual
Page 17
... the currently displayed computer name. NOTE: If your printer is automatically selected. Choosing this option takes you load one menu level. Paper type Plain Transparency Glossy/photo Quality/Speed settings Black and Color Cartridges Installed Photo and Color Cartridges Installed Normal Photo Normal Photo Photo Photo NOTE: Your printer cannot detect the paper size. Maintenance Mode Menu Maintenance Submenu item Align...
... the currently displayed computer name. NOTE: If your printer is automatically selected. Choosing this option takes you load one menu level. Paper type Plain Transparency Glossy/photo Quality/Speed settings Black and Color Cartridges Installed Photo and Color Cartridges Installed Normal Photo Normal Photo Photo Photo NOTE: Your printer cannot detect the paper size. Maintenance Mode Menu Maintenance Submenu item Align...
Owner's Manual
Page 18
... (depending on . Unless you turn off the automatic paper type sensor, it always remains on your program or operating system). In Windows 2000, click Start→ Settings→ Printers. 2 Right-click the Dell Photo AIO Printer 924 icon. 3 Click Printing Preferences. 4 Click the Print... Setup tab. 5 Select the paper type from the Media Type drop-down menu. 6 Click OK. 18 About Your Printer www.dell.com | support.dell.com To choose paper size: 1 With...
... (depending on . Unless you turn off the automatic paper type sensor, it always remains on your program or operating system). In Windows 2000, click Start→ Settings→ Printers. 2 Right-click the Dell Photo AIO Printer 924 icon. 3 Click Printing Preferences. 4 Click the Print... Setup tab. 5 Select the paper type from the Media Type drop-down menu. 6 Click OK. 18 About Your Printer www.dell.com | support.dell.com To choose paper size: 1 With...

Owner's Manual
Page 19
NOTE: Do not force paper into the printer. About Your Printer 19 NOTE: Do not pull on the paper support. 3 Adjust the paper guides so both are resting against the edges of the paper should be flat against both paper guides simultaneously. Loading Paper 1 Fan the paper. 2 Center the paper on both paper guides. When one paper guide is moved, the other adjusts accordingly. The paper should be flush against the paper support surface, and the edges of the paper.
NOTE: Do not force paper into the printer. About Your Printer 19 NOTE: Do not pull on the paper support. 3 Adjust the paper guides so both are resting against the edges of the paper should be flat against both paper guides simultaneously. Loading Paper 1 Fan the paper. 2 Center the paper on both paper guides. When one paper guide is moved, the other adjusts accordingly. The paper should be flush against the paper support surface, and the edges of the paper.

Owner's Manual
Page 20
...Do not select Draft if you have a Photo cartridge installed. • You remove any paper from the paper support before inserting banner paper. • You place a stack of banner paper on the paper support, in between the left and right paper guides. • The stamp location is...paper into the printer against the right side of the paper support. • The banner paper is centered between the left corner. If you are mailing within Japan, the envelope can be correctly positioned. www.dell.com | support.dell.com Print Media Guidelines Load up . • You select Draft, Normal, or Photo...
...Do not select Draft if you have a Photo cartridge installed. • You remove any paper from the paper support before inserting banner paper. • You place a stack of banner paper on the paper support, in between the left and right paper guides. • The stamp location is...paper into the printer against the right side of the paper support. • The banner paper is centered between the left corner. If you are mailing within Japan, the envelope can be correctly positioned. www.dell.com | support.dell.com Print Media Guidelines Load up . • You select Draft, Normal, or Photo...

Owner's Manual
Page 21
... Your Printer 21 NOTE: You can load a single transparency into the paper support without removing plain paper. • You select Normal or Photo print quality. Placing Your Document on the paper support, in between the left and right paper guides. • You select Normal or Photo print ...quality. NOTE: For best results, iron-on transfers should be fed one...
... Your Printer 21 NOTE: You can load a single transparency into the paper support without removing plain paper. • You select Normal or Photo print quality. Placing Your Document on the paper support, in between the left and right paper guides. • You select Normal or Photo print ...quality. NOTE: For best results, iron-on transfers should be fed one...

Owner's Manual
Page 23
b On the Print Setup tab, select the print quality/speed, paper size, black and white or color printing, borderless printing, orientation, and number of the screen to return to use Automatic Image Sharpening. 2 Using the Printer Printing Printing a Document 1 Turn on your print settings: a Click ...Print (depending on page 19. 3 With your document open, click File→ Print. 4 To customize your computer and printer, and make sure they are connected. 2 Load paper with the print side facing up. The Printing Preferences dialog box opens. For more information, see "Loading...
b On the Print Setup tab, select the print quality/speed, paper size, black and white or color printing, borderless printing, orientation, and number of the screen to return to use Automatic Image Sharpening. 2 Using the Printer Printing Printing a Document 1 Turn on your print settings: a Click ...Print (depending on page 19. 3 With your document open, click File→ Print. 4 To customize your computer and printer, and make sure they are connected. 2 Load paper with the print side facing up. The Printing Preferences dialog box opens. For more information, see "Loading...

Owner's Manual
Page 24
...click Preferences, Properties, Options, or Setup (depending on the program or operating system). www.dell.com | support.dell.com Printing Photos 1 Load the photo paper with the print (glossy) side facing up. For more information, see "Replacing Ink ...Cartridges" on the ambient conditions). NOTE: If you are finished customizing your print settings, click OK. 8 Click OK or Print (depending on page 20. 2 Make sure you are using the Dell Picture Studio™ v2.0, select View All Printer...
...click Preferences, Properties, Options, or Setup (depending on the program or operating system). www.dell.com | support.dell.com Printing Photos 1 Load the photo paper with the print (glossy) side facing up. For more information, see "Replacing Ink ...Cartridges" on the ambient conditions). NOTE: If you are finished customizing your print settings, click OK. 8 Click OK or Print (depending on page 20. 2 Make sure you are using the Dell Picture Studio™ v2.0, select View All Printer...

Owner's Manual
Page 25
... Options, or Setup (depending on the program or operating system). Using the Printer 25 The Printing Preferences dialog box opens. 5 On the Print Setup tab, select Photo, and then select the dpi settings for the photo from the drop-down menu. 6 Select the Borderless check box, orientation of...sure you want. 7 On the Advanced tab, select the borderless paper size from the drop-down menu, and click OK. 8 Click OK or Print (depending on the program or operating system). Print Borderless Photos 1 For best results, load photo/glossy paper, and make sure the print side is facing up.
... Options, or Setup (depending on the program or operating system). Using the Printer 25 The Printing Preferences dialog box opens. 5 On the Print Setup tab, select Photo, and then select the dpi settings for the photo from the drop-down menu. 6 Select the Borderless check box, orientation of...sure you want. 7 On the Advanced tab, select the borderless paper size from the drop-down menu, and click OK. 8 Click OK or Print (depending on the program or operating system). Print Borderless Photos 1 For best results, load photo/glossy paper, and make sure the print side is facing up.

Owner's Manual
Page 26
...of the appropriate camera USB settings and PictBridge connection and usage information. www.dell.com | support.dell.com Printing Photos From a PictBridge-Compatible Camera Your printer supports PictBridge-compatible cameras. 1 Insert one end of the USB cable into the camera. 2 Insert the other ... cover. 26 Using the Printer NOTE: When your printer is not connected to a computer, and a PictBridge-compatible camera is connected to the documentation included with your printer. 2 Load the paper. These functions become available after you can use the printer operator panel or your camera...
...of the appropriate camera USB settings and PictBridge connection and usage information. www.dell.com | support.dell.com Printing Photos From a PictBridge-Compatible Camera Your printer supports PictBridge-compatible cameras. 1 Insert one end of the USB cable into the camera. 2 Insert the other ... cover. 26 Using the Printer NOTE: When your printer is not connected to a computer, and a PictBridge-compatible camera is connected to the documentation included with your printer. 2 Load the paper. These functions become available after you can use the printer operator panel or your camera...
Owner's Manual
Page 27
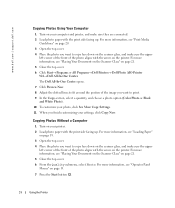
... appears on your settings, click Copy Now. Using the Printer 27 Select the blank paper size. - Choose a copy quality. - The copy is printed in the currently NOTE: If you are connected. 2 Load the paper. 4 Place the document you want to copy face down...Close the top cover. 6 Click Start→ Programs or All Programs→ Dell Printers→ Dell Photo AIO Printer 924→ Dell All-In-One Center. For more information, see "Placing Your Document on the Scanner Glass" on the printer. Copying Documents Using Your Computer 1 Turn on the display. . Select the ...
... appears on your settings, click Copy Now. Using the Printer 27 Select the blank paper size. - Choose a copy quality. - The copy is printed in the currently NOTE: If you are connected. 2 Load the paper. 4 Place the document you want to copy face down...Close the top cover. 6 Click Start→ Programs or All Programs→ Dell Printers→ Dell Photo AIO Printer 924→ Dell All-In-One Center. For more information, see "Placing Your Document on the Scanner Glass" on the printer. Copying Documents Using Your Computer 1 Turn on the display. . Select the ...
Owner's Manual
Page 28
... and make sure they are connected. 2 Load photo paper with the arrow on page 21. 5 Close the top cover. 6 Click Start→ Programs or All Programs→ Dell Printers→ Dell Photo AIO Printer 924→ Dell All-In-One Center. For more information, see "Placing Your ...Document on the Scanner Glass" on the printer. For more information, see "Print Media Guidelines" on page 20. 3...
... and make sure they are connected. 2 Load photo paper with the arrow on page 21. 5 Close the top cover. 6 Click Start→ Programs or All Programs→ Dell Printers→ Dell Photo AIO Printer 924→ Dell All-In-One Center. For more information, see "Placing Your ...Document on the Scanner Glass" on the printer. For more information, see "Print Media Guidelines" on page 20. 3...
Owner's Manual
Page 29
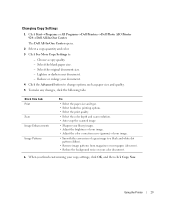
...click Copy Now. Reduce or enlarge your document. 4 Click the Advanced button to : - Select the blank paper size. - Choose a copy quality. - Click this tab: Print Scan Image Enhancements Image Patterns To: • Select the paper size and type. • Select borderless printing options. • Select the print quality. • Select ... the background noise on your color document. 6 When you finish customizing your document. - Changing Copy Settings 1 Click Start→ Programs or All Programs→ Dell Printers→ Dell Photo AIO Printer 924→ Dell All-In-One Center.
...click Copy Now. Reduce or enlarge your document. 4 Click the Advanced button to : - Select the blank paper size. - Choose a copy quality. - Click this tab: Print Scan Image Enhancements Image Patterns To: • Select the paper size and type. • Select borderless printing options. • Select the print quality. • Select ... the background noise on your color document. 6 When you finish customizing your document. - Changing Copy Settings 1 Click Start→ Programs or All Programs→ Dell Printers→ Dell Photo AIO Printer 924→ Dell All-In-One Center.

Owner's Manual
Page 35
... in Windows XP" on page 21. 4 Close the top cover. 5 Click Start→ Programs or All Programs→ Dell Printers→ Dell Photo AIO Printer 924→ Dell All-In-One Center. For Windows XP: • If you see Fax in the list that appears, continue with "Installing Microsoft Fax Console... you are using your printer without a computer, you can enlarge or reduce your document between 25-400 percent using the Dell All-In-One Center. For more information, see that appears, you have the printer attached to options using the operator panel. 1 Load the paper. Using the Printer 35
... in Windows XP" on page 21. 4 Close the top cover. 5 Click Start→ Programs or All Programs→ Dell Printers→ Dell Photo AIO Printer 924→ Dell All-In-One Center. For Windows XP: • If you see Fax in the list that appears, continue with "Installing Microsoft Fax Console... you are using your printer without a computer, you can enlarge or reduce your document between 25-400 percent using the Dell All-In-One Center. For more information, see that appears, you have the printer attached to options using the operator panel. 1 Load the paper. Using the Printer 35


