User Guide
Page 7
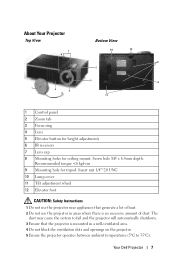
About Your Projector Top View 1 6 Bottom View 10 12 8 2 3 9 7 5 4 11 1 Control panel 2 Zoom tab 3 Focus ring 4 Lens 5 Elevator button for height adjustments 6 IR receivers 7 Lens cap 8 Mounting holes for ceiling mount: Screw hole M3 x 6.5mm depth. Recommended torque
About Your Projector Top View 1 6 Bottom View 10 12 8 2 3 9 7 5 4 11 1 Control panel 2 Zoom tab 3 Focus ring 4 Lens 5 Elevator button for height adjustments 6 IR receivers 7 Lens cap 8 Mounting holes for ceiling mount: Screw hole M3 x 6.5mm depth. Recommended torque
User Guide
Page 8
It should be installed by a qualified technician. • Recommended Projector Ceiling Mount Kit (P/N: C3505). For more information, see the Dell Support website at support.dell.com. • For more information, see the Safety Information that is on as the heat may cause injury to your eyes. 8 Do not ... or burn. 6 Do not try to touch the ventilation outlet as it can become very hot after the projector has been turned on or immediately after it is turned off. 7 Do not look into the lens while the projector is on as it may cause the object to ceiling mount the projector yourself.
It should be installed by a qualified technician. • Recommended Projector Ceiling Mount Kit (P/N: C3505). For more information, see the Dell Support website at support.dell.com. • For more information, see the Safety Information that is on as the heat may cause injury to your eyes. 8 Do not ... or burn. 6 Do not try to touch the ventilation outlet as it can become very hot after the projector has been turned on or immediately after it is turned off. 7 Do not look into the lens while the projector is on as it may cause the object to ceiling mount the projector yourself.
User Guide
Page 39
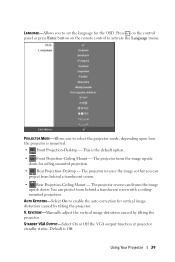
... the OSD. Default is the default option. • Front Projection-Ceiling Mount - Using Your Projector 39 Press on the control panel or press Enter button on the remote control to select the projector mode, depending upon how the projector is mounted. • Front Projection-Desktop - V. PROJECTOR MODE-Allows you to activate the Language menu. KEYSTONE-Manually adjust...
... the OSD. Default is the default option. • Front Projection-Ceiling Mount - Using Your Projector 39 Press on the control panel or press Enter button on the remote control to select the projector mode, depending upon how the projector is mounted. • Front Projection-Desktop - V. PROJECTOR MODE-Allows you to activate the Language menu. KEYSTONE-Manually adjust...
User Guide
Page 51
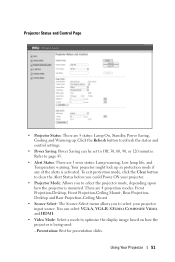
...clear the Alert Status before you could Power ON your projector. • Projector Mode: Allows you to select your projector input source. Using Your Projector 51 Presentation: Best for presentation slides. Your projector might lock up . Click the Refresh button to ... lamp life, and Temperature warning. Refer to select the projector mode, depending upon how the projector is mounted. There are 4 projection modes: Front Projection-Desktop, Front Projection-Ceiling Mount, Rear ProjectionDesktop and Rear Projection-Ceiling Mount • Source Select: The Source Select menu allows you...
...clear the Alert Status before you could Power ON your projector. • Projector Mode: Allows you to select your projector input source. Using Your Projector 51 Presentation: Best for presentation slides. Your projector might lock up . Click the Refresh button to ... lamp life, and Temperature warning. Refer to select the projector mode, depending upon how the projector is mounted. There are 4 projection modes: Front Projection-Desktop, Front Projection-Ceiling Mount, Rear ProjectionDesktop and Rear Projection-Ceiling Mount • Source Select: The Source Select menu allows you...


