Setup Guide
Page 8
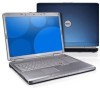
Using The Wireless Switch To turn on the wireless switch, slide it from the rear to the front of the computer until it into place. - Off - Using an incompatible cable or ... wireless connections, make sure the wireless switch is in the "On" position. CAUTION: The AC adapter works with electrical outlets worldwide. Momentary 6 Setting Up Your Inspiron Laptop Connect the AC Adapter Connect the AC adapter to the computer and then plug it clicks into a wall outlet or surge protector. Check the Wireless...
Using The Wireless Switch To turn on the wireless switch, slide it from the rear to the front of the computer until it into place. - Off - Using an incompatible cable or ... wireless connections, make sure the wireless switch is in the "On" position. CAUTION: The AC adapter works with electrical outlets worldwide. Momentary 6 Setting Up Your Inspiron Laptop Connect the AC Adapter Connect the AC adapter to the computer and then plug it clicks into a wall outlet or surge protector. Check the Wireless...
Setup Guide
Page 14
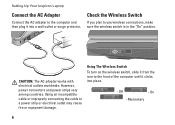
... device status lights located at -a-glance and time-saving shortcuts for wireless communication and keyboard input options. 1 2345 1 Power light - INSPIRON Using Your Inspiron Laptop Your Inspiron 1525/1526 has several indicators, buttons, and features that provide information at the front left of data, never turn on steadily or blinks to indicate battery charge status. 12
... device status lights located at -a-glance and time-saving shortcuts for wireless communication and keyboard input options. 1 2345 1 Power light - INSPIRON Using Your Inspiron Laptop Your Inspiron 1525/1526 has several indicators, buttons, and features that provide information at the front left of data, never turn on steadily or blinks to indicate battery charge status. 12
Setup Guide
Page 15
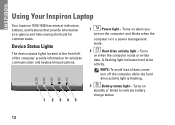
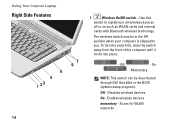
...switch, slide it away from the front of your desktop, and click Disable Bluetooth Radio or use the wireless switch. 13 Using Your Inspiron Laptop To turn off . On - NOTE: The card with Bluetooth wireless technology is an optional feature. Use the wireless switch located at the, ...right side of the computer to quickly turn on and off Bluetooth wireless, right-click the bluetooth icon in the notification area of the computer until it clicks into place. - Momentary...
...switch, slide it away from the front of your desktop, and click Disable Bluetooth Radio or use the wireless switch. 13 Using Your Inspiron Laptop To turn off . On - NOTE: The card with Bluetooth wireless technology is an optional feature. Use the wireless switch located at the, ...right side of the computer to quickly turn on and off Bluetooth wireless, right-click the bluetooth icon in the notification area of the computer until it clicks into place. - Momentary...
Setup Guide
Page 16
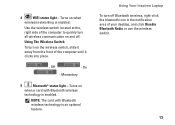
Using Your Inspiron Laptop Right Side Features 7 6 5 4 1 23 14 1 Wireless On/Off switch - Momentary NOTE: This switch can be in the Off position when your computer is shipped to rapidly turn the switch On, slide the switch away from the front of the computer until it clicks into place. - Disables... wireless devices On - Scans for WLAN networks To turn all wireless devices off or on such as WLAN cards and internal cards with Bluetooth wireless technology. Off - Off - The wireless switch may...
Using Your Inspiron Laptop Right Side Features 7 6 5 4 1 23 14 1 Wireless On/Off switch - Momentary NOTE: This switch can be in the Off position when your computer is shipped to rapidly turn the switch On, slide the switch away from the front of the computer until it clicks into place. - Disables... wireless devices On - Scans for WLAN networks To turn all wireless devices off or on such as WLAN cards and internal cards with Bluetooth wireless technology. Off - Off - The wireless switch may...
Setup Guide
Page 22
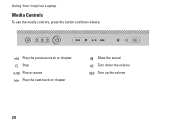
Play the previous track or chapter Stop Play or pause Play the next track or chapter Mute the sound Turn down the volume Turn up the volume 20 Using Your Inspiron Laptop Media Controls To use the media controls, press the button and then release.
Play the previous track or chapter Stop Play or pause Play the next track or chapter Mute the sound Turn down the volume Turn up the volume 20 Using Your Inspiron Laptop Media Controls To use the media controls, press the button and then release.

Setup Guide
Page 24
... purchased from other computers. This computer should only use batteries from Dell. CAUTION: Before removing the battery, shut down the computer and turn it clicks into place. 22 To replace the battery, slide it into the bay until it over. 2. Using Your Inspiron Laptop Removing and Replacing the Battery CAUTION: Using an incompatible battery...
... purchased from other computers. This computer should only use batteries from Dell. CAUTION: Before removing the battery, shut down the computer and turn it clicks into place. 22 To replace the battery, slide it into the bay until it over. 2. Using Your Inspiron Laptop Removing and Replacing the Battery CAUTION: Using an incompatible battery...

Setup Guide
Page 28
...turn on page 50. Off - Momentary 26 CAUTION: Only trained service personnel should remove the computer cover. If you can not solve your computer. See the Service Manual on the Dell Support website at support.dell.com for your problem using the following guidelines, see "Using Support Tools" on page 33 or "Contacting Dell..." on the wireless switch, slide it from the rear to the front of the computer until it clicks into place. - On - The wireless switch may be off. Network Problems Wireless Connections If the network connection is lost - INSPIRON Solving...
...turn on page 50. Off - Momentary 26 CAUTION: Only trained service personnel should remove the computer cover. If you can not solve your computer. See the Service Manual on the Dell Support website at support.dell.com for your problem using the following guidelines, see "Using Support Tools" on page 33 or "Contacting Dell..." on the wireless switch, slide it from the rear to the front of the computer until it clicks into place. - On - The wireless switch may be off. Network Problems Wireless Connections If the network connection is lost - INSPIRON Solving...
Owner's Manual
Page 180
...turning the equipment off and on, you are encouraged to try to provide reasonable protection against harmful interference in a residential installation. These limits are on the device or devices covered in this document in compliance with the FCC regulations: Product name: Model number: Company name: Dell™ Inspiron™ 1525/1526 PP29L Dell... Inc. Worldwide Regulatory Compliance & Environmental Affairs One Dell Way Round Rock, TX 78682 USA 512-338-4400 Macrovision ...
...turning the equipment off and on, you are encouraged to try to provide reasonable protection against harmful interference in a residential installation. These limits are on the device or devices covered in this document in compliance with the FCC regulations: Product name: Model number: Company name: Dell™ Inspiron™ 1525/1526 PP29L Dell... Inc. Worldwide Regulatory Compliance & Environmental Affairs One Dell Way Round Rock, TX 78682 USA 512-338-4400 Macrovision ...
Service Manual
Page 2
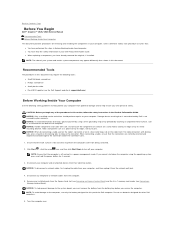
...l You have read the safety information in your computer. NOTE: To avoid damage to the computer, use batteries designed for other Dell computers. 6. Turn the computer over. CAUTION: Before you service the computer. NOTE: Ensure that the work surface is not covered by periodically touching... in the Product Information Guide. For cable connectors with care. Back to Contents Page Before You Begin Dell™ Inspiron™ 1525/1526 Service Manual Recommended Tools Before Working Inside Your Computer This document provides procedures for removing and installing the components ...
...l You have read the safety information in your computer. NOTE: To avoid damage to the computer, use batteries designed for other Dell computers. 6. Turn the computer over. CAUTION: Before you service the computer. NOTE: Ensure that the work surface is not covered by periodically touching... in the Product Information Guide. For cable connectors with care. Back to Contents Page Before You Begin Dell™ Inspiron™ 1525/1526 Service Manual Recommended Tools Before Working Inside Your Computer This document provides procedures for removing and installing the components ...
Service Manual
Page 4
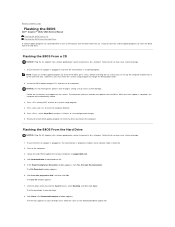
... hard drive. The Save In window appears. 7. Click Close if the Download Complete window appears. Insert the BIOS-update program CD, and turn on the computer. 3. When the flash update is titled the same as the downloaded BIOS update file. Ensure that you use a BIOS ...configuration changes. 6. If the Export Compliance Disclaimer window appears, click Yes, I Accept this Agreement. Back to Contents Page Flashing the BIOS Dell™ Inspiron™ 1525/1526 Service Manual Flashing the BIOS From a CD Flashing the BIOS From the Hard Drive If a BIOS-update program CD is attached. 2....
... hard drive. The Save In window appears. 7. Click Close if the Download Complete window appears. Insert the BIOS-update program CD, and turn on the computer. 3. When the flash update is titled the same as the downloaded BIOS update file. Ensure that you use a BIOS ...configuration changes. 6. If the Export Compliance Disclaimer window appears, click Yes, I Accept this Agreement. Back to Contents Page Flashing the BIOS Dell™ Inspiron™ 1525/1526 Service Manual Flashing the BIOS From a CD Flashing the BIOS From the Hard Drive If a BIOS-update program CD is attached. 2....

Service Manual
Page 9
Turn the computer top side up . 1 center control cover 2 scribe 3 media control buttons connector 5. Disconnect the cable from the battery bay. 3. Remove the center control cover. 7. ... securing the center control cover from the media control buttons connector located underneath the center control cover. Back to Contents Page Center Control Cover Dell™ Inspiron™ 1525/1526 Service Manual CAUTION: Before you begin working inside the computer. NOTICE: To avoid electrostatic discharge, ground yourself by using a wrist grounding strap or...
Turn the computer top side up . 1 center control cover 2 scribe 3 media control buttons connector 5. Disconnect the cable from the battery bay. 3. Remove the center control cover. 7. ... securing the center control cover from the media control buttons connector located underneath the center control cover. Back to Contents Page Center Control Cover Dell™ Inspiron™ 1525/1526 Service Manual CAUTION: Before you begin working inside the computer. NOTICE: To avoid electrostatic discharge, ground yourself by using a wrist grounding strap or...
Service Manual
Page 13
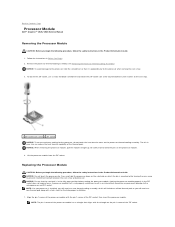
Back to Contents Page Processor Module Dell™ Inspiron™ 1525/1526 Service Manual Removing the Processor Module CAUTION: Before you begin the following procedure, follow the safety instructions in the fully open position before seating the ... to prevent intermittent contact between the cam screw and processor. Press and hold the screwdriver so that aligns with a tech sheet to the processor when turning the cam screw. 3. Remove the processor thermal-cooling assembly (see Removing the Processor Thermal-Cooling Assembly). NOTICE: To avoid damage to the processor, hold the...
Back to Contents Page Processor Module Dell™ Inspiron™ 1525/1526 Service Manual Removing the Processor Module CAUTION: Before you begin the following procedure, follow the safety instructions in the fully open position before seating the ... to prevent intermittent contact between the cam screw and processor. Press and hold the screwdriver so that aligns with a tech sheet to the processor when turning the cam screw. 3. Remove the processor thermal-cooling assembly (see Removing the Processor Thermal-Cooling Assembly). NOTICE: To avoid damage to the processor, hold the...
Service Manual
Page 15
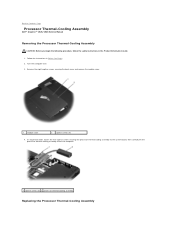
Turn the computer over. 3. In sequential order, loosen the five captive screws securing the processor thermal-cooling assembly to Contents Page Processor Thermal-Cooling Assembly Dell™ Inspiron™ 1525/1526 Service Manual Removing the Processor Thermal-Cooling Assembly CAUTION: Before you begin the following procedure, follow the safety instructions in Before You Begin. 2. Remove...
Turn the computer over. 3. In sequential order, loosen the five captive screws securing the processor thermal-cooling assembly to Contents Page Processor Thermal-Cooling Assembly Dell™ Inspiron™ 1525/1526 Service Manual Removing the Processor Thermal-Cooling Assembly CAUTION: Before you begin the following procedure, follow the safety instructions in Before You Begin. 2. Remove...

Service Manual
Page 25
...drive out of the procedures in this section, follow the safety instructions in Sleep state. Follow the procedures in the Product Information Guide). 3. Turn the computer over and remove the two hard drive screws. 1 screws (2) 2 hard drive NOTICE: When the hard drive is on or in.... CAUTION: Do not touch the metal housing of the hard drive cover), then pull to Contents Page Hard Drive Dell™ Inspiron™ 1525/1526 Service Manual NOTE: Dell does not guarantee compatibility or provide support for hard drives obtained from the computer while the drive is hot. Exercise...
...drive out of the procedures in this section, follow the safety instructions in Sleep state. Follow the procedures in the Product Information Guide). 3. Turn the computer over and remove the two hard drive screws. 1 screws (2) 2 hard drive NOTICE: When the hard drive is on or in.... CAUTION: Do not touch the metal housing of the hard drive cover), then pull to Contents Page Hard Drive Dell™ Inspiron™ 1525/1526 Service Manual NOTE: Dell does not guarantee compatibility or provide support for hard drives obtained from the computer while the drive is hot. Exercise...

Service Manual
Page 31
Back to Contents Page Memory Dell™ Inspiron™ 1525/1526 Service Manual CAUTION: Before you install a module in the connector labeled "DIMMB." Turn the computer upside-down, loosen the eight captive screws on each end of the memory module connector until the module pops up...., do not use tools to install memory modules in two connectors, install a memory module in the Product Information Guide. Remove the module from Dell are located under your computer warranty. Your computer has two user-accessible SODIMM sockets, DIMM A and DIMM B, accessed from the bottom of the...
Back to Contents Page Memory Dell™ Inspiron™ 1525/1526 Service Manual CAUTION: Before you install a module in the connector labeled "DIMMB." Turn the computer upside-down, loosen the eight captive screws on each end of the memory module connector until the module pops up...., do not use tools to install memory modules in two connectors, install a memory module in the Product Information Guide. Remove the module from Dell are located under your computer warranty. Your computer has two user-accessible SODIMM sockets, DIMM A and DIMM B, accessed from the bottom of the...
Service Manual
Page 33
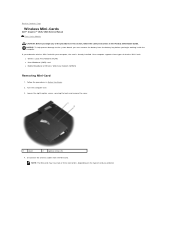
...(WWAN) Removing Mini-Card 1. NOTICE: To help prevent damage to Contents Page Wireless Mini-Cards Dell™ Inspiron™ 1525/1526 Service Manual Flash Cache Module CAUTION: Before you begin working inside the computer. Disconnect the antenna ...cables from the battery bay before you begin any of the procedures in this section, follow the safety instructions in Before You Begin. 2. Your computer supports three types of card you ordered. Turn...
...(WWAN) Removing Mini-Card 1. NOTICE: To help prevent damage to Contents Page Wireless Mini-Cards Dell™ Inspiron™ 1525/1526 Service Manual Flash Cache Module CAUTION: Before you begin working inside the computer. Disconnect the antenna ...cables from the battery bay before you begin any of the procedures in this section, follow the safety instructions in Before You Begin. 2. Your computer supports three types of card you ordered. Turn...
Service Manual
Page 36
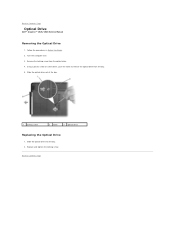
Using a plastic scribe or screw driver, push the notch to Contents Page Slide the optical drive into the bay. 2. Replace and tighten the locking screw. Follow the procedures in Before You Begin. 2. Back to release the optical drive from the optical drive. 4. Remove the locking screw from the bay. 5. Slide the optical drive out of the bay. 1 locking screw 2 notch 3 optical drive Replacing the Optical Drive 1. Back to Contents Page Optical Drive Dell™ Inspiron™ 1525/1526 Service Manual Removing the Optical Drive 1. Turn the computer over. 3.
Using a plastic scribe or screw driver, push the notch to Contents Page Slide the optical drive into the bay. 2. Replace and tighten the locking screw. Follow the procedures in Before You Begin. 2. Back to release the optical drive from the optical drive. 4. Remove the locking screw from the bay. 5. Slide the optical drive out of the bay. 1 locking screw 2 notch 3 optical drive Replacing the Optical Drive 1. Back to Contents Page Optical Drive Dell™ Inspiron™ 1525/1526 Service Manual Removing the Optical Drive 1. Turn the computer over. 3.
Service Manual
Page 37
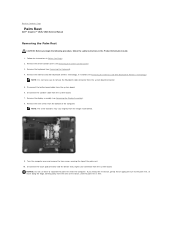
... may vary slightly from the system board. Remove the display assembly (see Removing the Internal Card With Bluetooth® Wireless Technology). Turn the computer over and remove the two screws securing the top of the computer. Disconnect the touch pad connector and the device status... If you begin the following procedure, follow the safety instructions in Before You Begin. 2. Back to Contents Page Palm Rest Dell™ Inspiron™ 1525/1526 Service Manual Removing the Palm Rest CAUTION: Before you encounter resistance, gently flex or apply pressure to the palm rest, or...
... may vary slightly from the system board. Remove the display assembly (see Removing the Internal Card With Bluetooth® Wireless Technology). Turn the computer over and remove the two screws securing the top of the computer. Disconnect the touch pad connector and the device status... If you begin the following procedure, follow the safety instructions in Before You Begin. 2. Back to Contents Page Palm Rest Dell™ Inspiron™ 1525/1526 Service Manual Removing the Palm Rest CAUTION: Before you encounter resistance, gently flex or apply pressure to the palm rest, or...


