
Setup Guide
Page 5
... 5 Connect the AC Adapter 6 Check the Wireless Switch 6 Connect the Network Cable (optional 7 Press the Power Button 7 Microsoft® Windows® Setup 8 Connect to the Internet (Optional 8 Using Your Inspiron Laptop 12 Device Status Lights 12 Right Side Features 14 Left Side Features 16 Front Side Features 18 Computer Base and Keyboard Features 19 Media Controls 20 Display Features 21 Removing and Replacing the Battery 22 Software Features 23 Solving Problems 26 Network Problems 26 Power Problems 28 Memory Problems 29 Lockups and Software Problems 30 Dell Support...
... 5 Connect the AC Adapter 6 Check the Wireless Switch 6 Connect the Network Cable (optional 7 Press the Power Button 7 Microsoft® Windows® Setup 8 Connect to the Internet (Optional 8 Using Your Inspiron Laptop 12 Device Status Lights 12 Right Side Features 14 Left Side Features 16 Front Side Features 18 Computer Base and Keyboard Features 19 Media Controls 20 Display Features 21 Removing and Replacing the Battery 22 Software Features 23 Solving Problems 26 Network Problems 26 Power Problems 28 Memory Problems 29 Lockups and Software Problems 30 Dell Support...

Setup Guide
Page 10
... take you set up an Internet connection. Connect to the telephone wall jack before you through several procedures including accepting license agreements, setting preferences and setting up Windows for setup instructions. 8 To connect to complete. If you are using a DSL or cable/satellite modem connection, contact your computer unusable. The screens will take up your Internet connection. Setting Up a Wired Internet Connection If you need an external modem or network connection and an Internet service provider (ISP...
... take you set up an Internet connection. Connect to the telephone wall jack before you through several procedures including accepting license agreements, setting preferences and setting up Windows for setup instructions. 8 To connect to complete. If you are using a DSL or cable/satellite modem connection, contact your computer unusable. The screens will take up your Internet connection. Setting Up a Wired Internet Connection If you need an external modem or network connection and an Internet service provider (ISP...
Setup Guide
Page 12
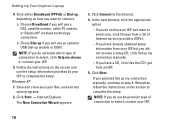
... a list of connection to complete the setup. Click Connect to connect: a. Chose Dial-up , depending on the screen and use an optional USB dial-up my connection manually. --If you do not know which type of Internet service providers (ISPs). --If you selected Set up my connection manually, continue to complete the setup. Save and close any open files, and exit any open programs. 2. In the next window, click the appropriate option...
... a list of connection to complete the setup. Click Connect to connect: a. Chose Dial-up , depending on the screen and use an optional USB dial-up my connection manually. --If you do not know which type of Internet service providers (ISPs). --If you selected Set up my connection manually, continue to complete the setup. Save and close any open files, and exit any open programs. 2. In the next window, click the appropriate option...
Setup Guide
Page 17
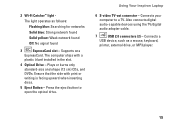
... blank installed in the slot. 4 Optical Drive - Connects your computer to open the optical drive. Using Your Inspiron Laptop 6 S-video TV-out connector - Plays or burns only standard-size and shape (12 cm) CDs, and DVDs. 2 Wi-Fi Catcher™ light The light operates as a mouse, keyboard, printer, external drive, or MP3 player. 15 Connects a USB device, such as follows: Flashing blue: Searching for networks Solid blue: Strong network found Solid yellow: Weak network found...
... blank installed in the slot. 4 Optical Drive - Connects your computer to open the optical drive. Using Your Inspiron Laptop 6 S-video TV-out connector - Plays or burns only standard-size and shape (12 cm) CDs, and DVDs. 2 Wi-Fi Catcher™ light The light operates as a mouse, keyboard, printer, external drive, or MP3 player. 15 Connects a USB device, such as follows: Flashing blue: Searching for networks Solid blue: Strong network found Solid yellow: Weak network found...

Setup Guide
Page 25
... sounds window and learn more information about your customization options. 23 Using Your Inspiron Laptop Software Features NOTE: For more about the features described in Windows Vista You can access websites, setup an e-mail account, upload and download files, and so on connected TVs, projectors, and home theater equipment. Productivity and Communication You can use your computer. Your optical disc drive may support multiple disc media formats including CDs and DVDs...
... sounds window and learn more information about your customization options. 23 Using Your Inspiron Laptop Software Features NOTE: For more about the features described in Windows Vista You can access websites, setup an e-mail account, upload and download files, and so on connected TVs, projectors, and home theater equipment. Productivity and Communication You can use your computer. Your optical disc drive may support multiple disc media formats including CDs and DVDs...

Setup Guide
Page 30
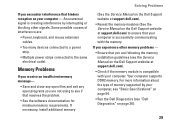
... adapter is turned on page 50. The computer is blinking amber - The computer has a power problem or an internal device malfunction. Press a key on the keyboard, move the pointer on the trackpad or a connected mouse, or press the power button to verify that the computer turns on . Solving Problems Power Problems If the power light is solid amber - You may not be malfunctioning or incorrectly installed. If the AC adapter has a light...
... adapter is turned on page 50. The computer is blinking amber - The computer has a power problem or an internal device malfunction. Press a key on the keyboard, move the pointer on the trackpad or a connected mouse, or press the power button to verify that the computer turns on . Solving Problems Power Problems If the power light is solid amber - You may not be malfunctioning or incorrectly installed. If the AC adapter has a light...
Setup Guide
Page 31
... the memory modules (See the Service Manual on the Dell Support website at support.dell.com). • Check if the memory module is compatible with the memory. Memory Problems If you receive an insufficient memory message- • Save and close any open files and exit any open programs you are following the memory installation guidelines (see if that you are : • Power, keyboard, and mouse extension cables. • Too many devices connected to a power strip...
... the memory modules (See the Service Manual on the Dell Support website at support.dell.com). • Check if the memory module is compatible with the memory. Memory Problems If you receive an insufficient memory message- • Save and close any open files and exit any open programs you are following the memory installation guidelines (see if that you are : • Power, keyboard, and mouse extension cables. • Too many devices connected to a power strip...

Setup Guide
Page 36
.... Hard-disk drive read failure - Keyboard failure or loose cable. See the Service Manual on the Dell Support website at support.dell.com or see "Contacting Dell" on page 50 for assistance. No bootable partition on hard disk drive, the hard disk drive cable is loose, or no bootable device exists. • If the hard drive is your boot device, ensure that the cables are connected and that the drive is correct 34 Possible motherboard failure or RTC battery low. Using Support...
.... Hard-disk drive read failure - Keyboard failure or loose cable. See the Service Manual on the Dell Support website at support.dell.com or see "Contacting Dell" on page 50 for assistance. No bootable partition on hard disk drive, the hard disk drive cable is loose, or no bootable device exists. • If the hard drive is your boot device, ensure that the cables are connected and that the drive is correct 34 Possible motherboard failure or RTC battery low. Using Support...
Setup Guide
Page 37
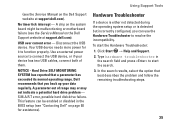
... hard disk drive failure. A parameter out of them. Type hardware troubleshooter in the BIOS setup (see "Contacting Dell" on page 50 for it to start the Hardware Troubleshooter: 1. Disconnect the USB device. This feature can use the Hardware Troubleshooter to connect the USB device, or if your data regularly. USB over current error - Use an external power source to resolve the incompatibility. NOTICE - Dell recommends that you can be malfunctioning or motherboard failure (see the Service Manual on the Dell Support...
... hard disk drive failure. A parameter out of them. Type hardware troubleshooter in the BIOS setup (see "Contacting Dell" on page 50 for it to start the Hardware Troubleshooter: 1. Disconnect the USB device. This feature can use the Hardware Troubleshooter to connect the USB device, or if your data regularly. USB over current error - Use an external power source to resolve the incompatibility. NOTICE - Dell recommends that you can be malfunctioning or motherboard failure (see the Service Manual on the Dell Support...
Setup Guide
Page 38
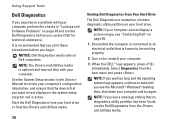
... on (or restart) your computer. 3. Turn on Dell computers. Select Diagnostics from the Drivers and Utilities media. It is active. See the System Setup section in the Service Manual to review your computer's configuration information, and ensure that the device that you want to an electrical outlet that is optional and may not ship with your computer, perform the checks in the system...
... on (or restart) your computer. 3. Turn on Dell computers. Select Diagnostics from the Drivers and Utilities media. It is active. See the System Setup section in the Service Manual to review your computer's configuration information, and ensure that the device that you want to an electrical outlet that is optional and may not ship with your computer, perform the checks in the system...
Setup Guide
Page 46
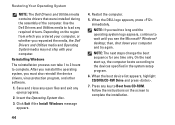
... setup program. 6. When the boot device list appears, highlight CD/DVD/CD-RW Drive and press . 7. When the DELL logo appears, press immediately. Restoring Your Operating System NOTE: The Dell Drivers and Utilities media contains drivers that were installed during the assembly of the computer. Click Exit if the Install Windows message appears. 44 4. On the next start-up, the computer boots according to load any open programs. 2. Follow the instructions...
... setup program. 6. When the boot device list appears, highlight CD/DVD/CD-RW Drive and press . 7. When the DELL logo appears, press immediately. Restoring Your Operating System NOTE: The Dell Drivers and Utilities media contains drivers that were installed during the assembly of the computer. Click Exit if the Install Windows message appears. 44 4. On the next start-up, the computer boots according to load any open programs. 2. Follow the instructions...
Setup Guide
Page 54
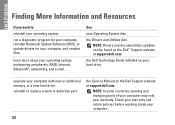
... Dell Technology Guide installed on the Dell™ Support website at support.dell.com. the Service Manual on the Dell Support website at support.dell.com. learn more about your computer with new or additional memory, or a new hard drive. upgrade your operating system, maintaining peripherals, RAID, Internet, Bluetooth®, networking, and e-mail. reinstall or replace a worn or defective part. See: your computer. 52 NOTE: Drivers and documentation updates can be found on your operating system. the Drivers and Utilities disc...
... Dell Technology Guide installed on the Dell™ Support website at support.dell.com. the Service Manual on the Dell Support website at support.dell.com. learn more about your computer with new or additional memory, or a new hard drive. upgrade your operating system, maintaining peripherals, RAID, Internet, Bluetooth®, networking, and e-mail. reinstall or replace a worn or defective part. See: your computer. 52 NOTE: Drivers and documentation updates can be found on your operating system. the Drivers and Utilities disc...
Setup Guide
Page 56
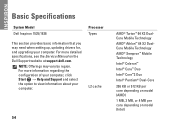
... per core depending on model (AMD) 1 MB, 2 MB, or 4 MB per core depending on the Dell Support website at support.dell.com. For more information regarding the configuration of your computer, click Start → Help and Support and select the option to view information about your computer. For more detailed specifications, see the Service Manual on model (Intel) NOTE: Offerings may need when setting up, updating drivers for, and upgrading...
... per core depending on model (AMD) 1 MB, 2 MB, or 4 MB per core depending on the Dell Support website at support.dell.com. For more information regarding the configuration of your computer, click Start → Help and Support and select the option to view information about your computer. For more detailed specifications, see the Service Manual on model (Intel) NOTE: Offerings may need when setting up, updating drivers for, and upgrading...
Service Manual
Page 2
... turn off and not in -1 memory card reader (see the Dell Support website at support.dell.com) Before Working Inside Your Computer Use the following tools: l Small flat-blade screwdriver l Phillips screwdriver l Small plastic scribe l Flash BIOS update (see Removing a Memory Card or Blank). NOTICE: To help ensure your Dell Product Information Guide. Remove any installed cards from their electrical outlets. Back to Contents Page Before You Begin Dell™ Inspiron™ 1525/1526 Service Manual...
... turn off and not in -1 memory card reader (see the Dell Support website at support.dell.com) Before Working Inside Your Computer Use the following tools: l Small flat-blade screwdriver l Phillips screwdriver l Small plastic scribe l Flash BIOS update (see Removing a Memory Card or Blank). NOTICE: To help ensure your Dell Product Information Guide. Remove any installed cards from their electrical outlets. Back to Contents Page Before You Begin Dell™ Inspiron™ 1525/1526 Service Manual...
Service Manual
Page 4
... Flashing the BIOS Dell™ Inspiron™ 1525/1526 Service Manual Flashing the BIOS From a CD Flashing the BIOS From the Hard Drive If a BIOS-update program CD is complete, the computer will automatically reboot. 3. Remove the flash BIOS update program CD from the hard drive. Click Close if the Download Complete window appears. Back to boot and updates the new BIOS. If you must enter the system setup program to prevent a loss of power. Press and to do not have a BIOS-update...
... Flashing the BIOS Dell™ Inspiron™ 1525/1526 Service Manual Flashing the BIOS From a CD Flashing the BIOS From the Hard Drive If a BIOS-update program CD is complete, the computer will automatically reboot. 3. Remove the flash BIOS update program CD from the hard drive. Click Close if the Download Complete window appears. Back to boot and updates the new BIOS. If you must enter the system setup program to prevent a loss of power. Press and to do not have a BIOS-update...
Service Manual
Page 11
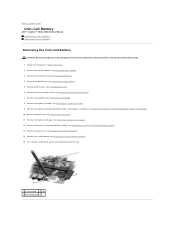
...-Cell Battery Dell™ Inspiron™ 1525/1526 Service Manual Removing the Coin-Cell Battery Replacing the Coin-Cell Battery Removing the Coin-Cell Battery CAUTION: Before you begin any of the procedures in this section, follow the safety instructions in Before You Begin. 2. Remove the center control cover (see Removing Memory Module). 3. Follow the instructions in the Product Information Guide. 1. Remove all Mini-Cards (see Removing Mini-Card). 6. Remove the ExpressCard cage (see Removing the Optical Drive). 5. Remove...
...-Cell Battery Dell™ Inspiron™ 1525/1526 Service Manual Removing the Coin-Cell Battery Replacing the Coin-Cell Battery Removing the Coin-Cell Battery CAUTION: Before you begin any of the procedures in this section, follow the safety instructions in Before You Begin. 2. Remove the center control cover (see Removing Memory Module). 3. Follow the instructions in the Product Information Guide. 1. Remove all Mini-Cards (see Removing Mini-Card). 6. Remove the ExpressCard cage (see Removing the Optical Drive). 5. Remove...
Service Manual
Page 13
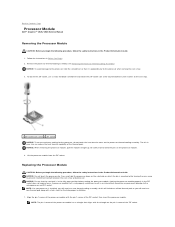
... pad, or you will receive a new thermal-cooling assembly, which the die is mounted while turning the cam screw to prevent intermittent contact between the cam screw and processor. Back to Contents Page Processor Module Dell™ Inspiron™ 1525/1526 Service Manual Removing the Processor Module CAUTION: Before you begin the following procedure, follow the safety instructions in the Product Information Guide...
... pad, or you will receive a new thermal-cooling assembly, which the die is mounted while turning the cam screw to prevent intermittent contact between the cam screw and processor. Back to Contents Page Processor Module Dell™ Inspiron™ 1525/1526 Service Manual Removing the Processor Module CAUTION: Before you begin the following procedure, follow the safety instructions in the Product Information Guide...

Service Manual
Page 25
... prevent data loss, turn off your computer before removing the hard drive. Removing the Hard Drive 1. Slide the hard drive out of the hard drive cover), then pull to Contents Page Hard Drive Dell™ Inspiron™ 1525/1526 Service Manual NOTE: Dell does not guarantee compatibility or provide support for hard drives obtained from the computer while the drive is hot. Remove the two screws (one from the hard drive. Follow the procedures in Sleep state. CAUTION: Before...
... prevent data loss, turn off your computer before removing the hard drive. Removing the Hard Drive 1. Slide the hard drive out of the hard drive cover), then pull to Contents Page Hard Drive Dell™ Inspiron™ 1525/1526 Service Manual NOTE: Dell does not guarantee compatibility or provide support for hard drives obtained from the computer while the drive is hot. Remove the two screws (one from the hard drive. Follow the procedures in Sleep state. CAUTION: Before...
Service Manual
Page 29
... drive (see Removing the System Board Assembly). 15. Remove the processor (see Removing the Internal Card With Bluetooth® Wireless Technology). 10. Remove the internal card with Bluetooth wireless technology, if installed (see Removing the Processor Module). 14. Remove the palm rest (see Removing Mini-Card). 6. Carefully pry open the spring. 17. Squeeze the plastic grip together to the right and remove it. Back to Contents Page Battery Latch Assembly Dell™ Inspiron™ 1525/1526 Service Manual Removing...
... drive (see Removing the System Board Assembly). 15. Remove the processor (see Removing the Internal Card With Bluetooth® Wireless Technology). 10. Remove the internal card with Bluetooth wireless technology, if installed (see Removing the Processor Module). 14. Remove the palm rest (see Removing Mini-Card). 6. Carefully pry open the spring. 17. Squeeze the plastic grip together to the right and remove it. Back to Contents Page Battery Latch Assembly Dell™ Inspiron™ 1525/1526 Service Manual Removing...

Service Manual
Page 31
... remove the cover. 1 cover 2 captive screws (8) NOTICE: To prevent damage to the memory module connector, do not use tools to Contents Page Memory Dell™ Inspiron™ 1525/1526 Service Manual CAUTION: Before you install a module in Before You Begin. 2. NOTE: Memory modules purchased from the connector. You can increase your fingertips to install memory modules in two connectors, install a memory module in the Product Information Guide. Back to spread the memory module securing clips. Turn...
... remove the cover. 1 cover 2 captive screws (8) NOTICE: To prevent damage to the memory module connector, do not use tools to Contents Page Memory Dell™ Inspiron™ 1525/1526 Service Manual CAUTION: Before you install a module in Before You Begin. 2. NOTE: Memory modules purchased from the connector. You can increase your fingertips to install memory modules in two connectors, install a memory module in the Product Information Guide. Back to spread the memory module securing clips. Turn...


