User Guide
Page 3
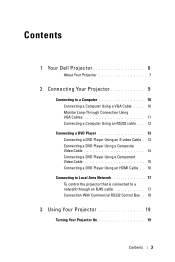
Contents 1 Your Dell Projector 6 About Your Projector 7 2 Connecting Your Projector 9 Connecting to a Computer 10 Connecting a Computer Using a VGA Cable . . . . 10 Monitor Loop-Through Connection Using VGA Cables 11 ... an S-video Cable . 13 Connecting a DVD Player Using a Composite Video Cable 14 Connecting a DVD Player Using a Component Video Cable 15 Connecting a DVD Player Using an HDMI Cable . . 16 Connecting to Local Area Network 17 To control the projector that is connected to a network through an RJ45 cable 17 Connection With Commercial...
Contents 1 Your Dell Projector 6 About Your Projector 7 2 Connecting Your Projector 9 Connecting to a Computer 10 Connecting a Computer Using a VGA Cable . . . . 10 Monitor Loop-Through Connection Using VGA Cables 11 ... an S-video Cable . 13 Connecting a DVD Player Using a Composite Video Cable 14 Connecting a DVD Player Using a Component Video Cable 15 Connecting a DVD Player Using an HDMI Cable . . 16 Connecting to Local Area Network 17 To control the projector that is connected to a network through an RJ45 cable 17 Connection With Commercial...
User Guide
Page 9
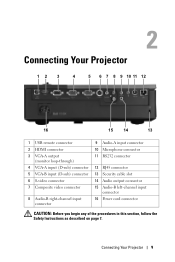
2 Connecting Your Projector 12 3 4 5 6 7 8 9 10 11 12 16 15 14 13 1 USB remote connector 2 HDMI connector 3 VGA-A output (monitor loop-through) 4 VGA-A input (D-sub) connector 5 VGA-B input (D-sub) connector 6 S-video connector 7 Composite video connector 8 Audio-B right-channel input connector 9 Audio-A ...
2 Connecting Your Projector 12 3 4 5 6 7 8 9 10 11 12 16 15 14 13 1 USB remote connector 2 HDMI connector 3 VGA-A output (monitor loop-through) 4 VGA-A input (D-sub) connector 5 VGA-B input (D-sub) connector 6 S-video connector 7 Composite video connector 8 Audio-B right-channel input connector 9 Audio-A ...
User Guide
Page 16
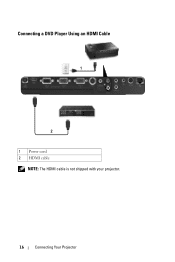
Connecting a DVD Player Using an HDMI Cable 1 2 1 Power cord 2 HDMI cable NOTE: The HDMI cable is not shipped with your projector. 16 Connecting Your Projector
Connecting a DVD Player Using an HDMI Cable 1 2 1 Power cord 2 HDMI cable NOTE: The HDMI cable is not shipped with your projector. 16 Connecting Your Projector

User Guide
Page 25
Using Your Projector 25 Use the directional keys and the Menu button to navigate through Analog RGB, Composite, Component (YPbPr via VGA), HDMI, and S-video sources when multiple sources are connected to the projector. Press to confirm the selection item. Press to navigate through the On-Screen Display (...
Using Your Projector 25 Use the directional keys and the Menu button to navigate through Analog RGB, Composite, Component (YPbPr via VGA), HDMI, and S-video sources when multiple sources are connected to the projector. Press to confirm the selection item. Press to navigate through the On-Screen Display (...

User Guide
Page 27
7 Video mode 8 Mouse up Press to increase the volume. 18 Source Press to switch between Analog RGB, Composite, Component (YPbPr, via VGA), HDMI, and S-video source. 19 Volume down V The projector has preset configurations that are optimized for displaying data (presentation slides) or video (movies, games, etc.). Pressing ...
7 Video mode 8 Mouse up Press to increase the volume. 18 Source Press to switch between Analog RGB, Composite, Component (YPbPr, via VGA), HDMI, and S-video source. 19 Volume down V The projector has preset configurations that are optimized for displaying data (presentation slides) or video (movies, games, etc.). Pressing ...
User Guide
Page 32
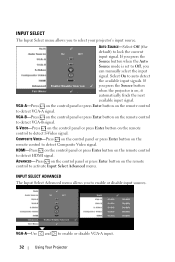
..., you can manually select the input signal. ADVANCED-Press on the control panel or press Enter button on the remote control to detect VGA-B signal. HDMI-Press on the control panel or press Enter button on the remote control to detect S-Video signal. If you press the Source button when the... panel or press Enter button on the remote control to select your projector's input source. INPUT SELECT The Input Select menu allows you to detect HDMI signal.
..., you can manually select the input signal. ADVANCED-Press on the control panel or press Enter button on the remote control to detect VGA-B signal. HDMI-Press on the control panel or press Enter button on the remote control to detect S-Video signal. If you press the Source button when the... panel or press Enter button on the remote control to select your projector's input source. INPUT SELECT The Input Select menu allows you to detect HDMI signal.
User Guide
Page 33
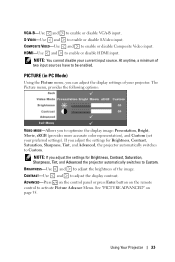
... Brightness, Contrast, Saturation, Sharpness, Tint, and Advanced, the projector automatically switches to be enabled. CONTRAST-Use and to enable or disable HDMI input. BRIGHTNESS-Use and to activate Picture Advance Menu. ADVANCED-Press on the control panel or press Enter button on page 35. VGA...remote control to adjust the brightness of your projector. and to enable or disable S-Video input. S-VIDEO-Use and COMPOSITE VIDEO-Use HDMI-Use and to enable or disable Composite Video input. Using Your Projector 33 NOTE: You cannot disable your preferred settings). If you ...
... Brightness, Contrast, Saturation, Sharpness, Tint, and Advanced, the projector automatically switches to be enabled. CONTRAST-Use and to enable or disable HDMI input. BRIGHTNESS-Use and to activate Picture Advance Menu. ADVANCED-Press on the control panel or press Enter button on page 35. VGA...remote control to adjust the brightness of your projector. and to enable or disable S-Video input. S-VIDEO-Use and COMPOSITE VIDEO-Use HDMI-Use and to enable or disable Composite Video input. Using Your Projector 33 NOTE: You cannot disable your preferred settings). If you ...
User Guide
Page 43
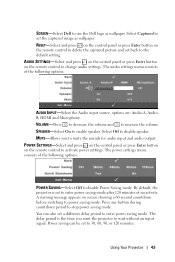
The audio settings menu consists of the following options: AUDIO INPUT-Select the Audio input source, options are: Audio-A, AudioB, HDMI and Microphone. Select Off to mute the sounds for audio input and audio output. MUTE-Allows you want the projector to increase the ... showing a 60-second countdown before switching to enable speaker. SPEAKER-Select On to power saving mode. Using Your Projector 43 SCREEN-Select Dell to use the Dell logo as wallpaper. A warning message appears on the remote control to delete the captured picture and set back to change audio settings. ...
The audio settings menu consists of the following options: AUDIO INPUT-Select the Audio input source, options are: Audio-A, AudioB, HDMI and Microphone. Select Off to mute the sounds for audio input and audio output. MUTE-Allows you want the projector to increase the ... showing a 60-second countdown before switching to enable speaker. SPEAKER-Select On to power saving mode. Using Your Projector 43 SCREEN-Select Dell to use the Dell logo as wallpaper. A warning message appears on the remote control to delete the captured picture and set back to change audio settings. ...
User Guide
Page 51
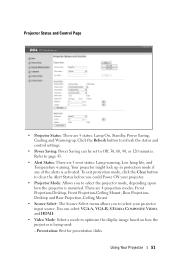
Click the Refresh button to refresh the status and control settings. • Power Saving: Power Saving can select VGA-A, VGA-B, S-VIDEO, COMPOSITE VIDEO, and HDMI. • Video Mode: Select a mode to Off, 30, 60, 90, or 120 minutes. Presentation: Best for presentation slides. There are 3 error status: Lamp warning, Low ...
Click the Refresh button to refresh the status and control settings. • Power Saving: Power Saving can select VGA-A, VGA-B, S-VIDEO, COMPOSITE VIDEO, and HDMI. • Video Mode: Select a mode to Off, 30, 60, 90, or 120 minutes. Presentation: Best for presentation slides. There are 3 error status: Lamp warning, Low ...

User Guide
Page 52
... value to adjust the brightness of the image. • Contrast: Select value to adjust the display contrast. • Audio Input: You can select Audio-A, Audio-B, HDMI and Microphone for the input source • Volume: You can select the value (0~20) for the audio volume • Speaker: You can select On to...
... value to adjust the brightness of the image. • Contrast: Select value to adjust the display contrast. • Audio Input: You can select Audio-A, Audio-B, HDMI and Microphone for the input source • Volume: You can select the value (0~20) for the audio volume • Speaker: You can select On to...
User Guide
Page 69
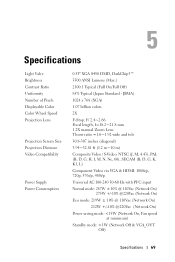
... and tele 30.8-307 inches (diagonal) 3.94~32.81 ft (1.2 m~10 m) Composite Video / S-Video: NTSC (J, M, 4.43), PAL (B, D, G, H, I, M, N, Nc, 60), SECAM (B, D, G, K, K1, L) Component Video via VGA & HDMI: 1080i/p, 720p, 576i/p, 480i/p Universal AC 100-240 50-60 Hz with PFC input Normal mode: 287W ± 10% @ 110Vac (Network On) 275W +/-10% @220Vac...
... and tele 30.8-307 inches (diagonal) 3.94~32.81 ft (1.2 m~10 m) Composite Video / S-Video: NTSC (J, M, 4.43), PAL (B, D, G, H, I, M, N, Nc, 60), SECAM (B, D, G, K, K1, L) Component Video via VGA & HDMI: 1080i/p, 720p, 576i/p, 480i/p Universal AC 100-240 50-60 Hz with PFC input Normal mode: 287W ± 10% @ 110Vac (Network On) 275W +/-10% @220Vac...

User Guide
Page 70
... RCA jack for Y/C signal. S-Video input: One standard 4-pin min-DIN S-Video connector for CVBS signal. HDMI input: One HDMI connector for VGA-A loop through. HDCP compliant. VGA output: One 15-pin D-sub connector (Black) for supporting HDMI 1.3. Analog Audio input: One 3.5 mm stereo mini phone jack (Blue) & one pair of RCA connector...
... RCA jack for Y/C signal. S-Video input: One standard 4-pin min-DIN S-Video connector for CVBS signal. HDMI input: One HDMI connector for VGA-A loop through. HDCP compliant. VGA output: One 15-pin D-sub connector (Black) for supporting HDMI 1.3. Analog Audio input: One 3.5 mm stereo mini phone jack (Blue) & one pair of RCA connector...
User Guide
Page 76
...image onto a screen. 76 Glossary A network protocol that translates domain names into a picture projected onto screen, also known as DVI and HDMI. DLP® - DMD - An internet service that enables a server to automatically assign a TCP/IP address to screen angle. A ...Screen - It measures from the surface of electrical signals. DHCP - Focal Length - Digital Micro-Mirror Device - HDCP - HDMI - Frequency - HDMI carries both uncompressed high definition video along with digital audio and device control data in cycles per the example above. The closest ...
...image onto a screen. 76 Glossary A network protocol that translates domain names into a picture projected onto screen, also known as DVI and HDMI. DLP® - DMD - An internet service that enables a server to automatically assign a TCP/IP address to screen angle. A ...Screen - It measures from the surface of electrical signals. DHCP - Focal Length - Digital Micro-Mirror Device - HDCP - HDMI - Frequency - HDMI carries both uncompressed high definition video along with digital audio and device control data in cycles per the example above. The closest ...
User Guide
Page 78
... a Computer with a RS232 cable 12 Connecting with a Component Cable 15 Connecting with a Composite Cable 14 Connecting with an HDMI Cable 16 Connecting with an S-video Cable 13 HDMI cable 16, 17, 18 Power cord 10, 11, 12, 13, 14, 15, 16, 17, 18 RS232 cable 12... to VGA cable 10, 11 VGA to YPbPr cable 15 Connection Ports Audio input connector 9 Audio-B left-channel input connector 9 Audio-B right-channel input connector 9 HDMI connector 9 Microphone connector 9 Power cord connector 9 RS232 connector 9 Security cable slot 9 S-video connector 9 USB remote connector 9 VGA-A input (D-sub) connector 9...
... a Computer with a RS232 cable 12 Connecting with a Component Cable 15 Connecting with a Composite Cable 14 Connecting with an HDMI Cable 16 Connecting with an S-video Cable 13 HDMI cable 16, 17, 18 Power cord 10, 11, 12, 13, 14, 15, 16, 17, 18 RS232 cable 12... to VGA cable 10, 11 VGA to YPbPr cable 15 Connection Ports Audio input connector 9 Audio-B left-channel input connector 9 Audio-B right-channel input connector 9 HDMI connector 9 Microphone connector 9 Power cord connector 9 RS232 connector 9 Security cable slot 9 S-video connector 9 USB remote connector 9 VGA-A input (D-sub) connector 9...


