Manual
Page 2
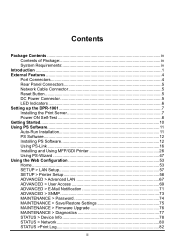
... 4 Port Connectors 4 Rear Panel Connectors 5 Network Cable Connector 5 Reset Button ...5 DC Power Connector 5 LED Indicators 6 Setting up the DPR-1061 7 Installing the Print Server 7 Power ON Self-Test 8 Getting Started...10 Using PS Software 11 Auto-Run Installation 11 PS Software 12 Installing PS Software 12 Using PS-Link 16 Installing and Using MFP/GDI Printer 26 Using PS-Wizard 47 Using the Web Configuration 53 Home ...53 SETUP > LAN Setup 57 SETUP > Printer Setup 58 ADVANCED > Advanced LAN 67 ADVANCED > User Access 69 ADVANCED > E-Mail Notification 71 ADVANCED > SNMP...
... 4 Port Connectors 4 Rear Panel Connectors 5 Network Cable Connector 5 Reset Button ...5 DC Power Connector 5 LED Indicators 6 Setting up the DPR-1061 7 Installing the Print Server 7 Power ON Self-Test 8 Getting Started...10 Using PS Software 11 Auto-Run Installation 11 PS Software 12 Installing PS Software 12 Using PS-Link 16 Installing and Using MFP/GDI Printer 26 Using PS-Wizard 47 Using the Web Configuration 53 Home ...53 SETUP > LAN Setup 57 SETUP > Printer Setup 58 ADVANCED > Advanced LAN 67 ADVANCED > User Access 69 ADVANCED > E-Mail Notification 71 ADVANCED > SNMP...
Manual
Page 3
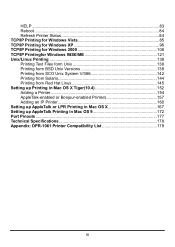
... Printing Text Files form Unix 138 Printing form BSD Unix Versions 139 Printing from SCO Unix System V/386 142 Printing from Solaris 144 Printing from Red Hat Linux 145 Setting up Printing in Mac OS X Tiger(10.4 152 Adding a Printer 154 AppleTalk-enabled or Bonjour-enabled Printers 157 Adding an IP Printer 160 Setting up AppleTalk or LPR Printing in Mac OS X 167 Setting up AppleTalk Printing in Mac OS 9 172 Port Pinouts ...177 Technical Specifications 178 Appendix: DPR-1061 Printer Compatibility List...
... Printing Text Files form Unix 138 Printing form BSD Unix Versions 139 Printing from SCO Unix System V/386 142 Printing from Solaris 144 Printing from Red Hat Linux 145 Setting up Printing in Mac OS X Tiger(10.4 152 Adding a Printer 154 AppleTalk-enabled or Bonjour-enabled Printers 157 Adding an IP Printer 160 Setting up AppleTalk or LPR Printing in Mac OS X 167 Setting up AppleTalk Printing in Mac OS 9 172 Port Pinouts ...177 Technical Specifications 178 Appendix: DPR-1061 Printer Compatibility List...
Manual
Page 5
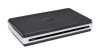
... make and model printer on most Windows-based networks. Introduction The D-Link DPR-1061 Print Server is IEEE1284-compliant high-speed bi-directional port, which can . The DPR-1061 includes easy-to-use software to easily configure and manage multiple print queues through TCP/IP. On peer-to-peer networks, workstations can print directly to the Print Server without increasing the load of another workstation or server. „ The DPR-1061's parallel printer port is an Ethernet/USB print server that allows users to install on...
... make and model printer on most Windows-based networks. Introduction The D-Link DPR-1061 Print Server is IEEE1284-compliant high-speed bi-directional port, which can . The DPR-1061 includes easy-to-use software to easily configure and manage multiple print queues through TCP/IP. On peer-to-peer networks, workstations can print directly to the Print Server without increasing the load of another workstation or server. „ The DPR-1061's parallel printer port is an Ethernet/USB print server that allows users to install on...
Manual
Page 6
... LAN Server „ AppleTalk MacOS EtherTalk Furthermore, the MFP server features various useful software utilities: PS Softwarea user-friendly program used to add a network printer on Windows for the MFP Server, contains PS-Link and PS-Wizard: 2 „ Because the DPR-1061's very portable and inexpensive compared to a PC-based print server, and Print Server connects to your file servers through the network, printers can be deployed to locations of maximum convenience to users. „ Use USB redirection software (PS-Link) to support MFP printer's print/scan...
... LAN Server „ AppleTalk MacOS EtherTalk Furthermore, the MFP server features various useful software utilities: PS Softwarea user-friendly program used to add a network printer on Windows for the MFP Server, contains PS-Link and PS-Wizard: 2 „ Because the DPR-1061's very portable and inexpensive compared to a PC-based print server, and Print Server connects to your file servers through the network, printers can be deployed to locations of maximum convenience to users. „ Use USB redirection software (PS-Link) to support MFP printer's print/scan...
Manual
Page 8
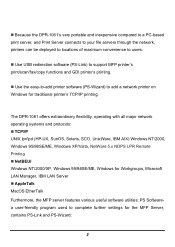
..., excluding 10.) 4 Default IP Address of 255.255.255.0, then your computer's IP Address should be in DHCP server. NOTE: The PC's IP Address must be 192.168.0.x, where x is set as automatically getting from DHCP server or Router which build-in the same subnet as the Print Server's IP Address for the two devices to configure settings through the web browser. External Features Port Connectors The DPR-1061's three printer ports are labeled...
..., excluding 10.) 4 Default IP Address of 255.255.255.0, then your computer's IP Address should be in DHCP server. NOTE: The PC's IP Address must be 192.168.0.x, where x is set as automatically getting from DHCP server or Router which build-in the same subnet as the Print Server's IP Address for the two devices to configure settings through the web browser. External Features Port Connectors The DPR-1061's three printer ports are labeled...
Manual
Page 9
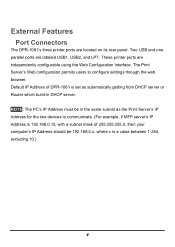
..., USB2, and LPT LEDs on the Print Server's rear panel and is located on the front panel light up and then release the button, the MFP Server will resume the factory default settings. DC Power Connector The DC power input connector is labeled DC 5V. 5 The port supports the NWay protocol, allowing the Print Server to 10Base-T Ethernet cabling or 100Base-TX Fast Ethernet cabling (which should be Category 5 twisted-pair cable).
..., USB2, and LPT LEDs on the Print Server's rear panel and is located on the front panel light up and then release the button, the MFP Server will resume the factory default settings. DC Power Connector The DC power input connector is labeled DC 5V. 5 The port supports the NWay protocol, allowing the Print Server to 10Base-T Ethernet cabling or 100Base-TX Fast Ethernet cabling (which should be Category 5 twisted-pair cable).
Manual
Page 10
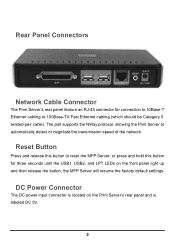
... of the Print Server features five LED indicators: „ Power Steady green confirms that the Print Server is powered ON. „ Link/Act Steady green confirms that the Print Server is receiving or transmitting from the network. „ USB1, USB2, LPT When these LEDs light in steady green, it indicates that data is on line now. While if these LEDs light in blinking green, it indicates the printer is transferred between print server and printer.
... of the Print Server features five LED indicators: „ Power Steady green confirms that the Print Server is powered ON. „ Link/Act Steady green confirms that the Print Server is receiving or transmitting from the network. „ USB1, USB2, LPT When these LEDs light in steady green, it indicates that data is on line now. While if these LEDs light in blinking green, it indicates the printer is transferred between print server and printer.
Manual
Page 11
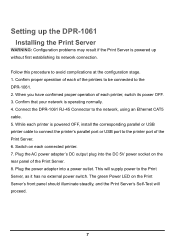
... external power switch. Setting up the DPR-1061 Installing the Print Server WARNING: Configuration problems may result if the Print Server is powered up without first establishing its power OFF. 3. When you have confirmed proper operation of the Print Server. 8. Plug the power adapter into the DC 5V power socket on each printer, switch its network connection. This will proceed. 7 Follow this procedure to the network, using an Ethernet CAT5 cable. 5. Confirm that your network is powered OFF, install...
... external power switch. Setting up the DPR-1061 Installing the Print Server WARNING: Configuration problems may result if the Print Server is powered up without first establishing its power OFF. 3. When you have confirmed proper operation of the Print Server. 8. Plug the power adapter into the DC 5V power socket on each printer, switch its network connection. This will proceed. 7 Follow this procedure to the network, using an Ethernet CAT5 cable. 5. Confirm that your network is powered OFF, install...
Manual
Page 15
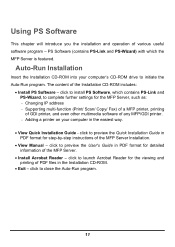
... of PDF files in the Installation CD-ROM. • Exit - click to initiate the Auto-Run program. Changing IP address - PS Software (contains PS-Link and PS-Wizard) with which contains PS-Link and PS-Wizard, to install PS Software, which the MFP Server is featured. click to complete further settings for step-by-step instructions of various useful software program - Supporting multi-function (Print/ Scan/ Copy/ Fax) of a MFP printer, printing of GDI printer, and...
... of PDF files in the Installation CD-ROM. • Exit - click to initiate the Auto-Run program. Changing IP address - PS Software (contains PS-Link and PS-Wizard) with which contains PS-Link and PS-Wizard, to install PS Software, which the MFP Server is featured. click to complete further settings for step-by-step instructions of various useful software program - Supporting multi-function (Print/ Scan/ Copy/ Fax) of a MFP printer, printing of GDI printer, and...

Manual
Page 20
... MFP server identity data is to enable the MFP Server to support MFP/GDI printers. If your MFP server is a useful tool for Windows 2000/XP/2003/Vista, is discovered and listed in the same network segment. If the installation is successful, you setting up , please check its network connectivity and click the Discover button to StartÎ ProgramsÎ PS Software, and select PS-Link. Go to research it again. 16 Using PS-Link PS-Link, supports...
... MFP server identity data is to enable the MFP Server to support MFP/GDI printers. If your MFP server is a useful tool for Windows 2000/XP/2003/Vista, is discovered and listed in the same network segment. If the installation is successful, you setting up , please check its network connectivity and click the Discover button to StartÎ ProgramsÎ PS Software, and select PS-Link. Go to research it again. 16 Using PS-Link PS-Link, supports...
Manual
Page 29
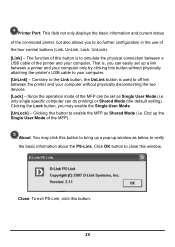
...-up window as Single User Mode (i.e. Click OK button to off link between the printer and your computer without physically attaching the printer's USB cable to enable the MFP as Shared Mode (i.e. Close: To exit PS-Link, click this button is , you can do further configuration in the use of the four control buttons (Link, UnLink, Lock, UnLock). [Link] - Since the operation mode of the MFP can be set up the Single User Mode of the MFP...
...-up window as Single User Mode (i.e. Click OK button to off link between the printer and your computer without physically attaching the printer's USB cable to enable the MFP as Shared Mode (i.e. Close: To exit PS-Link, click this button is , you can do further configuration in the use of the four control buttons (Link, UnLink, Lock, UnLock). [Link] - Since the operation mode of the MFP can be set up the Single User Mode of the MFP...
Manual
Page 54
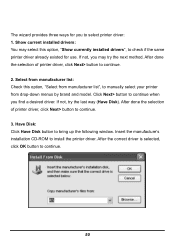
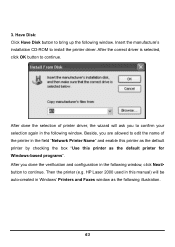
... done the selection of printer driver, click Next> button to manually select your printer from manufacturer list", to continue. 2. The wizard provides three ways for use. Show current installed drivers: You may try the last way (Have Disk). Insert the manufacture's installation CD-ROM to select printer driver: 1. After done the selection of printer driver, click Next> button to bring up the following window. Have Disk: Click...
... done the selection of printer driver, click Next> button to manually select your printer from manufacturer list", to continue. 2. The wizard provides three ways for use. Show current installed drivers: You may try the last way (Have Disk). Insert the manufacture's installation CD-ROM to select printer driver: 1. After done the selection of printer driver, click Next> button to bring up the following window. Have Disk: Click...
Manual
Page 62
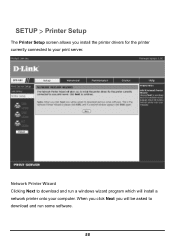
SETUP > Printer Setup The Printer Setup screen allows you will install a network printer onto your print server. Network Printer Wizard Clicking Next to download and run a windows wizard program which will be asked to your computer. When you click Next you install the printer drivers for the printer currently connected to download and run some software. 58
SETUP > Printer Setup The Printer Setup screen allows you will install a network printer onto your print server. Network Printer Wizard Clicking Next to download and run a windows wizard program which will be asked to your computer. When you click Next you install the printer drivers for the printer currently connected to download and run some software. 58
Manual
Page 67
... OK button to install the printer driver. After done the selection of the printer in the field "Network Printer Name" and enable this printer as the default printer by checking the box "Use this manual) will ask you done the verification and configuration in Windows' Printers and Faxes window as the default printer for Windows-based programs". Beside, you are allowed to edit the name of printer driver, the wizard will be auto-created in...
... OK button to install the printer driver. After done the selection of the printer in the field "Network Printer Name" and enable this printer as the default printer by checking the box "Use this manual) will ask you done the verification and configuration in Windows' Printers and Faxes window as the default printer for Windows-based programs". Beside, you are allowed to edit the name of printer driver, the wizard will be auto-created in...
Manual
Page 72
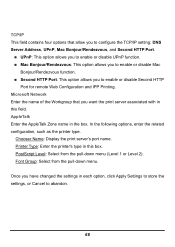
..., enter the related configuration, such as the printer type. Once you to enable or disable Second HTTP Port for remote Web Configuration and IPP Printing. AppleTalk Enter the AppleTalk Zone name in each option, click Apply Settings to store the settings, or Cancel to enable or disable Mac Bonjour/Rendezvous function. „ Second HTTP Port: This option allows you have changed the settings in the box. Microsoft Network Enter the name...
..., enter the related configuration, such as the printer type. Once you to enable or disable Second HTTP Port for remote Web Configuration and IPP Printing. AppleTalk Enter the AppleTalk Zone name in each option, click Apply Settings to store the settings, or Cancel to enable or disable Mac Bonjour/Rendezvous function. „ Second HTTP Port: This option allows you have changed the settings in the box. Microsoft Network Enter the name...

Manual
Page 83
Print Server Status This field displays the information of your printing tasks, etc. Printer Status The items in this field display the information of the printer, such as the given name for the printer, speed, printer status, and status of the print server about the firmware version, MAC/IP address, and up time. LAN Status You can monitor the networking status in this field, including the network connection, speed, and the packets status. 79
Print Server Status This field displays the information of your printing tasks, etc. Printer Status The items in this field display the information of the printer, such as the given name for the printer, speed, printer status, and status of the print server about the firmware version, MAC/IP address, and up time. LAN Status You can monitor the networking status in this field, including the network connection, speed, and the packets status. 79
Manual
Page 152
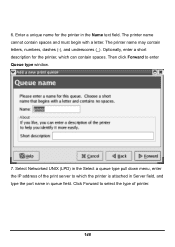
..., numbers, dashes (-), and underscores (_). The printer name cannot contain spaces and must begin with a letter. 6. Click Forward to enter Queue type window. 7. Then click Forward to select the type of the print server to which can contain spaces. Optionally, enter a short description for the printer in queue field. Select Networked UNIX (LPD) in the Select a queue type pull down menu, enter the IP address of printer...
..., numbers, dashes (-), and underscores (_). The printer name cannot contain spaces and must begin with a letter. 6. Click Forward to enter Queue type window. 7. Then click Forward to select the type of the print server to which can contain spaces. Optionally, enter a short description for the printer in queue field. Select Networked UNIX (LPD) in the Select a queue type pull down menu, enter the IP address of printer...
Manual
Page 171
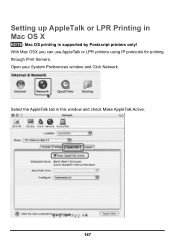
Setting up AppleTalk or LPR Printing in this window and check Make AppleTalk Active. 167 Select the AppleTalk tab in Mac OS X NOTE: Mac OS printing is supported by Postscript printers only! With Mac OSX you can use AppleTalk or LPR printers using IP protocols for printing through Print Servers. Open your System Preferences window and Click Network.
Setting up AppleTalk or LPR Printing in this window and check Make AppleTalk Active. 167 Select the AppleTalk tab in Mac OS X NOTE: Mac OS printing is supported by Postscript printers only! With Mac OSX you can use AppleTalk or LPR printers using IP protocols for printing through Print Servers. Open your System Preferences window and Click Network.
Manual
Page 175
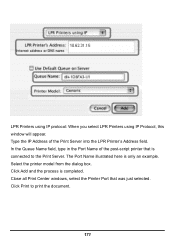
Click Print to the Print Server. The Port Name illustrated here is completed. LPR Printers using IP protocol: When you select LPR Printers using IP Protocol, this window will appear. Click Add and the process is only an example. Select the printer model from the dialog box. Close all Print Center windows, select the Printer Port that is connected to print the document. 171 In the Queue Name field, type in the Port Name of the Print Server into the LPR Printer's Address field. Type the IP Address of the post-script printer that was just selected.
Click Print to the Print Server. The Port Name illustrated here is completed. LPR Printers using IP protocol: When you select LPR Printers using IP Protocol, this window will appear. Click Add and the process is only an example. Select the printer model from the dialog box. Close all Print Center windows, select the Printer Port that is connected to print the document. 171 In the Queue Name field, type in the Port Name of the Print Server into the LPR Printer's Address field. Type the IP Address of the post-script printer that was just selected.

Manual
Page 176
... Print Server's IP Address in the same segment for network printing to one of the network printers in this manual are using the MacOS operating system. Setting up MFP server so that every Port Name is unique among all of the Print Server's ports is the same as its Port Name. You can be used for AppleTalk printing: „ Make sure the AppleTalk protocol is enabled in Mac OS 9 NOTE: Mac OS printing...
... Print Server's IP Address in the same segment for network printing to one of the network printers in this manual are using the MacOS operating system. Setting up MFP server so that every Port Name is unique among all of the Print Server's ports is the same as its Port Name. You can be used for AppleTalk printing: „ Make sure the AppleTalk protocol is enabled in Mac OS 9 NOTE: Mac OS printing...


