Manual
Page 4
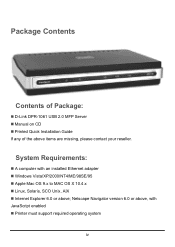
System Requirements: „ A computer with an installed Ethernet adapter „ Windows Vista/XP/2000/NT4/ME/98SE/95 „ Apple Mac OS 9.x to MAC OS X 10.4.x „ Linux, Solaris, SCO Unix, AIX „ Internet Explorer 6.0 or above , with JavaScript enabled „ Printer must support required operating system iv Netscape Navigator version 6.0 or above ; Package Contents Contents of Package: „ D-Link DPR-1061 USB 2.0 MFP Server „ Manual on CD „ Printed Quick Installation Guide If any of the above items are missing, please contact your reseller.
System Requirements: „ A computer with an installed Ethernet adapter „ Windows Vista/XP/2000/NT4/ME/98SE/95 „ Apple Mac OS 9.x to MAC OS X 10.4.x „ Linux, Solaris, SCO Unix, AIX „ Internet Explorer 6.0 or above , with JavaScript enabled „ Printer must support required operating system iv Netscape Navigator version 6.0 or above ; Package Contents Contents of Package: „ D-Link DPR-1061 USB 2.0 MFP Server „ Manual on CD „ Printed Quick Installation Guide If any of the above items are missing, please contact your reseller.
Manual
Page 7
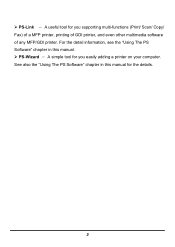
¾ PS-Link - A useful tool for you easily adding a printer on your computer. See also the "Using The PS Software" chapter in this manual for you supporting multi-functions (Print/ Scan/ Copy/ Fax) of a MFP printer, printing of GDI printer, and even other multimedia software of any MFP/GDI printer. For the detail information, see the "Using The PS Software" chapter in this manual. ¾ PS-Wizard - A simple tool for the details. 3
¾ PS-Link - A useful tool for you easily adding a printer on your computer. See also the "Using The PS Software" chapter in this manual for you supporting multi-functions (Print/ Scan/ Copy/ Fax) of a MFP printer, printing of GDI printer, and even other multimedia software of any MFP/GDI printer. For the detail information, see the "Using The PS Software" chapter in this manual. ¾ PS-Wizard - A simple tool for the details. 3
Manual
Page 14
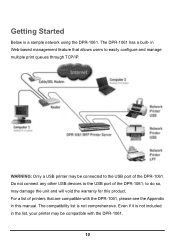
... The compatibility list is not included in the list, your printer may be connected to do so, may be compatible with the DPR-1061, please see the Appendix in Web-based management feature that allows users to easily configure and manage multiple print queues through TCP/IP.... in this product. For a list of the DPR-1061; Even if it is not comprehensive. Getting Started Below is a sample network using the DPR-1061. to the USB port of the DPR-1061. The DPR-1061 has a built- WARNING: Only a USB printer may damage the unit and will ...
... The compatibility list is not included in the list, your printer may be connected to do so, may be compatible with the DPR-1061, please see the Appendix in Web-based management feature that allows users to easily configure and manage multiple print queues through TCP/IP.... in this product. For a list of the DPR-1061; Even if it is not comprehensive. Getting Started Below is a sample network using the DPR-1061. to the USB port of the DPR-1061. The DPR-1061 has a built- WARNING: Only a USB printer may damage the unit and will ...
Manual
Page 15
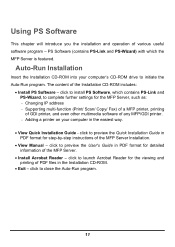
... program - click to preview the Quick Installation Guide in the easiest way. • View Quick Installation Guide - PS Software (contains PS-Link and PS-Wizard) with which contains PS-Link and PS-Wizard, to preview the User's Guide in PDF format for the viewing and printing of the MFP Server. • Install... for the MFP Server, such as: - Using PS Software This chapter will introduce you the installation and operation of the MFP Server Installation. • View Manual - click to close the Auto-Run program. 11
... program - click to preview the Quick Installation Guide in the easiest way. • View Quick Installation Guide - PS Software (contains PS-Link and PS-Wizard) with which contains PS-Link and PS-Wizard, to preview the User's Guide in PDF format for the viewing and printing of the MFP Server. • Install... for the MFP Server, such as: - Using PS Software This chapter will introduce you the installation and operation of the MFP Server Installation. • View Manual - click to close the Auto-Run program. 11

Manual
Page 21
... of the connected MFP Server within the network. Discover: You may click this field: Setup Wizard, Change IP Address, and Web Setup for you to manually research the current connected MFP Server.
... of the connected MFP Server within the network. Discover: You may click this field: Setup Wizard, Change IP Address, and Web Setup for you to manually research the current connected MFP Server.
Manual
Page 28
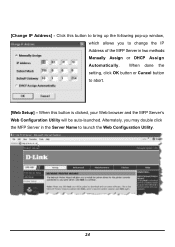
When done the setting, click OK button or Cancel button to launch the Web Configuration Utility. 24 When this button to bring up the following pop-up window, which allows you may double click the MFP Server in two methods: Manually Assign or DHCP Assign Automatically. Click this button is clicked, your Web browser and the MFP Server's Web Configuration Utility will be auto-launched. [Change IP Address] - Alternately, you to change the IP Address of the MFP Server in the Server Name to abort. [Web Setup] -
When done the setting, click OK button or Cancel button to launch the Web Configuration Utility. 24 When this button to bring up the following pop-up window, which allows you may double click the MFP Server in two methods: Manually Assign or DHCP Assign Automatically. Click this button is clicked, your Web browser and the MFP Server's Web Configuration Utility will be auto-launched. [Change IP Address] - Alternately, you to change the IP Address of the MFP Server in the Server Name to abort. [Web Setup] -
Manual
Page 52
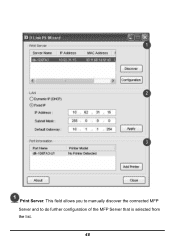
Print Server: This field allows you to manually discover the connected MFP Server and to do further configuration of the MFP Server that is selected from the list. 48
Print Server: This field allows you to manually discover the connected MFP Server and to do further configuration of the MFP Server that is selected from the list. 48
Manual
Page 54
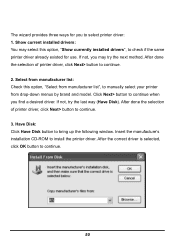
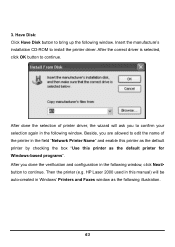
... drivers: You may try the last way (Have Disk). Click Next> button to continue when you may select this option, "Select from manufacturer list", to manually select your printer from manufacturer list: Check this option, "Show currently installed drivers", to check if the same printer driver already existed for you to...
... drivers: You may try the last way (Have Disk). Click Next> button to continue when you may select this option, "Select from manufacturer list", to manually select your printer from manufacturer list: Check this option, "Show currently installed drivers", to check if the same printer driver already existed for you to...
Manual
Page 55
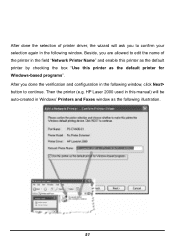
... the name of the printer in the field "Network Printer Name" and enable this printer as the default printer by checking the box "Use this manual) will be auto-created in Windows' Printers and Faxes window as the default printer for Windows-based programs".
... the name of the printer in the field "Network Printer Name" and enable this printer as the default printer by checking the box "Use this manual) will be auto-created in Windows' Printers and Faxes window as the default printer for Windows-based programs".
Manual
Page 57
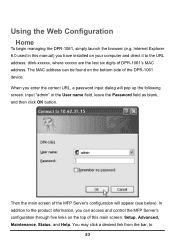
...be found on your computer and direct it to 53 Then the main screen of the DPR-1061 device. The MAC address can access and control the MFP Server's configuration through five links on the top of DPR-1061's MAC address. Input "admin" in this main screen: Setup, Advanced, Maintenance, Status...OK button. Using the Web Configuration Home To begin managing the DPR-1061, simply launch the browser (e.g. You may click a desired link from the bar, to the URL address: dlink-xxxxxx, where xxxxxx are the last six digits of this manual) you enter the correct URL, a password input dialog will...
...be found on your computer and direct it to 53 Then the main screen of the DPR-1061 device. The MAC address can access and control the MFP Server's configuration through five links on the top of DPR-1061's MAC address. Input "admin" in this main screen: Setup, Advanced, Maintenance, Status...OK button. Using the Web Configuration Home To begin managing the DPR-1061, simply launch the browser (e.g. You may click a desired link from the bar, to the URL address: dlink-xxxxxx, where xxxxxx are the last six digits of this manual) you enter the correct URL, a password input dialog will...
Manual
Page 60
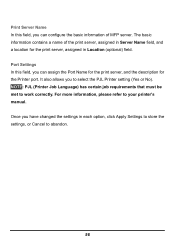
NOTE: PJL (Printer Job Language) has certain job requirements that must be met to your printer's manual. Once you can assign the Port Name for the print server, and the description for the print server, assigned in each option, click Apply Settings ...
NOTE: PJL (Printer Job Language) has certain job requirements that must be met to your printer's manual. Once you can assign the Port Name for the print server, and the description for the print server, assigned in each option, click Apply Settings ...

Manual
Page 61
... any of MFP server. TCP/IP This field allows you should enter the related information in manual or automatic method. Please note that this section is optional and you to abandon. 57 When you choose Manually Assign, you configure the local network settings of the settings here to get MFP server up...
... any of MFP server. TCP/IP This field allows you should enter the related information in manual or automatic method. Please note that this section is optional and you to abandon. 57 When you choose Manually Assign, you configure the local network settings of the settings here to get MFP server up...
Manual
Page 66
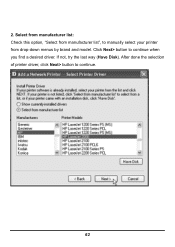
2. Click Next> button to continue. 62 If not, try the last way (Have Disk). After done the selection of printer driver, click Next> button to continue when you find a desired driver. Select from manufacturer list: Check this option, "Select from manufacturer list", to manually select your printer from drop-down menus by brand and model.
2. Click Next> button to continue. 62 If not, try the last way (Have Disk). After done the selection of printer driver, click Next> button to continue when you find a desired driver. Select from manufacturer list: Check this option, "Select from manufacturer list", to manually select your printer from drop-down menus by brand and model.
Manual
Page 67
... to confirm your selection again in the field "Network Printer Name" and enable this printer as the default printer by checking the box "Use this manual) will ask you to bring up the following illustration. 63
... to confirm your selection again in the field "Network Printer Name" and enable this printer as the default printer by checking the box "Use this manual) will ask you to bring up the following illustration. 63
Manual
Page 91
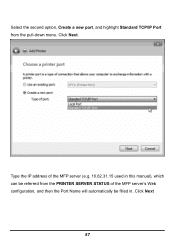
Click Next 87 Select the second option, Create a new port, and highlight Standard TCP/IP Port from the PRINTER SERVER STATUS of the MFP server (e.g. 10.62.31.15 used in . Type the IP address of the MFP server's Web configuration, and then the Port Name will automatically be filled in this manual), which can be referred from the pull-down menu. Click Next.
Click Next 87 Select the second option, Create a new port, and highlight Standard TCP/IP Port from the PRINTER SERVER STATUS of the MFP server (e.g. 10.62.31.15 used in . Type the IP address of the MFP server's Web configuration, and then the Port Name will automatically be filled in this manual), which can be referred from the pull-down menu. Click Next.

Manual
Page 102
Click Next 98 Select the second option, Create a new port, and highlight Standard TCP/IP Port from the PRINTER SERVER STATUS of the MFP server's Web configuration, and then the Port Name will automatically be filled in this manual), which can be referred from the pull-down menu. Type the IP address of the MFP server (e.g. 10.62.31.15 used in . Click Next.
Click Next 98 Select the second option, Create a new port, and highlight Standard TCP/IP Port from the PRINTER SERVER STATUS of the MFP server's Web configuration, and then the Port Name will automatically be filled in this manual), which can be referred from the pull-down menu. Type the IP address of the MFP server (e.g. 10.62.31.15 used in . Click Next.

Manual
Page 115
Type the IP address of the MFP server (e.g. 10.62.31.15 used in this manual), which can be checked from the PRINTER SERVER STATUS of the MFP server's Web configuration, and then the Port Name will automatically be filled in. Click Next 111 Click Next.
Type the IP address of the MFP server (e.g. 10.62.31.15 used in this manual), which can be checked from the PRINTER SERVER STATUS of the MFP server's Web configuration, and then the Port Name will automatically be filled in. Click Next 111 Click Next.

Manual
Page 137
Click OK. 133 At the following screen, browse for the printer port and highlight the port (e.g. dlink-1D6FA3 in this manual).
Click OK. 133 At the following screen, browse for the printer port and highlight the port (e.g. dlink-1D6FA3 in this manual).

Manual
Page 154
Click Forward to modify the configuration. 150 Click Apply button to confirm or Back button to continue. 9. If a printer has not been detected automatically, select the model from the Generic (click to confirm your printer configuration. The last step is to select manufacturer) pull-down menu, and the printer model from the sub-list. You can manually select the name of the printer manufacturer from the list.
Click Forward to modify the configuration. 150 Click Apply button to confirm or Back button to continue. 9. If a printer has not been detected automatically, select the model from the Generic (click to confirm your printer configuration. The last step is to select manufacturer) pull-down menu, and the printer model from the sub-list. You can manually select the name of the printer manufacturer from the list.

Manual
Page 162
By default the Printer Browser will use the Auto Select for Print Using: to determine what printer configuration to exit the Printer Browser window and implement the new setting. 158 Select the printer model from Printer Name list and Connection type in the Print Using drop-down menu by brand and model. This may also be the same as that appearing listed in the Printer Server's web manager. Click the Add button to use. In the example here, the printer name is PS-C0D26A-U3. The printer name selected should be manually selected in the Printer Browser menu.
By default the Printer Browser will use the Auto Select for Print Using: to determine what printer configuration to exit the Printer Browser window and implement the new setting. 158 Select the printer model from Printer Name list and Connection type in the Print Using drop-down menu by brand and model. This may also be the same as that appearing listed in the Printer Server's web manager. Click the Add button to use. In the example here, the printer name is PS-C0D26A-U3. The printer name selected should be manually selected in the Printer Browser menu.