Manual
Page 3
HELP ...83 Reboot ...84 Refresh Printer Status 84 TCP/IP Printing for Windows Vista 85 TCP/IP Printing for Windows XP 96 TCP/IP Printing for Windows 2000 108 TCP/IP Printingfor Windows 98SE/ME 121 Unix/Linux Printing 138 Printing Text Files form Unix 138 Printing form BSD Unix Versions 139 Printing from SCO... Setting up AppleTalk or LPR Printing in Mac OS X 167 Setting up AppleTalk Printing in Mac OS 9 172 Port Pinouts ...177 Technical Specifications 178 Appendix: DPR-1061 Printer Compatibility List 179 iii
HELP ...83 Reboot ...84 Refresh Printer Status 84 TCP/IP Printing for Windows Vista 85 TCP/IP Printing for Windows XP 96 TCP/IP Printing for Windows 2000 108 TCP/IP Printingfor Windows 98SE/ME 121 Unix/Linux Printing 138 Printing Text Files form Unix 138 Printing form BSD Unix Versions 139 Printing from SCO... Setting up AppleTalk or LPR Printing in Mac OS X 167 Setting up AppleTalk Printing in Mac OS 9 172 Port Pinouts ...177 Technical Specifications 178 Appendix: DPR-1061 Printer Compatibility List 179 iii
Manual
Page 4
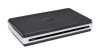
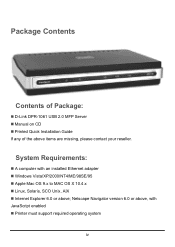
System Requirements: „ A computer with JavaScript enabled „ Printer must support required operating system iv Netscape Navigator version 6.0 or above, with an installed Ethernet adapter „ Windows Vista/XP/2000/NT4/ME/98SE/95 „ Apple Mac OS 9.x to MAC OS X 10.4.x „ Linux, Solaris, SCO Unix, AIX „ Internet Explorer 6.0 or above items are missing, please contact your reseller. Package Contents Contents of Package: „ D-Link DPR-1061 USB 2.0 MFP Server „ Manual on CD „ Printed Quick Installation Guide If any of the above ;
System Requirements: „ A computer with JavaScript enabled „ Printer must support required operating system iv Netscape Navigator version 6.0 or above, with an installed Ethernet adapter „ Windows Vista/XP/2000/NT4/ME/98SE/95 „ Apple Mac OS 9.x to MAC OS X 10.4.x „ Linux, Solaris, SCO Unix, AIX „ Internet Explorer 6.0 or above items are missing, please contact your reseller. Package Contents Contents of Package: „ D-Link DPR-1061 USB 2.0 MFP Server „ Manual on CD „ Printed Quick Installation Guide If any of the above ;
Manual
Page 5
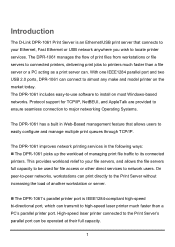
... IEEE1284 parallel port and two USB 2.0 ports, DPR-1061 can connect to almost any make and model printer on most Windows-based networks. Protocol support for file access or other direct services to easily configure and manage multiple print queues through TCP/IP. Introduction The D-Link DPR-1061 Print Server is IEEE1284-compliant high-speed bi...
... IEEE1284 parallel port and two USB 2.0 ports, DPR-1061 can connect to almost any make and model printer on most Windows-based networks. Protocol support for file access or other direct services to easily configure and manage multiple print queues through TCP/IP. Introduction The D-Link DPR-1061 Print Server is IEEE1284-compliant high-speed bi...
Manual
Page 6
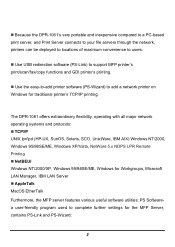
..., the MFP server features various useful software utilities: PS Softwarea user-friendly program used to add a network printer on Windows for the MFP Server, contains PS-Link and PS-Wizard: 2 „ Because the DPR-1061's very portable and inexpensive compared to a PC-based print server, and Print Server connects to your file servers through...
..., the MFP server features various useful software utilities: PS Softwarea user-friendly program used to add a network printer on Windows for the MFP Server, contains PS-Link and PS-Wizard: 2 „ Because the DPR-1061's very portable and inexpensive compared to a PC-based print server, and Print Server connects to your file servers through...
Manual
Page 16
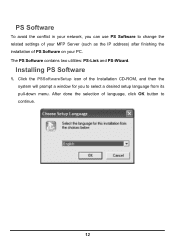
The PS Software contains two utilities: PS-Link and PS-Wizard. PS Software To avoid the conflict in your network, you to continue. 12 Installing PS Software 1. After done the selection of PS Software on your PC. Click the PSSoftwareSetup icon of the Installation CD-ROM, and then the system will prompt a window for you can use PS Software to change the related settings of your MFP Server (such as the IP address) after finishing the installation of language, click OK button to select a desired setup language from its pull-down menu.
The PS Software contains two utilities: PS-Link and PS-Wizard. PS Software To avoid the conflict in your network, you to continue. 12 Installing PS Software 1. After done the selection of PS Software on your PC. Click the PSSoftwareSetup icon of the Installation CD-ROM, and then the system will prompt a window for you can use PS Software to change the related settings of your MFP Server (such as the IP address) after finishing the installation of language, click OK button to select a desired setup language from its pull-down menu.
Manual
Page 17
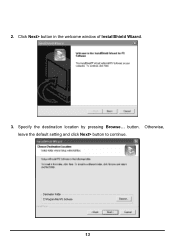
Click Next> button in the welcome window of InstallShield Wizard. 3. Specify the destination location by pressing Browse... button. Otherwise, leave the default setting and click Next> button to continue. 13 2.
Click Next> button in the welcome window of InstallShield Wizard. 3. Specify the destination location by pressing Browse... button. Otherwise, leave the default setting and click Next> button to continue. 13 2.
Manual
Page 18
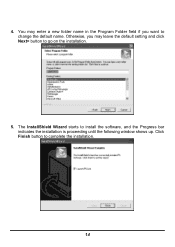
Otherwise, you want to go on the installation. 5. The InstallShield Wizard starts to complete the installation. 14 Click Finish button to install the software, and the Progress bar indicates the installation is proceeding until the following window shows up. 4. You may enter a new folder name in the Program Folder field if you may leave the default setting and click Next> button to change the default name.
Otherwise, you want to go on the installation. 5. The InstallShield Wizard starts to complete the installation. 14 Click Finish button to install the software, and the Progress bar indicates the installation is proceeding until the following window shows up. 4. You may enter a new folder name in the Program Folder field if you may leave the default setting and click Next> button to change the default name.

Manual
Page 20
...GDI printer. If your MFP server is discovered and listed in the same network segment. Go to support MFP/GDI printers. Using PS-Link PS-Link, supports for Windows 2000/XP/2003/Vista, is a useful tool for you will automatically search the MFP servers in the Server Name column of the following... window. That is, the main goal and advantage of the PS-Link is successful, you setting up , please check its network connectivity and click the Discover button to research it again....
...GDI printer. If your MFP server is discovered and listed in the same network segment. Go to support MFP/GDI printers. Using PS-Link PS-Link, supports for Windows 2000/XP/2003/Vista, is a useful tool for you will automatically search the MFP servers in the Server Name column of the following... window. That is, the main goal and advantage of the PS-Link is successful, you setting up , please check its network connectivity and click the Discover button to research it again....
Manual
Page 22
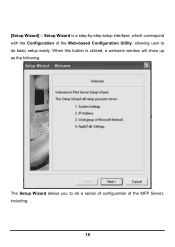
When this button is a step-by-step setup interface, which correspond with the Configuration of the MFP Server, including: 18 The Setup Wizard allows you to do a series of configuration of the Web-based Configuration Utility, allowing user to do basic setup easily. [Setup Wizard] - Setup Wizard is clicked, a welcome window will show up as the following.
When this button is a step-by-step setup interface, which correspond with the Configuration of the MFP Server, including: 18 The Setup Wizard allows you to do a series of configuration of the Web-based Configuration Utility, allowing user to do basic setup easily. [Setup Wizard] - Setup Wizard is clicked, a welcome window will show up as the following.
Manual
Page 28
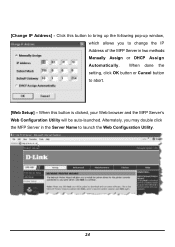
Alternately, you to change the IP Address of the MFP Server in the Server Name to abort. [Web Setup] - [Change IP Address] - Click this button is clicked, your Web browser and the MFP Server's Web Configuration Utility will be auto-launched. When this button to bring up the following pop-up window, which allows you may double click the MFP Server in two methods: Manually Assign or DHCP Assign Automatically. When done the setting, click OK button or Cancel button to launch the Web Configuration Utility. 24
Alternately, you to change the IP Address of the MFP Server in the Server Name to abort. [Web Setup] - [Change IP Address] - Click this button is clicked, your Web browser and the MFP Server's Web Configuration Utility will be auto-launched. When this button to bring up the following pop-up window, which allows you may double click the MFP Server in two methods: Manually Assign or DHCP Assign Automatically. When done the setting, click OK button or Cancel button to launch the Web Configuration Utility. 24
Manual
Page 29
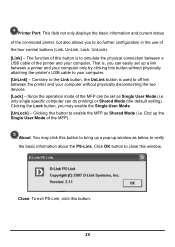
.... [UnLock] - Clicking this button to verify the basic information about the PS-Link. Contrary to the Link button, the UnLink button is used to off link between a printer and your computer only by clicking this window. Click OK button to simulate the physical connection between a USB cable of the ...computer, That is to close this button without physically disconnecting the two devices. [Lock] - Close: To exit PS-Link, click this button to bring up a pop-up window as below to enable the MFP as Single User Mode (i.e. The function of this button is , you may click this...
.... [UnLock] - Clicking this button to verify the basic information about the PS-Link. Contrary to the Link button, the UnLink button is used to off link between a printer and your computer only by clicking this window. Click OK button to simulate the physical connection between a USB cable of the ...computer, That is to close this button without physically disconnecting the two devices. [Lock] - Close: To exit PS-Link, click this button to bring up a pop-up window as below to enable the MFP as Single User Mode (i.e. The function of this button is , you may click this...

Manual
Page 45
Press OK to complete the physical connection between the MFP/GDI printer and your compute. 41 After the installation of the MFP/GID CD-ROM is finished, you with its multi-functions (Print/Scan/Copy/Fax). Now the MFP/GDI printer is done successfully, a prompt of the PS-Link window as below . Click the [Link] button of PS-Link window as below will show up to use the MFP/GDI printer through your computer. When the connection is ready to serve you may start to utilize PS-Link to exit. 4. You may start to inform you. 3.
Press OK to complete the physical connection between the MFP/GDI printer and your compute. 41 After the installation of the MFP/GID CD-ROM is finished, you with its multi-functions (Print/Scan/Copy/Fax). Now the MFP/GDI printer is done successfully, a prompt of the PS-Link window as below . Click the [Link] button of PS-Link window as below will show up to use the MFP/GDI printer through your computer. When the connection is ready to serve you may start to utilize PS-Link to exit. 4. You may start to inform you. 3.
Manual
Page 51
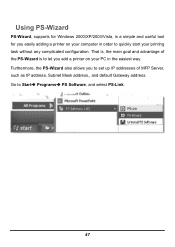
Go to StartÎ ProgramsÎ PS Software, and select PS-Link. 47 That is, the main goal and advantage of MFP Server, such as IP address, Subnet Mask address,, and default Gateway address. Furthermore, the PS-Wizard also allows you to set up IP addresses of the PS-Wizard is a simple and useful tool for Windows 2000/XP/2003/Vista, is to let you easily adding a printer on your printing task without any complicated configuration. Using PS-Wizard PS-Wizard, supports for you add a printer on your computer in order to quickly start your PC in the easiest way.
Go to StartÎ ProgramsÎ PS Software, and select PS-Link. 47 That is, the main goal and advantage of MFP Server, such as IP address, Subnet Mask address,, and default Gateway address. Furthermore, the PS-Wizard also allows you to set up IP addresses of the PS-Wizard is a simple and useful tool for Windows 2000/XP/2003/Vista, is to let you easily adding a printer on your printing task without any complicated configuration. Using PS-Wizard PS-Wizard, supports for you add a printer on your computer in order to quickly start your PC in the easiest way.
Manual
Page 53
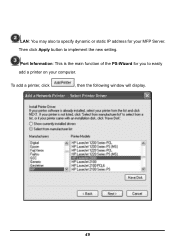
To add a printer, click , then the following window will display. 49 Port Information: This is the main function of the PS-Wizard for your computer. Then click Apply button to easily add a printer on your MFP Server. LAN: You may also to specify dynamic or static IP address for you to implement the new setting.
To add a printer, click , then the following window will display. 49 Port Information: This is the main function of the PS-Wizard for your computer. Then click Apply button to easily add a printer on your MFP Server. LAN: You may also to specify dynamic or static IP address for you to implement the new setting.
Manual
Page 54
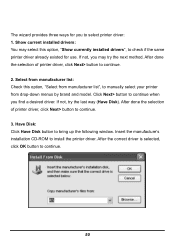
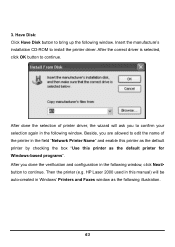
Insert the manufacture's installation CD-ROM to bring up the following window. The wizard provides three ways for use. After done the selection of printer driver, click Next> button to select printer driver: 1. Click Next> button to ...
Insert the manufacture's installation CD-ROM to bring up the following window. The wizard provides three ways for use. After done the selection of printer driver, click Next> button to select printer driver: 1. Click Next> button to ...
Manual
Page 55
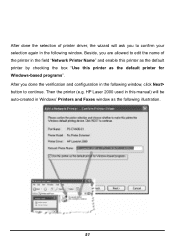
..., you to confirm your selection again in the following window, click Next> button to edit the name of printer driver, the wizard will be auto-created in Windows' Printers and Faxes window as the default printer for Windows-based programs". Then the printer (e.g. After done the selection... of the printer in the following window. After you done the verification and configuration in the field ...
..., you to confirm your selection again in the following window, click Next> button to edit the name of printer driver, the wizard will be auto-created in Windows' Printers and Faxes window as the default printer for Windows-based programs". Then the printer (e.g. After done the selection... of the printer in the following window. After you done the verification and configuration in the field ...

Manual
Page 56
If yes, then click Finish button to check if you may do print test by clicking Print Test Page button to exit the installation window and now you can do printing normally. When the following window shows up, you may start your printing tasks. 52
If yes, then click Finish button to check if you may do print test by clicking Print Test Page button to exit the installation window and now you can do printing normally. When the following window shows up, you may start your printing tasks. 52
Manual
Page 62
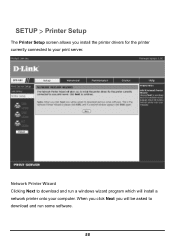
Network Printer Wizard Clicking Next to download and run a windows wizard program which will install a network printer onto your print server. When you click Next you install the printer drivers for the printer currently connected to your computer. SETUP > Printer Setup The Printer Setup screen allows you will be asked to download and run some software. 58
Network Printer Wizard Clicking Next to download and run a windows wizard program which will install a network printer onto your print server. When you click Next you install the printer drivers for the printer currently connected to your computer. SETUP > Printer Setup The Printer Setup screen allows you will be asked to download and run some software. 58
Manual
Page 63
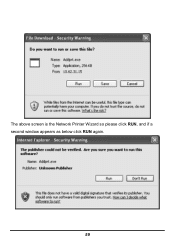
The above screen is the Network Printer Wizard so please click RUN, and if a second window appears as below click RUN again. 59
The above screen is the Network Printer Wizard so please click RUN, and if a second window appears as below click RUN again. 59
Manual
Page 67
Then the printer (e.g. 3. After you done the verification and configuration in the following window. After the correct driver is selected, click OK button to continue. HP Laser 2000 used in the field "Network Printer Name" and enable ...the selection of the printer in this printer as the following window. Have Disk: Click Have Disk button to confirm your selection again in Windows' Printers and Faxes window as the default printer for Windows-based programs". Beside, you to bring up the following window, click Next> button to continue. Insert the manufacture's ...
Then the printer (e.g. 3. After you done the verification and configuration in the following window. After the correct driver is selected, click OK button to continue. HP Laser 2000 used in the field "Network Printer Name" and enable ...the selection of the printer in this printer as the following window. Have Disk: Click Have Disk button to confirm your selection again in Windows' Printers and Faxes window as the default printer for Windows-based programs". Beside, you to bring up the following window, click Next> button to continue. Insert the manufacture's ...
