

Product Manual
Page 2
... 6 Hardware Overview 7 LED Indicators...7 Interface Connectors 8 Top...8 Back...8 Installation...9 Using Power over Ethernet (PoE 9 Configuration 9 Using Nuclias Connect 9 Nuclias Connect App Configuration 9 Manual Configuration 10 Mounting...11 LAN Port Waterproof Enclosure 11 Install Enclosure Onto The Articulation Pole 11 Installation for Wall 12 Installation for Pole 12 Mounting for Pole 1~ 3" (25.4~76.2mm 13 Install Articulation Pole with The T-formed Bracket 13 Installation for DIN Rail 14 Setup Wizard 16 Web User Interface 17 Wireless...18 Access Point Mode...
... 6 Hardware Overview 7 LED Indicators...7 Interface Connectors 8 Top...8 Back...8 Installation...9 Using Power over Ethernet (PoE 9 Configuration 9 Using Nuclias Connect 9 Nuclias Connect App Configuration 9 Manual Configuration 10 Mounting...11 LAN Port Waterproof Enclosure 11 Install Enclosure Onto The Articulation Pole 11 Installation for Wall 12 Installation for Pole 12 Mounting for Pole 1~ 3" (25.4~76.2mm 13 Install Articulation Pole with The T-formed Bracket 13 Installation for DIN Rail 14 Setup Wizard 16 Web User Interface 17 Wireless...18 Access Point Mode...

Product Manual
Page 3
... Settings- Remote RADIUS 59 Authentication Settings- POP3 63 Login Page Upload 65 MAC Bypass 66 DHCP Server 67 Dynamic Pool Settings 67 Static Pool Setting 68 Current IP Mapping List 69 Filters...70 Wireless MAC ACL 70 IP Filter Settings 71 WLAN Partition 72 Traffic Control 73 Uplink/Downlink Setting 73 QoS...74 Traffic Manager 75 Status...76 Device Information 77 Client Information 78 WDS Information Page 79 Statistics...80 Ethernet Traffic Statistics 80 WLAN Traffic...
... Settings- Remote RADIUS 59 Authentication Settings- POP3 63 Login Page Upload 65 MAC Bypass 66 DHCP Server 67 Dynamic Pool Settings 67 Static Pool Setting 68 Current IP Mapping List 69 Filters...70 Wireless MAC ACL 70 IP Filter Settings 71 WLAN Partition 72 Traffic Control 73 Uplink/Downlink Setting 73 QoS...74 Traffic Manager 75 Status...76 Device Information 77 Client Information 78 WDS Information Page 79 Statistics...80 Ethernet Traffic Statistics 80 WLAN Traffic...

Product Manual
Page 4
... for remote locations. Admins can support 8 SSIDs per radio (16 SSIDs per dual band APs), administrators have the option of using one (up to traditional hardware-based unified management systems. Configuration can be deployed anywhere in part). Nuclias Connect allows for multiple user authentications while enabling specific access control configurations for each deployment. Through software-based monitoring and remote management of distributed deployments, including setting & admin account configuration for visitors. Network traffic analytics are enabled. In...
... for remote locations. Admins can support 8 SSIDs per radio (16 SSIDs per dual band APs), administrators have the option of using one (up to traditional hardware-based unified management systems. Configuration can be deployed anywhere in part). Nuclias Connect allows for multiple user authentications while enabling specific access control configurations for each deployment. Through software-based monitoring and remote management of distributed deployments, including setting & admin account configuration for visitors. Network traffic analytics are enabled. In...
Product Manual
Page 9
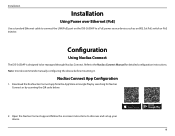
... QR code below. 2. Refer to be managed through Nuclias Connect. Nuclias Connect App Configuration 1. Download the free Nuclias Connect app from the App Store or Google Play by searching for detailed configuration instructions. Installation Installation Using Power over Ethernet (PoE) Use a standard Ethernet cable to connect the LAN(PoE) port on the DIS-3650AP to discover and set up your device. 9 Note: D-Link recommends manually configuring the device before mounting it. Open the Nuclias Connect app and follow the onscreen instructions to a PoE power...
... QR code below. 2. Refer to be managed through Nuclias Connect. Nuclias Connect App Configuration 1. Download the free Nuclias Connect app from the App Store or Google Play by searching for detailed configuration instructions. Installation Installation Using Power over Ethernet (PoE) Use a standard Ethernet cable to connect the LAN(PoE) port on the DIS-3650AP to discover and set up your device. 9 Note: D-Link recommends manually configuring the device before mounting it. Open the Nuclias Connect app and follow the onscreen instructions to a PoE power...

Product Manual
Page 10
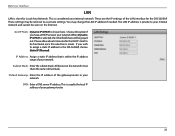
Configuration Manual Configuration Note: The management computer, DHCP server and DIS-3650AP must be in to access the web user interface: Connecting through Ethernet 1. Log in to . 2. Enter dis3650ap.local. Use an Ethernet cable to connect the DIS-3650AP to the switch or router the management computer is connected to the administration user interface. Enter dis3650ap.local. in the address field of the following methods to the administration user interface. Manage the access point from a computer. The default login information is Username: admin Password: admin 10 ...
Configuration Manual Configuration Note: The management computer, DHCP server and DIS-3650AP must be in to access the web user interface: Connecting through Ethernet 1. Log in to . 2. Enter dis3650ap.local. Use an Ethernet cable to connect the DIS-3650AP to the switch or router the management computer is connected to the administration user interface. Enter dis3650ap.local. in the address field of the following methods to the administration user interface. Manage the access point from a computer. The default login information is Username: admin Password: admin 10 ...

Product Manual
Page 11
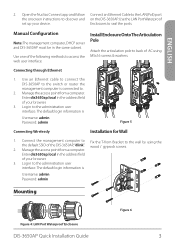
Use the LAN Port Waterproof Enclosures to the LAN(PoE) port on the DIS-3650AP. Mounting Mounting LAN Port Waterproof Enclosure Connect an Ethernet Cable to seal the ports. Install Enclosure Onto The Articulation Pole Attach the articulation pole to back of AC using M5x16 screws & washers. 11
Use the LAN Port Waterproof Enclosures to the LAN(PoE) port on the DIS-3650AP. Mounting Mounting LAN Port Waterproof Enclosure Connect an Ethernet Cable to seal the ports. Install Enclosure Onto The Articulation Pole Attach the articulation pole to back of AC using M5x16 screws & washers. 11

Product Manual
Page 16
... settings are configured, click Update button to accept the configuration and proceed to define the system time. In the System Time function, select Using Network Time Protocol (NTP) or Manually to the main interface menu page. 16 y Setting NTP System Time: Before trying to use. Setup Wizard Setup Wizard The first login instance displays the System Settings window which requires a change in to enable the daylight savings time (DST) function. In the NTP Server field, enter the NTP server to configure NTP check...
... settings are configured, click Update button to accept the configuration and proceed to define the system time. In the System Time function, select Using Network Time Protocol (NTP) or Manually to the main interface menu page. 16 y Setting NTP System Time: Before trying to use. Setup Wizard Setup Wizard The first login instance displays the System Settings window which requires a change in to enable the daylight savings time (DST) function. In the NTP Server field, enter the NTP server to configure NTP check...
Product Manual
Page 17
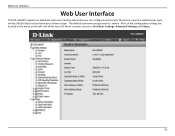
Web User Interface Web User Interface The DIS-3650AP supports an elaborate web user interface where the user can configure and monitor the device. Launch a web browser, type in the menu on the left side of the web GUI which contains sections called Basic Settings, Advanced Settings and Status. 17 The default username and password is: admin Most of the configurable settings are located in http://dis2650ap.local and then press Enter to login.
Web User Interface Web User Interface The DIS-3650AP supports an elaborate web user interface where the user can configure and monitor the device. Launch a web browser, type in the menu on the left side of the web GUI which contains sections called Basic Settings, Advanced Settings and Status. 17 The default username and password is: admin Most of the configurable settings are located in http://dis2650ap.local and then press Enter to login.
Product Manual
Page 18
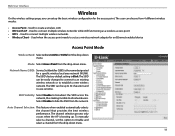
Web User Interface Wireless On the wireless settings page, you can choose from 4 different wireless modes: • Access Point - Network Name (SSID): Service Set Identifier (SSID) is dlink. To manually select a channel, set this option to connect multiple wireless networks • Wireless Client - The user can setup the basic wireless configuration for the access point. Mode: Select Access Point from the drop-down menu. 18 Auto Channel Selection: This feature when enabled automatically selects the...
Web User Interface Wireless On the wireless settings page, you can choose from 4 different wireless modes: • Access Point - Network Name (SSID): Service Set Identifier (SSID) is dlink. To manually select a channel, set this option to connect multiple wireless networks • Wireless Client - The user can setup the basic wireless configuration for the access point. Mode: Select Access Point from the drop-down menu. 18 Auto Channel Selection: This feature when enabled automatically selects the...
Product Manual
Page 24
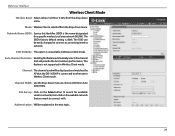
... in Wireless Client mode. Auto Channel Selection: Enablingthisfeatureautomaticallyselectsthechannel that will be easily changed to connect to an existing wireless network. Mode: Wireless Client is not supported in the next topic. 24 This feature is selected from the drop-down menu. Site Survey: Click on the available network that the DIS-3650AP is unavailable in Wireless Client mode. Web User Interface Wireless Client Mode Wireless Band: Select...
... in Wireless Client mode. Auto Channel Selection: Enablingthisfeatureautomaticallyselectsthechannel that will be easily changed to connect to an existing wireless network. Mode: Wireless Client is not supported in the next topic. 24 This feature is selected from the drop-down menu. Site Survey: Click on the available network that the DIS-3650AP is unavailable in Wireless Client mode. Web User Interface Wireless Client Mode Wireless Band: Select...
Product Manual
Page 28
... private settings. This is usually the local IP address of the LAN interface for the DIS-3650AP. Web User Interface LAN LAN is short for the DHCP client to be functional once this option if you wish to assign a static IP address to the DIS-3650AP, choose Static IP (Manual). These are the IP settings of your network. If you have a DHCP server in your network. DNS: Enter a DNS server IP address.
... private settings. This is usually the local IP address of the LAN interface for the DIS-3650AP. Web User Interface LAN LAN is short for the DHCP client to be functional once this option if you wish to assign a static IP address to the DIS-3650AP, choose Static IP (Manual). These are the IP settings of your network. If you have a DHCP server in your network. DNS: Enter a DNS server IP address.

Product Manual
Page 32
... WDS with AP mode, including MultiControl : SSIDs Maximum Multicast Set the multicast packets maximum bandwidth pass through the AP. Short GI: Select Enable or Disable. Multicast Bandwidth Adjust the multicast packet data rate here. Enabling a short guard interval can also increase the error rate in your area. Internet Group Management Protocol allows the AP to radio-frequency installations. Multicast Rate: Adjust the multicast packet data rate here. The multicast rate is another wireless network's channel over Multimedia...
... WDS with AP mode, including MultiControl : SSIDs Maximum Multicast Set the multicast packets maximum bandwidth pass through the AP. Short GI: Select Enable or Disable. Multicast Bandwidth Adjust the multicast packet data rate here. Enabling a short guard interval can also increase the error rate in your area. Internet Group Management Protocol allows the AP to radio-frequency installations. Multicast Rate: Adjust the multicast packet data rate here. The multicast rate is another wireless network's channel over Multimedia...

Product Manual
Page 48
... Type: Specify type of network. Access Network Type: Specify type of venue. Web User Interface Interworking Interworking: Choose enable to . ESR: Choose enable to indicate that can be used in the name. ASRA: Choose enable if the network has Additional Steps required for this device. Venue Group: Specify group venue belongs to turn on interworking function. Choose from the drop down list a language used to enable or disable Internet access for Access...
... Type: Specify type of network. Access Network Type: Specify type of venue. Web User Interface Interworking Interworking: Choose enable to . ESR: Choose enable to indicate that can be used in the name. ASRA: Choose enable if the network has Additional Steps required for this device. Venue Group: Specify group venue belongs to turn on interworking function. Choose from the drop down list a language used to enable or disable Internet access for Access...

Product Manual
Page 68
... a DHCP server. WINS: Specify the Windows Internet Naming Service (WINS) server address for the wireless network. Select Enable to allow the DIS-3650AP to wireless devices on the network. the device will appear in the Static Pool list must NOT be assigned to receive IP addresses automatically without time control. Function Enable/Disable: Dynamic Host Configuration Protocol (DHCP) assigns IP addresses to function as the Dynamic Pool. Assigned IP: Use the Static Pool Settings...
... a DHCP server. WINS: Specify the Windows Internet Naming Service (WINS) server address for the wireless network. Select Enable to allow the DIS-3650AP to wireless devices on the network. the device will appear in the Static Pool list must NOT be assigned to receive IP addresses automatically without time control. Function Enable/Disable: Dynamic Host Configuration Protocol (DHCP) assigns IP addresses to function as the Dynamic Pool. Assigned IP: Use the Static Pool Settings...

Product Manual
Page 70
.... Download ACL File: Download currenty ACL list to disable the filters function. Highlight a MAC address and click Delete to accept only those devices with MAC addresses on the list will be accepted. Wireless Band: Displays the current wireless band rate. Select Reject to configure Wireless MAC ACL settings for access control. Current Client This table displays information about all the current Information: connected stations. Access Control List: Select Disable to local hard drive. 70 Web User Interface Filters Wireless MAC ACL This...
.... Download ACL File: Download currenty ACL list to disable the filters function. Highlight a MAC address and click Delete to accept only those devices with MAC addresses on the list will be accepted. Wireless Band: Displays the current wireless band rate. Select Reject to configure Wireless MAC ACL settings for access control. Current Client This table displays information about all the current Information: connected stations. Access Control List: Select Disable to local hard drive. 70 Web User Interface Filters Wireless MAC ACL This...

Product Manual
Page 97
... multiple computers, try connecting using a different cable or connect to Start > Settings > Control Panel. What can occur during the installation and operation of the unit. If you forgot your computer will look similar to the configuration pages. Unfortunately, this process will go through its reboot process. Release the button and the access point will change all your D-Link access point in . The default IP address is checked. When logging...
... multiple computers, try connecting using a different cable or connect to Start > Settings > Control Panel. What can occur during the installation and operation of the unit. If you forgot your computer will look similar to the configuration pages. Unfortunately, this process will go through its reboot process. Release the button and the access point will change all your D-Link access point in . The default IP address is checked. When logging...

Product Manual
Page 99
... the Local Area Connection which represents your network adapter and select Properties. Make sure that is a number between 2 and 99. Step 3: Highlight Internet Protocol (TCP/IP) and click Properties. Step 5: Click OK twice to statically assign an IP address? Troubleshooting How to save your ISP. If you are not using a DHCP capable gateway/router, or you may enter a DNS server from your settings. 99
... the Local Area Connection which represents your network adapter and select Properties. Make sure that is a number between 2 and 99. Step 3: Highlight Internet Protocol (TCP/IP) and click Properties. Step 5: Click OK twice to statically assign an IP address? Troubleshooting How to save your ISP. If you are not using a DHCP capable gateway/router, or you may enter a DNS server from your settings. 99

Quick Install Guide
Page 3
...5G Solid green - 5GHz is enabled Blinking green - Articulation Pole x 1 - M8x40 Screw Bolts x 1 - Table 1: LED Description DIS-3650AP Quick Installation Guide 1 Anchors plastic screws x 4 - Stainless screws x 4 - Device operational 1 Power/ Status Red (Flashing) - M6 x 4) - data transmission 4 LAN (PoE) Indicates whether a device is also available on the D-Link support website. • Nuclias Connect Manual: For additional information and instructions on how to configure the device using the web user interface. Additional documentation is connected to configure the...
...5G Solid green - 5GHz is enabled Blinking green - Articulation Pole x 1 - M8x40 Screw Bolts x 1 - Table 1: LED Description DIS-3650AP Quick Installation Guide 1 Anchors plastic screws x 4 - Stainless screws x 4 - Device operational 1 Power/ Status Red (Flashing) - M6 x 4) - data transmission 4 LAN (PoE) Indicates whether a device is also available on the D-Link support website. • Nuclias Connect Manual: For additional information and instructions on how to configure the device using the web user interface. Additional documentation is connected to configure the...

Quick Install Guide
Page 4
...Connect DIN rail kit to mount it . Wire Table 3: Interface Description 1 23 Figure 2: Top Connectors Installation # Connector Description 1 LAN(PoE) Gigabit RJ-45 port for Nuclias Connect or by scanning the QR code below. 3 Figure 3: Back Connectors 2 DIS-3650AP Quick Installation Guide Note: D-Link recommends manually configuring the device before mounting it Adapter on DIN-Rail. 2 Wall/Pole Mount to connect to factory reset the device Table 2: Interface Description Using Power over Ethernet (PoE) power. 2 CONSOLE Connect an RJ-45 Ethernet console for CLI control...
...Connect DIN rail kit to mount it . Wire Table 3: Interface Description 1 23 Figure 2: Top Connectors Installation # Connector Description 1 LAN(PoE) Gigabit RJ-45 port for Nuclias Connect or by scanning the QR code below. 3 Figure 3: Back Connectors 2 DIS-3650AP Quick Installation Guide Note: D-Link recommends manually configuring the device before mounting it Adapter on DIN-Rail. 2 Wall/Pole Mount to connect to factory reset the device Table 2: Interface Description Using Power over Ethernet (PoE) power. 2 CONSOLE Connect an RJ-45 Ethernet console for CLI control...
Quick Install Guide
Page 5
... dis3650ap.local in the address field of the DIS-3650AP,"dlink". The default login information is Username: admin Password: admin Mounting Figure 4: LAN Port Waterproof Enclosure DIS-3650AP Quick Installation Guide Figure 6 3 wood / gyprock screws. 2. Open the Nuclias Connect app and follow Connect an Ethernet Cable to the LAN(PoE) port the onscreen instructions to seal the ports. Use an Ethernet cable to connect the DIS-3650AP to the switch or router the management computer is connected to the administration user interface. Log in to the wall...
... dis3650ap.local in the address field of the DIS-3650AP,"dlink". The default login information is Username: admin Password: admin Mounting Figure 4: LAN Port Waterproof Enclosure DIS-3650AP Quick Installation Guide Figure 6 3 wood / gyprock screws. 2. Open the Nuclias Connect app and follow Connect an Ethernet Cable to the LAN(PoE) port the onscreen instructions to seal the ports. Use an Ethernet cable to connect the DIS-3650AP to the switch or router the management computer is connected to the administration user interface. Log in to the wall...


