User Manual
Page 2
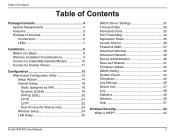
... Check 44 Schedules 45 Log Settings 46 Device Info 47 Log 48 Statistics 49 Wireless 50 Help 51 Wireless Security 52 What is WEP 52 D-Link DIR-605 User Manual 2
... Check 44 Schedules 45 Log Settings 46 Device Info 47 Log 48 Statistics 49 Wireless 50 Help 51 Wireless Security 52 What is WEP 52 D-Link DIR-605 User Manual 2
User Manual
Page 3
... Wireless Network (WEP, WPA-PSK & WPA2-PSK 75 Connecting to an Unsecured Wireless Network..... 79 Troubleshooting 83 Wireless Basics 87 What is Wireless 88 D-Link DIR-605 User Manual Tips 90 Wireless Modes 91 Networking Basics 92 Check your IP address 92 Statically Assign an IP address 93 Technical Specifications 94 Contacting Technical Support...
... Wireless Network (WEP, WPA-PSK & WPA2-PSK 75 Connecting to an Unsecured Wireless Network..... 79 Troubleshooting 83 Wireless Basics 87 What is Wireless 88 D-Link DIR-605 User Manual Tips 90 Wireless Modes 91 Networking Basics 92 Check your IP address 92 Statically Assign an IP address 93 Technical Specifications 94 Contacting Technical Support...
User Manual
Page 4
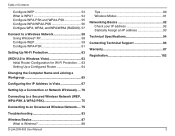
...supply, before inserting the power cord and connected power supply to the wall outlet. Product Overview Package Contents • D-Link DIR-605 Wireless Router • Power Adapter • Ethernet Cable • Manual and Warranty on CD Note: Using a power supply with a different voltage rating than the one included with an ...Requirements • Ethernet-based Cable or DSL Modem • Computers with Windows®, Macintosh®, or Linux-based operating systems with the DIR-605 will cause damage and void the warranty for configuration) D-Link DIR-605 User Manual 4 Section 1 -
...supply, before inserting the power cord and connected power supply to the wall outlet. Product Overview Package Contents • D-Link DIR-605 Wireless Router • Power Adapter • Ethernet Cable • Manual and Warranty on CD Note: Using a power supply with a different voltage rating than the one included with an ...Requirements • Ethernet-based Cable or DSL Modem • Computers with Windows®, Macintosh®, or Linux-based operating systems with the DIR-605 will cause damage and void the warranty for configuration) D-Link DIR-605 User Manual 4 Section 1 -
User Manual
Page 5
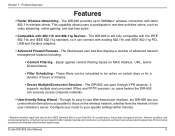
... of network traffic, building materials and construction, and network overhead, lower actual data throughput rate. Environmental conditions will vary. The DIR-605 provides up to be scheduled to 300Mbps* wireless connection with 802.11b and 802.11g Devices - Configure your router to participate ...days or for a duration of hours or minutes. • Secure Multiple/Concurrent Sessions - D-Link DIR-605 User Manual 5 Section 1 - Through its easy-to-use Web-based user interface, the DIR-605 lets you control what information is still fully compatible with existing 802.11b and IEEE 802.11g...
... of network traffic, building materials and construction, and network overhead, lower actual data throughput rate. Environmental conditions will vary. The DIR-605 provides up to be scheduled to 300Mbps* wireless connection with 802.11b and 802.11g Devices - Configure your router to participate ...days or for a duration of hours or minutes. • Secure Multiple/Concurrent Sessions - D-Link DIR-605 User Manual 5 Section 1 - Through its easy-to-use Web-based user interface, the DIR-605 lets you control what information is still fully compatible with existing 802.11b and IEEE 802.11g...
User Manual
Page 6
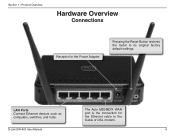
LAN Ports Connect Ethernet devices such as computers, switches, and hubs. The Auto MDI/MDIX WAN port is the connection for the Power Adapter. D-Link DIR-605 User Manual 6 Pressing the Reset Button restores the router to the Cable or DSL modem. Product Overview Hardware Overview Connections Receptor for the Ethernet cable to its original factory default settings. Section 1 -
LAN Ports Connect Ethernet devices such as computers, switches, and hubs. The Auto MDI/MDIX WAN port is the connection for the Power Adapter. D-Link DIR-605 User Manual 6 Pressing the Reset Button restores the router to the Cable or DSL modem. Product Overview Hardware Overview Connections Receptor for the Ethernet cable to its original factory default settings. Section 1 -
User Manual
Page 7
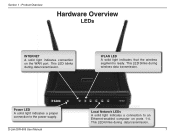
Section 1 - This LED blinks during data transmission. 7 Product Overview Hardware Overview LEDs INTERNET A solid light indicates connection on ports 1-4. Power LED A solid light indicates a proper connection to an Ethernet-enabled computer on the WAN port. D-Link DIR-605 User Manual Local Network LEDs A solid light indicates a connection to the power supply. WLAN LED A solid light indicates that the wireless segment is ready. This LED blinks during wireless data transmission. This LED blinks during data transmission.
Section 1 - This LED blinks during data transmission. 7 Product Overview Hardware Overview LEDs INTERNET A solid light indicates connection on ports 1-4. Power LED A solid light indicates a proper connection to an Ethernet-enabled computer on the WAN port. D-Link DIR-605 User Manual Local Network LEDs A solid light indicates a connection to the power supply. WLAN LED A solid light indicates that the wireless segment is ready. This LED blinks during wireless data transmission. This LED blinks during data transmission.
User Manual
Page 8
... only use the Ethernet port on . C). Section 2 - Placement of the router is very important. Turn the device, let the bottom toward to your modem. D-Link DIR-605 User Manual 8 If you were using the USB connection before using the router, then you disable or uninstall any PPPoE software such as a closet, cabinet, or in...
... only use the Ethernet port on . C). Section 2 - Placement of the router is very important. Turn the device, let the bottom toward to your modem. D-Link DIR-605 User Manual 8 If you were using the USB connection before using the router, then you disable or uninstall any PPPoE software such as a closet, cabinet, or in...
User Manual
Page 9
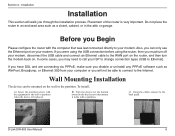
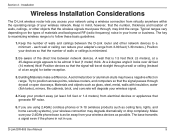
...Typical ranges vary depending on range. A wall that the signal will degrade your home or business. Building Materials make a difference. D-Link DIR-605 User Manual 9 Be aware of at a 45-degree angle appears to follow these basic guidelines: 1. Section 2 - At a 2-degree ... may degrade dramatically or drop completely. Make sure your 2.4GHz phone base is minimized. 2. Installation Wireless Installation Considerations The D-Link wireless router lets you are using a wireless connection from virtually anywhere within the operating range of your product away (at least...
...Typical ranges vary depending on range. A wall that the signal will degrade your home or business. Building Materials make a difference. D-Link DIR-605 User Manual 9 Be aware of at a 45-degree angle appears to follow these basic guidelines: 1. Section 2 - At a 2-degree ... may degrade dramatically or drop completely. Make sure your 2.4GHz phone base is minimized. 2. Installation Wireless Installation Considerations The D-Link wireless router lets you are using a wireless connection from virtually anywhere within the operating range of your product away (at least...

User Manual
Page 10
... for the modem to boot (about 30 seconds for the router to configure your computer, modem, and router are powered on the router. 4. Verify the link lights on the router. Installation Connect to Cable/DSL/Satellite Modem If you are correct. 9. Plug the other end into the WAN port on and... steps below: 1. If not, make sure your router. Skip to page 16 to boot. 7. If there is plugged into the router. 2. Wait about 30 seconds). 6. D-Link DIR-605 User Manual 10 Turn on your computer is no on/off on your modem.
... for the modem to boot (about 30 seconds for the router to configure your computer, modem, and router are powered on the router. 4. Verify the link lights on the router. Installation Connect to Cable/DSL/Satellite Modem If you are correct. 9. Plug the other end into the WAN port on and... steps below: 1. If not, make sure your router. Skip to page 16 to boot. 7. If there is plugged into the router. 2. Wait about 30 seconds). 6. D-Link DIR-605 User Manual 10 Turn on your computer is no on/off on your modem.
User Manual
Page 11
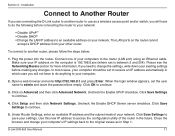
...box empty. Make sure your settings. Open a web browser and enter http://192.168.0.1 and press Enter. Uncheck the Enable UPnP checkbox. D-Link DIR-605 User Manual 11 In most cases, your computer should be set the user name to an available address on your computer. 2. Click Save Settings to ... the power into the router. When the login window appears, set to receive an IP address automatically in which case you are connecting the D-Link router to another router, please follow the steps below: 1. Under Router Settings, enter an available IP address and the subnet mask of your...
...box empty. Make sure your settings. Open a web browser and enter http://192.168.0.1 and press Enter. Uncheck the Enable UPnP checkbox. D-Link DIR-605 User Manual 11 In most cases, your computer should be set the user name to an available address on your computer. 2. Click Save Settings to ... the power into the router. When the login window appears, set to receive an IP address automatically in which case you are connecting the D-Link router to another router, please follow the steps below: 1. Under Router Settings, enter an available IP address and the subnet mask of your...
User Manual
Page 12
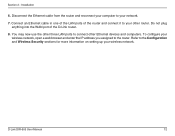
... browser and enter the IP address you assigned to connect other router. You may now use the other three LAN ports to the router. D-Link DIR-605 User Manual 12 Disconnect the Ethernet cable from the router and reconnect your computer to the Configuration and Wireless Security sections for more information on setting up... to your wireless network. To configure your other Ethernet devices and computers. Section 2 - Connect an Ethernet cable in one of the LAN ports of the D-Link router. 8. Installation 6.
... browser and enter the IP address you assigned to connect other router. You may now use the other three LAN ports to the router. D-Link DIR-605 User Manual 12 Disconnect the Ethernet cable from the router and reconnect your computer to the Configuration and Wireless Security sections for more information on setting up... to your wireless network. To configure your other Ethernet devices and computers. Section 2 - Connect an Ethernet cable in one of the LAN ports of the D-Link router. 8. Installation 6.
User Manual
Page 13
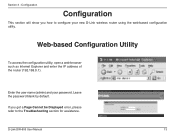
D-Link DIR-605 User Manual 13 Configuration Configuration This section will show you get a Page Cannot be Displayed error, please refer to configure your password. Section 3 - If you how to the Troubleshooting section for assistance. Web-based Configuration Utility To access the configuration utility, open a web-browser such as Internet Explorer and enter the IP address of the router (192.168.0.1). Leave the password blank by default. Enter the user name (admin) and your new D-Link wireless router using the web-based configuration utility.
D-Link DIR-605 User Manual 13 Configuration Configuration This section will show you get a Page Cannot be Displayed error, please refer to configure your password. Section 3 - If you how to the Troubleshooting section for assistance. Web-based Configuration Utility To access the configuration utility, open a web-browser such as Internet Explorer and enter the IP address of the router (192.168.0.1). Leave the password blank by default. Enter the user name (admin) and your new D-Link wireless router using the web-based configuration utility.
User Manual
Page 14
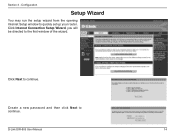
Click Internet Connection Setup Wizard, you will be directed to quickly set up your router. Configuration Setup Wizard You may run the setup wizard from the opening Internet Setup window to the first window of the wizard. Click Next to continue. D-Link DIR-605 User Manual 14 Create a new password and then click Next to continue. Section 3 -
Click Internet Connection Setup Wizard, you will be directed to quickly set up your router. Configuration Setup Wizard You may run the setup wizard from the opening Internet Setup window to the first window of the wizard. Click Next to continue. D-Link DIR-605 User Manual 14 Create a new password and then click Next to continue. Section 3 -
User Manual
Page 15
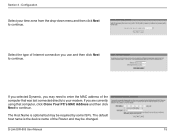
..., you are currently using that was last connected directly to continue. Section 3 - The default host name is optional but may be required by some ISPs. D-Link DIR-605 User Manual 15
..., you are currently using that was last connected directly to continue. Section 3 - The default host name is optional but may be required by some ISPs. D-Link DIR-605 User Manual 15

User Manual
Page 16
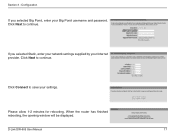
Click Next to continue. Note: Make sure to continue. Section 3 - D-Link DIR-605 User Manual 16 Configuration If you selected PPPoE, enter your computer. Click Next to continue. If you selected L2TP, enter your ISP assigned you selected PPTP, enter your PPTP username and password. Select Static if your L2TP username and password. If you the IP address, subnet mask, gateway, and DNS server addresses. Click Next to remove your PPPoE software from your PPPoE username and password. The software is no longer needed and will not work through a router.
Click Next to continue. Note: Make sure to continue. Section 3 - D-Link DIR-605 User Manual 16 Configuration If you selected PPPoE, enter your computer. Click Next to continue. If you selected L2TP, enter your ISP assigned you selected PPTP, enter your PPTP username and password. Select Static if your L2TP username and password. If you the IP address, subnet mask, gateway, and DNS server addresses. Click Next to remove your PPPoE software from your PPPoE username and password. The software is no longer needed and will not work through a router.
User Manual
Page 17
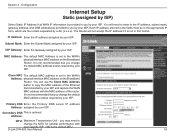
Configuration If you selected Static, enter your network settings supplied by your Internet provider. Click Next to continue. D-Link DIR-605 User Manual 17 Click Next to continue. If you selected Big Pond, enter your settings. Please allow 1-2 minutes for rebooting. When the router has finished rebooting, the opening window will be displayed. Click Connect to save your Big Pond username and password. Section 3 -
Configuration If you selected Static, enter your network settings supplied by your Internet provider. Click Next to continue. D-Link DIR-605 User Manual 17 Click Next to continue. If you selected Big Pond, enter your settings. Please allow 1-2 minutes for rebooting. When the router has finished rebooting, the opening window will be displayed. Click Connect to save your Big Pond username and password. Section 3 -
User Manual
Page 18
... address on the Broadband Router. Clone MAC The default MAC address is set to you change the default MAC address unless required by a dot (x.x.x.x). D-Link DIR-605 User Manual 18 Each IP address entered in the fields must be in this format. MAC Address: The default MAC Address is set to change the MTU...
... address on the Broadband Router. Clone MAC The default MAC address is set to you change the default MAC address unless required by a dot (x.x.x.x). D-Link DIR-605 User Manual 18 Each IP address entered in the fields must be in this format. MAC Address: The default MAC Address is set to change the MTU...
User Manual
Page 19
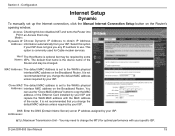
Configuration Internet Setup Dynamic To manually set up the Internet connection, click the Manual Internet Connection Setup button on the Broadband Router. Select this box disables NAT and turns the Router into Point an Access Point only. This option ... ISP. Host The Host Name is set to change the default MAC address unless required by your specific ISP. Addresses: MTU: Maximum Transmission Unit - D-Link DIR-605 User Manual 19 It is not recommended that you any IP numbers to use the "Clone MAC Address" button to copy the MAC address of the Router...
Configuration Internet Setup Dynamic To manually set up the Internet connection, click the Manual Internet Connection Setup button on the Broadband Router. Select this box disables NAT and turns the Router into Point an Access Point only. This option ... ISP. Host The Host Name is set to change the default MAC address unless required by your specific ISP. Addresses: MTU: Maximum Transmission Unit - D-Link DIR-605 User Manual 19 It is not recommended that you any IP numbers to use the "Clone MAC Address" button to copy the MAC address of the Router...
User Manual
Page 20
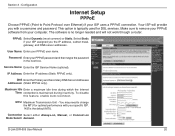
...: Select Dynamic (most common) or Static. DNS Enter the Primary and Secondary DNS Server Addresses Addresses: (Static PPPoE only). D-Link DIR-605 User Manual 20 You may need to Point Protocol over Ethernet) if your ISP assigned you with your PPPoE password and then retype the password...Choose PPPoE (Point to change the MTU for DSL services. Your ISP will not work through a router. Connection Select either Always-on, Manual, or Connect-on Mode Select: demand. The software is maintained during inactivity. Select Static if your ISP uses a PPPoE connection. Service ...
...: Select Dynamic (most common) or Static. DNS Enter the Primary and Secondary DNS Server Addresses Addresses: (Static PPPoE only). D-Link DIR-605 User Manual 20 You may need to Point Protocol over Ethernet) if your ISP assigned you with your PPPoE password and then retype the password...Choose PPPoE (Point to change the MTU for DSL services. Your ISP will not work through a router. Connection Select either Always-on, Manual, or Connect-on Mode Select: demand. The software is maintained during inactivity. Select Static if your ISP uses a PPPoE connection. Service ...
User Manual
Page 21
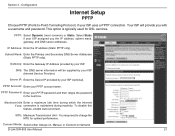
...Gateway IP Address provided by your ISP assigned you with a username and password. PPTP Account: Enter your ISP uses a PPTP connection. D-Link DIR-605 User Manual 21 Configuration Internet Setup PPTP Choose PPTP (Point-to change the MTU for DSL services. Section 3 - To disable this feature, enable Auto...: Enter your ISP. You may need to -Point-Tunneling Protocol ) if your PPTP account name. Connect Mode: Select either Always-on, Manual, or Connect-on demand. PPTP: Select Dynamic (most common) or Static. Select Static if your ISP (optional). Subnet Mask: Enter the...
...Gateway IP Address provided by your ISP assigned you with a username and password. PPTP Account: Enter your ISP uses a PPTP connection. D-Link DIR-605 User Manual 21 Configuration Internet Setup PPTP Choose PPTP (Point-to change the MTU for DSL services. Section 3 - To disable this feature, enable Auto...: Enter your ISP. You may need to -Point-Tunneling Protocol ) if your PPTP account name. Connect Mode: Select either Always-on, Manual, or Connect-on demand. PPTP: Select Dynamic (most common) or Static. Select Static if your ISP (optional). Subnet Mask: Enter the...


