
Product Manual
Page 2
Contents Package Contents 3 Introduction 4 Features and Benefits 5 LEDs ...6 Connections 7 Introduction to Broadband Router Technology 8 Sample Scenario 10 Network Setup 11 Using the Setup Wizard 12 Using the Configuration Menu 17 Installing the Print Server Software 58 Networking Basics 62 Resetting the DI-704UP to the Factory Default Settings 75 Technical Specifications 76 Frequently Asked Questions 77 Contacting Technical Support 105 Warranty 106 Registration 109 2
Contents Package Contents 3 Introduction 4 Features and Benefits 5 LEDs ...6 Connections 7 Introduction to Broadband Router Technology 8 Sample Scenario 10 Network Setup 11 Using the Setup Wizard 12 Using the Configuration Menu 17 Installing the Print Server Software 58 Networking Basics 62 Resetting the DI-704UP to the Factory Default Settings 75 Technical Specifications 76 Frequently Asked Questions 77 Contacting Technical Support 105 Warranty 106 Registration 109 2

Product Manual
Page 3
Package Contents Contents of the above , or another Internet Browser application with the DI-704UP will cause damage and void the warranty for this product. System Requirements for Configuration: „ Computer with Windows, Macintosh, or Linux-based ...a different voltage rating than the one included with Javascript enabled 3 WARNING! AC 5V, 2A „ CAT5 Ethernet Cable If any of Package: „ D-Link DI-704UP Express EtherNetwork TM Broadband Router with USB Print Server „ Manual, Warranty and Print Server Software on CD „ Quick Installation Guide „ Power Adapter -
Package Contents Contents of the above , or another Internet Browser application with the DI-704UP will cause damage and void the warranty for this product. System Requirements for Configuration: „ Computer with Windows, Macintosh, or Linux-based ...a different voltage rating than the one included with Javascript enabled 3 WARNING! AC 5V, 2A „ CAT5 Ethernet Cable If any of Package: „ D-Link DI-704UP Express EtherNetwork TM Broadband Router with USB Print Server „ Manual, Warranty and Print Server Software on CD „ Quick Installation Guide „ Power Adapter -
Product Manual
Page 5
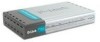
NAT allows your computer connected to the DI-704UP will be on a private network shielded from Internet intruders. „... Address Translation - Includes a USB port to connect to a USB printer and includes a Windows-based print server software application, so users on the network access to get you up and running in just a few clicks. 5 ...through or cross-over. Connect additional switches to allow more computer to share a single public IP address. The D-Link setup wizard simplifies the installation process, getting you started. „ Simple Setup Wizard for Easy Installation - Allows ...
NAT allows your computer connected to the DI-704UP will be on a private network shielded from Internet intruders. „... Address Translation - Includes a USB port to connect to a USB printer and includes a Windows-based print server software application, so users on the network access to get you up and running in just a few clicks. 5 ...through or cross-over. Connect additional switches to allow more computer to share a single public IP address. The D-Link setup wizard simplifies the installation process, getting you started. „ Simple Setup Wizard for Easy Installation - Allows ...
Product Manual
Page 8
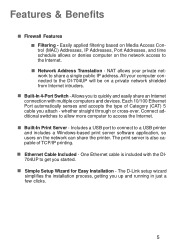
...based on Open System Interconnection (OSI) layer 3, which computer the information should be a computer using firewall software or a special piece of data that is sent through . A router also determines the best route that your information should not be configured to work on the type of ... your computer and the Internet that prevents unauthorized access to or from accessing or damaging your network. When you click on a link on your network. The request sent and the information received by eliminating information that should follow to ensure that the information is delivered...
...based on Open System Interconnection (OSI) layer 3, which computer the information should be a computer using firewall software or a special piece of data that is sent through . A router also determines the best route that your information should not be configured to work on the type of ... your computer and the Internet that prevents unauthorized access to or from accessing or damaging your network. When you click on a link on your network. The request sent and the information received by eliminating information that should follow to ensure that the information is delivered...
Product Manual
Page 10
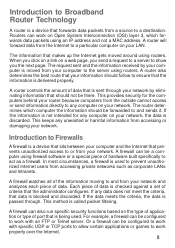
... Cable or DSL modem to the DI-704UP wireless broadband router. (See the Quick Installation Guide included with the DI-704UP.) If you are connecting a desktop computer that does not already have an available Ethernet port to your network, you can install the D-Link DFE-530TX+ Ethernet adapter into an... by adding a wireless Access Point (D-Link DWL-900AP+) ** 10 Consult with your network with the DFE-690TXD.) Connect your home or office). For specific information on setting up your Cable or DSL provider for loading the Windows print server software if on a Windows-based computer. ...
... Cable or DSL modem to the DI-704UP wireless broadband router. (See the Quick Installation Guide included with the DI-704UP.) If you are connecting a desktop computer that does not already have an available Ethernet port to your network, you can install the D-Link DFE-530TX+ Ethernet adapter into an... by adding a wireless Access Point (D-Link DWL-900AP+) ** 10 Consult with your network with the DFE-690TXD.) Connect your home or office). For specific information on setting up your Cable or DSL provider for loading the Windows print server software if on a Windows-based computer. ...

Product Manual
Page 16
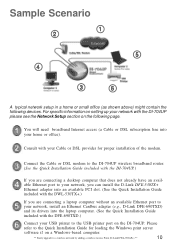
Using the Setup Wizard (continued) If your ISP uses PPPoE (Point-to-Point Protocol over Ethernet), and this option is selected, then this screen will appear: (Used mainly for DSL Internet service.) Please be sure to you by your computers. Click Next Click Restart 16 Enter in the username and password provided to remove any existing PPPoE client software installed on your ISP.
Using the Setup Wizard (continued) If your ISP uses PPPoE (Point-to-Point Protocol over Ethernet), and this option is selected, then this screen will appear: (Used mainly for DSL Internet service.) Please be sure to you by your computers. Click Next Click Restart 16 Enter in the username and password provided to remove any existing PPPoE client software installed on your ISP.

Product Manual
Page 22
Your ISP will provide you start your configuration of the DI-704UP Router. Select Static PPPoE to use a static IP address for DSL services. This option is typically used for your PPPoE connection. 22 Select Dynamic PPPoE to obtain an IP address automatically for your ISP uses PPPoE connection. Choose PPPoE (Point to Point Protocol over Ethernet) if your PPPoE connection. Using the Configuration Menu (continued) Home > WAN > PPPoE Please be sure to remove any Client Software program on your computer before you with a username and password.
Your ISP will provide you start your configuration of the DI-704UP Router. Select Static PPPoE to use a static IP address for DSL services. This option is typically used for your PPPoE connection. 22 Select Dynamic PPPoE to obtain an IP address automatically for your ISP uses PPPoE connection. Choose PPPoE (Point to Point Protocol over Ethernet) if your PPPoE connection. Using the Configuration Menu (continued) Home > WAN > PPPoE Please be sure to remove any Client Software program on your computer before you with a username and password.

Product Manual
Page 58
Click Install Print Server Software Click to Install Print Server Software for either Windows 98SE/ME or Windows 2000/XP Click Next 58 The following window will be shown automatically. If it is not, please run "install.exe" on the CD-ROM. Installing the Print Server Software Insert the installation CD-ROM into the CD-ROM drive.
Click Install Print Server Software Click to Install Print Server Software for either Windows 98SE/ME or Windows 2000/XP Click Next 58 The following window will be shown automatically. If it is not, please run "install.exe" on the CD-ROM. Installing the Print Server Software Insert the installation CD-ROM into the CD-ROM drive.

Product Manual
Page 59
Installing the Print Server Software (continued) Select the destination folder. Click OK After rebooting your computer, the software installation procedure is finished. 59 Click Browse to select a destination folder Click Next Click Finish Select the option for restarting the computer.
Installing the Print Server Software (continued) Select the destination folder. Click OK After rebooting your computer, the software installation procedure is finished. 59 Click Browse to select a destination folder Click Next Click Finish Select the option for restarting the computer.

Product Manual
Page 60
Now, you finish the software installation procedure, your computer will appear. Click Port Settings 60 Click on that the Printer Driver item is configured to the correct driver of network printing provided by the DI-704UP. The screen at the Print To item. On a Windows 95/98 platform, ...tab Choose the "D-Link LPT port (Print Server)" from the list attached at the right will be capable of your printer, for your printer. Installing the Print Server Software (continued) Configuring on Windows 98SE/ME Platforms After you can configure the print server of the DI-704UP: Find the ...
Now, you finish the software installation procedure, your computer will appear. Click Port Settings 60 Click on that the Printer Driver item is configured to the correct driver of network printing provided by the DI-704UP. The screen at the Print To item. On a Windows 95/98 platform, ...tab Choose the "D-Link LPT port (Print Server)" from the list attached at the right will be capable of your printer, for your printer. Installing the Print Server Software (continued) Configuring on Windows 98SE/ME Platforms After you can configure the print server of the DI-704UP: Find the ...

Product Manual
Page 61
Click OK (Note: Screen shots are taken in Windows 2000, similar screens will appear in the IP address of the DI-704UP. Installing the Print Server Software (continued) Configuring on Windows XP/2000/NT Platforms Type in Windows XP.) 61 Click OK Click Port The configuration procedure for a Windows 2000/XP platform is similar to that of Windows 95/98 except the screen of printer Properties: Click Configure Port Type in the IP address of the DI-704UP.
Click OK (Note: Screen shots are taken in Windows 2000, similar screens will appear in the IP address of the DI-704UP. Installing the Print Server Software (continued) Configuring on Windows XP/2000/NT Platforms Type in Windows XP.) 61 Click OK Click Port The configuration procedure for a Windows 2000/XP platform is similar to that of Windows 95/98 except the screen of printer Properties: Click Configure Port Type in the IP address of the DI-704UP.

Product Manual
Page 79
..., Sygate, Norton Personal Firewall, etc. Double click the Internet Options Icon. might block access to the desktop and close any Internet security software running on disabling or configuring it. Go to the configuration pages. Frequently Asked Questions (continued) Why can´t I access the web ... (continued) Step 2 Disable any open windows 79 Check the help files included with your Internet settings. Step 3 Configure your firewall software for more information on the computer. Click OK Go to the Advanced tab and click the Restore Defaults button to restore these settings...
..., Sygate, Norton Personal Firewall, etc. Double click the Internet Options Icon. might block access to the desktop and close any Internet security software running on disabling or configuring it. Go to the configuration pages. Frequently Asked Questions (continued) Why can´t I access the web ... (continued) Step 2 Disable any open windows 79 Check the help files included with your Internet settings. Step 3 Configure your firewall software for more information on the computer. Click OK Go to the Advanced tab and click the Restore Defaults button to restore these settings...

Product Manual
Page 87
...on the back of the screen. For BellSouth users, enter [email protected]. Step 3 After the router stabilizes, open your own username. If the password dialog box does not come up repeat Step 2. ...Dynamic PPPoE (unless your connection. 87 Select PPPoE. Make sure you with Earthlink DSL or any PPPoE software such as 1472, 1452, etc. Click OK. Step 6 In the username field enter ELN/[email protected]. Step 1 Upgrade Firmware if needed. (Please visit the D-Link tech support website at: http://support.dlink.com for your ISP supplied you disable or uninstall any PPPoE...
...on the back of the screen. For BellSouth users, enter [email protected]. Step 3 After the router stabilizes, open your own username. If the password dialog box does not come up repeat Step 2. ...Dynamic PPPoE (unless your connection. 87 Select PPPoE. Make sure you with Earthlink DSL or any PPPoE software such as 1472, 1452, etc. Click OK. Step 6 In the username field enter ELN/[email protected]. Step 1 Upgrade Firmware if needed. (Please visit the D-Link tech support website at: http://support.dlink.com for your ISP supplied you disable or uninstall any PPPoE...
Product Manual
Page 88
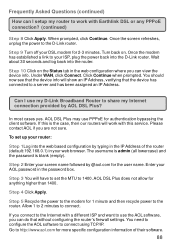
...AOL DSL Plus may use PPPoE for 1 minute and then recycle power to the router. Step 2 Enter your screen name followed by typing in the IP Address of their software. 88 Allow 1 to 2 minutes to the D-Link router. Once the screen refreshes, unplug the power to connect. In most cases yes. ...Step 5 Recycle the power to the modem for authentication bypassing the client software. Go to http://www.aol.com for anything higher than 1400. Once the modem has established a link to your router: Step 1Log into the router. Click Continue when prompted. To set the MTU to 1400. If you...
...AOL DSL Plus may use PPPoE for 1 minute and then recycle power to the router. Step 2 Enter your screen name followed by typing in the IP Address of their software. 88 Allow 1 to 2 minutes to the D-Link router. Once the screen refreshes, unplug the power to connect. In most cases yes. ...Step 5 Recycle the power to the modem for authentication bypassing the client software. Go to http://www.aol.com for anything higher than 1400. Once the modem has established a link to your router: Step 1Log into the router. Click Continue when prompted. To set the MTU to 1400. If you...

Product Manual
Page 98
...for KaZaA, Grokster, and others using the FastTrack P2P file sharing system. Step 5 Enter 1214 in the KaZaA software. 98 The following is blank (empty). Step 2 Click on the Kazaa software. Select TCP for KaZaA and Grokster? Click Apply. In most cases, you are having problems, please follow ...steps below: Step 1 Log into the web based configuration by typing in your web browser. Step 4 Enter the IP Address of the router (default:192.168.0.1) ...
...for KaZaA, Grokster, and others using the FastTrack P2P file sharing system. Step 5 Enter 1214 in the KaZaA software. 98 The following is blank (empty). Step 2 Click on the Kazaa software. Select TCP for KaZaA and Grokster? Click Apply. In most cases, you are having problems, please follow ...steps below: Step 1 Log into the web based configuration by typing in your web browser. Step 4 Enter the IP Address of the router (default:192.168.0.1) ...

Product Manual
Page 99
...on . Note: If you want to host the game. Configure the Game Port information on each computer, click Options > Gameplay. For the DI-704UP: Step 1 Log into the web based configuration by typing in the IP Address of the other computers. Select Both for Protocol Type Enter ...Computer #2 can use port 6113, computer #3 can use 6114, and so on your router. Private IP - Step 4 Click Apply and then Continue. You will need to change the port information within the Warcraft 3 software for both 6112 6112 Step 2 Click on each computer: Start Warcraft 3 on Advanced and...
...on . Note: If you want to host the game. Configure the Game Port information on each computer, click Options > Gameplay. For the DI-704UP: Step 1 Log into the web based configuration by typing in the IP Address of the other computers. Select Both for Protocol Type Enter ...Computer #2 can use port 6113, computer #3 can use 6114, and so on your router. Private IP - Step 4 Click Apply and then Continue. You will need to change the port information within the Warcraft 3 software for both 6112 6112 Step 2 Click on each computer: Start Warcraft 3 on Advanced and...
Product Manual
Page 100
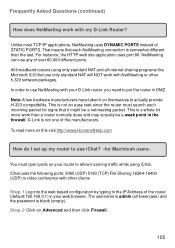
.... Step 2 Click on this visit http://www.HomenetHelp.com How do I set up my router to video conference with my D-Link Router? To read more work than the last. Frequently Asked Questions (continued) How does NetMeeting work with other h.323 software packages. iChat uses the following ports: 5060 (UDP) 5190 (TCP) File Sharing 16384...
.... Step 2 Click on this visit http://www.HomenetHelp.com How do I set up my router to video conference with my D-Link Router? To read more work than the last. Frequently Asked Questions (continued) How does NetMeeting work with other h.323 software packages. iChat uses the following ports: 5060 (UDP) 5190 (TCP) File Sharing 16384...

Product Manual
Page 103
... information is to temporarily turn off the firewall in its default state, the Mac OS X firewall blocks file transfers using iChat or America Online AIM software. " 103
... information is to temporarily turn off the firewall in its default state, the Mac OS X firewall blocks file transfers using iChat or America Online AIM software. " 103

Product Manual
Page 105
... the Internet: http://support.dlink.ca email:[email protected] 105 U.S. Technical Support You can contact D-Link technical support through our website, or by phone. D-Link Technical Support over the Internet: http://support.dlink.com email:[email protected] Tech Support for customers within... Monday to Friday 7:30am to 12:00am EST D-Link Technical Support over the Telephone: (877) 453-5465 24 hours a day, seven days a week. and Canadian customers can find software updates and user documentation on this product. D-Link provides free technical support for the duration of the warranty...
... the Internet: http://support.dlink.ca email:[email protected] 105 U.S. Technical Support You can contact D-Link technical support through our website, or by phone. D-Link Technical Support over the Internet: http://support.dlink.com email:[email protected] Tech Support for customers within... Monday to Friday 7:30am to 12:00am EST D-Link Technical Support over the Telephone: (877) 453-5465 24 hours a day, seven days a week. and Canadian customers can find software updates and user documentation on this product. D-Link provides free technical support for the duration of the warranty...

Product Manual
Page 106
... Installations, addresses with an APO or FPO. All Hardware (or part thereof) that it is given automatically terminates. If a material defect is replaced by D-Link for the Software. D-Link further warrants that originally purchased the product from the date of original retail purchase of the product, for the period set forth below will...
... Installations, addresses with an APO or FPO. All Hardware (or part thereof) that it is given automatically terminates. If a material defect is replaced by D-Link for the Software. D-Link further warrants that originally purchased the product from the date of original retail purchase of the product, for the period set forth below will...