User Manual
Page 2
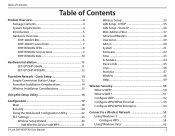
...Security 20 Using the Web-based Configuration Utility 22 PLC Settings 23 Wireless Setup Wizard 26 Add Wireless Device with WPS 31 D-Link DHP-W307AV User Manual Wireless Setup 33 LAN Setup - DHCP 35 LAN Setup - Table of Contents Table of Contents Product Overview 4 ...Package Contents 4 System Requirements 4 Introduction 5 Hardware Overview 6 DHP-306AV LEDs 6 DHP-306AV Connections 7 DHP-W306AV LEDs 8 DHP-W306AV Connections 9 DHP-W306AV Side 10 Hardware Installation 11 SET-UP DHP-306AV 11 SET-UP DHP-W306AV 12 Powerline Network - Static IP 36 MAC Address Filter 37 ...
...Security 20 Using the Web-based Configuration Utility 22 PLC Settings 23 Wireless Setup Wizard 26 Add Wireless Device with WPS 31 D-Link DHP-W307AV User Manual Wireless Setup 33 LAN Setup - DHCP 35 LAN Setup - Table of Contents Table of Contents Product Overview 4 ...Package Contents 4 System Requirements 4 Introduction 5 Hardware Overview 6 DHP-306AV LEDs 6 DHP-306AV Connections 7 DHP-W306AV LEDs 8 DHP-W306AV Connections 9 DHP-W306AV Side 10 Hardware Installation 11 SET-UP DHP-306AV 11 SET-UP DHP-W306AV 12 Powerline Network - Static IP 36 MAC Address Filter 37 ...
User Manual
Page 3
Table of Contents Configure WEP 64 Configure WPA-PSK 65 Using Windows® XP 66 Configure WEP 67 Configure WPA-PSK 69 Troubleshooting 71 Wireless Basics 74 What is Wireless 75 Tips 77 Wireless Modes 78 Networking Basics 79 Check your IP address 79 Statically Assign an IP address 80 Technical Specifications 81 DHP-306AV 81 DHP-W306AV 82 D-Link DHP-W307AV User Manual 3
Table of Contents Configure WEP 64 Configure WPA-PSK 65 Using Windows® XP 66 Configure WEP 67 Configure WPA-PSK 69 Troubleshooting 71 Wireless Basics 74 What is Wireless 75 Tips 77 Wireless Modes 78 Networking Basics 79 Check your IP address 79 Statically Assign an IP address 80 Technical Specifications 81 DHP-306AV 81 DHP-W306AV 82 D-Link DHP-W307AV User Manual 3
User Manual
Page 4
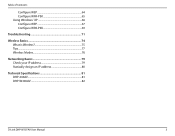
Section 1 - Product Overview PProacdkuacgteOCvoentrevnietsw • D-Link DHP-306AV Powerline AV Network Adapter • D-Link DHP-W306AV Powerline AV Wireless N Extender • CAT5 Ethernet Cable X 2 • CD-ROM with Software and User Manual • Quick Install Guide System Requirements Network Requirements &#... higher CD Installation Wizard Requirements • Windows® XP with Service Pack 2 / Vista® / Windows® 7 • An installed Ethernet adapter • CD-ROM drive D-Link DHP-W307AV User Manual 4
Section 1 - Product Overview PProacdkuacgteOCvoentrevnietsw • D-Link DHP-306AV Powerline AV Network Adapter • D-Link DHP-W306AV Powerline AV Wireless N Extender • CAT5 Ethernet Cable X 2 • CD-ROM with Software and User Manual • Quick Install Guide System Requirements Network Requirements &#... higher CD Installation Wizard Requirements • Windows® XP with Service Pack 2 / Vista® / Windows® 7 • An installed Ethernet adapter • CD-ROM drive D-Link DHP-W307AV User Manual 4
User Manual
Page 5
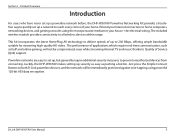
...video. Product Overview Introduction For users who have never set up a powerline network before, the DHP-W307AV Powerline Networking Kit provides a hasslefree way to quickly set up to all wireless devices within ...Link powerline devices, and the network will not be immediately protected against wire-tapping using the most pervasive medium in your home. Extend your Internet connection to prevent unauthorized devices from connecting. the electrical wiring. Powerline networks are easy to set up a network to Quality of Service (QoS) support. Section 1 - D-Link DHP-W307AV...
...video. Product Overview Introduction For users who have never set up a powerline network before, the DHP-W307AV Powerline Networking Kit provides a hasslefree way to quickly set up to all wireless devices within ...Link powerline devices, and the network will not be immediately protected against wire-tapping using the most pervasive medium in your home. Extend your Internet connection to prevent unauthorized devices from connecting. the electrical wiring. Powerline networks are easy to set up a network to Quality of Service (QoS) support. Section 1 - D-Link DHP-W307AV...

User Manual
Page 6
... itself up after reset or security button was pressed or power saving mode enabled. • Off. The Ethernet port is linked but there is no data traffic. • Blinking. There is no Ethernet connection. 6 The device is transmitting data. ... compatible Powerline devices using the same encryption key. The device is receiving electrical power. • Blinking. The color indicates the Powerline link rate: • Green. D-Link DHP-W307AV User Manual Ethernet LED • Solid. The device is connected to a Powerline network. • Blinking. Product Overview Power LED ...
... itself up after reset or security button was pressed or power saving mode enabled. • Off. The Ethernet port is linked but there is no data traffic. • Blinking. There is no Ethernet connection. 6 The device is transmitting data. ... compatible Powerline devices using the same encryption key. The device is receiving electrical power. • Blinking. The color indicates the Powerline link rate: • Green. D-Link DHP-W307AV User Manual Ethernet LED • Solid. The device is connected to a Powerline network. • Blinking. Product Overview Power LED ...

User Manual
Page 7
Product Overview Hardware Overview DHP-306AV Connections Simple Connect Button Press to Digital Media Devices, PCs, Game Consoles, Network Storage Devices CAT5 Ethernet cable. D-Link DHP-W307AV User Manual 7 Reset Button Press and hold the button for more information. Refer to page 8 for 1 second to reset to factory default. RJ-45 10/100BASE-TX Ethernet Port Connects to secure your network. Section 1 -
Product Overview Hardware Overview DHP-306AV Connections Simple Connect Button Press to Digital Media Devices, PCs, Game Consoles, Network Storage Devices CAT5 Ethernet cable. D-Link DHP-W307AV User Manual 7 Reset Button Press and hold the button for more information. Refer to page 8 for 1 second to reset to factory default. RJ-45 10/100BASE-TX Ethernet Port Connects to secure your network. Section 1 -
User Manual
Page 8
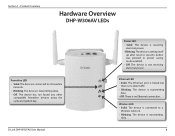
...encryption key. The device is transmitting data. • Off. The device is transmitting data. • Off. The device is transmitting data. 8 D-Link DHP-W307AV User Manual Power LED • Solid. The device is no Ethernet connection. Wireless LED • Solid. The Ethernet port is... linked but there is receiving electrical power. • Blinking. The device is connected to a Wireless network. • Blinking. Section 1 - The device is no...
...encryption key. The device is transmitting data. • Off. The device is transmitting data. • Off. The device is transmitting data. 8 D-Link DHP-W307AV User Manual Power LED • Solid. The device is no Ethernet connection. Wireless LED • Solid. The Ethernet port is... linked but there is receiving electrical power. • Blinking. The device is connected to a Wireless network. • Blinking. Section 1 - The device is no...
User Manual
Page 9
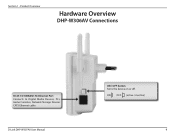
ON: OFF: (active / inactive) 9 Product Overview Hardware Overview DHP-W306AV Connections RJ-45 10/100BASE-TX Ethernet Port Connects to Digital Media Devices, PCs, Game Consoles, Network Storage Devices CAT5 Ethernet cable D-Link DHP-W307AV User Manual ON / OFF button Turns the device on or off. Section 1 -
ON: OFF: (active / inactive) 9 Product Overview Hardware Overview DHP-W306AV Connections RJ-45 10/100BASE-TX Ethernet Port Connects to Digital Media Devices, PCs, Game Consoles, Network Storage Devices CAT5 Ethernet cable D-Link DHP-W307AV User Manual ON / OFF button Turns the device on or off. Section 1 -
User Manual
Page 10
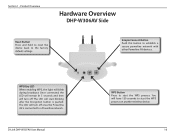
Simple Connect Button Push this button to the factory default settings. D-Link DHP-W307AV User Manual WPS Button Press to start the WPS process on another wireless device. 10 Once connected, the LED will remain lit 5 seconds and then ... light will start blinking after the Encryption button is connected to start the WPS process. The LED will blink during broadcast. Product Overview Hardware Overview DHP-W306AV Side Reset Button Press and hold to reset the device back to establish a secure powerline network with other Powerline AV devices.
Simple Connect Button Push this button to the factory default settings. D-Link DHP-W307AV User Manual WPS Button Press to start the WPS process on another wireless device. 10 Once connected, the LED will remain lit 5 seconds and then ... light will start blinking after the Encryption button is connected to start the WPS process. The LED will blink during broadcast. Product Overview Hardware Overview DHP-W306AV Side Reset Button Press and hold to reset the device back to establish a secure powerline network with other Powerline AV devices.
User Manual
Page 11
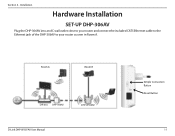
Section 2 - Room A Room B DIR-655 DHP-306AV DHP-W306AV D-Link DHP-W307AV User Manual Simple Connection Button Reset Button 11 Installation Hardware Installation SET-UP DHP-306AV Plug the DHP-306AV into an AC wall outlet close to your router and connect the included CAT5 Ethernet cable to the Ethernet jack of the DHP-306AV to your router as seen in Room A.
Section 2 - Room A Room B DIR-655 DHP-306AV DHP-W306AV D-Link DHP-W307AV User Manual Simple Connection Button Reset Button 11 Installation Hardware Installation SET-UP DHP-306AV Plug the DHP-306AV into an AC wall outlet close to your router and connect the included CAT5 Ethernet cable to the Ethernet jack of the DHP-306AV to your router as seen in Room A.
User Manual
Page 12
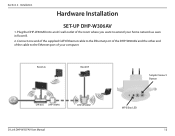
Room A Room B Simple Connect Button DIR-655 DHP-306AV DHP-W306AV D-Link DHP-W307AV User Manual WPS/Eny LED 12 Connect one end of the supplied CAT5 Ethernet cable to the Ethernet port of the DHP-W306AV and the other end of the cable to the Ethernet port of the room where you want to extend your computer. Installation Hardware Installation SET-UP DHP-W306AV 1. Plug the DHP-W306AV into an AC wall outlet of your home network as seen in Room B. 2. Section 2 -
Room A Room B Simple Connect Button DIR-655 DHP-306AV DHP-W306AV D-Link DHP-W307AV User Manual WPS/Eny LED 12 Connect one end of the supplied CAT5 Ethernet cable to the Ethernet port of the DHP-W306AV and the other end of the cable to the Ethernet port of the room where you want to extend your computer. Installation Hardware Installation SET-UP DHP-W306AV 1. Plug the DHP-W306AV into an AC wall outlet of your home network as seen in Room B. 2. Section 2 -
User Manual
Page 13
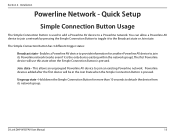
Hold down the Simple Connection Button for another Powerline AV device to a Powerline network. D-Link DHP-W307AV User Manual 13 The Simple Connection Button has 3 different trigger states: Broadcast state - This allows an ungrouped Powerline AV device to the Broadcast state or ...
Hold down the Simple Connection Button for another Powerline AV device to a Powerline network. D-Link DHP-W307AV User Manual 13 The Simple Connection Button has 3 different trigger states: Broadcast state - This allows an ungrouped Powerline AV device to the Broadcast state or ...
User Manual
Page 14
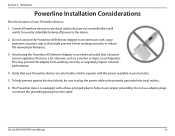
Installation Powerline Installation Considerations Plan the location of power, such as this might prevent it from the cable. D-Link DHP-W307AV User Manual 14 Connect Powerline devices to plug the power cables into properly grounded electrical outlets. 6. To help ensure proper grounding. Avoid using the Powerline ...
Installation Powerline Installation Considerations Plan the location of power, such as this might prevent it from the cable. D-Link DHP-W307AV User Manual 14 Connect Powerline devices to plug the power cables into properly grounded electrical outlets. 6. To help ensure proper grounding. Avoid using the Powerline ...
User Manual
Page 15
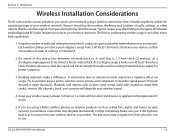
...or 1-2 meters) from your 2.4GHz phone base is not in mind that the signal will degrade your wireless connection may limit the range. D-Link DHP-W307AV User Manual 15 Typical ranges vary depending on range. Be aware of walls or ceilings is to position access points, wireless access points, and...can reduce your adapter's range from virtually anywhere within the operating range of your devices so that the number of the direct line between the D-Link access point and other objects that is 1.5 feet thick (.5 meters), at an angle) for better reception. 3. A wall that the wireless ...
...or 1-2 meters) from your 2.4GHz phone base is not in mind that the signal will degrade your wireless connection may limit the range. D-Link DHP-W307AV User Manual 15 Typical ranges vary depending on range. Be aware of walls or ceilings is to position access points, wireless access points, and...can reduce your adapter's range from virtually anywhere within the operating range of your devices so that the number of the direct line between the D-Link access point and other objects that is 1.5 feet thick (.5 meters), at an angle) for better reception. 3. A wall that the wireless ...
User Manual
Page 16
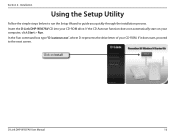
Click on your computer, click Start > Run. Section 2 - In the Run command box type "D:\autorun.exe", where D: represents the drive letter of your CD-ROM drive. If the CD Autorun function does not automatically start , proceed to guide you quickly through the installation process. If it does start on Install D-Link DHP-W307AV User Manual 16 Installation Using the Setup Utility Follow the simple steps below to run the Setup Wizard to the next screen. Insert the D-Link DHP-W307AV CD into your CD-ROM.
Click on your computer, click Start > Run. Section 2 - In the Run command box type "D:\autorun.exe", where D: represents the drive letter of your CD-ROM drive. If the CD Autorun function does not automatically start , proceed to guide you quickly through the installation process. If it does start on Install D-Link DHP-W307AV User Manual 16 Installation Using the Setup Utility Follow the simple steps below to run the Setup Wizard to the next screen. Insert the D-Link DHP-W307AV CD into your CD-ROM.
User Manual
Page 17
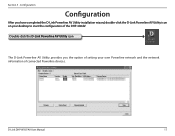
Section 3 - D-Link DHP-W307AV User Manual 17 Configuration Configuration After you the option of setting your desktop to start the configuration of connected Powerline devices. Double-click the D-Link Powerline AV Utility icon The D-Link Powerline AV Utility provides you have completed the D-Link Powerline AV Utility installation wizard, double-click the D-Link Powerline AV Utility icon on your own Powerline network and the network information of the DHP-306AV.
Section 3 - D-Link DHP-W307AV User Manual 17 Configuration Configuration After you the option of setting your desktop to start the configuration of connected Powerline devices. Double-click the D-Link Powerline AV Utility icon The D-Link Powerline AV Utility provides you have completed the D-Link Powerline AV Utility installation wizard, double-click the D-Link Powerline AV Utility icon on your own Powerline network and the network information of the DHP-306AV.

User Manual
Page 18
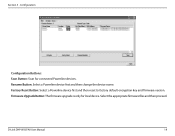
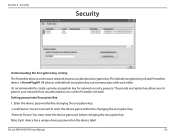
... 3 - Configuration Main Device Information Tab: Device Name: Shows the name of the connected device. Suitable for data and Internet activity connection. D-Link DHP-W307AV User Manual 18 The device name is local or remote. Suitable for SD video stream connection. • One square - MAC Address: Shows the...the firmware version of the connected device. Location: Shows the device is initially set by the utility itself. Link Rate: Shows the link rate of the connected device. Quality: Shows the network connection quality of the connected device. • Three squares -
... 3 - Configuration Main Device Information Tab: Device Name: Shows the name of the connected device. Suitable for data and Internet activity connection. D-Link DHP-W307AV User Manual 18 The device name is local or remote. Suitable for SD video stream connection. • One square - MAC Address: Shows the...the firmware version of the connected device. Location: Shows the device is initially set by the utility itself. Link Rate: Shows the link rate of the connected device. Quality: Shows the network connection quality of the connected device. • Three squares -
User Manual
Page 19
Configuration Configuration Buttons: Scan Button: Scan for local device. Firmware Upgrade Button: The firmware upgrade is only for connected Powerline devices. Rename Button: Select a Powerline device first and then change the device name. Factory Reset Button: Select a Powerline device first and then reset to factory default encryption key and firmware version. D-Link DHP-W307AV User Manual 19 Select the appropriate firmware files and then proceed. Section 3 -
Configuration Configuration Buttons: Scan Button: Scan for local device. Firmware Upgrade Button: The firmware upgrade is only for connected Powerline devices. Rename Button: Select a Powerline device first and then change the device name. Factory Reset Button: Select a Powerline device first and then reset to factory default encryption key and firmware version. D-Link DHP-W307AV User Manual 19 Select the appropriate firmware files and then proceed. Section 3 -
User Manual
Page 20
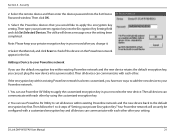
...: You do not need to create a private encryption key for network security purpose. The private encryption key allows you to protect your private Encryption Key 1. D-Link DHP-W307AV User Manual 20 All devices with default encryption key can communicate with each Powerline device is HomePlugAV. Section 4 -
...: You do not need to create a private encryption key for network security purpose. The private encryption key allows you to protect your private Encryption Key 1. D-Link DHP-W307AV User Manual 20 All devices with default encryption key can communicate with each Powerline device is HomePlugAV. Section 4 -
User Manual
Page 21
... a customized encryption key and all devices can communicate with each other . Then all devices can communicate with each other by using the customized encryption key. 2. D-Link DHP-W307AV User Manual 21 Section 4 - Then type your Powerline network. 1.
... a customized encryption key and all devices can communicate with each other . Then all devices can communicate with each other by using the customized encryption key. 2. D-Link DHP-W307AV User Manual 21 Section 4 - Then type your Powerline network. 1.


