User Manual
Page 2
... Wizard 26 Add Wireless Device with WPS 31 D-Link DHP-W307AV User Manual Wireless Setup 33 LAN Setup - Table of Contents Table of Contents Product Overview 4 Package Contents 4 System Requirements 4 Introduction 5 Hardware Overview 6 DHP-306AV LEDs 6 DHP-306AV Connections 7 DHP-W306AV LEDs 8 DHP-W306AV Connections 9 DHP-W306AV Side 10 Hardware Installation 11 SET-UP DHP-306AV 11 SET-UP DHP-W306AV 12 Powerline Network -
... Wizard 26 Add Wireless Device with WPS 31 D-Link DHP-W307AV User Manual Wireless Setup 33 LAN Setup - Table of Contents Table of Contents Product Overview 4 Package Contents 4 System Requirements 4 Introduction 5 Hardware Overview 6 DHP-306AV LEDs 6 DHP-306AV Connections 7 DHP-W306AV LEDs 8 DHP-W306AV Connections 9 DHP-W306AV Side 10 Hardware Installation 11 SET-UP DHP-306AV 11 SET-UP DHP-W306AV 12 Powerline Network -
User Manual
Page 3
Table of Contents Configure WEP 64 Configure WPA-PSK 65 Using Windows® XP 66 Configure WEP 67 Configure WPA-PSK 69 Troubleshooting 71 Wireless Basics 74 What is Wireless 75 Tips 77 Wireless Modes 78 Networking Basics 79 Check your IP address 79 Statically Assign an IP address 80 Technical Specifications 81 DHP-306AV 81 DHP-W306AV 82 D-Link DHP-W307AV User Manual 3
Table of Contents Configure WEP 64 Configure WPA-PSK 65 Using Windows® XP 66 Configure WEP 67 Configure WPA-PSK 69 Troubleshooting 71 Wireless Basics 74 What is Wireless 75 Tips 77 Wireless Modes 78 Networking Basics 79 Check your IP address 79 Statically Assign an IP address 80 Technical Specifications 81 DHP-306AV 81 DHP-W306AV 82 D-Link DHP-W307AV User Manual 3
User Manual
Page 4
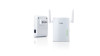
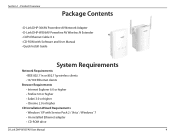
Product Overview PProacdkuacgteOCvoentrevnietsw • D-Link DHP-306AV Powerline AV Network Adapter • D-Link DHP-W306AV Powerline AV Wireless N Extender • CAT5 Ethernet Cable X 2 • CD-ROM with Software and User Manual • Quick Install Guide System Requirements Network Requirements • ... higher CD Installation Wizard Requirements • Windows® XP with Service Pack 2 / Vista® / Windows® 7 • An installed Ethernet adapter • CD-ROM drive D-Link DHP-W307AV User Manual 4 Section 1 -
Product Overview PProacdkuacgteOCvoentrevnietsw • D-Link DHP-306AV Powerline AV Network Adapter • D-Link DHP-W306AV Powerline AV Wireless N Extender • CAT5 Ethernet Cable X 2 • CD-ROM with Software and User Manual • Quick Install Guide System Requirements Network Requirements • ... higher CD Installation Wizard Requirements • Windows® XP with Service Pack 2 / Vista® / Windows® 7 • An installed Ethernet adapter • CD-ROM drive D-Link DHP-W307AV User Manual 4 Section 1 -
User Manual
Page 8
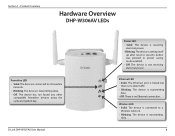
... LED • Solid. The device is no data traffic. • Blinking. The device is transmitting data. • Off. D-Link DHP-W307AV User Manual Power LED • Solid. There is connected to a Wireless network. • Blinking. The device is no Ethernet connection... Powerline devices using the same encryption key. The device is transmitting data. 8 Wireless LED • Solid. Product Overview Hardware Overview DHP-W306AV LEDs Powerline LED • Solid. The device is not receiving electrical power. The device is receiving electrical power. • Blinking. The...
... LED • Solid. The device is no data traffic. • Blinking. The device is transmitting data. • Off. D-Link DHP-W307AV User Manual Power LED • Solid. There is connected to a Wireless network. • Blinking. The device is no Ethernet connection... Powerline devices using the same encryption key. The device is transmitting data. 8 Wireless LED • Solid. Product Overview Hardware Overview DHP-W306AV LEDs Powerline LED • Solid. The device is not receiving electrical power. The device is receiving electrical power. • Blinking. The...
User Manual
Page 9
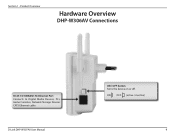
Product Overview Hardware Overview DHP-W306AV Connections RJ-45 10/100BASE-TX Ethernet Port Connects to Digital Media Devices, PCs, Game Consoles, Network Storage Devices CAT5 Ethernet cable D-Link DHP-W307AV User Manual ON / OFF button Turns the device on or off. Section 1 - ON: OFF: (active / inactive) 9
Product Overview Hardware Overview DHP-W306AV Connections RJ-45 10/100BASE-TX Ethernet Port Connects to Digital Media Devices, PCs, Game Consoles, Network Storage Devices CAT5 Ethernet cable D-Link DHP-W307AV User Manual ON / OFF button Turns the device on or off. Section 1 - ON: OFF: (active / inactive) 9
User Manual
Page 10
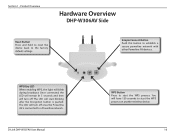
... . Product Overview Hardware Overview DHP-W306AV Side Reset Button Press and hold to reset the device back to start the WPS process. The LED will blink during broadcast. Once connected, the LED will remain lit 5 seconds and then will have 120 seconds to the factory default settings. Section 1 - D-Link DHP-W307AV User Manual WPS Button...
... . Product Overview Hardware Overview DHP-W306AV Side Reset Button Press and hold to reset the device back to start the WPS process. The LED will blink during broadcast. Once connected, the LED will remain lit 5 seconds and then will have 120 seconds to the factory default settings. Section 1 - D-Link DHP-W307AV User Manual WPS Button...
User Manual
Page 11
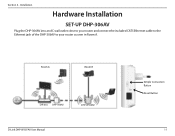
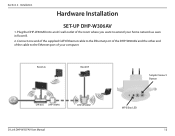
Section 2 - Installation Hardware Installation SET-UP DHP-306AV Plug the DHP-306AV into an AC wall outlet close to your router and connect the included CAT5 Ethernet cable to the Ethernet jack of the DHP-306AV to your router as seen in Room A. Room A Room B DIR-655 DHP-306AV DHP-W306AV D-Link DHP-W307AV User Manual Simple Connection Button Reset Button 11
Section 2 - Installation Hardware Installation SET-UP DHP-306AV Plug the DHP-306AV into an AC wall outlet close to your router and connect the included CAT5 Ethernet cable to the Ethernet jack of the DHP-306AV to your router as seen in Room A. Room A Room B DIR-655 DHP-306AV DHP-W306AV D-Link DHP-W307AV User Manual Simple Connection Button Reset Button 11
User Manual
Page 12
Room A Room B Simple Connect Button DIR-655 DHP-306AV DHP-W306AV D-Link DHP-W307AV User Manual WPS/Eny LED 12 Section 2 - Plug the DHP-W306AV into an AC wall outlet of the room where you want to the Ethernet port of the cable to extend your computer. Installation Hardware Installation SET-UP DHP-W306AV 1. Connect one end of the supplied CAT5 Ethernet cable to the Ethernet port of the DHP-W306AV and the other end of your home network as seen in Room B. 2.
Room A Room B Simple Connect Button DIR-655 DHP-306AV DHP-W306AV D-Link DHP-W307AV User Manual WPS/Eny LED 12 Section 2 - Plug the DHP-W306AV into an AC wall outlet of the room where you want to the Ethernet port of the cable to extend your computer. Installation Hardware Installation SET-UP DHP-W306AV 1. Connect one end of the supplied CAT5 Ethernet cable to the Ethernet port of the DHP-W306AV and the other end of your home network as seen in Room B. 2.
User Manual
Page 22
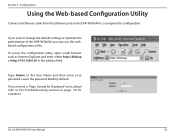
...then enter your password. If you receive a "Page Cannot be Displayed" error, please refer to the Troubleshooting section on the DHP-W306AV to change the default settings or optimize the performance of the DHP-W306AV, you wish to a computer for assistance. Leave the password blank by default. Section 3 - Configuration Using the Web-based ...page 78 for configuration. http://dlinkap Type Admin as Internet Explorer and enter either http://dlinkap or http://192.168.0.50 in the address field. D-Link DHP-W307AV User Manual 22 If you may use the webbased configuration utility.
...then enter your password. If you receive a "Page Cannot be Displayed" error, please refer to the Troubleshooting section on the DHP-W306AV to change the default settings or optimize the performance of the DHP-W306AV, you wish to a computer for assistance. Leave the password blank by default. Section 3 - Configuration Using the Web-based ...page 78 for configuration. http://dlinkap Type Admin as Internet Explorer and enter either http://dlinkap or http://192.168.0.50 in the address field. D-Link DHP-W307AV User Manual 22 If you may use the webbased configuration utility.

User Manual
Page 27
This is more than one D-Link device within the same wireless network. Changing the Device Name is recommended if there is the NetBIOS name for the AP. Changing the password is designed to assist you would like to continue. Configuration This Wizard is strongly recommended. D-Link DHP-W307AV User Manual 27 If you in configuring your DHP-W306AV as an access point. Section 3 - Enter the Device Name of the AP and click Next to change the admin account password, enter a new password and click Next.
This is more than one D-Link device within the same wireless network. Changing the Device Name is recommended if there is the NetBIOS name for the AP. Changing the password is designed to assist you would like to continue. Configuration This Wizard is strongly recommended. D-Link DHP-W307AV User Manual 27 If you in configuring your DHP-W306AV as an access point. Section 3 - Enter the Device Name of the AP and click Next to change the admin account password, enter a new password and click Next.
User Manual
Page 33
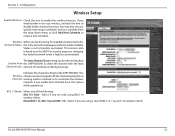
...for available wireless networks, Network Name: this is set up ). The Wireless channel can be changed to fit the channel setting for the DHP-W306AV. Mixed 802.11n, 802.11g and 802.11b - Configuration Wireless Setup Enable Wireless: Check this option will appear in the list (...the SSID. This name is highly recommended. For security purposes, changing the default network name is also referred to enable the wireless function. D-Link DHP-W307AV User Manual 33 If you are using 802.11n wireless clients. Select if you are only using a mix of the following: 802.11n...
...for available wireless networks, Network Name: this is set up ). The Wireless channel can be changed to fit the channel setting for the DHP-W306AV. Mixed 802.11n, 802.11g and 802.11b - Configuration Wireless Setup Enable Wireless: Check this option will appear in the list (...the SSID. This name is highly recommended. For security purposes, changing the default network name is also referred to enable the wireless function. D-Link DHP-W307AV User Manual 33 If you are using 802.11n wireless clients. Select if you are only using a mix of the following: 802.11n...
User Manual
Page 34
...network to be broadcasted by site survey utilities, so your wireless clients will only be added to the user interface PIN: of your DHP-W306AV in order to connect to it. Lock Wireless Locking the wireless security settings prevents the settings from being changed by any 802.11n ... Reset PIN to Not Configured. Default: Reset to Resets Wi-Fi Protected Status to Restores the default PIN of the access point's PIN. D-Link DHP-W307AV User Manual 34 Transmission Rate: Select the transmission rate. Devices Security Settings: can then copy this PIN to the wireless network using Wi-Fi ...
...network to be broadcasted by site survey utilities, so your wireless clients will only be added to the user interface PIN: of your DHP-W306AV in order to connect to it. Lock Wireless Locking the wireless security settings prevents the settings from being changed by any 802.11n ... Reset PIN to Not Configured. Default: Reset to Resets Wi-Fi Protected Status to Restores the default PIN of the access point's PIN. D-Link DHP-W307AV User Manual 34 Transmission Rate: Select the transmission rate. Devices Security Settings: can then copy this PIN to the wireless network using Wi-Fi ...
User Manual
Page 36
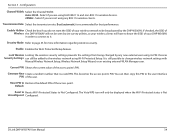
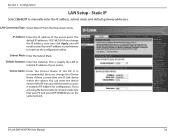
Static IP Select Static IP to enter the new IP address in your DHP-W306AV are on the same network. Subnet Mask: Enter the Subnet Mask. It is.... Device Name: Enter the Device Name of the access point. The default IP address is more than one D-Link device within the subnet. This is usually the LAN or internal IP address of your web browser to the configuration...will need to manually enter the IP address, subnet mask, and default gateway addresses. D-Link DHP-W307AV User Manual 36 Section 3 - Configuration LAN Setup - If you change the Device Name if there is 192.168.0.50.
Static IP Select Static IP to enter the new IP address in your DHP-W306AV are on the same network. Subnet Mask: Enter the Subnet Mask. It is.... Device Name: Enter the Device Name of the access point. The default IP address is more than one D-Link device within the subnet. This is usually the LAN or internal IP address of your web browser to the configuration...will need to manually enter the IP address, subnet mask, and default gateway addresses. D-Link DHP-W307AV User Manual 36 Section 3 - Configuration LAN Setup - If you change the Device Name if there is 192.168.0.50.
User Manual
Page 45
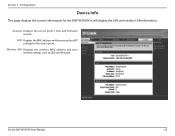
General: Displays the access point's time and firmware version. LAN: Displays the MAC address and the private (local) IP settings for the DHP-W306AV. Configuration Device Info This page displays the current information for the access point. Wireless LAN: Displays the wireless MAC address and your wireless settings such as SSID and Channel. Section 3 - It will display the LAN and wireless LAN information. D-Link DHP-W307AV User Manual 45
General: Displays the access point's time and firmware version. LAN: Displays the MAC address and the private (local) IP settings for the DHP-W306AV. Configuration Device Info This page displays the current information for the access point. Wireless LAN: Displays the wireless MAC address and your wireless settings such as SSID and Channel. Section 3 - It will display the LAN and wireless LAN information. D-Link DHP-W307AV User Manual 45
User Manual
Page 46
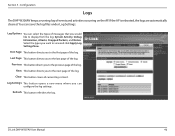
... page of the log. First Page: This button directs you to the first page of the log. Clear: This button clears all current log content. D-Link DHP-W307AV User Manual 46 Next: This button directs you to the next page of events and activities occurring on the AP. Log Settings: This button opens... display from the log: System Activity, Debug Information, Attacks, Dropped Packets, and Notice. Select the types you can configure the log settings. Configuration Logs The DHP-W306AV keeps a running log of the log. Refresh: This button refreshes the log.
... page of the log. First Page: This button directs you to the first page of the log. Clear: This button clears all current log content. D-Link DHP-W307AV User Manual 46 Next: This button directs you to the next page of events and activities occurring on the AP. Log Settings: This button opens... display from the log: System Activity, Debug Information, Attacks, Dropped Packets, and Notice. Select the types you can configure the log settings. Configuration Logs The DHP-W306AV keeps a running log of the log. Refresh: This button refreshes the log.
User Manual
Page 47
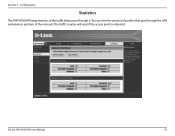
Section 3 - D-Link DHP-W307AV User Manual 47 Configuration Statistics The DHP-W306AV keeps statistics of the network. The traffic counter will reset if the access point is rebooted. You can view the amount of packets that pass through the LAN and wireless portions of the traffic that passes through it.
Section 3 - D-Link DHP-W307AV User Manual 47 Configuration Statistics The DHP-W306AV keeps statistics of the network. The traffic counter will reset if the access point is rebooted. You can view the amount of packets that pass through the LAN and wireless portions of the traffic that passes through it.

User Manual
Page 50
...must know the key. When using characters 0-9, A-F) or ASCII (American Standard Code for Information Interchange - alphanumeric characters) format. D-Link DHP-W307AV User Manual 50 ASCII format is converted to another. The ASCII string is provided so you can use over your data from intruders. ... the level of security you can change keys easily. WEP provides security by entering in a string in HEX (hexadecimal - The DHP-W306AV offers the following types of encryption determines the key length. 128-bit encryption requires a longer key than 64-bit encryption. WEP ...
...must know the key. When using characters 0-9, A-F) or ASCII (American Standard Code for Information Interchange - alphanumeric characters) format. D-Link DHP-W307AV User Manual 50 ASCII format is converted to another. The ASCII string is provided so you can use over your data from intruders. ... the level of security you can change keys easily. WEP provides security by entering in a string in HEX (hexadecimal - The DHP-W306AV offers the following types of encryption determines the key length. 128-bit encryption requires a longer key than 64-bit encryption. WEP ...
User Manual
Page 58
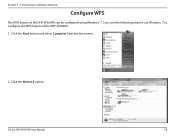
Carry out the following steps to use Windows® 7 to a Wireless Network Configure WPS The WPS feature of the DHP-W306AV: 1. Click the Network option. D-Link DHP-W307AV User Manual 58 Click the Start button and select Computer from the Start menu. 2. Section 5 - Connecting to configure the WPS feature of the DHP-W306AV can be configured using Windows® 7.
Carry out the following steps to use Windows® 7 to a Wireless Network Configure WPS The WPS feature of the DHP-W306AV: 1. Click the Network option. D-Link DHP-W307AV User Manual 58 Click the Start button and select Computer from the Start menu. 2. Section 5 - Connecting to configure the WPS feature of the DHP-W306AV can be configured using Windows® 7.
User Manual
Page 59
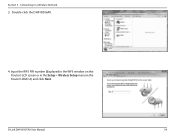
Input the WPS PIN number (displayed in the WPS window on the Router's LCD screen or in the Setup > Wireless Setup menu in the Router's Web UI) and click Next. D-Link DHP-W307AV User Manual 59 Section 5 - Connecting to a Wireless Network 3. Double-click the DHP-W306AV. 4.
Input the WPS PIN number (displayed in the WPS window on the Router's LCD screen or in the Setup > Wireless Setup menu in the Router's Web UI) and click Next. D-Link DHP-W307AV User Manual 59 Section 5 - Connecting to a Wireless Network 3. Double-click the DHP-W306AV. 4.
User Manual
Page 61
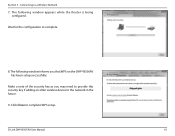
Connecting to complete WPS setup. Make a note of the security key as you that WPS on the DHP-W306AV has been setup successfully. Click Close to a Wireless Network 7. The following window informs you may need to provide this security key if adding an older wireless device to complete 8. The following window appears while the Router is being configured. D-Link DHP-W307AV User Manual 61 Wait for the configuration to the network in the future. 9. Section 5 -
Connecting to complete WPS setup. Make a note of the security key as you that WPS on the DHP-W306AV has been setup successfully. Click Close to a Wireless Network 7. The following window informs you may need to provide this security key if adding an older wireless device to complete 8. The following window appears while the Router is being configured. D-Link DHP-W307AV User Manual 61 Wait for the configuration to the network in the future. 9. Section 5 -


