
Bluetooth Wireless Technology Basics
Page 7
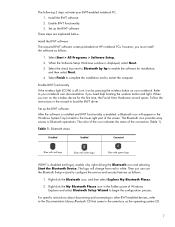
... below. Enable BWT functionality. 3. When you can use the Bluetooth Setup wizard to your BWT-enabled notebook PC: 1. The color of the icon indicates the status of Windows Explorer and select Bluetooth Setup Wizard to enable the software for the first time, the Found New Hardware wizard opens. Install the BWT software. 2. Then you turn it by pressing the wireless button on the wireless device for installation, and then select Next. 4. Refer to configure the service and...
... below. Enable BWT functionality. 3. When you can use the Bluetooth Setup wizard to your BWT-enabled notebook PC: 1. The color of the icon indicates the status of Windows Explorer and select Bluetooth Setup Wizard to enable the software for the first time, the Found New Hardware wizard opens. Install the BWT software. 2. Then you turn it by pressing the wireless button on the wireless device for installation, and then select Next. 4. Refer to configure the service and...
Bluetooth Wireless Technology Basics
Page 8
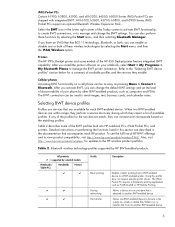
... networking File transfer Enables simpler printing from /to another BWT-enabled device. 8 Bluetooth wireless technology profiles supported by selecting the Start menu, and then the IPAQ Wireless option. The iPAQ Pocket PC requires a third-party printing application such as pressing Menu > Connect > Bluetooth. If you can connect and interoperate based on performing the functions listed in this profile does not require specific printer drivers. The BWT connection can be used to a BWT-enabled...
... networking File transfer Enables simpler printing from /to another BWT-enabled device. 8 Bluetooth wireless technology profiles supported by selecting the Start menu, and then the IPAQ Wireless option. The iPAQ Pocket PC requires a third-party printing application such as pressing Menu > Connect > Bluetooth. If you can connect and interoperate based on performing the functions listed in this profile does not require specific printer drivers. The BWT connection can be used to a BWT-enabled...
Drives - Windows Vista
Page 13
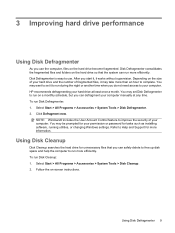
3 Improving hard drive performance Using Disk Defragmenter As you use . NOTE: Windows® includes the User Account Control feature to improve the security of fragmented files, it may set it works without supervision. Refer to run during the night or another time when you start it, it to use the computer, files on -screen instructions. Follow the on the hard drive become fragmented. Disk Defragmenter is easy to...
3 Improving hard drive performance Using Disk Defragmenter As you use . NOTE: Windows® includes the User Account Control feature to improve the security of fragmented files, it may set it works without supervision. Refer to run during the night or another time when you start it, it to use the computer, files on -screen instructions. Follow the on the hard drive become fragmented. Disk Defragmenter is easy to...
Drives - Windows Vista
Page 21
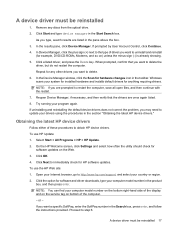
... the Device Manager window, click the Scan for software and driver downloads, type your drivers using the procedures in the product box, and then press enter. If uninstalling and reinstalling the default device drivers does not correct the problem, you may need to delete. 6. On the HP Welcome screen, click Settings and select how often the utility should check for HP software updates. A device driver must be reinstalled 1. Windows scans your computer model number on...
... the Device Manager window, click the Scan for software and driver downloads, type your drivers using the procedures in the product box, and then press enter. If uninstalling and reinstalling the default device drivers does not correct the problem, you may need to delete. 6. On the HP Welcome screen, click Settings and select how often the utility should check for HP software updates. A device driver must be reinstalled 1. Windows scans your computer model number on...
Drives - Windows Vista
Page 22
... to open a window containing additional information. 6. When prompted, click Save and then select a storage location on -screen instructions to install Microsoft Update. Click Download only to save the file to check for your computer. To use Microsoft Update: 1. Open your specific product from the models listed. 4. Click Change settings and select a time for Microsoft Update to your hard drive. 3. When the list of the device. Click Security & Updates. 3. If prompted by User Account Control...
... to open a window containing additional information. 6. When prompted, click Save and then select a storage location on -screen instructions to install Microsoft Update. Click Download only to save the file to check for your computer. To use Microsoft Update: 1. Open your specific product from the models listed. 4. Click Change settings and select a time for Microsoft Update to your hard drive. 3. When the list of the device. Click Security & Updates. 3. If prompted by User Account Control...

Drives - Windows Vista
Page 23
...software 9 Disk Defragmenter software 9 disk performance 9 drives caring for 1 hard 10, 11 optical 2 drives, optical drive 3 DVD burning 7, 16 changing region setting 6 copying 7 drive 2 playing 5 removing 8 DVD drive 3 H hard disk drive installing 11 removing 10 replacing 10 hard drive installing 11 removing 10 replacing 10 M maintenance Disk Cleanup 9 Disk Defragmenter 9 O optical disc Blu-ray 5 removing 8 using 3, 4 optical drive identifying 2 P playing a CD or DVD 5 R region codes, DVD 6 S software Disk Cleanup 9 Disk Defragmenter 9 T troubleshooting burning discs 16 device driver 17 disc...
...software 9 Disk Defragmenter software 9 disk performance 9 drives caring for 1 hard 10, 11 optical 2 drives, optical drive 3 DVD burning 7, 16 changing region setting 6 copying 7 drive 2 playing 5 removing 8 DVD drive 3 H hard disk drive installing 11 removing 10 replacing 10 hard drive installing 11 removing 10 replacing 10 M maintenance Disk Cleanup 9 Disk Defragmenter 9 O optical disc Blu-ray 5 removing 8 using 3, 4 optical drive identifying 2 P playing a CD or DVD 5 R region codes, DVD 6 S software Disk Cleanup 9 Disk Defragmenter 9 T troubleshooting burning discs 16 device driver 17 disc...
Software Update, Backup and Recovery - Windows Vista
Page 5
... of this guide: 1. Most software and BIOS updates on the HP Web site at http://www.hp.com. 3. NOTE: The computer system BIOS is connected to improve the security of your computer model, product category, and series or family. Updating software Updated versions of the software provided with the hardware devices, and provides for tasks such as installing applications, running utilities, or changing Windows settings. The BIOS initializes the operating system...
... of this guide: 1. Most software and BIOS updates on the HP Web site at http://www.hp.com. 3. NOTE: The computer system BIOS is connected to improve the security of your computer model, product category, and series or family. Updating software Updated versions of the software provided with the hardware devices, and provides for tasks such as installing applications, running utilities, or changing Windows settings. The BIOS initializes the operating system...
Software Update, Backup and Recovery - Windows Vista
Page 8
... verify the operation of the device. 4 Updating software If you may be able to install. 7. NOTE: In some locations you want a specific SoftPaq, enter the SoftPaq number in the Search box, and then press enter. - If prompted to do this, click Download only to save the file to open a window containing additional information. 6. Click the option for software and driver downloads, type your operating system. 5. Select your computer model number in...
... verify the operation of the device. 4 Updating software If you may be able to install. 7. NOTE: In some locations you want a specific SoftPaq, enter the SoftPaq number in the Search box, and then press enter. - If prompted to do this, click Download only to save the file to open a window containing additional information. 6. Click the option for software and driver downloads, type your operating system. 5. Select your computer model number in...

Wireless (Select Models Only) - Windows Vista
Page 24
... tasks such as installing software, running utilities, or changing Windows settings. If no WLAN device is listed, either your computer does not have a problem connecting to improve the security of your permission or password for a WLAN device may be prompted for your computer. Identify the WLAN device from the Network adapters list. Refer to Help and Support for the WLAN device is properly installed on troubleshooting WLANs, refer to the...
... tasks such as installing software, running utilities, or changing Windows settings. If no WLAN device is listed, either your computer does not have a problem connecting to improve the security of your permission or password for a WLAN device may be prompted for your computer. Identify the WLAN device from the Network adapters list. Refer to Help and Support for the WLAN device is properly installed on troubleshooting WLANs, refer to the...

Multimedia - Windows Vista
Page 13
... HDMI cable into the HDMI port on the computer display or any other end of graphics card is installed on your media program. NOTE: To transmit video signals through the HDMI port, you need an HDMI cable (purchased separately), available from most electronics retailers. Select Start > Computer > System properties. 2. The HDMI port connects the computer to the HDMI port: 1. In the left pane, click Device Manager, and then click Display adapters. Connect the other supported external display. Connecting an HDMI device 9 Connecting...
... HDMI cable into the HDMI port on the computer display or any other end of graphics card is installed on your media program. NOTE: To transmit video signals through the HDMI port, you need an HDMI cable (purchased separately), available from most electronics retailers. Select Start > Computer > System properties. 2. The HDMI port connects the computer to the HDMI port: 1. In the left pane, click Device Manager, and then click Display adapters. Connect the other supported external display. Connecting an HDMI device 9 Connecting...
Multimedia - Windows Vista
Page 30
....com/support, and select your Internet browser and go to step 6. 3. This Windows feature can obtain the latest Windows device drivers by User Account Control, click Continue. 26 Chapter 7 Troubleshooting If prompted to http://www.microsoft.com. 2. Open your country or region. 2. On the HP Welcome screen, click Settings and select a time when the utility should check for software and driver downloads, type your specific product from the models listed. 4.
....com/support, and select your Internet browser and go to step 6. 3. This Windows feature can obtain the latest Windows device drivers by User Account Control, click Continue. 26 Chapter 7 Troubleshooting If prompted to http://www.microsoft.com. 2. Open your country or region. 2. On the HP Welcome screen, click Settings and select a time when the utility should check for software and driver downloads, type your specific product from the models listed. 4.
Power Management - Windows Vista
Page 5
... or writing to a disc or an external media card. When Sleep is saved to a hibernation file on the hard drive and the computer turns off. You can be changed using Power Options in any computer functions while the computer is closed, open the display. ● Press a key on the keyboard or button on the remote control (select models only). ● Activate the TouchPad. Your work is initiated, the power lights blink and the screen clears. With the computer...
... or writing to a disc or an external media card. When Sleep is saved to a hibernation file on the hard drive and the computer turns off. You can be changed using Power Options in any computer functions while the computer is closed, open the display. ● Press a key on the keyboard or button on the remote control (select models only). ● Activate the TouchPad. Your work is initiated, the power lights blink and the screen clears. With the computer...

Power Management - Windows Vista
Page 20
... Sleep CAUTION: Failure to reenable Hibernation after calibration may result in the notification area, and then click More power options. - Select Start > Control Panel > System and Maintenance > Power Options. 2. or - Under the current power plan, click Change plan settings. 3. Plug the computer into external power and maintain external power until the battery is off . Click Restore default settings for this plan, and then follow the on-screen instructions. 16 Chapter 2 Using battery power You can use...
... Sleep CAUTION: Failure to reenable Hibernation after calibration may result in the notification area, and then click More power options. - Select Start > Control Panel > System and Maintenance > Power Options. 2. or - Under the current power plan, click Change plan settings. 3. Plug the computer into external power and maintain external power until the battery is off . Click Restore default settings for this plan, and then follow the on-screen instructions. 16 Chapter 2 Using battery power You can use...

Power Management - Windows Vista
Page 24
... conditions: ● When you need to replace the battery or access components inside the computer ● When you are unable to use the preceding shutdown procedures, try the following emergency procedures in Hibernation, you must first exit Sleep or Hibernation before shutdown is unresponsive and you are connecting an external hardware device that does not connect to the Lock button. 3. If the computer...
... conditions: ● When you need to replace the battery or access components inside the computer ● When you are unable to use the preceding shutdown procedures, try the following emergency procedures in Hibernation, you must first exit Sleep or Hibernation before shutdown is unresponsive and you are connecting an external hardware device that does not connect to the Lock button. 3. If the computer...

Pointing Devices and Keyboard - Windows Vista
Page 11
... have set up your Internet or network services and your Web browser home page, you can press fn+f3 to quickly access your information by the fn+f4 hotkey: ● LCD (computer display) ● External VGA (most external monitors) ● HDMI (televisions, camcorders, DVD players, VCRs, and video capture cards with examples of devices that use them, are supported by displaying the operating system Log On window. After you have set up your work...
... have set up your Internet or network services and your Web browser home page, you can press fn+f3 to quickly access your information by the fn+f4 hotkey: ● LCD (computer display) ● External VGA (most external monitors) ● HDMI (televisions, camcorders, DVD players, VCRs, and video capture cards with examples of devices that use them, are supported by displaying the operating system Log On window. After you have set up your work...

Pointing Devices and Keyboard - Windows Vista
Page 14
... num lock on an external keypad is turned on an external keypad. When the embedded numeric keypad is turned on, each key on the computer is turned off , the num lock light on the keypad performs the function indicated by using the fn key or the fn+shift key combination. ● To change the function of a keypad key to keypad functions while the keypad is connected to enable the embedded...
... num lock on an external keypad is turned on an external keypad. When the embedded numeric keypad is turned on, each key on the computer is turned off , the num lock light on the keypad performs the function indicated by using the fn key or the fn+shift key combination. ● To change the function of a keypad key to keypad functions while the keypad is connected to enable the embedded...
HP G50 Notebook PC and Compaq Presario CQ50 Notebook PC - Maintenance and Service Guide
Page 95
... enter. 3. NOTE: Your password, security, and language settings are not changed when you restore the factory default settings. The Setup Utility default settings go into effect when the computer restarts. Restoring default settings in the Setup Utility The following procedure explains how to restore the Setup Utility default settings. If the Setup Utility is already running , begin at step 1. While the "Press the ESC key for Startup Menu" message is displayed in the lower-left corner of the screen...
... enter. 3. NOTE: Your password, security, and language settings are not changed when you restore the factory default settings. The Setup Utility default settings go into effect when the computer restarts. Restoring default settings in the Setup Utility The following procedure explains how to restore the Setup Utility default settings. If the Setup Utility is already running , begin at step 1. While the "Press the ESC key for Startup Menu" message is displayed in the lower-left corner of the screen...

HP G50 Notebook PC and Compaq Presario CQ50 Notebook PC - Maintenance and Service Guide
Page 145
... boot options 91 boot order 91 bottom components 13 button components 7 button sound 91 buttons power 7 TouchPad 9 C cables, service considerations 33 Card Reader Power Saving 91 changing the Setup Utility language 85 chipset, product description 2 CMOS clearing 37 components bottom 13 buttons 7 display 6 front 10 keys 8 left-side 12 rear 11 right-side 11 top 6 TouchPad 9 computer feet locations 39 spare part number 39 computer specifications 93 connectors power 12 service considerations 33 D Diagnostics menu 92 Digital Media Slot 12 Digital Media Slot light 12 diskette drive...
... boot options 91 boot order 91 bottom components 13 button components 7 button sound 91 buttons power 7 TouchPad 9 C cables, service considerations 33 Card Reader Power Saving 91 changing the Setup Utility language 85 chipset, product description 2 CMOS clearing 37 components bottom 13 buttons 7 display 6 front 10 keys 8 left-side 12 rear 11 right-side 11 top 6 TouchPad 9 computer feet locations 39 spare part number 39 computer specifications 93 connectors power 12 service considerations 33 D Diagnostics menu 92 Digital Media Slot 12 Digital Media Slot light 12 diskette drive...

HP G50 Notebook PC and Compaq Presario CQ50 Notebook PC - Maintenance and Service Guide
Page 147
... 2 diskette drive 3 display panel 2 docking support 4 Ethernet 3 external media cards 4 graphics 2 hard drives 3 keyboard 4 memory module 2 microphone 3 modem module 3 operating system 4 optical drives 3 pointing devices 4 ports 4 power requirements 4 processors 1 product name 1 security 4 serviceability 5 webcam 3 wireless 3 product name 1 R rear component 11 recovering a program or driver 119 recovering from the dedicated recovery partition 123 recovering from the recovery discs 123 recovery discs 119 Recovery Manager 119, 123 recovery partition 119 recovery, system 123 removal/replacement...
... 2 diskette drive 3 display panel 2 docking support 4 Ethernet 3 external media cards 4 graphics 2 hard drives 3 keyboard 4 memory module 2 microphone 3 modem module 3 operating system 4 optical drives 3 pointing devices 4 ports 4 power requirements 4 processors 1 product name 1 security 4 serviceability 5 webcam 3 wireless 3 product name 1 R rear component 11 recovering a program or driver 119 recovering from the dedicated recovery partition 123 recovering from the recovery discs 123 recovery discs 119 Recovery Manager 119, 123 recovery partition 119 recovery, system 123 removal/replacement...
HP G50 Notebook PC and Compaq Presario CQ50 Notebook PC - Maintenance and Service Guide
Page 148
... 9 TouchPad button board removal 68 spare part number 17, 29, 68 TouchPad buttons 9 TouchPad components, illustrated 9 TouchPad light 9 TouchPad on/off button 9 TouchPad on/off button board removal 66 spare part number 17, 29, 66 transporting guidelines 35 U Universal Serial Bus (USB) port location 11, 12 pin assignments 128 unknown password 37 USB board removal 73 spare part number 18, 29, 73 USB board cable, spare part number 18, 29, 73 V vents 11, 13 vertical scroll zone 9 Virtualization Technology 91 Volume keys 8 W webcam location 7 product description 3 webcam light 6 webcam module...
... 9 TouchPad button board removal 68 spare part number 17, 29, 68 TouchPad buttons 9 TouchPad components, illustrated 9 TouchPad light 9 TouchPad on/off button 9 TouchPad on/off button board removal 66 spare part number 17, 29, 66 transporting guidelines 35 U Universal Serial Bus (USB) port location 11, 12 pin assignments 128 unknown password 37 USB board removal 73 spare part number 18, 29, 73 USB board cable, spare part number 18, 29, 73 V vents 11, 13 vertical scroll zone 9 Virtualization Technology 91 Volume keys 8 W webcam location 7 product description 3 webcam light 6 webcam module...


