
User Guide
Page 3
... E-15 Recording to and Playing Back from Song Memory E-18 Other Settings E-19 Changing the Keyboard Touch E-19 Changing the Piano Key E-19 Changing the Pitch of the Piano to Match Another Instrument E-19 Using MIDI E-20 Expanding the Selections in this manual may be... registered trademarks of the Keyboard ......... E-6 Selecting and Playing a Tone E-6 Using Tone Effects E-6 Layering Two Tones E-7 Assigning Different Tones to a PEDAL Jack E-5 ...
... E-15 Recording to and Playing Back from Song Memory E-18 Other Settings E-19 Changing the Keyboard Touch E-19 Changing the Piano Key E-19 Changing the Pitch of the Piano to Match Another Instrument E-19 Using MIDI E-20 Expanding the Selections in this manual may be... registered trademarks of the Keyboard ......... E-6 Selecting and Playing a Tone E-6 Using Tone Effects E-6 Layering Two Tones E-7 Assigning Different Tones to a PEDAL Jack E-5 ...
User Guide
Page 5
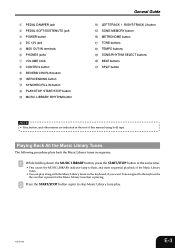
... the same time. • This causes the MUSIC LIBRARY indicator lamp to stop Music Library tune play along with the Music Library tunes on the keyboard, if you want. Playing Back All the Music Library Tunes The following procedure plays back the Music Library tunes in the text of the Music... Library tunes. • You can play . 412A-E-005A E-3 Tone assigned to the keyboard is the one that is preset for the Music Library tune that is playing. 2 Press the START/STOP button again to flash, and starts sequential...
... the same time. • This causes the MUSIC LIBRARY indicator lamp to stop Music Library tune play along with the Music Library tunes on the keyboard, if you want. Playing Back All the Music Library Tunes The following procedure plays back the Music Library tunes in the text of the Music... Library tunes. • You can play . 412A-E-005A E-3 Tone assigned to the keyboard is the one that is preset for the Music Library tune that is playing. 2 Press the START/STOP button again to flash, and starts sequential...
User Guide
Page 8
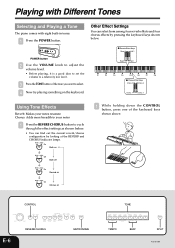
... indicator lamps. CONTROL TONE E-6 REVERB CHORUS METRONOME TEMPO BEAT SPLIT 412A-E-008A On Both on Off Both off On Reverb on On Chorus on the keyboard. POWER button 2 Use the VOLUME knob to adjust the volume level. • Before playing, it is a good idea to set the volume to a ...relatively low level. 3 Press the TONE button of the keyboard keys shown above. Playing with Different Tones Selecting and Playing a Tone The piano comes with eight built-in tones. 1 Press the POWER button.
... indicator lamps. CONTROL TONE E-6 REVERB CHORUS METRONOME TEMPO BEAT SPLIT 412A-E-008A On Both on Off Both off On Reverb on On Chorus on the keyboard. POWER button 2 Use the VOLUME knob to adjust the volume level. • Before playing, it is a good idea to set the volume to a ...relatively low level. 3 Press the TONE button of the keyboard keys shown above. Playing with Different Tones Selecting and Playing a Tone The piano comes with eight built-in tones. 1 Press the POWER button.
User Guide
Page 9
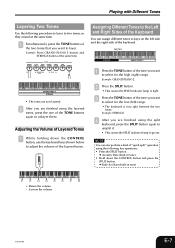
...; Ride Aco Bass (built-in tone) • Hold down the CONTROL button, use the keyboard keys shown below to select for the low (left side and the right side of the keyboard. Example: Press GRAND PIANO 2 button and STRINGS button at the same time. 1 Simultaneously press the TONE buttons of the... two tones that you are finished using the split keyboard, press the SPLIT button again to unsplit it. • ...
...; Ride Aco Bass (built-in tone) • Hold down the CONTROL button, use the keyboard keys shown below to select for the low (left side and the right side of the keyboard. Example: Press GRAND PIANO 2 button and STRINGS button at the same time. 1 Simultaneously press the TONE buttons of the... two tones that you are finished using the split keyboard, press the SPLIT button again to unsplit it. • ...
User Guide
Page 10
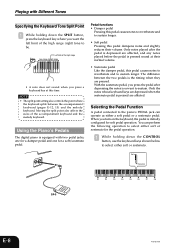
... be. Moving the split point also affects the sizes of the accompaniment keyboard and the melody keyboard. Using the Piano's Pedals The digital piano is equipped with Different Tones Specifying the Keyboard Tone Split Point 1 While holding down the SPLIT button, press the keyboard key where you press the pedal after the pedal is depressed are affected...
... be. Moving the split point also affects the sizes of the accompaniment keyboard and the melody keyboard. Using the Piano's Pedals The digital piano is equipped with Different Tones Specifying the Keyboard Tone Split Point 1 While holding down the SPLIT button, press the keyboard key where you press the pedal after the pedal is depressed are affected...
User Guide
Page 11
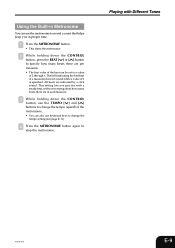
Using the Built-in Metronome You can use keyboard keys to change the tempo (speed) of the metronome. • You can be set to stop the metronome. Playing with a steady beat, without worrying about ...
Using the Built-in Metronome You can use keyboard keys to change the tempo (speed) of the metronome. • You can be set to stop the metronome. Playing with a steady beat, without worrying about ...
User Guide
Page 12
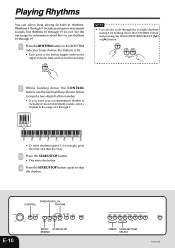
... [ ] button. 2 While holding down the CONTROL button, use rhythms 10 through 19. 1 Press the RHYTHM button so the RHYTHM indicator lamp (below to input a two-digit rhythm number. • If you want your accompaniment rhythm to include percussion instrument sounds, select a rhythm in rhythms. Rhythms 0 through 9 include percussion instrument sounds, but... the 0 key and then the 5 key. 3 Press the START/STOP button. • This starts the rhythm. 4 Press the START/STOP button again to use the keyboard keys shown below the button) is lit. • Each press of 0 through 19 do not.
... [ ] button. 2 While holding down the CONTROL button, use rhythms 10 through 19. 1 Press the RHYTHM button so the RHYTHM indicator lamp (below to input a two-digit rhythm number. • If you want your accompaniment rhythm to include percussion instrument sounds, select a rhythm in rhythms. Rhythms 0 through 9 include percussion instrument sounds, but... the 0 key and then the 5 key. 3 Press the START/STOP button. • This starts the rhythm. 4 Press the START/STOP button again to use the keyboard keys shown below the button) is lit. • Each press of 0 through 19 do not.

User Guide
Page 13
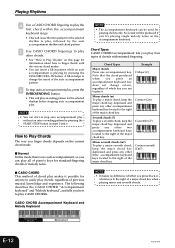
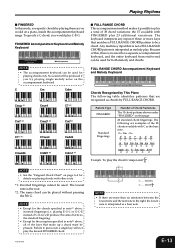
...have your own private backup group with you try playing chords. To play . With such rhythms, make sure that CASIO CHORD, FINGERED, or FULL RANGE CHORD is selected as the accompaniment mode. CASIO CHORD Full-Range Chord Normal Fingered 023578 L L L L L L L L C1 C2 C3 C4 C5 ... the SYNCHRO/FILL-IN button. • This configures the piano so rhythm and chord accompaniment will start automatically when you want to use keyboard keys to change the tempo (speed) of the keyboard keys shown below to input a three-digit number. * Tempo Range: 030 to its standard tempo setting...
...have your own private backup group with you try playing chords. To play . With such rhythms, make sure that CASIO CHORD, FINGERED, or FULL RANGE CHORD is selected as the accompaniment mode. CASIO CHORD Full-Range Chord Normal Fingered 023578 L L L L L L L L C1 C2 C3 C4 C5 ... the SYNCHRO/FILL-IN button. • This configures the piano so rhythm and chord accompaniment will start automatically when you want to use keyboard keys to change the tempo (speed) of the keyboard keys shown below to input a three-digit number. * Tempo Range: 030 to its standard tempo setting...
User Guide
Page 14
...B B C C#DE E F NOTE • It makes no auto accompaniment, so you can play all of piano's keys for standard-fingering chords or melody notes. CASIO CHORD Accompaniment Keyboard and Melody Keyboard Accompaniment keyboard Melody keyboard E-12 412A-E-014A No sound will be used for playing chords only. A fill-in steps 3 and 6. NOTE ...intro or ending pattern by pressing the SYNCHRO/FILL-IN button. Playing Rhythms 4 Use a CASIO CHORD fingering to play the first chord within the accompaniment keyboard range. • This will cause the intro pattern for the selected rhythm to play, ...
...B B C C#DE E F NOTE • It makes no auto accompaniment, so you can play all of piano's keys for standard-fingering chords or melody notes. CASIO CHORD Accompaniment Keyboard and Melody Keyboard Accompaniment keyboard Melody keyboard E-12 412A-E-014A No sound will be used for playing chords only. A fill-in steps 3 and 6. NOTE ...intro or ending pattern by pressing the SYNCHRO/FILL-IN button. Playing Rhythms 4 Use a CASIO CHORD fingering to play the first chord within the accompaniment keyboard range. • This will cause the intro pattern for the selected rhythm to play, ...
User Guide
Page 15
...as melody play C-E-G. No sound will not play the desired FINGERED chord. FULL RANGE CHORD Accompaniment Keyboard and Melody Keyboard Accompaniment keyboard/Melody keyboard Chords Recognized by This Piano The following are more keys that make up a chord must be a chord. Chord C ... without pressing the 5th G. playing E-G-C or G-C-E instead of Chord Variations The 15 chord patterns shown under "FINGERED" on a piano, inside the accompaniment keyboard range. Playing Rhythms I FULL RANGE CHORD This accompaniment method makes it possible to play the chord C major and C E ....
...as melody play C-E-G. No sound will not play the desired FINGERED chord. FULL RANGE CHORD Accompaniment Keyboard and Melody Keyboard Accompaniment keyboard/Melody keyboard Chords Recognized by This Piano The following are more keys that make up a chord must be a chord. Chord C ... without pressing the 5th G. playing E-G-C or G-C-E instead of Chord Variations The 15 chord patterns shown under "FINGERED" on a piano, inside the accompaniment keyboard range. Playing Rhythms I FULL RANGE CHORD This accompaniment method makes it possible to play the chord C major and C E ....
User Guide
Page 16
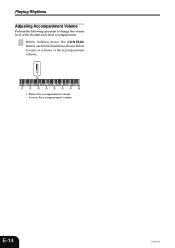
Playing Rhythms Adjusting Accompaniment Volume Perform the following operation to change the volume level of the rhythm and chord accompaniment. 1 While holding down the CONTROL button, use the keyboard keys shown below to raise (+) or lower (-) the accompaniment volume. - + L L L L L L L L C1 C2 C3 C4 C5 C6 C7 C8 + : Raises the accompaniment volume - : Lowers the accompaniment volume E-14 412A-E-016A
Playing Rhythms Adjusting Accompaniment Volume Perform the following operation to change the volume level of the rhythm and chord accompaniment. 1 While holding down the CONTROL button, use the keyboard keys shown below to raise (+) or lower (-) the accompaniment volume. - + L L L L L L L L C1 C2 C3 C4 C5 C6 C7 C8 + : Raises the accompaniment volume - : Lowers the accompaniment volume E-14 412A-E-016A

User Guide
Page 17
.... 2 Press the PLAY/STOP button. • This starts playback of the tune. 4 Press the PLAY/STOP button again to stop song playback. Always input two digits for the tune number. 3 Press the PLAY/STOP button. • This starts the playback of the tune, without the part you want to practice and.... If you are playing a tune for the first time, a slow tempo is lit. • Each press of a Music Library tune and play along on the piano's keyboard. 4 Press the PLAY/STOP button again to stop tune playback. See the Song List on or off. PREPARATION • Select the tune you selected in...
.... 2 Press the PLAY/STOP button. • This starts playback of the tune. 4 Press the PLAY/STOP button again to stop song playback. Always input two digits for the tune number. 3 Press the PLAY/STOP button. • This starts the playback of the tune, without the part you want to practice and.... If you are playing a tune for the first time, a slow tempo is lit. • Each press of a Music Library tune and play along on the piano's keyboard. 4 Press the PLAY/STOP button again to stop tune playback. See the Song List on or off. PREPARATION • Select the tune you selected in...

User Guide
Page 19
...synchro start and an intro pattern will start when you finger a chord in the accompaniment range of the keyboard. • Press the INTRO/ENDING button to put the piano into synchro start as soon as you play when you finger a chord in the accompaniment range of ...Track 1. I When recording to Track 2 • Press the START/STOP button or play something on the keyboard to start recording. 2 Start playing something on the keyboard. This indicates that the piano is standing by pressing the INTRO/ENDING button. • Stopping recording causes the SONG MEMORY indicator lamp to ...
...synchro start and an intro pattern will start when you finger a chord in the accompaniment range of the keyboard. • Press the INTRO/ENDING button to put the piano into synchro start as soon as you play when you finger a chord in the accompaniment range of ...Track 1. I When recording to Track 2 • Press the START/STOP button or play something on the keyboard to start recording. 2 Start playing something on the keyboard. This indicates that the piano is standing by pressing the INTRO/ENDING button. • Stopping recording causes the SONG MEMORY indicator lamp to ...

User Guide
Page 20
...track you selected. • You can change the tone setting during playback. • Press the START/STOP button again to stop playback. Note that the piano is playing, you can play back Track 1 and Track 2 at the same time. G The indicator lamps above the button show the currently selected track. ... MEMORY indicator lamp to light. 2 Use the LEFT/TRACK 1 RIGHT/TRACK 2 button to select the track you can turn the metronome on the keyboard to start simultaneous playback from Track 1 and recording to Track 2. 5 When you want to a track while playing back from the selected track.
...track you selected. • You can change the tone setting during playback. • Press the START/STOP button again to stop playback. Note that the piano is playing, you can play back Track 1 and Track 2 at the same time. G The indicator lamps above the button show the currently selected track. ... MEMORY indicator lamp to light. 2 Use the LEFT/TRACK 1 RIGHT/TRACK 2 button to select the track you can turn the metronome on the keyboard to start simultaneous playback from Track 1 and recording to Track 2. 5 When you want to a track while playing back from the selected track.

User Guide
Page 21
... Instrument 3 Use this setting to raise or lower the overall pitch of the keyboard keys. Changing the Piano Key 2 Use this setting to raise or lower the overall key of a key changes the current setting by approximately 1 cents (1/100 semitone). Other Settings Changing the Keyboard Touch 1 This setting changes the relative touch of the...
... Instrument 3 Use this setting to raise or lower the overall pitch of the keyboard keys. Changing the Piano Key 2 Use this setting to raise or lower the overall key of a key changes the current setting by approximately 1 cents (1/100 semitone). Other Settings Changing the Keyboard Touch 1 This setting changes the relative touch of the...
User Guide
Page 22
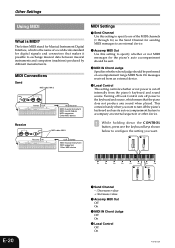
... musical instruments and computers (machines) produced by different manufacturers. The letters MIDI stand for Musical Instrument Digital Interface, which means that makes it possible to configure the setting you want to turn off internally from the piano's keyboard and sound source. This comes in handy when you want . 1 2 On - + Off...MIDI device MIDI Settings 1 Send Channel Use this setting to the keyboard and source, which is the name of the MIDI channels (1 through 16) as the Send Channel for digital signals and connectors that the piano does not produce any sound when played.
... musical instruments and computers (machines) produced by different manufacturers. The letters MIDI stand for Musical Instrument Digital Interface, which means that makes it possible to configure the setting you want to turn off internally from the piano's keyboard and sound source. This comes in handy when you want . 1 2 On - + Off...MIDI device MIDI Settings 1 Send Channel Use this setting to the keyboard and source, which is the name of the MIDI channels (1 through 16) as the Send Channel for digital signals and connectors that the piano does not produce any sound when played.
User Guide
Page 24
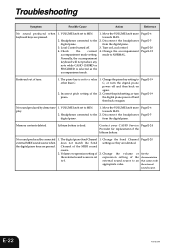
.... 2. Check the current accompaniment mode setting. Turn on again. Change the accompaniment mode to the digital piano. 1. Page E-6 Page E-5 Page E-20 Page E-12 Keyboard out of the piano. 1. Lithium battery is selected as the accompaniment mode. 1. Contact your CASIO Service Page E-24 Provider for replacement of the MIDI sound source. 2. Change the Send Channel settings...
.... 2. Check the current accompaniment mode setting. Turn on again. Change the accompaniment mode to the digital piano. 1. Page E-6 Page E-5 Page E-20 Page E-12 Keyboard out of the piano. 1. Lithium battery is selected as the accompaniment mode. 1. Contact your CASIO Service Page E-24 Provider for replacement of the MIDI sound source. 2. Change the Send Channel settings...
User Guide
Page 25
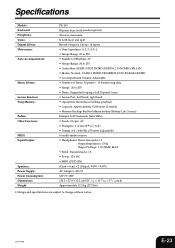
Specifications Models: Keyboard: Polyphony: Tones: Digital Effects: Metronome: Auto Accompaniment: Music Library: Lesson Function: Song Memory: Pedals: Other Functions: MIDI: Input/Output: Speakers: Power Supply: Power Consumption: Dimensions: Weight: PX-100 88 piano keys (with layer and ...split Reverb (4 types), Chorus (4 types) • Time Signatures: 0, 2, 3, 4, 5, 6 • Tempo Range: 30 to 255 • Number of Rhythms: 20 • Tempo Range: 30 to 255 • Controllers: START/STOP, INTRO/ENDING, SYNCHRO/FILL-IN • Modes: Normal, CASIO...
Specifications Models: Keyboard: Polyphony: Tones: Digital Effects: Metronome: Auto Accompaniment: Music Library: Lesson Function: Song Memory: Pedals: Other Functions: MIDI: Input/Output: Speakers: Power Supply: Power Consumption: Dimensions: Weight: PX-100 88 piano keys (with layer and ...split Reverb (4 types), Chorus (4 types) • Time Signatures: 0, 2, 3, 4, 5, 6 • Tempo Range: 30 to 255 • Number of Rhythms: 20 • Tempo Range: 30 to 255 • Controllers: START/STOP, INTRO/ENDING, SYNCHRO/FILL-IN • Modes: Normal, CASIO...

User Guide
Page 26
...held liable for concern. These lines are the result of the molding process used to shape the plastic of this product. All rights reserved. • CASIO COMPUTER CO., LTD. Lithium Battery This unit is equipped with a weak solution of a mild neutral detergent and water. E-24 412A-E-026A NOTE •... the Unit • Never use benzene, alcohol, thinner or other such chemicals to clean the exterior of the unit. • To clean the keyboard, use of this product or this manual. • The contents of this manual are subject to change without notice. You may notice lines in ...
...held liable for concern. These lines are the result of the molding process used to shape the plastic of this product. All rights reserved. • CASIO COMPUTER CO., LTD. Lithium Battery This unit is equipped with a weak solution of a mild neutral detergent and water. E-24 412A-E-026A NOTE •... the Unit • Never use benzene, alcohol, thinner or other such chemicals to clean the exterior of the unit. • To clean the keyboard, use of this product or this manual. • The contents of this manual are subject to change without notice. You may notice lines in ...

User Guide
Page 27
... shown below. 1 2 3 45 6 7 8 90 A L L L L L L L L C1 C2 C3 C4 C5 C6 C7 C8 1 Number Input Keys (0 to 9) 2 Keyboard Touch (Off, Weak, Normal, Strong) 3 Chord Mode (Normal, CASIO CHORD, Fingered, Full-Range Chord) 4 Accompaniment Volume (-, +) 5 Layered Tones Volume (-, +) 6 Piano Key (F to C to F) 7 Reverb Effect (1 to 4) 8 Chorus Effect (1 to perform a variety of different setting functions. To...
... shown below. 1 2 3 45 6 7 8 90 A L L L L L L L L C1 C2 C3 C4 C5 C6 C7 C8 1 Number Input Keys (0 to 9) 2 Keyboard Touch (Off, Weak, Normal, Strong) 3 Chord Mode (Normal, CASIO CHORD, Fingered, Full-Range Chord) 4 Accompaniment Volume (-, +) 5 Layered Tones Volume (-, +) 6 Piano Key (F to C to F) 7 Reverb Effect (1 to 4) 8 Chorus Effect (1 to perform a variety of different setting functions. To...


