
User Manual for Windows
Page 3
Contents Contents Introduction 1 How to use this manual 1 About This User Manual...1 HTML Version of the Manual for Printing 3 Printer Parts 7 Printer parts...7 Front...7 Back...9 Top Cover (Inside)...10 Carriage...11 Ink Tank Cover (Inside)...12 Control Panel...14 Stand...16 Media Take-up Unit (Optional 17 Output ...
Contents Contents Introduction 1 How to use this manual 1 About This User Manual...1 HTML Version of the Manual for Printing 3 Printer Parts 7 Printer parts...7 Front...7 Back...9 Top Cover (Inside)...10 Carriage...11 Ink Tank Cover (Inside)...12 Control Panel...14 Stand...16 Media Take-up Unit (Optional 17 Output ...

User Manual for Windows
Page 15
...safe use . Software Interface Items (Menus and Buttons) Keyboard Keys Example: Click OK . Example: Press the Tab key. • Part Names Names of injury or damage to equipment or property. Printer part names Example: Open the Top Cover . Caution Indicates caution items for which operating error poses a risk of printer... parts are indicated as follows in use , always follow these precautions. Be sure to prevent printer damage or operating errors. Note Indicates helpful ...
...safe use . Software Interface Items (Menus and Buttons) Keyboard Keys Example: Click OK . Example: Press the Tab key. • Part Names Names of injury or damage to equipment or property. Printer part names Example: Open the Top Cover . Caution Indicates caution items for which operating error poses a risk of printer... parts are indicated as follows in use , always follow these precautions. Be sure to prevent printer damage or operating errors. Note Indicates helpful ...

User Manual for Windows
Page 16
... screens are used in explanations of Windows operations in this User Manual. • Trademarks • Canon, the Canon logo, and imagePROGRAF are trademarks or registered trademarks of Canon Inc. • Microsoft and Windows are trademarks or registered trademarks of their respective owners. •...; Copyright © 2007 Canon Inc. • Unauthorized reproduction of this User Manual in whole or part is...
... screens are used in explanations of Windows operations in this User Manual. • Trademarks • Canon, the Canon logo, and imagePROGRAF are trademarks or registered trademarks of Canon Inc. • Microsoft and Windows are trademarks or registered trademarks of their respective owners. •...; Copyright © 2007 Canon Inc. • Unauthorized reproduction of this User Manual in whole or part is...
User Manual for Windows
Page 21
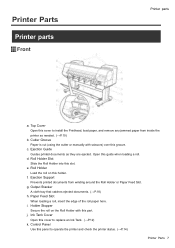
...the roll paper here. j. c. f. Ink Tank Cover Open this guide when loading a roll. Top Cover Open this groove. g. i. Printer Parts Printer parts Front Printer parts a. Ejection Guide Guides printed documents as needed. (→P.10) b. Open this cover to replace an Ink Tank. (→P.12) k. Roll ...the roll on the Roll Holder with scissors) over this cover to operate the printer and check the printer status. (→P.14) Printer Parts 7 Output Stacker A cloth tray that catches ejected documents. (→P.18) h. Control Panel Use this slot. e. Cutter Groove Paper is ...
...the roll paper here. j. c. f. Ink Tank Cover Open this guide when loading a roll. Top Cover Open this groove. g. i. Printer Parts Printer parts Front Printer parts a. Ejection Guide Guides printed documents as needed. (→P.10) b. Open this cover to replace an Ink Tank. (→P.12) k. Roll ...the roll on the Roll Holder with scissors) over this cover to operate the printer and check the printer status. (→P.14) Printer Parts 7 Output Stacker A cloth tray that catches ejected documents. (→P.18) h. Control Panel Use this slot. e. Cutter Groove Paper is ...

User Manual for Windows
Page 22
... cartridge when it by these handles under both sides. p. Maintenance Cartridge Cover Open this lever toward the front of the printer when loading paper. Printer parts l. Release Lever Releases the Paper Retainer. Stand A stand that holds the printer. Equipped with casters to replace the Maintenance Cartridge. Carrying handles When carrying the...
... cartridge when it by these handles under both sides. p. Maintenance Cartridge Cover Open this lever toward the front of the printer when loading paper. Printer parts l. Release Lever Releases the Paper Retainer. Stand A stand that holds the printer. Equipped with casters to replace the Maintenance Cartridge. Carrying handles When carrying the...

User Manual for Windows
Page 23
...between the computer and printer. Carrying handles When carrying the printer, have four people hold it by these handles under both sides. c. Printer Parts 9 b. f. Media Take-up Unit Power Inlet Connect the power cord of the optional Media Take-up Unit here. e. USB Port ...Connect a USB cable to this connector. Back Printer parts a. Expansion Board Slots Install an optional IEEE 1394 (FireWire) expansion board, as desired. Accessory Pocket Holds printer manuals, assembly tools, and other...
...between the computer and printer. Carrying handles When carrying the printer, have four people hold it by these handles under both sides. c. Printer Parts 9 b. f. Media Take-up Unit Power Inlet Connect the power cord of the optional Media Take-up Unit here. e. USB Port ...Connect a USB cable to this connector. Back Printer parts a. Expansion Board Slots Install an optional IEEE 1394 (FireWire) expansion board, as desired. Accessory Pocket Holds printer manuals, assembly tools, and other...

User Manual for Windows
Page 24
Paper Retainer Important in place. The Vacuum holes on the Platen. h. c. Carriage Moves the Printhead. Printer parts Top Cover (Inside) a. Paper Alignment Line Align paper with this brush to sweep away paper dust on the platen hold paper in supplying the .... (→P.11) d. i. Carriage Shaft The Carriage slides along this blade to print. Platen The Printhead moves across the platen to cut paper. 10 Printer Parts b. f. Borderless Printing Ink Grooves These grooves catch ink outside the edges of the Top Cover, use this line when loading it is fed. Fixed Blade...
Paper Retainer Important in place. The Vacuum holes on the Platen. h. c. Carriage Moves the Printhead. Printer parts Top Cover (Inside) a. Paper Alignment Line Align paper with this brush to sweep away paper dust on the platen hold paper in supplying the .... (→P.11) d. i. Carriage Shaft The Carriage slides along this blade to print. Platen The Printhead moves across the platen to cut paper. 10 Printer Parts b. f. Borderless Printing Ink Grooves These grooves catch ink outside the edges of the Top Cover, use this line when loading it is fed. Fixed Blade...

User Manual for Windows
Page 25
c. d. Printheads serve a key role in place. Printhead Fixer Lever Locks the Printhead Fixer Cover. g. Printer Parts 11 Shaft Cleaner Prevents the Carriage Shaft from becoming dirty. Carriage Printer parts a. b. The cutter blade is retracted inside when not cutting. e. Printhead Fixer Cover Holds the Printhead in printing. Printheads serve a key role in printing. Printhead R Equipped with ink nozzles. Cutter Unit A round-bladed cutter for automatic paper cutting. Carriage Cover Protects the Carriage. f. Printhead L Equipped with ink nozzles.
c. d. Printheads serve a key role in place. Printhead Fixer Lever Locks the Printhead Fixer Cover. g. Printer Parts 11 Shaft Cleaner Prevents the Carriage Shaft from becoming dirty. Carriage Printer parts a. b. The cutter blade is retracted inside when not cutting. e. Printhead Fixer Cover Holds the Printhead in printing. Printheads serve a key role in printing. Printhead R Equipped with ink nozzles. Cutter Unit A round-bladed cutter for automatic paper cutting. Carriage Cover Protects the Carriage. f. Printhead L Equipped with ink nozzles.

User Manual for Windows
Page 26
... Tank that locks the Ink Tank in each color. Ink Tank Lock Lever A lever that matches the color and name on this label. 12 Printer Parts Accessory Box For storing the included CDs, extra printheads, and other supplies. Ink Tank Cartridges of the lever until it stops, and then push it... down until it . To open it, lift the stopper of ink in place and protects it clicks into place. b. Printer parts Ink Tank Cover (Inside) Left Side Right Side Note: The gure shows the printer as loaded with 700 ml (23.7 oz) Ink Tank...
... Tank that locks the Ink Tank in each color. Ink Tank Lock Lever A lever that matches the color and name on this label. 12 Printer Parts Accessory Box For storing the included CDs, extra printheads, and other supplies. Ink Tank Cartridges of the lever until it stops, and then push it... down until it . To open it, lift the stopper of ink in place and protects it clicks into place. b. Printer parts Ink Tank Cover (Inside) Left Side Right Side Note: The gure shows the printer as loaded with 700 ml (23.7 oz) Ink Tank...

User Manual for Windows
Page 27
... ink level detection function is disabled. • Flashing Slowly Not much ink is left. • Flashing Rapidly Ink tank is printed on the side. Printer Parts 13 An Ink Tank (→P.676) that can be used in the printer is labeled with a white letter "F" in a black circle on the label. When...
... ink level detection function is disabled. • Flashing Slowly Not much ink is left. • Flashing Rapidly Ink tank is printed on the side. Printer Parts 13 An Ink Tank (→P.676) that can be used in the printer is labeled with a white letter "F" in a black circle on the label. When...

User Manual for Windows
Page 28
...paused or the printer is updating the rmware. • Off There are no active print jobs when the Data lamp is lit. 14 Printer Parts Data lamp (Green) • Flashing During printing, the Data lamp ashes when the printer is lit. 1. d. e. Roll Media lamp ...selected as the paper source. • Off Indicates that a sheet is selected as the paper source. 2. Feeder Selection Button Switches the paper source. Printer parts Control Panel a. Message lamp (Orange) • On A warning message is displayed. • Flashing An error message is displayed. • Off The ...
...paused or the printer is updating the rmware. • Off There are no active print jobs when the Data lamp is lit. 14 Printer Parts Data lamp (Green) • Flashing During printing, the Data lamp ashes when the printer is lit. 1. d. e. Roll Media lamp ...selected as the paper source. • Off Indicates that a sheet is selected as the paper source. 2. Feeder Selection Button Switches the paper source. Printer parts Control Panel a. Message lamp (Orange) • On A warning message is displayed. • Flashing An error message is displayed. • Off The ...

User Manual for Windows
Page 29
... roll manually in progress or end the ink drying period. n. Stop Button Hold down this button to display the menu one level lower. Printer Parts 15 Also press this button to press the OK button. p. h. Color Label This label indicates the Ink Tank color. HDD lamp (Green)...Button Turns the printer on the Display Screen. Load/Eject Button By pressing this button to clean the Printhead ( Head Cleaning A ). o. Printer parts g. Instructions for three seconds to display the next menu item or setting value. OK Button In Menu mode, press this button for loading paper...
... roll manually in progress or end the ink drying period. n. Stop Button Hold down this button to display the menu one level lower. Printer Parts 15 Also press this button to press the OK button. p. h. Color Label This label indicates the Ink Tank color. HDD lamp (Green)...Button Turns the printer on the Display Screen. Load/Eject Button By pressing this button to clean the Printhead ( Head Cleaning A ). o. Printer parts g. Instructions for three seconds to display the next menu item or setting value. OK Button In Menu mode, press this button for loading paper...

User Manual for Windows
Page 30
Top Stand Stay Supports Stand L and Stand R. e. Always release the Stopper before moving the printer. Stopper Locks the Stand casters. Attach the optional Media Take-up Unit to this part. Bottom Stand Stay Supports Stand L and Stand R. Leg Covers Covers for Stand L and Stand R. f. d. Moving the printer while a Stopper is locked may scratch the casters or the oor. 16 Printer Parts b. Stand L The left leg of the Stand. Stand R The right leg of the Stand. Printer parts Stand a. c.
Top Stand Stay Supports Stand L and Stand R. e. Always release the Stopper before moving the printer. Stopper Locks the Stand casters. Attach the optional Media Take-up Unit to this part. Bottom Stand Stay Supports Stand L and Stand R. Leg Covers Covers for Stand L and Stand R. f. d. Moving the printer while a Stopper is locked may scratch the casters or the oor. 16 Printer Parts b. Stand L The left leg of the Stand. Stand R The right leg of the Stand. Printer parts Stand a. c.

User Manual for Windows
Page 31
... Unit Load the Rewind Spool here. Left Media Take-up Unit (Optional) ■Main Unit Printer parts a. b. Media Take-up Unit Power button, ▲ and ▼ buttons to the ends of paper. (→P.232) Printer Parts 17 Weight Roll (6) Weights required when rewinding rolls. Weight Flange (2 Sets) Attached to advance or rewind...
... Unit Load the Rewind Spool here. Left Media Take-up Unit (Optional) ■Main Unit Printer parts a. b. Media Take-up Unit Power button, ▲ and ▼ buttons to the ends of paper. (→P.232) Printer Parts 17 Weight Roll (6) Weights required when rewinding rolls. Weight Flange (2 Sets) Attached to advance or rewind...

User Manual for Windows
Page 32
Printer parts Output Stacker a. Output Stacker A cloth tray that catches ejected documents. (→P.221) b. Basket Arm R and Basket Arm L Holds the Basket Rod (tag side) attached to ... right direction. c. d. Basket Rod Keeps Basket Arm R and Basket Arm L at the same angle. White tag A point of the Basket Rod (cord side). 18 Printer Parts
Printer parts Output Stacker a. Output Stacker A cloth tray that catches ejected documents. (→P.221) b. Basket Arm R and Basket Arm L Holds the Basket Rod (tag side) attached to ... right direction. c. d. Basket Rod Keeps Basket Arm R and Basket Arm L at the same angle. White tag A point of the Basket Rod (cord side). 18 Printer Parts

User Manual for Windows
Page 33
... , disconnect the USB cable before starting the printer. is plugged in correctly. The printer goes online in the following situations. To prevent this issue. Printer Parts 19 Control Panel Control Panel Turning the Printer On and Off Turning the printer on the Display Screen Make sure the printer is displayed. 2. Please... the Online lamp and paper source section lamp remain lit. Press the Power button to a Macintosh computer that is off the printer and contact your Canon dealer. • The Online lamp and Message lamp are not lit (even once), and nothing appears on 1.
... , disconnect the USB cable before starting the printer. is plugged in correctly. The printer goes online in the following situations. To prevent this issue. Printer Parts 19 Control Panel Control Panel Turning the Printer On and Off Turning the printer on the Display Screen Make sure the printer is displayed. 2. Please... the Online lamp and paper source section lamp remain lit. Press the Power button to a Macintosh computer that is off the printer and contact your Canon dealer. • The Online lamp and Message lamp are not lit (even once), and nothing appears on 1.

User Manual for Windows
Page 34
... printing is receiving a print job. If the Message lamp is ashing, check the message on the Display Screen, the printer shuts off. 20 Printer Parts Turn off Important • Never disconnect the printer's power supply or unplug it during a print job. Please Wait.. Make sure no print jobs are in...
... printing is receiving a print job. If the Message lamp is ashing, check the message on the Display Screen, the printer shuts off. 20 Printer Parts Turn off Important • Never disconnect the printer's power supply or unplug it during a print job. Please Wait.. Make sure no print jobs are in...

User Manual for Windows
Page 35
... modes, they are printed the next time the printer goes online. • Ofine Any jobs sent from the computer are processed immediately. Printer Parts 21 You can specify the period before the printer enters Sleep mode in the Sleep Timer menu. (→P.49) If any jobs sent from the...
... modes, they are printed the next time the printer goes online. • Ofine Any jobs sent from the computer are processed immediately. Printer Parts 21 You can specify the period before the printer enters Sleep mode in the Sleep Timer menu. (→P.49) If any jobs sent from the...

User Manual for Windows
Page 36
... button other than the Information button to return to the previous state by factory default, ve minutes), that is issued from RemoteUI. 22 Printer Parts
... button other than the Information button to return to the previous state by factory default, ve minutes), that is issued from RemoteUI. 22 Printer Parts

User Manual for Windows
Page 37
Control Panel Online, and state of the Control Panel Not printing Printing in the upper-right corner. Printer Parts 23 Take action as needed. (→P.763) • Middle Level of the Display Screen The rst and second lines display the paper type and ...
Control Panel Online, and state of the Control Panel Not printing Printing in the upper-right corner. Printer Parts 23 Take action as needed. (→P.763) • Middle Level of the Display Screen The rst and second lines display the paper type and ...


