
Calibration Guide
Page 4
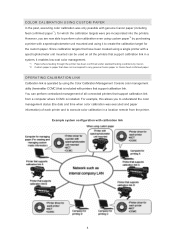
...unit mounted can perform centralized management of each printer and to execute color calibration in a system, it to any genuine Canon paper or Canon feed confirmed paper. OPERATING CALIBRATION LINK Calibration link is operated by using the Color Calibration Management Console color management utility ...calibration even using it enables low-cost color management. *1 Paper where feeding through the printer has been confirmed under standard testing conditions by purchasing a printer with printers that does not correspond to create the calibration target for which the calibration targets...
...unit mounted can perform centralized management of each printer and to execute color calibration in a system, it to any genuine Canon paper or Canon feed confirmed paper. OPERATING CALIBRATION LINK Calibration link is operated by using the Color Calibration Management Console color management utility ...calibration even using it enables low-cost color management. *1 Paper where feeding through the printer has been confirmed under standard testing conditions by purchasing a printer with printers that does not correspond to create the calibration target for which the calibration targets...
Calibration Guide
Page 16
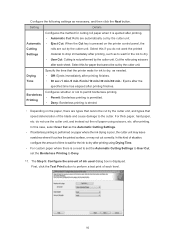
... the cutter unit. Select this if you do not use the cutter unit, and instead cut by the cutter unit. First, click the Test Print button to perform a test print of the blade and cause damage to Deny. 11. Cut the rolls using Drying Time. ・ For custom paper where there is...
... the cutter unit. Select this if you do not use the cutter unit, and instead cut by the cutter unit. First, click the Test Print button to perform a test print of the blade and cause damage to Deny. 11. Cut the rolls using Drying Time. ・ For custom paper where there is...
Calibration Guide
Page 17
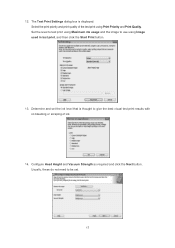
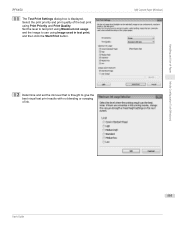
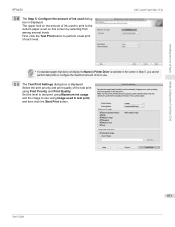
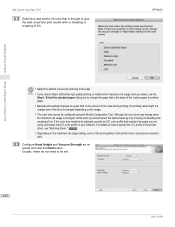
12. Determine and set . 17 The Test Print Settings dialog box is thought to give the best visual test print results with no bleeding or scraping of the test print using Image used in test print, and then click the Start Print button. 13. Select the print priority and print quality of ink. 14. Set the level to test print using Maximum ink usage and the image to be set the ink level that is displayed. Usually, these do not need to use using Print Priority and Print Quality. Configure Head Height and Vacuum Strength as required and click the Next button.
12. Determine and set . 17 The Test Print Settings dialog box is thought to give the best visual test print results with no bleeding or scraping of the test print using Image used in test print, and then click the Start Print button. 13. Select the print priority and print quality of ink. 14. Set the level to test print using Maximum ink usage and the image to be set the ink level that is displayed. Usually, these do not need to use using Print Priority and Print Quality. Configure Head Height and Vacuum Strength as required and click the Next button.
User Guide
Page 594
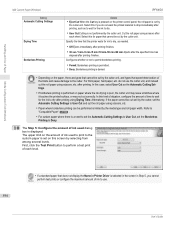
... on this case, select User Cut as the Automatic Cutting Set- Configures whether or not to perform a test print of Paper Add Custom Paper (Windows) iPF6450 Setting Automatic Cutting Settings Drying Time Borderless Printing Details • Eject Cut:When the Cut key is cut by...cutter unit, and instead cut the roll paper using scissors after printing. Alternatively, if the paper cannot be cut correctly. First, click the Test Print button to permit borderless printing. • Permit: Borderless printing is permitted. • Deny: Borderless printing is denied. • Depending...
... on this case, select User Cut as the Automatic Cutting Set- Configures whether or not to perform a test print of Paper Add Custom Paper (Windows) iPF6450 Setting Automatic Cutting Settings Drying Time Borderless Printing Details • Eject Cut:When the Cut key is cut by...cutter unit, and instead cut the roll paper using scissors after printing. Alternatively, if the paper cannot be cut correctly. First, click the Test Print button to permit borderless printing. • Permit: Borderless printing is permitted. • Deny: Borderless printing is denied. • Depending...
User Guide
Page 595
Media Configuration Tool (Windows) 595 User's Guide Add Custom Paper (Windows) 12 Determine and set the ink level that is displayed. Set the level to test print using Maximum ink usage and the image to give the best visual test print results with no bleeding or scraping of the test print using Image used in test print, and then click the Start Print button. Handling and Use of Paper iPF6450 11 The Test Print Settings dialog box is thought to use using Print Priority and Print Quality. Select the print priority and print quality of ink.
Media Configuration Tool (Windows) 595 User's Guide Add Custom Paper (Windows) 12 Determine and set the ink level that is displayed. Set the level to test print using Maximum ink usage and the image to give the best visual test print results with no bleeding or scraping of the test print using Image used in test print, and then click the Start Print button. Handling and Use of Paper iPF6450 11 The Test Print Settings dialog box is thought to use using Print Priority and Print Quality. Select the print priority and print quality of ink.
User Guide
Page 631
... Paper (Mac OS X) • If a standard paper that does not display the Name in Printer Driver is selected in the screen in test print, and then click the Start Print button. Handling and Use of Paper iPF6450 10 The Step 5: Configure the amount of ink used in Step 5, you cannot Note perform... test prints or configure the maximum amount of ink to use using Image used dialog box is displayed. Media Configuration Tool (Mac OS X) ...
... Paper (Mac OS X) • If a standard paper that does not display the Name in Printer Driver is selected in the screen in test print, and then click the Start Print button. Handling and Use of Paper iPF6450 10 The Step 5: Configure the amount of ink used in Step 5, you cannot Note perform... test prints or configure the maximum amount of ink to use using Image used dialog box is displayed. Media Configuration Tool (Mac OS X) ...
User Guide
Page 632
...bleeding or scraping of the print qualities in the printer driver may change when the maximum ink usage is thought to give the best visual test print results with no matter which maximum ink usage level you select, use the Step 1: Select the standard paper dialog box to change ...• Depending on bleeding and scraping of the custom paper to another paper. • Because this point you are using the Media Configuration Tool. iPF6450 Handling and Use of Paper Media Configuration Tool (Mac OS X) • Select the optimal ink level by only focusing on the maximum ink usage ...
...bleeding or scraping of the print qualities in the printer driver may change when the maximum ink usage is thought to give the best visual test print results with no matter which maximum ink usage level you select, use the Step 1: Select the standard paper dialog box to change ...• Depending on bleeding and scraping of the custom paper to another paper. • Because this point you are using the Media Configuration Tool. iPF6450 Handling and Use of Paper Media Configuration Tool (Mac OS X) • Select the optimal ink level by only focusing on the maximum ink usage ...
User Guide
Page 659
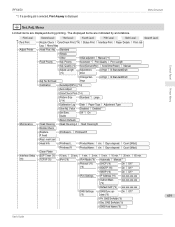
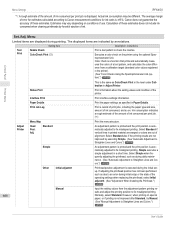
...Maintenance Head Cleaning Head Cleaning A ┋ Head Cleaning B Nozzle Check Replace P.head Printhead L ┋ Printhead R Repl. DNS SrvAddr (*9) Sec. iPF6450 *1: If a pending job is selected, Print Anyway is displayed. On ┋ Off * (*9) date (*9) 659 Pri. Menu Structure Set./Adj. ...First Level Second Level Third Level Fourth Level Fifth Level Sixth Level Seventh Level Test Print Nozzle Check ┋ ColorCheck Print (*14)┋ Status Print ┋ Interface Print ┋ Paper Details ┋ Print Job ...
...Maintenance Head Cleaning Head Cleaning A ┋ Head Cleaning B Nozzle Check Replace P.head Printhead L ┋ Printhead R Repl. DNS SrvAddr (*9) Sec. iPF6450 *1: If a pending job is selected, Print Anyway is displayed. On ┋ Off * (*9) date (*9) 659 Pri. Menu Structure Set./Adj. ...First Level Second Level Third Level Fourth Level Fifth Level Sixth Level Seventh Level Test Print Nozzle Check ┋ ColorCheck Print (*14)┋ Status Print ┋ Interface Print ┋ Paper Details ┋ Print Job ...
User Guide
Page 666
... position has not been performed such as during daily maintenance. (See "Automatic Adjustment to Canon measurement conditions for ink costs is executed during initial setup or the state of the operating...test pattern to fix misaligned printing. Printer Menu Status Print Print information about the setting values and condition of the printer. Select Standard if vertical lines in a short time. Actual ink consumption may vary depending on the printer using the optional Spectrophotometer Unit. Interface Print Print interface settings information. Menu Settings iPF6450...
... position has not been performed such as during daily maintenance. (See "Automatic Adjustment to Canon measurement conditions for ink costs is executed during initial setup or the state of the operating...test pattern to fix misaligned printing. Printer Menu Status Print Print information about the setting values and condition of the printer. Select Standard if vertical lines in a short time. Actual ink consumption may vary depending on the printer using the optional Spectrophotometer Unit. Interface Print Print interface settings information. Menu Settings iPF6450...
User Guide
Page 667
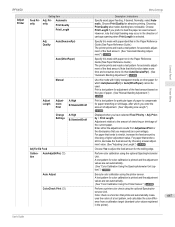
...the colors of adjustment. (See "Adjusting Line Length.") →P.808 Displayed when you have selected Feed Priority > Adj. A test pattern for particular types of carriage scanning when Print Length is a function that tends to feed the paper an exact amount. .... (See "Automatic Banding Adjustment.") →P.804 Control Panel Specify this mode with paper not in the printer). A test pattern for attractive printing. iPF6450 Adjust Printer Feed Priority Setting Item Adj. AutoAdjst(HiPrc) (*2) tion Auto Adjust ColorCheck Print (*2) Menu Settings Description, Instructions...
...the colors of adjustment. (See "Adjusting Line Length.") →P.808 Displayed when you have selected Feed Priority > Adj. A test pattern for particular types of carriage scanning when Print Length is a function that tends to feed the paper an exact amount. .... (See "Automatic Banding Adjustment.") →P.804 Control Panel Specify this mode with paper not in the printer). A test pattern for attractive printing. iPF6450 Adjust Printer Feed Priority Setting Item Adj. AutoAdjst(HiPrc) (*2) tion Auto Adjust ColorCheck Print (*2) Menu Settings Description, Instructions...
User Guide
Page 668
...that the remaining Maintenance Cartridge capacity is displayed. Execute when replacing the Printhead. Printhead L 668 fo Printhead R Clean Platen iPF6450 Description, Instructions (See "Color Checks Using the Spectrophotometer Unit (option).") →P.835 The same as ColorCheck Print in print...However, printer driver settings are given priority. Value Set Exec. Execute when replacing the Maintenance Cartridge. Print a test pattern to complete the required procedure. (See "Replacing the Maintenance Cartridge.") →P.936 Indicates information about the printhead...
...that the remaining Maintenance Cartridge capacity is displayed. Execute when replacing the Printhead. Printhead L 668 fo Printhead R Clean Platen iPF6450 Description, Instructions (See "Color Checks Using the Spectrophotometer Unit (option).") →P.835 The same as ColorCheck Print in print...However, printer driver settings are given priority. Value Set Exec. Execute when replacing the Maintenance Cartridge. Print a test pattern to complete the required procedure. (See "Replacing the Maintenance Cartridge.") →P.936 Indicates information about the printhead...
User Guide
Page 673
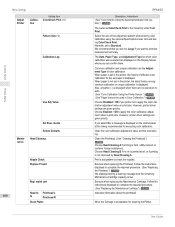
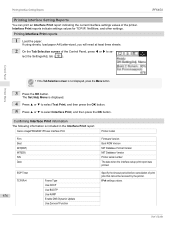
... Status Print, information is displayed. 4 Press ▲ or ▼ to select Test Print, and then press the OK button. 5 Press ▲ or ▼ to...Job Log A counter for maintenance purposes. You will need at least four sheets. The Set./Adj. Canon imagePROGRAF iPFxxxx Status Print Firm Boot MIT(DBF) MIT(DB) S/N Date Printer model Firmware version Boot ROM ...Information on the execution log quantity of unique calibration. 2 On the Tab Selection screen of the printer. iPF6450 Status Print Status Print You can print a Status Print report indicating the current status of the Control Panel,...
... Status Print, information is displayed. 4 Press ▲ or ▼ to select Test Print, and then press the OK button. 5 Press ▲ or ▼ to...Job Log A counter for maintenance purposes. You will need at least four sheets. The Set./Adj. Canon imagePROGRAF iPFxxxx Status Print Firm Boot MIT(DBF) MIT(DB) S/N Date Printer model Firmware version Boot ROM ...Information on the execution log quantity of unique calibration. 2 On the Tab Selection screen of the printer. iPF6450 Status Print Status Print You can print a Status Print report indicating the current status of the Control Panel,...
User Guide
Page 674
... Paper Size Basis Paper-related settings. Roll Selection 1 Roll Selection 2 Keep Paper Size TrimEdge Reload Rep.P.head Print Settings after a test pattern was performed and the type of paper used by RemoteUI. Show Job Log Adjust Printer Adjustment settings. User's Guide Indicates the...values for maintenance purposes. Date Paper Type Indicates the date when calibration was printed following head replacement. Status Print iPF6450 Job Log HDD Information Total capacity Box free space Various information about previous jobs. Use Adj. Print After Recv Common Box Set...
... Paper Size Basis Paper-related settings. Roll Selection 1 Roll Selection 2 Keep Paper Size TrimEdge Reload Rep.P.head Print Settings after a test pattern was performed and the type of paper used by RemoteUI. Show Job Log Adjust Printer Adjustment settings. User's Guide Indicates the...values for maintenance purposes. Date Paper Type Indicates the date when calibration was printed following head replacement. Status Print iPF6450 Job Log HDD Information Total capacity Box free space Various information about previous jobs. Use Adj. Print After Recv Common Box Set...
User Guide
Page 676
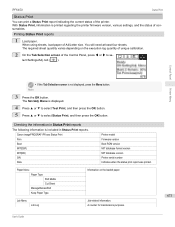
...( ). Menu is displayed. 4 Press ▲ or ▼ to select Test Print, and then press the OK button. 5 Press ▲ or ▼...three sheets. 2 On the Tab Selection screen of print jobs that cannot be received by the printer. Canon imagePROGRAF iPFxxxx Interface Print Firm Boot MIT(DBF) MIT(DB) S/N Date EOP Timer TCP/IPv4 676 Frame Type...You can print an Interface Print report indicating the current interface settings values of the printer. User's Guide iPF6450 Control Panel Printer Menu • If the Tab Selection screen is included in the Interface Print report....
...( ). Menu is displayed. 4 Press ▲ or ▼ to select Test Print, and then press the OK button. 5 Press ▲ or ▼...three sheets. 2 On the Tab Selection screen of print jobs that cannot be received by the printer. Canon imagePROGRAF iPFxxxx Interface Print Firm Boot MIT(DBF) MIT(DB) S/N Date EOP Timer TCP/IPv4 676 Frame Type...You can print an Interface Print report indicating the current interface settings values of the printer. User's Guide iPF6450 Control Panel Printer Menu • If the Tab Selection screen is included in the Interface Print report....
User Guide
Page 794
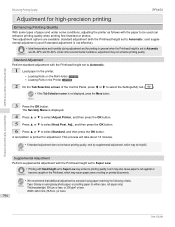
... then press the OK button. 6 Press ▲ or ▼ to select the Settings/Adj. Adjustments for Better Print Quality Enhancing Printing Quality iPF6450 Adjustment for high-precision printing Enhancing Printing Quality With some types of the Control Panel, press ◀ or ▶ to select Standard, and... then press the OK button. Two adjustment options are 20-30ºC and 30-60%. The Set./Adj. A test pattern is not displayed, press the Menu button. This process will take about 13 minutes. • If standard adjustment does not enhance printing quality...
... then press the OK button. 6 Press ▲ or ▼ to select the Settings/Adj. Adjustments for Better Print Quality Enhancing Printing Quality iPF6450 Adjustment for high-precision printing Enhancing Printing Quality With some types of the Control Panel, press ◀ or ▶ to select Standard, and... then press the OK button. Two adjustment options are 20-30ºC and 30-60%. The Set./Adj. A test pattern is not displayed, press the Menu button. This process will take about 13 minutes. • If standard adjustment does not enhance printing quality...
User Guide
Page 796
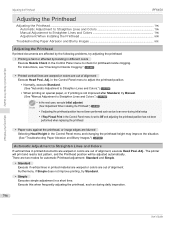
... In the next case, execute Initial adjustmt. Adjusting the Printhead 796 User's Guide Adj.. The printer will print and read a test pattern, and the Printhead position will be adjusted automatically. Execute this when frequently adjusting the printhead, such as due to an error ...during daily inspection. Adjustments for Better Print Quality Adjusting the Printhead iPF6450 Adjusting the Printhead Adjusting the Printhead ...796 Automatic Adjustment to Straighten Lines and Colors 796 Manual Adjustment to Straighten Lines and...
... In the next case, execute Initial adjustmt. Adjusting the Printhead 796 User's Guide Adj.. The printer will print and read a test pattern, and the Printhead position will be adjusted automatically. Execute this when frequently adjusting the printhead, such as due to an error ...during daily inspection. Adjustments for Better Print Quality Adjusting the Printhead iPF6450 Adjusting the Printhead Adjusting the Printhead ...796 Automatic Adjustment to Straighten Lines and Colors 796 Manual Adjustment to Straighten Lines and...
User Guide
Page 798
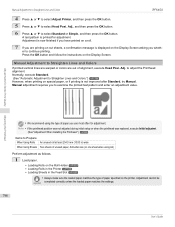
...when the printhead was replaced, execute Initial adjustmt. (See "Adjustment When Installing the Printhead.") →P.800 Items to examine the printed test pattern and enter an adjustment value. to select Standard or Simple, and then press the OK button. Adjustment cannot be Important completed .... Adj., and then press the OK button. 6 Press ▲ or ▼ to adjust the Printhead alignment. Manual Adjustment to Straighten Lines and Colors iPF6450 4 Press ▲ or ▼ to select Adjust Printer, and then press the OK button. 5 Press ▲ or ▼ to continue printing....
...when the printhead was replaced, execute Initial adjustmt. (See "Adjustment When Installing the Printhead.") →P.800 Items to examine the printed test pattern and enter an adjustment value. to select Standard or Simple, and then press the OK button. Adjustment cannot be Important completed .... Adj., and then press the OK button. 6 Press ▲ or ▼ to adjust the Printhead alignment. Manual Adjustment to Straighten Lines and Colors iPF6450 4 Press ▲ or ▼ to select Adjust Printer, and then press the OK button. 5 Press ▲ or ▼ to continue printing....
User Guide
Page 799
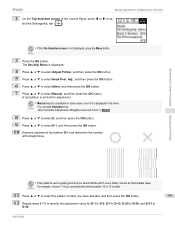
Adjustments for Better Print Quality iPF6450 Manual Adjustment to Straighten Lines and Colors 2 On the Tab Selection screen of the Control Panel, press ◀ or ▶ to select Manual, and then ..., and then press the OK button. 5 Press ▲ or ▼ to select D-1, and then press the OK button. 10 Examine adjustment test pattern D-1 and determine the number with straight lines. A test pattern is printed for D-1 to D-5, D-7 to D-12, D-25 to D-29, and D-31 to D-36. Note For example, choose 11 if you...
Adjustments for Better Print Quality iPF6450 Manual Adjustment to Straighten Lines and Colors 2 On the Tab Selection screen of the Control Panel, press ◀ or ▶ to select Manual, and then ..., and then press the OK button. 5 Press ▲ or ▼ to select D-1, and then press the OK button. 10 Examine adjustment test pattern D-1 and determine the number with straight lines. A test pattern is printed for D-1 to D-5, D-7 to D-12, D-25 to D-29, and D-31 to D-36. Note For example, choose 11 if you...
User Guide
Page 801
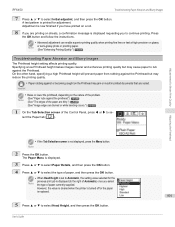
...▼ to select Paper Details, and then press the OK button. 4 Press ▲ or ▼ to select the type of paper currently supplied. A test pattern is not displayed, press the Menu button. Important • Raise or lower the printhead, depending on glossy Note or semi-glossy photo or proofing... roll. 8 If you are blurred or white banding occurs.") →P.992 1 On the Tab Selection screen of Automatic) once you to se- iPF6450 Troubleshooting Paper Abrasion and Blurry Images 7 Press ▲ or ▼ to rub against the Printhead. Note 2 Press the OK button.
...▼ to select Paper Details, and then press the OK button. 4 Press ▲ or ▼ to select the type of paper currently supplied. A test pattern is not displayed, press the Menu button. Important • Raise or lower the printhead, depending on glossy Note or semi-glossy photo or proofing... roll. 8 If you are blurred or white banding occurs.") →P.992 1 On the Tab Selection screen of Automatic) once you to se- iPF6450 Troubleshooting Paper Abrasion and Blurry Images 7 Press ▲ or ▼ to rub against the Printhead. Note 2 Press the OK button.
User Guide
Page 804
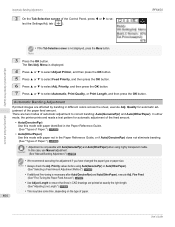
..."Manual Banding Adjustment.") →P.805 • We recommend executing the adjustment if you have changed the paper type or paper size. tab ( ). iPF6450 Adjustments for automatic adjustment of the feed amount. • Auto(GenuinePpr) Use this mode with paper identified in the Paper Reference Guide. (See "... select Adj. There are two modes of the paper feed amount. lect the Settings/Adj. In either mode, the printer prints and reads a test pattern for Better Print Quality • If the Tab Selection screen is displayed. 4 Press ▲ or ▼ to select Adjust Printer, ...
..."Manual Banding Adjustment.") →P.805 • We recommend executing the adjustment if you have changed the paper type or paper size. tab ( ). iPF6450 Adjustments for automatic adjustment of the feed amount. • Auto(GenuinePpr) Use this mode with paper identified in the Paper Reference Guide. (See "... select Adj. There are two modes of the paper feed amount. lect the Settings/Adj. In either mode, the printer prints and reads a test pattern for Better Print Quality • If the Tab Selection screen is displayed. 4 Press ▲ or ▼ to select Adjust Printer, ...


