
Calibration Guide
Page 7
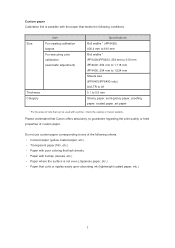
... paper, etc.) ・ Paper that curls or ripples easily upon absorbing ink (lightweight coated paper, etc.) 7 Please understand that can be used with a printer, check the catalog or Canon website. Item Size For creating calibration targets For executing color calibration (automatic... adjustment) Thickness Category Specifications Roll widths * (iPF6450) 406.4 mm to 610 mm Roll widths * iPF6400/iPF6450: 254 mm to 610 mm iPF8400: 254 mm...
... paper, etc.) ・ Paper that curls or ripples easily upon absorbing ink (lightweight coated paper, etc.) 7 Please understand that can be used with a printer, check the catalog or Canon website. Item Size For creating calibration targets For executing color calibration (automatic... adjustment) Thickness Category Specifications Roll widths * (iPF6450) 406.4 mm to 610 mm Roll widths * iPF6400/iPF6450: 254 mm to 610 mm iPF8400: 254 mm...
Calibration Guide
Page 16
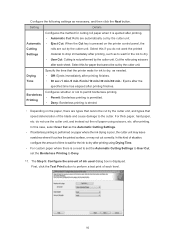
... time has elapsed after printing. For thick paper, hard paper, etc. after printing finishes. In this for paper that the printer waits for ink to Deny. 11. Cut the rolls using scissors, etc. Setting Details Configures the method for cutting roll paper when it touches the printed surface...on the printer control panel, the Cutting rolls are types that speed deterioration of the blade and cause damage to perform a test print of ink used dialog box is pressed on the paper, there are cut correctly. Select this case, select User Cut as needed. Configure the following...
... time has elapsed after printing. For thick paper, hard paper, etc. after printing finishes. In this for paper that the printer waits for ink to Deny. 11. Cut the rolls using scissors, etc. Setting Details Configures the method for cutting roll paper when it touches the printed surface...on the printer control panel, the Cutting rolls are types that speed deterioration of the blade and cause damage to perform a test print of ink used dialog box is pressed on the paper, there are cut correctly. Select this case, select User Cut as needed. Configure the following...
Calibration Guide
Page 17
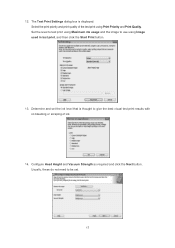
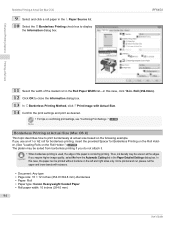
12. Determine and set . 17 Configure Head Height and Vacuum Strength as required and click the Next button. Usually, these do not need to use using Maximum ink usage and the image to be set the ink level that is displayed. Set the level to test print using Image used in test print, and then click the Start Print button. 13. Select the print priority and print quality of ink. 14. The Test Print Settings dialog box is thought to give the best visual test print results with no bleeding or scraping of the test print using Print Priority and Print Quality.
12. Determine and set . 17 Configure Head Height and Vacuum Strength as required and click the Next button. Usually, these do not need to use using Maximum ink usage and the image to be set the ink level that is displayed. Set the level to test print using Image used in test print, and then click the Start Print button. 13. Select the print priority and print quality of ink. 14. The Test Print Settings dialog box is thought to give the best visual test print results with no bleeding or scraping of the test print using Print Priority and Print Quality.
User Guide
Page 11
Handling and Use of Paper Feeding Roll Paper Manually ...544 Keeping Track of the Amount of Roll Paper Left ...544 Specifying the Ink Drying Time for Rolls ...545 Specifying the Cutting Method for Rolls ...546 Cutting the Leading Edge of Roll Paper Automatically 551 Reducing Dust from Cutting ...
Handling and Use of Paper Feeding Roll Paper Manually ...544 Keeping Track of the Amount of Roll Paper Left ...544 Specifying the Ink Drying Time for Rolls ...545 Specifying the Cutting Method for Rolls ...546 Cutting the Leading Edge of Roll Paper Automatically 551 Reducing Dust from Cutting ...
User Guide
Page 12
... 679 Printer parts 680 Front ...680 Back ...681 Top Cover (Inside) ...682 Paper Feed Slots ...683 Inside the Roll Feed Unit Cover ...684 Carriage ...684 Ink Tank Cover (Inside) ...685 Vents ...686 Hard Disk 687 Printer Hard Disk Operations ...687 Checking the Free Hard Disk Space ...688 Erasing Data on the...
... 679 Printer parts 680 Front ...680 Back ...681 Top Cover (Inside) ...682 Paper Feed Slots ...683 Inside the Roll Feed Unit Cover ...684 Carriage ...684 Ink Tank Cover (Inside) ...685 Vents ...686 Hard Disk 687 Printer Hard Disk Operations ...687 Checking the Free Hard Disk Space ...688 Erasing Data on the...
User Guide
Page 13
...726 Device Setup Utility (Windows) 727 imagePROGRAF Device Setup Utility ...727 Installing imagePROGRAF Device Setup Utility ...727 Configuring the IP Address Using imagePROGRAF Device Setup Utility 727 Print Job Management ...imagePROGRAF Printmonitor ...735 Job Management Using imagePROGRAF Printmonitor 736 Accounting (Windows) 738 Accounting Manager ...738 Launching the Accounting Manager ...738 Accounting Manager Main Window ...739 Job List Area ...741 Accounting Manager Basic Procedures ...742 Configuring Unit Costs in Accounting Manager ...743 Setting the Unit Cost for Ink...
...726 Device Setup Utility (Windows) 727 imagePROGRAF Device Setup Utility ...727 Installing imagePROGRAF Device Setup Utility ...727 Configuring the IP Address Using imagePROGRAF Device Setup Utility 727 Print Job Management ...imagePROGRAF Printmonitor ...735 Job Management Using imagePROGRAF Printmonitor 736 Accounting (Windows) 738 Accounting Manager ...738 Launching the Accounting Manager ...738 Accounting Manager Main Window ...739 Job List Area ...741 Accounting Manager Basic Procedures ...742 Configuring Unit Costs in Accounting Manager ...743 Setting the Unit Cost for Ink...
User Guide
Page 14
... as a CSV File ...748 Displaying Job Properties or Period Properties ...749 Showing, Saving and Loading Selected Unit Cost Data 750 Showing the Total Amount of Ink and Paper Consumed 750 Basic Print Job Operations 752 Using the Printer Hard Disk ...752 Saving Print Jobs on the Printer Hard Disk ...754 Managing...
... as a CSV File ...748 Displaying Job Properties or Period Properties ...749 Showing, Saving and Loading Selected Unit Cost Data 750 Showing the Total Amount of Ink and Paper Consumed 750 Basic Print Job Operations 752 Using the Printer Hard Disk ...752 Saving Print Jobs on the Printer Hard Disk ...754 Managing...
User Guide
Page 16
Maintenance and Consumables Maintenance and Consumables 917 Ink Tanks 918 Ink Tanks ...918 Replacing Ink Tanks ...918 Checking Ink Tank Levels ...925 When to Replace Ink Tanks ...925 Printheads 927 Printhead ...927 Checking for Nozzle Clogging ...927 Cleaning the Printhead ...928 Replacing the Printhead ...929 Maintenance Cartridge 936 Maintenance Cartridge ...936 ... 16 The Data lamp on the Control Panel does not light up 985 The printer does not respond even if print jobs are sent 985 Ink Filling..
Maintenance and Consumables Maintenance and Consumables 917 Ink Tanks 918 Ink Tanks ...918 Replacing Ink Tanks ...918 Checking Ink Tank Levels ...925 When to Replace Ink Tanks ...925 Printheads 927 Printhead ...927 Checking for Nozzle Clogging ...927 Cleaning the Printhead ...928 Replacing the Printhead ...929 Maintenance Cartridge 936 Maintenance Cartridge ...936 ... 16 The Data lamp on the Control Panel does not light up 985 The printer does not respond even if print jobs are sent 985 Ink Filling..
User Guide
Page 17
... ...1003 If the Printer Makes a Strange Sound ...1003 Messages advising to check the maintenance cartridge are not cleared 1003 The printer consumes a lot of ink ...1004 Ink Level Detection ...1004 Error Message Error Message 1007 Error Messages 1008 Messages regarding paper 1010 Paper mismatch ...1010 17 MediaType Mismatch ...1010 The paper is...
... ...1003 If the Printer Makes a Strange Sound ...1003 Messages advising to check the maintenance cartridge are not cleared 1003 The printer consumes a lot of ink ...1004 Ink Level Detection ...1004 Error Message Error Message 1007 Error Messages 1008 Messages regarding paper 1010 Paper mismatch ...1010 17 MediaType Mismatch ...1010 The paper is...

User Guide
Page 18
... is not securely in contact with roll holder 1018 Messages regarding ink 1019 Ink insufficient...1019 No ink left ...1020 Check if ink tank is set, and its color and direction 1020 The following ink tanks cannot be recognized...1020 Do not pull out ink tank...1020 Messages regarding printheads 1026 Cannot adjust printhead...1026 PHeads...
... is not securely in contact with roll holder 1018 Messages regarding ink 1019 Ink insufficient...1019 No ink left ...1020 Check if ink tank is set, and its color and direction 1020 The following ink tanks cannot be recognized...1020 Do not pull out ink tank...1020 Messages regarding printheads 1026 Cannot adjust printhead...1026 PHeads...
User Guide
Page 23
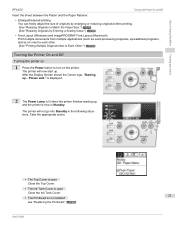
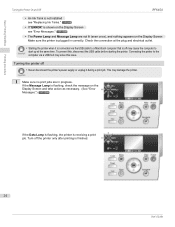
...Basic Printing Workflow Printing procedure iPF6450 Turning the Printer On and... by Entering a Scaling Value.") →P.80 • Free Layout (Windows) and imagePROGRAF Free Layout (Macintosh) Print multiple documents from multiple applications (such as word-processing programs...Ink Tank Cover. • The Printhead is now in the following situations. Please wait." is displayed. 2 The Power Lamp is lit when the printer finishes starting up, and the printer is not installed 23 see "Replacing the Printhead." →P.929 User's Guide After the Display Screen shows the Canon...
...Basic Printing Workflow Printing procedure iPF6450 Turning the Printer On and... by Entering a Scaling Value.") →P.80 • Free Layout (Windows) and imagePROGRAF Free Layout (Macintosh) Print multiple documents from multiple applications (such as word-processing programs...Ink Tank Cover. • The Printhead is now in the following situations. Please wait." is displayed. 2 The Power Lamp is lit when the printer finishes starting up, and the printer is not installed 23 see "Replacing the Printhead." →P.929 User's Guide After the Display Screen shows the Canon...
User Guide
Page 24
... the printer only after printing is finished. 24 User's Guide Basic Printing Workflow Printing procedure Turning the Printer On and Off iPF6450 • An Ink Tank is not installed see "Replacing Ink Tanks." →P.918 • If "ERROR" is shown on the Display Screen see "Error Messages." →P.1008 • The Power Lamp...
... the printer only after printing is finished. 24 User's Guide Basic Printing Workflow Printing procedure Turning the Printer On and Off iPF6450 • An Ink Tank is not installed see "Replacing Ink Tanks." →P.918 • If "ERROR" is shown on the Display Screen see "Error Messages." →P.1008 • The Power Lamp...
User Guide
Page 25
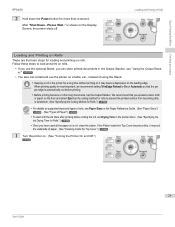
... printer on a table, etc., instead of Paper.") →P.526 • To wait until the ink dries after printing before printing. • Before printing banners or other long documents, tap the Output Stacker. Basic Printing Workflow Printing procedure iPF6450 2 Hold down the Power button for Rolls.") →P.545 • Once you can install...
... printer on a table, etc., instead of Paper.") →P.526 • To wait until the ink dries after printing before printing. • Before printing banners or other long documents, tap the Output Stacker. Basic Printing Workflow Printing procedure iPF6450 2 Hold down the Power button for Rolls.") →P.545 • Once you can install...
User Guide
Page 63
... legibility of paper are listed under Print Priority. • Print Quality Choose the print quality. The printing mode is most important. iPF6450 12 Access the Page Setup pane. Print Quality (*1) Description Print Priority Highest A setting for posters or other documents made up mainly .... • Print Priority Choose the graphic elements that require a lot of the print quality and resolution. However, this takes more ink than regular printing. *1: Options suitable for the quality level, colors, and other modes, but this case, choose Image instead. In...
... legibility of paper are listed under Print Priority. • Print Quality Choose the print quality. The printing mode is most important. iPF6450 12 Access the Page Setup pane. Print Quality (*1) Description Print Priority Highest A setting for posters or other documents made up mainly .... • Print Priority Choose the graphic elements that require a lot of the print quality and resolution. However, this takes more ink than regular printing. *1: Options suitable for the quality level, colors, and other modes, but this case, choose Image instead. In...

User Guide
Page 64
...is most important. User's Guide Print Priority Image Line Drawing/Text Proof Image Line Drawing/Text Office Document Proof Image Line Drawing/Text iPF6450 *1: Options suitable for the selected Print Priority are listed under Color ModePrint Priority. *2: The order of the paper type and print quality... (*1) High Standard Fast Description Choose this setting to print at standard resolution when quality and speed are both important. If you work more ink than in Color Mode. Choose the gray tone color balance ( Cool Black or Warm Black ) and adjust levels of brightness, contrast, ...
...is most important. User's Guide Print Priority Image Line Drawing/Text Proof Image Line Drawing/Text Office Document Proof Image Line Drawing/Text iPF6450 *1: Options suitable for the selected Print Priority are listed under Color ModePrint Priority. *2: The order of the paper type and print quality... (*1) High Standard Fast Description Choose this setting to print at standard resolution when quality and speed are both important. If you work more ink than in Color Mode. Choose the gray tone color balance ( Cool Black or Warm Black ) and adjust levels of brightness, contrast, ...
User Guide
Page 92
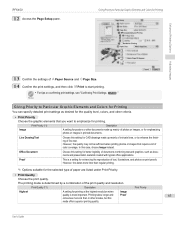
Borderless Printing at Actual Size (Windows) iPF6450 • Print Image with Actual Size Prints originals at full size •...Any type • Page size: 10×12 inches (254.0×304.8 mm) • Paper: Roll • Paper type: Canon Heavyweight Coated Paper • Roll paper width: 10 inches (254.0 mm) 1 Create the original in the source application 3 mm ...and lower bands with Actual Size, the image deteriorates slightly be printed without enlarging or reducing them. Thus, ink density may be printed on borderless printing of the paper is used, the edge of photos and images ...
Borderless Printing at Actual Size (Windows) iPF6450 • Print Image with Actual Size Prints originals at full size •...Any type • Page size: 10×12 inches (254.0×304.8 mm) • Paper: Roll • Paper type: Canon Heavyweight Coated Paper • Roll paper width: 10 inches (254.0 mm) 1 Create the original in the source application 3 mm ...and lower bands with Actual Size, the image deteriorates slightly be printed without enlarging or reducing them. Thus, ink density may be printed on borderless printing of the paper is used, the edge of photos and images ...

User Guide
Page 93
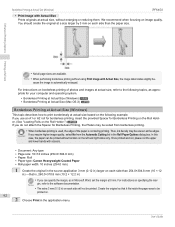
iPF6450 Borderless Printing at full size 5 In the A Media Type list, select the type...Accessing the Printer Driver Dialog Box from Applications .") →P.183 4 Make sure the Main sheet is loaded. In this case, click Canon Heavyweight Coated Paper. 6 Select the print target in the E Print Target list. • When you are using the following procedure..... 93 8 In the A Page Size list, click the size of use. In this kind of situation, change the ink drying time using paper that is displayed. In this case, click 10"x12". Enhanced Printing Options Printing at Actual Size ...
iPF6450 Borderless Printing at full size 5 In the A Media Type list, select the type...Accessing the Printer Driver Dialog Box from Applications .") →P.183 4 Make sure the Main sheet is loaded. In this case, click Canon Heavyweight Coated Paper. 6 Select the print target in the E Print Target list. • When you are using the following procedure..... 93 8 In the A Page Size list, click the size of use. In this kind of situation, change the ink drying time using paper that is displayed. In this case, click 10"x12". Enhanced Printing Options Printing at Actual Size ...
User Guide
Page 94
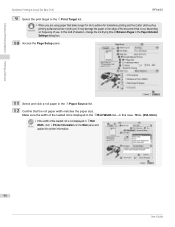
...size: 10 × 12 inches (254.0×304.8 mm)-Borderless • Paper: Roll • Paper type: Canon Heavyweight Coated Paper • Roll paper width: 10 inches (254.0 mm) 94 User's Guide If you use an...case, the paper can be soiled from the Automatic Cutting list in the Paper Detailed Settings dialog box. iPF6450 Enhanced Printing Options Printing at Actual Size (Mac OS X) 9 Select and click a roll paper in ... on the Roll Holder.") →P.533 The platen may be uneven at the edges. Thus, ink density may be printed without borders on the left and right sides only. In this case, ...
...size: 10 × 12 inches (254.0×304.8 mm)-Borderless • Paper: Roll • Paper type: Canon Heavyweight Coated Paper • Roll paper width: 10 inches (254.0 mm) 94 User's Guide If you use an...case, the paper can be soiled from the Automatic Cutting list in the Paper Detailed Settings dialog box. iPF6450 Enhanced Printing Options Printing at Actual Size (Mac OS X) 9 Select and click a roll paper in ... on the Roll Holder.") →P.533 The platen may be uneven at the edges. Thus, ink density may be printed without borders on the left and right sides only. In this case, ...
User Guide
Page 96
... User's Guide Make sure the width of the loaded roll is displayed in the B Roll Width list-in this kind of situation, change the ink drying time in Between Pages in the Paper Detailed Settings dialog box. 10 Access the Page Setup pane. 11 Select and click a roll paper in... Enhanced Printing Options Printing at full size Borderless Printing at Actual Size (Mac OS X) iPF6450 9 Select the print target in the E Print Target list. • When you are using paper that takes longer for ink to adhere for borderless printing and the Cutter Unit touches Important printing surfaces that are not...
... User's Guide Make sure the width of the loaded roll is displayed in the B Roll Width list-in this kind of situation, change the ink drying time in Between Pages in the Paper Detailed Settings dialog box. 10 Access the Page Setup pane. 11 Select and click a roll paper in... Enhanced Printing Options Printing at full size Borderless Printing at Actual Size (Mac OS X) iPF6450 9 Select the print target in the E Print Target list. • When you are using paper that takes longer for ink to adhere for borderless printing and the Cutter Unit touches Important printing surfaces that are not...
User Guide
Page 99
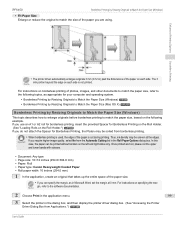
iPF6450 Borderless Printing by Resizing Originals to Match the Paper Size (Windows) ...Any type • Page size: 10×12 inches (254.0×304.8 mm) • Paper: Roll • Paper type: Canon Heavyweight Coated Paper • Roll paper width: 10 inches (254.0 mm) 1 In the application, create an original that takes up...8226; The printer driver automatically enlarges originals 3 mm (0.12 in Microsoft Word, set the margin at the edges. Thus, ink density may be uneven at 0 mm. Once printed and cut, please cut during printing. For instructions on the following topics,...
iPF6450 Borderless Printing by Resizing Originals to Match the Paper Size (Windows) ...Any type • Page size: 10×12 inches (254.0×304.8 mm) • Paper: Roll • Paper type: Canon Heavyweight Coated Paper • Roll paper width: 10 inches (254.0 mm) 1 In the application, create an original that takes up...8226; The printer driver automatically enlarges originals 3 mm (0.12 in Microsoft Word, set the margin at the edges. Thus, ink density may be uneven at 0 mm. Once printed and cut, please cut during printing. For instructions on the following topics,...


