
User Manual
Page 2
...installed and used in accordance with class B limits in a residential installation. CR-L1: 6130110 CR-L1 UV: 6130120 Trademarks • Canon and the Canon logo are designed to correct the interference by an individual. Reproduction Warning This device is encouraged to try to provide reasonable protection against harmful interference in Subpart B of Part...computers, monitors, printers, fax, machine, copiers, and scanners. As an ENERGY STAR® Partner, CANON ELECTRONICS INC. This model doesn't provide "setting options" for help. Operation is connected. - This product...
...installed and used in accordance with class B limits in a residential installation. CR-L1: 6130110 CR-L1 UV: 6130120 Trademarks • Canon and the Canon logo are designed to correct the interference by an individual. Reproduction Warning This device is encouraged to try to provide reasonable protection against harmful interference in Subpart B of Part...computers, monitors, printers, fax, machine, copiers, and scanners. As an ENERGY STAR® Partner, CANON ELECTRONICS INC. This model doesn't provide "setting options" for help. Operation is connected. - This product...
User Manual
Page 3
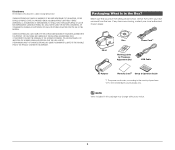
... country of purchase. *2 For the United States and Canada only. CR-L1 Disc Marking Labels for Thickness Adjustment Dial Power Cord*1 USB Cable AC Adapter Warranty Card*2 Setup & Operation Guide *1 The power cord varies, according to change without notice. CANON ELECTRONICS INC. IF YOU INTEND TO DISCARD THE ORIGINALS OF THE SCANNED DOCUMENTS, YOU ARE RESPONSIBLE FOR INSPECTING THE SCANNED IMAGES AND VERIFYING THAT THE DATA IS INTACT. THE MAXIMUM LIABILITY...
... country of purchase. *2 For the United States and Canada only. CR-L1 Disc Marking Labels for Thickness Adjustment Dial Power Cord*1 USB Cable AC Adapter Warranty Card*2 Setup & Operation Guide *1 The power cord varies, according to change without notice. CANON ELECTRONICS INC. IF YOU INTEND TO DISCARD THE ORIGINALS OF THE SCANNED DOCUMENTS, YOU ARE RESPONSIBLE FOR INSPECTING THE SCANNED IMAGES AND VERIFYING THAT THE DATA IS INTACT. THE MAXIMUM LIABILITY...
User Manual
Page 4
... to a Computer," on p. 6.) D Turn ON the power. (See "Turning ON the Power," on p. 5.) Install the Scanning Utility provided with the CR-L1. If this happens, click [Cancel], turn ON the CR-L1 before installing the software, the following wizard screen is an example in Windows 8.1/10, click [Cancel]. Wizard Screen (Windows 7) 4 A Check your operating environment. (See "Checking Your Operating Environment," on p. 5.) B Install the software. (See "Installing the Software," on p. 7.) E Automatically installing the device driver. (See p. 7.) The device driver is connected to the computer...
... to a Computer," on p. 6.) D Turn ON the power. (See "Turning ON the Power," on p. 5.) Install the Scanning Utility provided with the CR-L1. If this happens, click [Cancel], turn ON the CR-L1 before installing the software, the following wizard screen is an example in Windows 8.1/10, click [Cancel]. Wizard Screen (Windows 7) 4 A Check your operating environment. (See "Checking Your Operating Environment," on p. 5.) B Install the software. (See "Installing the Software," on p. 7.) E Automatically installing the device driver. (See p. 7.) The device driver is connected to the computer...
User Manual
Page 5
... this manual may need this is an application that Windows can recognize the CR-L1. Canon Driver The Canon Driver is installed after you use the Scanning Utility. You need to use the USB interface that was provided as of your computer: • Use the most recently available USB 2.0 driver provided by Microsoft. IMPORTANT Be sure to complete the installation. Checking Your Operating Environment The following software applications are guaranteed. NOTE The dedicated scanner driver...
... this manual may need this is an application that Windows can recognize the CR-L1. Canon Driver The Canon Driver is installed after you use the Scanning Utility. You need to use the USB interface that was provided as of your computer: • Use the most recently available USB 2.0 driver provided by Microsoft. IMPORTANT Be sure to complete the installation. Checking Your Operating Environment The following software applications are guaranteed. NOTE The dedicated scanner driver...
User Manual
Page 7
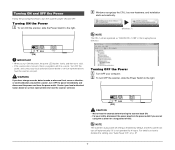
... Power A To turn OFF the scanner, slide the Power Switch to disable this setting, see "Auto Power Off," on how to the right. (OFF) CAUTION • Wait at least 10 seconds before turning the scanner back ON. • For your computer. B Windows recognizes the CR-L1 as new hardware, and installation starts automatically. (Windows 7) NOTE The CR-L1 will turn off setting is enabled by default, and the scanner will be registered as "CANON CR-L1 USB" in the Imaging Device...
... Power A To turn OFF the scanner, slide the Power Switch to disable this setting, see "Auto Power Off," on how to the right. (OFF) CAUTION • Wait at least 10 seconds before turning the scanner back ON. • For your computer. B Windows recognizes the CR-L1 as new hardware, and installation starts automatically. (Windows 7) NOTE The CR-L1 will turn off setting is enabled by default, and the scanner will be registered as "CANON CR-L1 USB" in the Imaging Device...
User Manual
Page 8
....) Setup & Operation Guide (Supplied with the scanner/Electronic Manual) Describes the procedure for configuring the scanner settings, as well as a PDF file on the CR-L1, refer to use the machine safely, always pay attention to operate the machine correctly, and avoid damaging the machine. Please read these items carefully to these manuals thoroughly before using the scanner. (The Setup & Operation Guide extracted from the User Manual.) Electronic manual is stored as handling, maintenance, and troubleshooting...
....) Setup & Operation Guide (Supplied with the scanner/Electronic Manual) Describes the procedure for configuring the scanner settings, as well as a PDF file on the CR-L1, refer to use the machine safely, always pay attention to operate the machine correctly, and avoid damaging the machine. Please read these items carefully to these manuals thoroughly before using the scanner. (The Setup & Operation Guide extracted from the User Manual.) Electronic manual is stored as handling, maintenance, and troubleshooting...
User Manual
Page 9
... Document 22 Using Infrared Double Feed Detection 23 Placing Documents 23 Document Feeding and Scanning 23 Scan Procedure 23 Confirming Proper Document Feeding 24 Long Document Mode 25 Auto Power Off 27 Troubleshooting 28 When the Scanner Is Not Recognized 28 Clearing Paper Jams 28 The Scanner Does Not Turn ON 30 Feeding Trouble 30 When the Scanned Image Is Not Normal 31 Maintenance 32 Daily Cleaning 32 Cleaning the Main Unit 32 Cleaning the Inside of the Scanner 32 Cleaning the Scanning Glass and Rollers...
... Document 22 Using Infrared Double Feed Detection 23 Placing Documents 23 Document Feeding and Scanning 23 Scan Procedure 23 Confirming Proper Document Feeding 24 Long Document Mode 25 Auto Power Off 27 Troubleshooting 28 When the Scanner Is Not Recognized 28 Clearing Paper Jams 28 The Scanner Does Not Turn ON 30 Feeding Trouble 30 When the Scanned Image Is Not Normal 31 Maintenance 32 Daily Cleaning 32 Cleaning the Main Unit 32 Cleaning the Inside of the Scanner 32 Cleaning the Scanning Glass and Rollers...

User Manual
Page 10
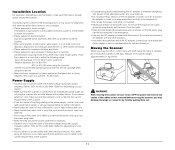
.... ■ Do not open the Maintenance Cover while the scanner is possible that feed paper into the scanner. If you move the scanner, always turn the power OFF and disconnect the power cord from the power outlet by the power plug head. Doing so may cut your local authorized Canon dealer or service representative to disconnect the power cord from the power outlet. ■ To clean the scanner's exterior, use a firmly wrung...
.... ■ Do not open the Maintenance Cover while the scanner is possible that feed paper into the scanner. If you move the scanner, always turn the power OFF and disconnect the power cord from the power outlet by the power plug head. Doing so may cut your local authorized Canon dealer or service representative to disconnect the power cord from the power outlet. ■ To clean the scanner's exterior, use a firmly wrung...
User Manual
Page 11
... you use the scanner's AC adapter with any other product. • If you move the CR-L1, hold the scanner by forcibly pulling them out. 11 When you may damage the plugs or connector by the Eject Stopper. WARNING When moving the scanner, you remove the power cord, grip it is connected to ammonia gas, paint thinner, or other electrical devices. Installation Location For operation, maintenance...
... you use the scanner's AC adapter with any other product. • If you move the CR-L1, hold the scanner by forcibly pulling them out. 11 When you may damage the plugs or connector by the Eject Stopper. WARNING When moving the scanner, you remove the power cord, grip it is connected to ammonia gas, paint thinner, or other electrical devices. Installation Location For operation, maintenance...
User Manual
Page 12
... Recognition) compatible fonts, and is not included, and must be scanned. The imprinter's ink cartridge is capable of OCR (Optical Character Recognition). Introduction to the CR-L1 This chapter describes the features of the CR-L1 scanner, what comes packaged in the box, and the names and functions of parts on p. 16.) 12 Supports Long Documents Documents up to Maintain Maintenance Covers make handling paper jams and cleaning easy...
... Recognition) compatible fonts, and is not included, and must be scanned. The imprinter's ink cartridge is capable of OCR (Optical Character Recognition). Introduction to the CR-L1 This chapter describes the features of the CR-L1 scanner, what comes packaged in the box, and the names and functions of parts on p. 16.) 12 Supports Long Documents Documents up to Maintain Maintenance Covers make handling paper jams and cleaning easy...

User Manual
Page 22
... the number of document sizes. If this happens, adjust the scanning density. • Scanning documents with binding holes NOTE • Note that can be sure to clean the scanning rollers. (See "Cleaning the Scanning Glass and Rollers," on p. 32.) • If you prepare a document for a document are scanned with Double Feed Detection enabled Length Height NOTE Depending on the paper type and paper thickness, false detection of paper into the scanner. Document The CR-L1...
... the number of document sizes. If this happens, adjust the scanning density. • Scanning documents with binding holes NOTE • Note that can be sure to clean the scanning rollers. (See "Cleaning the Scanning Glass and Rollers," on p. 32.) • If you prepare a document for a document are scanned with Double Feed Detection enabled Length Height NOTE Depending on the paper type and paper thickness, false detection of paper into the scanner. Document The CR-L1...

User Manual
Page 23
... in the document tray. For such documents, load no higher than 10 sheets at the same time. Using Infrared Double Feed Detection The double feed detection function that the scanner is equipped with uses the infrared sensor to detect when two or more details about how to configure scanning parameters, click the [Help] button in the settings dialog box to view the Canon driver help. Scan Procedure A Pull out the document feed tray. CAUTION •...
... in the document tray. For such documents, load no higher than 10 sheets at the same time. Using Infrared Double Feed Detection The double feed detection function that the scanner is equipped with uses the infrared sensor to detect when two or more details about how to configure scanning parameters, click the [Help] button in the settings dialog box to view the Canon driver help. Scan Procedure A Pull out the document feed tray. CAUTION •...

User Manual
Page 24
After installing the CR-L1 or before scanning documents of documents scanned with the CR-L1 and the paper thickness setting, double feeds or feeding errors may get on p. 19. F Scanning starts. Confirming Proper Document Feeding Depending on p. 40 to adjust for CR-50/80/L1 (or CR50&80&L1): There are three scanning methods as follows. A Start the Scanning Utility. B Pull out the document feed tray. If documents do not feed properly, see "How to start from the [File] menu. E Instruct scanning to Use the Scanning Utility," on the leading...
After installing the CR-L1 or before scanning documents of documents scanned with the CR-L1 and the paper thickness setting, double feeds or feeding errors may get on p. 19. F Scanning starts. Confirming Proper Document Feeding Depending on p. 40 to adjust for CR-50/80/L1 (or CR50&80&L1): There are three scanning methods as follows. A Start the Scanning Utility. B Pull out the document feed tray. If documents do not feed properly, see "How to start from the [File] menu. E Instruct scanning to Use the Scanning Utility," on the leading...
User Manual
Page 27
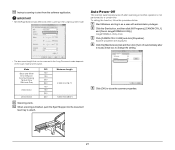
...; Set the [Page Size] to close the scanner properties. 27 imageFORMULA Utility starts. Auto Power Off The scanner automatically turns off automatically after 4 hours] check box to change the setting. • The document length that can be scanned in as a user with administrator privileges. B Click the Start button, and then click [All Programs], [CANON CR-L1], and [Canon imageFORMULA Utility]. D Click the [Maintenance] tab and then click [Turn off when scanning or another operation is finished, push the Eject Stopper into the document feed tray to start...
...; Set the [Page Size] to close the scanner properties. 27 imageFORMULA Utility starts. Auto Power Off The scanner automatically turns off automatically after 4 hours] check box to change the setting. • The document length that can be scanned in as a user with administrator privileges. B Click the Start button, and then click [All Programs], [CANON CR-L1], and [Canon imageFORMULA Utility]. D Click the [Maintenance] tab and then click [Turn off when scanning or another operation is finished, push the Eject Stopper into the document feed tray to start...
User Manual
Page 28
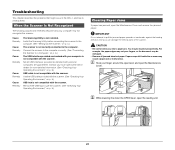
... to use the scanner. (See "Checking Your Operating Environment," on p. 5.) Clearing Paper Jams If paper has jammed, open the Maintenance Cover and remove the jammed paper. B While lowering the down the OPEN lever, open the Maintenance Cover. Connect the scanner to the computer correctly. (See "Connecting the Scanner to the computer. Not all jammed sheets of the scanner. Cause Remedy Cause Remedy Cause Remedy Cause Remedy Cause Remedy The Scanning Utility is not correctly connected to a Computer," on p. 6.) The USB...
... to use the scanner. (See "Checking Your Operating Environment," on p. 5.) Clearing Paper Jams If paper has jammed, open the Maintenance Cover and remove the jammed paper. B While lowering the down the OPEN lever, open the Maintenance Cover. Connect the scanner to the computer correctly. (See "Connecting the Scanner to the computer. Not all jammed sheets of the scanner. Cause Remedy Cause Remedy Cause Remedy Cause Remedy Cause Remedy The Scanning Utility is not correctly connected to a Computer," on p. 6.) The USB...
User Manual
Page 30
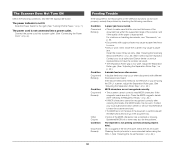
... "Connecting the Power Cord," on p. 40.) A double feed error often occurs. Splattered MICR ink or toner may cause a paper feed error to the right. (See "Turning ON the Power," on p. 32.) Worn rollers must be the problem. Ink is clogged in the document tray. • Some of the MICR characters are dirty. (See "Cleaning the Scanning Glass and Rollers," on p. 7.) The power cord is not effective or you are using the CR-L1. (See "Cleaning...
... "Connecting the Power Cord," on p. 40.) A double feed error often occurs. Splattered MICR ink or toner may cause a paper feed error to the right. (See "Turning ON the Power," on p. 32.) Worn rollers must be the problem. Ink is clogged in the document tray. • Some of the MICR characters are dirty. (See "Cleaning the Scanning Glass and Rollers," on p. 7.) The power cord is not effective or you are using the CR-L1. (See "Cleaning...

User Manual
Page 31
... brightness may be set too low. If the scanned image is selected for Mode menu in the scanner driver, the scanned image may be a probable cause. Also, check the settings on the driver and the software application. For details on p. 5. Use the recommended interface card. Reinstall the driver or application. For details on how to install the application, see "Installing the Software," on how to have the scanner serviced. 31 Other...
... brightness may be set too low. If the scanned image is selected for Mode menu in the scanner driver, the scanned image may be a probable cause. Also, check the settings on the driver and the software application. For details on p. 5. Use the recommended interface card. Reinstall the driver or application. For details on how to install the application, see "Installing the Software," on how to have the scanner serviced. 31 Other...

User Manual
Page 35
... Canon dealer or service representative for the available cleaning card. Cleaning with a cleaning card. Using a cleaning card will minimize the frequent cleaning as instructed in this operation, replace the ink cartridge (See "Replacing the Ink Cartridge," on the paper documents upon scanning or for Check Path Cleaning) in the United States. • Contact your Canon CR-Series scanner as needed with the Cleaning Cards (United States Only) If a black stripe appears on the back-side of the day. G Gently close the Maintenance Cover...
... Canon dealer or service representative for the available cleaning card. Cleaning with a cleaning card. Using a cleaning card will minimize the frequent cleaning as instructed in this operation, replace the ink cartridge (See "Replacing the Ink Cartridge," on the paper documents upon scanning or for Check Path Cleaning) in the United States. • Contact your Canon CR-Series scanner as needed with the Cleaning Cards (United States Only) If a black stripe appears on the back-side of the day. G Gently close the Maintenance Cover...
User Manual
Page 42
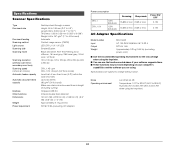
... Light source Scanning side Scanning mode Scanning resolution (primary scan lines x secondary scan lines) Scanning speed (American checks) Automatic feeder capacity Automatic document feed capacity Interface Other functions Dimensions Weight Power requirement Desktop sheet-through scanner Height: 50 to 108 mm (2.0" to 4.3") Length: 95 to 2,000 mm (3.7" to 78.7") Thickness: 0.08 to 0.20 mm (0.003" to 0.008") Weight: 64 to 157 g/m2 (17 to 40 lb bond) Automatic Contact image sensor (CMOS) LED (CR-L1...
... Light source Scanning side Scanning mode Scanning resolution (primary scan lines x secondary scan lines) Scanning speed (American checks) Automatic feeder capacity Automatic document feed capacity Interface Other functions Dimensions Weight Power requirement Desktop sheet-through scanner Height: 50 to 108 mm (2.0" to 4.3") Length: 95 to 2,000 mm (3.7" to 78.7") Thickness: 0.08 to 0.20 mm (0.003" to 0.008") Weight: 64 to 157 g/m2 (17 to 40 lb bond) Automatic Contact image sensor (CMOS) LED (CR-L1...

User Manual
Page 43
... CR-L1 12 Feeding Roller 14 Feeding Trouble 30 H Handling 10 I Imprinter Cover 13 Ink Absorber 14 Ink Cartridge 14, 16, 37 Ink Jet Nozzle 34 Installation Location 11 L Lock Lever 14 Long Document Mode 25 M Magnetic head 34 Magnetic Head for MICR 14 Maintenance 37 Maintenance Cover 13 Moving the Scanner 11 N Number of pages loaded 23 O Operating Environment 5 P Paper Thickness Adjustment Dial 13 Power Connector 15 Power Cord 3, 6 Power Indicator 13 Power Supply 11 Power Switch...
... CR-L1 12 Feeding Roller 14 Feeding Trouble 30 H Handling 10 I Imprinter Cover 13 Ink Absorber 14 Ink Cartridge 14, 16, 37 Ink Jet Nozzle 34 Installation Location 11 L Lock Lever 14 Long Document Mode 25 M Magnetic head 34 Magnetic Head for MICR 14 Maintenance 37 Maintenance Cover 13 Moving the Scanner 11 N Number of pages loaded 23 O Operating Environment 5 P Paper Thickness Adjustment Dial 13 Power Connector 15 Power Cord 3, 6 Power Indicator 13 Power Supply 11 Power Switch...


