MF4100 Series Scanner Driver Guide
Page 11
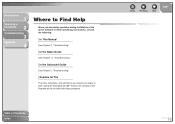
... Help When you need to be aware of when using the ScanGear and MF Toolbox are included in the Readme.txt file provided with these programs. Table of the driver software or while operating your machine, consult the following: In This Manual See Chapter 3, "Troubleshooting." In the Advanced Guide See Chapter 5, "Troubleshooting." Readme.txt File The hints, limitations, and restrictions you encounter a problem during installation...
... Help When you need to be aware of when using the ScanGear and MF Toolbox are included in the Readme.txt file provided with these programs. Table of the driver software or while operating your machine, consult the following: In This Manual See Chapter 3, "Troubleshooting." In the Advanced Guide See Chapter 5, "Troubleshooting." Readme.txt File The hints, limitations, and restrictions you encounter a problem during installation...

MF4100 Series Scanner Driver Guide
Page 13
... Windows task bar → select [Control Panel] → [Scanners and Cameras] (Windows 98/Me/2000: [Start] → [Settings] → [Control Panel] → double-click [Scanners and Cameras]). If the [Canon MF Toolbox 4.9] icon is displayed. 2. Back Previous Next TOP Table of the MF Toolbox 4.9 has been successful. Click [start] on the Windows desktop, installation of Contents Index 1-4 Introduction 1 Scanning a Document 2 Troubleshooting 3 Appendix 4 Checking Installation Check if the driver is installed successfully. 1. Open the [Scanners...
... Windows task bar → select [Control Panel] → [Scanners and Cameras] (Windows 98/Me/2000: [Start] → [Settings] → [Control Panel] → double-click [Scanners and Cameras]). If the [Canon MF Toolbox 4.9] icon is displayed. 2. Back Previous Next TOP Table of the MF Toolbox 4.9 has been successful. Click [start] on the Windows desktop, installation of Contents Index 1-4 Introduction 1 Scanning a Document 2 Troubleshooting 3 Appendix 4 Checking Installation Check if the driver is installed successfully. 1. Open the [Scanners...

MF4100 Series Scanner Driver Guide
Page 16
NOTE Your machine must be connected via USB and the USB scanner driver must be processed according to scan. The scanned document will be saved in this folder. Set documents. 2. Table of the machine. Press [SCAN] on the machine. If you are asked to select a program to your settings. This machine does not support network scanning. 1. When scanning is completed, a folder with [Start] on the Machine You can scan documents and transmit the scanned data to...
NOTE Your machine must be connected via USB and the USB scanner driver must be processed according to scan. The scanned document will be saved in this folder. Set documents. 2. Table of the machine. Press [SCAN] on the machine. If you are asked to select a program to your settings. This machine does not support network scanning. 1. When scanning is completed, a folder with [Start] on the Machine You can scan documents and transmit the scanned data to...
MF4100 Series Scanner Driver Guide
Page 20
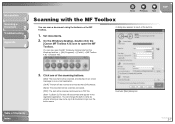
... Windows desktop, double-click the [Canon MF Toolbox 4.9] icon to open the MF Toolbox by clicking [start] on the MF Toolbox. 1. You can change the button name by the OCR software. [Save]: The document will be scanned and saved. [PDF]: The text will be scanned and saved as a PDF file. [Scan-1], [Scan-2]: The text will be scanned and read by directly entering a new name (up to an e-mail message...
... Windows desktop, double-click the [Canon MF Toolbox 4.9] icon to open the MF Toolbox by clicking [start] on the MF Toolbox. 1. You can change the button name by the OCR software. [Save]: The document will be scanned and saved. [PDF]: The text will be scanned and saved as a PDF file. [Scan-1], [Scan-2]: The text will be scanned and read by directly entering a new name (up to an e-mail message...
MF4100 Series Scanner Driver Guide
Page 21
... an e-mail message after scanning. PageManager 6. NOTE With [Scan-1] and [Scan-2] buttons, you have applications registered to keep the same settings for each. If you can be displayed in the MF Toolbox buttons at the time of Contents Index 2-8 Specify the required settings. If you select [Display the Scanner Driver] in this folder. If you want to the [Mail], [OCR], [PDF], [Scan-1], or [Scan-2] buttons, the scanned image will appear...
... an e-mail message after scanning. PageManager 6. NOTE With [Scan-1] and [Scan-2] buttons, you have applications registered to keep the same settings for each. If you can be displayed in the MF Toolbox buttons at the time of Contents Index 2-8 Specify the required settings. If you select [Display the Scanner Driver] in this folder. If you want to the [Mail], [OCR], [PDF], [Scan-1], or [Scan-2] buttons, the scanned image will appear...
MF4100 Series Scanner Driver Guide
Page 59
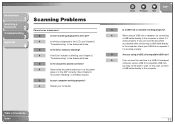
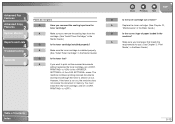
... TOP Q Is a USB hub or repeater working properly? If you can scan the document successfully after connecting a USB cable directly to scan. Table of Contents Index 3-2 Introduction 1 Scanning a Document 2 Troubleshooting 3 Appendix 4 Scanning Problems Cannot scan a document. Q Is there anything displayed in the Advanced Guide. A If the Error indicator is displayed in the LCD, see Chapter 5, "Troubleshooting," in the Basic Guide.) Q Is your computer. A When using a USB 2.0-compatible USB hub? In this case, connect a USB cable directly to check if it...
... TOP Q Is a USB hub or repeater working properly? If you can scan the document successfully after connecting a USB cable directly to scan. Table of Contents Index 3-2 Introduction 1 Scanning a Document 2 Troubleshooting 3 Appendix 4 Scanning Problems Cannot scan a document. Q Is there anything displayed in the Advanced Guide. A If the Error indicator is displayed in the LCD, see Chapter 5, "Troubleshooting," in the Basic Guide.) Q Is your computer. A When using a USB 2.0-compatible USB hub? In this case, connect a USB cable directly to check if it...
MF4100 Series Scanner Driver Guide
Page 62
... settings? A If you click a button on p. 2-13.) Back Previous Next TOP Changed settings in the [Events] tab, the changes may not be registered in the MF Toolbox. On the MF Toolbox dialog box, click [Set] to open [Scanners and Cameras] in the [Control Panel] folder and change the settings in a dialog box are not registered in the MF Toolbox. Introduction 1 Scanning a Document 2 Troubleshooting 3 Appendix 4 You installed...
... settings? A If you click a button on p. 2-13.) Back Previous Next TOP Changed settings in the [Events] tab, the changes may not be registered in the MF Toolbox. On the MF Toolbox dialog box, click [Set] to open [Scanners and Cameras] in the [Control Panel] folder and change the settings in a dialog box are not registered in the MF Toolbox. Introduction 1 Scanning a Document 2 Troubleshooting 3 Appendix 4 You installed...
MF4100 Series Scanner Driver Guide
Page 75
... 2-15, 2-43 problems 3-2 setting 2-5 using MF Toolbox 2-7 with [Start] on the machine 2-3 Setting the scanning function for [Start] in the [Scanners and Cameras] folder 2-5 in the [Settings] dialog box 2-5 on the MF Toolbox main window 2-4 Simple Mode switching 2-18 toolbar 2-20 using 2-18 Software checking installation 1-4 problems during installing and uninstalling 3-7 Specifications scanner 4-2 System requirements 1-3 T Threshold 2-33 Tone Curve 2-32 Tone Curve/Threshold drop-down list 2-34 Troubleshooting 3-1 TWAIN driver 2-15 U Unsharp...
... 2-15, 2-43 problems 3-2 setting 2-5 using MF Toolbox 2-7 with [Start] on the machine 2-3 Setting the scanning function for [Start] in the [Scanners and Cameras] folder 2-5 in the [Settings] dialog box 2-5 on the MF Toolbox main window 2-4 Simple Mode switching 2-18 toolbar 2-20 using 2-18 Software checking installation 1-4 problems during installing and uninstalling 3-7 Specifications scanner 4-2 System requirements 1-3 T Threshold 2-33 Tone Curve 2-32 Tone Curve/Threshold drop-down list 2-34 Troubleshooting 3-1 TWAIN driver 2-15 U Unsharp...
imageCLASS MF4150 Basic Guide
Page 32
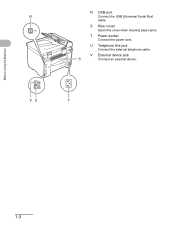
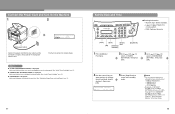
Before Using the Machine R USB port R Connect the USB (Universal Serial Bus) cable. VU T 1-3 V External device jack S Connect an external device. S Rear cover Open this cover when clearing paper jams. T Power socket Connect the power cord. U Telephone line jack Connect the external telephone cable.
Before Using the Machine R USB port R Connect the USB (Universal Serial Bus) cable. VU T 1-3 V External device jack S Connect an external device. S Rear cover Open this cover when clearing paper jams. T Power socket Connect the power cord. U Telephone line jack Connect the external telephone cable.
imageCLASS MF4150 Basic Guide
Page 73
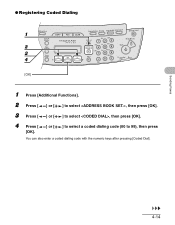
Sending Faxes 4-14 ● Registering Coded Dialing 1 2 3 4 [OK] 1 Press [Additional Functions]. 2 Press [ ] or [ ] to select , then press [OK]. 3 Press [ ] or [ ] to select , then press [OK]. 4 Press [ [OK]. ] or [ ] to select a coded dialing code (00 to 99), then press You can also enter a coded dialing code with the numeric keys after pressing [Coded Dial].
Sending Faxes 4-14 ● Registering Coded Dialing 1 2 3 4 [OK] 1 Press [Additional Functions]. 2 Press [ ] or [ ] to select , then press [OK]. 3 Press [ ] or [ ] to select , then press [OK]. 4 Press [ [OK]. ] or [ ] to select a coded dialing code (00 to 99), then press You can also enter a coded dialing code with the numeric keys after pressing [Coded Dial].
imageCLASS MF4150 Basic Guide
Page 75
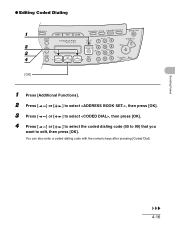
Sending Faxes ● Editing Coded Dialing 1 2 3 4 [OK] 1 Press [Additional Functions]. 2 Press [ ] or [ ] to select , then press [OK]. 3 Press [ ] or [ ] to select , then press [OK]. 4 Press [ ] or [ ] to select the coded dialing code (00 to 99) that you want to edit, then press [OK]. You can also enter a coded dialing code with the numeric keys after pressing [Coded Dial]. 4-16
Sending Faxes ● Editing Coded Dialing 1 2 3 4 [OK] 1 Press [Additional Functions]. 2 Press [ ] or [ ] to select , then press [OK]. 3 Press [ ] or [ ] to select , then press [OK]. 4 Press [ ] or [ ] to select the coded dialing code (00 to 99) that you want to edit, then press [OK]. You can also enter a coded dialing code with the numeric keys after pressing [Coded Dial]. 4-16
imageCLASS MF4150 Basic Guide
Page 78
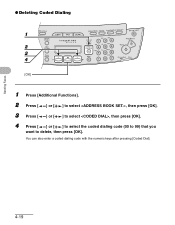
Sending Faxes ● Deleting Coded Dialing 1 2 3 4 [OK] 1 Press [Additional Functions]. 2 Press [ ] or [ ] to select , then press [OK]. 3 Press [ ] or [ ] to select , then press [OK]. 4 Press [ ] or [ ] to select the coded dialing code (00 to 99) that you want to delete, then press [OK]. You can also enter a coded dialing code with the numeric keys after pressing [Coded Dial]. 4-19
Sending Faxes ● Deleting Coded Dialing 1 2 3 4 [OK] 1 Press [Additional Functions]. 2 Press [ ] or [ ] to select , then press [OK]. 3 Press [ ] or [ ] to select , then press [OK]. 4 Press [ ] or [ ] to select the coded dialing code (00 to 99) that you want to delete, then press [OK]. You can also enter a coded dialing code with the numeric keys after pressing [Coded Dial]. 4-19
imageCLASS MF4150 Basic Guide
Page 148
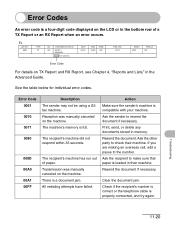
... paper is full. If you are making an overseas call, add a pause to resend the document if necessary. Resend the document if necessary. Clear the document jam. Resend the document. Print, send, or delete any documents stored in the Advanced Guide. See the table below for individual error codes. Ask the recipient to check their machine. Ex. Check if the recipient's number is correct or the telephone cable is properly connected...
... paper is full. If you are making an overseas call, add a pause to resend the document if necessary. Resend the document if necessary. Clear the document jam. Resend the document. Print, send, or delete any documents stored in the Advanced Guide. See the table below for individual error codes. Ask the recipient to check their machine. Ex. Check if the recipient's number is correct or the telephone cable is properly connected...
imageCLASS MF4150 Basic Guide
Page 156
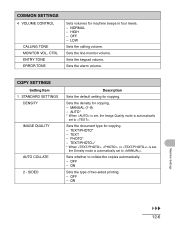
... SETTINGS DENSITY IMAGE QUALITY AUTO COLLATE 2 - CTRL ENTRY TONE ERROR TONE Sets volumes for copying. - TEXT/PHOTO* - SIDED Description Sets the default setting for copying. - AUTO* * When is set, the Image Quality mode is automatically set to . Sets the document type for copying. TEXT/PHOTO+* * When , , or is set, the Density mode is automatically set to collate the copies automatically. - ON Sets the type of two-sided printing. - NORMAL - TEXT - OFF - COMMON SETTINGS 4 VOLUME CONTROL CALLING TONE MONITOR VOL. PHOTO* - Sets the line monitor volume. MANUAL...
... SETTINGS DENSITY IMAGE QUALITY AUTO COLLATE 2 - CTRL ENTRY TONE ERROR TONE Sets volumes for copying. - TEXT/PHOTO* - SIDED Description Sets the default setting for copying. - AUTO* * When is set, the Image Quality mode is automatically set to . Sets the document type for copying. TEXT/PHOTO+* * When , , or is set, the Density mode is automatically set to collate the copies automatically. - ON Sets the type of two-sided printing. - NORMAL - TEXT - OFF - COMMON SETTINGS 4 VOLUME CONTROL CALLING TONE MONITOR VOL. PHOTO* - Sets the line monitor volume. MANUAL...
imageCLASS MF4150 Basic Guide
Page 173
... speed dialing 4-6 Replacing toner cartridge 10-8 REPORT SETTINGS 12-3, 12-14 RX SETTINGS 12-9 S Safety instructions xiii [SCAN] key 1-4 Scan Mode 1-7 Scan settings Copying 6-3 Faxes 4-3 Scanning 8-1 Scanning area 1-2, 2-3 Scanning platform 1-2 Sending faxes 4-1 Setting Menu 12-5 Accessing 12-3 Sleep Mode 1-11 Slide guides 1-1, 2-6 for multi-purpose tray 1-2 Specifications 13-1 Copier 13-2 Facsimile 13-3 General 13-1 Printer 13-3 Telephone 13-5 Speed dialing 4-6 Standby mode Copy 1-7 Fax 1-7 Scan 1-7 [Start] key 1-5 [Stop/Reset] key 1-5 [System Monitor] key 1-4 T Telephone line jack 1-3 TIMER...
... speed dialing 4-6 Replacing toner cartridge 10-8 REPORT SETTINGS 12-3, 12-14 RX SETTINGS 12-9 S Safety instructions xiii [SCAN] key 1-4 Scan Mode 1-7 Scan settings Copying 6-3 Faxes 4-3 Scanning 8-1 Scanning area 1-2, 2-3 Scanning platform 1-2 Sending faxes 4-1 Setting Menu 12-5 Accessing 12-3 Sleep Mode 1-11 Slide guides 1-1, 2-6 for multi-purpose tray 1-2 Specifications 13-1 Copier 13-2 Facsimile 13-3 General 13-1 Printer 13-3 Telephone 13-5 Speed dialing 4-6 Standby mode Copy 1-7 Fax 1-7 Scan 1-7 [Start] key 1-5 [Stop/Reset] key 1-5 [System Monitor] key 1-4 T Telephone line jack 1-3 TIMER...
imageCLASS MF4150 Advanced Guide
Page 43
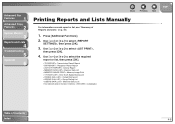
... Copy Features 2 System Monitor 3 Reports and Lists 4 Troubleshooting 5 Appendix 6 Back Previous Next Printing Reports and Lists Manually For information on each report or list, see "Summary of Reports and Lists," on p. 4-2. 1. Use [ ] or [ ] to select , then press [OK]. 3. Use [ ] or [ ] to select , then press [OK]. 4. Use [ ] or [ ] to select the required report or list, then press [OK]. : Transmission Result Report : Reception Result Report : Activity Report : Memory Data List : Memory Image Print : One-Touch Speed Dialing List : Coded Dialing List...
... Copy Features 2 System Monitor 3 Reports and Lists 4 Troubleshooting 5 Appendix 6 Back Previous Next Printing Reports and Lists Manually For information on each report or list, see "Summary of Reports and Lists," on p. 4-2. 1. Use [ ] or [ ] to select , then press [OK]. 3. Use [ ] or [ ] to select , then press [OK]. 4. Use [ ] or [ ] to select the required report or list, then press [OK]. : Transmission Result Report : Reception Result Report : Activity Report : Memory Data List : Memory Image Print : One-Touch Speed Dialing List : Coded Dialing List...
imageCLASS MF4150 Advanced Guide
Page 52
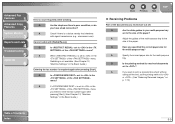
... you want to the size of Contents Index 5-9 Q Is set the printing method to the size of the menu? Q Is the printing method for the multi-purpose tray? A Specify the correct paper size for the multi-purpose tray. Advanced Fax Features 1 Advanced Copy Features 2 System Monitor 3 Reports and Lists 4 Troubleshooting 5 Appendix 6 Errors occur frequently while sending. Q Are the telephone lines in the of the paper? A Check if there is a device...
... you want to the size of Contents Index 5-9 Q Is set the printing method to the size of the menu? Q Is the printing method for the multi-purpose tray? A Specify the correct paper size for the multi-purpose tray. Advanced Fax Features 1 Advanced Copy Features 2 System Monitor 3 Reports and Lists 4 Troubleshooting 5 Appendix 6 Errors occur frequently while sending. Q Are the telephone lines in the of the paper? A Check if there is a device...
imageCLASS MF4150 Advanced Guide
Page 56
... toner cartridge out of paper loaded in the machine? A Replace the toner cartridge. (See Chapter 10, "Maintenance," in the of Contents Index 5-13 Advanced Fax Features 1 Advanced Copy Features 2 System Monitor 3 Reports and Lists 4 Troubleshooting 5 Appendix 6 Faxes do not print. A If you remove the sealing tape from the toner cartridge? A Make sure you want to print out the received documents without replacing the toner cartridge, set to in the Basic Guide.) Q Is the correct type of toner? A Make sure the toner cartridge...
... toner cartridge out of paper loaded in the machine? A Replace the toner cartridge. (See Chapter 10, "Maintenance," in the of Contents Index 5-13 Advanced Fax Features 1 Advanced Copy Features 2 System Monitor 3 Reports and Lists 4 Troubleshooting 5 Appendix 6 Faxes do not print. A If you remove the sealing tape from the toner cartridge? A Make sure you want to print out the received documents without replacing the toner cartridge, set to in the Basic Guide.) Q Is the correct type of toner? A Make sure the toner cartridge...
imageCLASS MF4150 Advanced Guide
Page 59
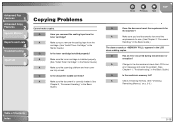
... Guide.) A Make sure the scanning platform and rear cover are fully closed. Q Has an error occurred during transmission or reception? Q Is the document loaded correctly? A Make sure the document is installed properly. (See "Install Toner Cartridge," in the LCD when making copies. A Change to the fax mode and check the LCD for the machine? Advanced Fax Features 1 Advanced Copy Features 2 System Monitor 3 Reports and Lists 4 Troubleshooting 5 Appendix 6 Copying Problems Cannot make copies. Q Have you removed the sealing tape from the cartridge...
... Guide.) A Make sure the scanning platform and rear cover are fully closed. Q Has an error occurred during transmission or reception? Q Is the document loaded correctly? A Make sure the document is installed properly. (See "Install Toner Cartridge," in the LCD when making copies. A Change to the fax mode and check the LCD for the machine? Advanced Fax Features 1 Advanced Copy Features 2 System Monitor 3 Reports and Lists 4 Troubleshooting 5 Appendix 6 Copying Problems Cannot make copies. Q Have you removed the sealing tape from the cartridge...
imageCLASS MF4150 Starter Guide
Page 7
... and Turn On the Machine 1 2 Ex. 100% LTR TEXT/PHOTO 1 Main power switch Connect the power cord into the rear socket and the wall outlet, and press the [I] side of the main power switch to ON. What if... ● is displayed: Make sure that the printer cover and scanning platform are closed properly. (See "Install Toner Cartridge," on p. 5.) ● is displayed: Make sure that the toner cartridge is installed properly. (See "Install Toner Cartridge," on p. 7.) 11 Set...
... and Turn On the Machine 1 2 Ex. 100% LTR TEXT/PHOTO 1 Main power switch Connect the power cord into the rear socket and the wall outlet, and press the [I] side of the main power switch to ON. What if... ● is displayed: Make sure that the printer cover and scanning platform are closed properly. (See "Install Toner Cartridge," on p. 5.) ● is displayed: Make sure that the toner cartridge is installed properly. (See "Install Toner Cartridge," on p. 7.) 11 Set...


