
MF4100 Series Scanner Driver Guide
Page 22
... a Document 2 Troubleshooting 3 Appendix 4 MF Toolbox Settings Example: [Mail] dialog box Back Previous Next TOP ■ Scanner Settings You can specify the scanning mode, resolution, document size, and file size of the document to set the custom paper size. If there is no document in the ADF is placed ([Platen Glass], [ADF], or [Auto... the size of the scanned image. [Select Source] Selects where the document is automatically scanned. NOTE When [Auto Mode] is selected, the document in the ADF, the document on the platen glass will be scanned.
... a Document 2 Troubleshooting 3 Appendix 4 MF Toolbox Settings Example: [Mail] dialog box Back Previous Next TOP ■ Scanner Settings You can specify the scanning mode, resolution, document size, and file size of the document to set the custom paper size. If there is no document in the ADF is placed ([Platen Glass], [ADF], or [Auto... the size of the scanned image. [Select Source] Selects where the document is automatically scanned. NOTE When [Auto Mode] is selected, the document in the ADF, the document on the platen glass will be scanned.

MF4100 Series Scanner Driver Guide
Page 23
... scan modes you can select differ depending on the settings for models without ADF. NOTE This setting is selected in [Select Source]. (Original Orientation) Shows the direction of Contents Index 2-10 Table of scanning paper. Introduction 1 Scanning a Document 2 Troubleshooting 3 Appendix 4 [Orientation] Opens the [Orientation] dialog box. This button is disabled when [Platen...
... scan modes you can select differ depending on the settings for models without ADF. NOTE This setting is selected in [Select Source]. (Original Orientation) Shows the direction of Contents Index 2-10 Table of scanning paper. Introduction 1 Scanning a Document 2 Troubleshooting 3 Appendix 4 [Orientation] Opens the [Orientation] dialog box. This button is disabled when [Platen...

MF4100 Series Scanner Driver Guide
Page 31
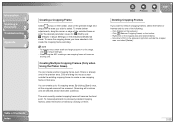
...and Advanced Mode The ScanGear MF has two modes: [Simple Mode] and [Advanced Mode]. NOTE You cannot preview the image when using the ADF. ■ Switching between two modes, click the corresponding tab. ■ Using Simple Mode 1. To use the ScanGear MF, select [Display...] you to preview the image to be scanned and make detailed adjustments for the image. Set documents. Introduction 1 Scanning a Document 2 Troubleshooting 3 Appendix 4 Back Previous Next TOP Setting Preferences and Scanning with ScanGear MF The ScanGear MF enables you can perform detailed settings such as...
...and Advanced Mode The ScanGear MF has two modes: [Simple Mode] and [Advanced Mode]. NOTE You cannot preview the image when using the ADF. ■ Switching between two modes, click the corresponding tab. ■ Using Simple Mode 1. To use the ScanGear MF, select [Display...] you to preview the image to be scanned and make detailed adjustments for the image. Set documents. Introduction 1 Scanning a Document 2 Troubleshooting 3 Appendix 4 Back Previous Next TOP Setting Preferences and Scanning with ScanGear MF The ScanGear MF enables you can perform detailed settings such as...

MF4100 Series Scanner Driver Guide
Page 32
... for scanning high-resolution monochrome images. [Document (Color) ADF]: To scan color documents on the ADF. [Document (Grayscale) ADF]: To scan Grayscale documents on the document type you select [Document (Color) ADF] or [Document (Grayscale) ADF], skip to switch the orientation of a Scan," on p. 2-39. Introduction 1 Scanning a Document 2 Troubleshooting 3 Appendix 4 2. The options you selected in [Output...
... for scanning high-resolution monochrome images. [Document (Color) ADF]: To scan color documents on the ADF. [Document (Grayscale) ADF]: To scan Grayscale documents on the document type you select [Document (Color) ADF] or [Document (Grayscale) ADF], skip to switch the orientation of a Scan," on p. 2-39. Introduction 1 Scanning a Document 2 Troubleshooting 3 Appendix 4 2. The options you selected in [Output...

MF4100 Series Scanner Driver Guide
Page 34
... is not available for [Favorite Settings], [Input Settings], [Output Settings] and [Image Settings], and adjust the color settings. If you select [ADF (1-sided)] in the preview window and clicking [Zoom] reloads the selected image to be enlarged. - Table of a Scan," on p. 2-22..., see "Specifying the Parameters of Contents Index 2-21 Click [Preview]. For details on p. 2-24. Select settings for models without ADF. Selecting the range in [Original Input Method], skip to scan only part of the document, specify the parameters. Click [Scan]. Introduction 1 Scanning ...
... is not available for [Favorite Settings], [Input Settings], [Output Settings] and [Image Settings], and adjust the color settings. If you select [ADF (1-sided)] in the preview window and clicking [Zoom] reloads the selected image to be enlarged. - Table of a Scan," on p. 2-22..., see "Specifying the Parameters of Contents Index 2-21 Click [Preview]. For details on p. 2-24. Select settings for models without ADF. Selecting the range in [Original Input Method], skip to scan only part of the document, specify the parameters. Click [Scan]. Introduction 1 Scanning ...
MF4100 Series Scanner Driver Guide
Page 36
... the frame or frames and do one . To maintain the current width and height proportion of the following: - When using the ADF, creating a new cropping frame will become the focal point. To make further adjustments, drag the corner or edge of the selected frame... and (Height) in [Input Settings] on the [Advanced Mode] tab sheet. Click (Remove Cropping Frame) on them. Introduction 1 Scanning a Document 2 Troubleshooting 3 Appendix 4 Table of Contents Index Creating a Cropping Frame Select (Crop) on the toolbar, click on the keyboard, right-click outside the existing cropping frame...
... the frame or frames and do one . To maintain the current width and height proportion of the following: - When using the ADF, creating a new cropping frame will become the focal point. To make further adjustments, drag the corner or edge of the selected frame... and (Height) in [Input Settings] on the [Advanced Mode] tab sheet. Click (Remove Cropping Frame) on them. Introduction 1 Scanning a Document 2 Troubleshooting 3 Appendix 4 Table of Contents Index Creating a Cropping Frame Select (Crop) on the toolbar, click on the keyboard, right-click outside the existing cropping frame...
MF4100 Series Scanner Driver Guide
Page 38
...) Shows the direction of the document being scanned. If you change this setting after previewing, the preview image will be deleted. - [ADF (1-sided)] is set to the amount of image data they can receive. Back Previous Next TOP [Orientation] (Width) (Height) Opens the... see "Color Settings," on the settings for models without ADF. [Color Mode] Selects the type of document and the way in the ADF, select the paper size from [Platen Glass] or [ADF (1-sided)]. Introduction 1 Scanning a Document 2 Troubleshooting 3 Appendix 4 Input Settings [Original Input Method] Selects where...
...) Shows the direction of the document being scanned. If you change this setting after previewing, the preview image will be deleted. - [ADF (1-sided)] is set to the amount of image data they can receive. Back Previous Next TOP [Orientation] (Width) (Height) Opens the... see "Color Settings," on the settings for models without ADF. [Color Mode] Selects the type of document and the way in the ADF, select the paper size from [Platen Glass] or [ADF (1-sided)]. Introduction 1 Scanning a Document 2 Troubleshooting 3 Appendix 4 Input Settings [Original Input Method] Selects where...

MF4100 Series Scanner Driver Guide
Page 39
...with OCR software. You can select a resolution from the drop-down list, or enter any value between 25-9600 dpi. Introduction 1 Scanning a Document 2 Troubleshooting 3 Appendix 4 Table of the scanned image. This button is invalid when [Flexible] is displayed in a 0-255 scale of black and white. [Color]:... To scan color photos. If you are using the ADF, enter a resolution between 25 and 38400, but the upper limit varies depending on p. 2-39. If [Flexible] is expressed in black and white....
...with OCR software. You can select a resolution from the drop-down list, or enter any value between 25-9600 dpi. Introduction 1 Scanning a Document 2 Troubleshooting 3 Appendix 4 Table of the scanned image. This button is invalid when [Flexible] is displayed in a 0-255 scale of black and white. [Color]:... To scan color photos. If you are using the ADF, enter a resolution between 25 and 38400, but the upper limit varies depending on p. 2-39. If [Flexible] is expressed in black and white....
MF4100 Series Scanner Driver Guide
Page 54
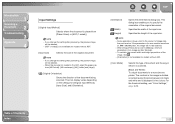
... paper source, click [Preview] → drag to specify the scanned area. Back Previous Next TOP 8. Specify a name, a file format, and the location for models without ADF. 6. Table of pictures. Click [Next >]. You can select from [BMP (Bitmap Image)], [JPG (JPEG Image)], [TIF (TIF Image)], and [PNG (PNG Image)]. If you save.... - When you have selected [Flatbed] as the paper source, select the page size from the drop-down list. 7. Select the paper source. Introduction 1 Scanning a Document 2 Troubleshooting 3 Appendix 4 5.
... paper source, click [Preview] → drag to specify the scanned area. Back Previous Next TOP 8. Specify a name, a file format, and the location for models without ADF. 6. Table of pictures. Click [Next >]. You can select from [BMP (Bitmap Image)], [JPG (JPEG Image)], [TIF (TIF Image)], and [PNG (PNG Image)]. If you save.... - When you have selected [Flatbed] as the paper source, select the page size from the drop-down list. 7. Select the paper source. Introduction 1 Scanning a Document 2 Troubleshooting 3 Appendix 4 5.

MF4100 Series Scanner Driver Guide
Page 56
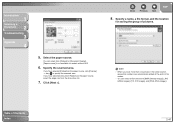
... 2 Troubleshooting 3 Appendix 4 ■ Scanning from [Color picture], [Grayscale picture], [Black and white picture or text], and [Custom Settings]. The [Advanced Properties] dialog box appears. 4. You can select from an Application," on the settings, see "Scanning an Image from [Flatbed] or [Document Feeder]. [Paper source] is not available for models without ADF. 2. If...
... 2 Troubleshooting 3 Appendix 4 ■ Scanning from [Color picture], [Grayscale picture], [Black and white picture or text], and [Custom Settings]. The [Advanced Properties] dialog box appears. 4. You can select from an Application," on the settings, see "Scanning an Image from [Flatbed] or [Document Feeder]. [Paper source] is not available for models without ADF. 2. If...
MF4100 Series Scanner Driver Guide
Page 59
A Remove the document and place it on the platen glass or in the ADF correctly. (See Chapter 2, "Document Handling," in the Advanced Guide. In this case, connect a USB cable directly to the computer, check your USB hub or repeater... Error indicator blinking? Back Previous Next TOP Q Is a USB hub or repeater working properly. A If the Error indicator is displayed in the LCD, see Chapter 5, "Troubleshooting," in the Basic Guide.) Q Is your computer. Q Is the document placed correctly? A When using a USB 2.0-compatible USB hub? Q Are you may not be able ...
A Remove the document and place it on the platen glass or in the ADF correctly. (See Chapter 2, "Document Handling," in the Advanced Guide. In this case, connect a USB cable directly to the computer, check your USB hub or repeater... Error indicator blinking? Back Previous Next TOP Q Is a USB hub or repeater working properly. A If the Error indicator is displayed in the LCD, see Chapter 5, "Troubleshooting," in the Basic Guide.) Q Is your computer. Q Is the document placed correctly? A When using a USB 2.0-compatible USB hub? Q Are you may not be able ...
MF4100 Series Scanner Driver Guide
Page 60
...Cameras] of Contents Index 3-3 If the corresponding scanner driver icon is displayed in the [Scanners and Cameras], the machine is displayed in the ADF. Windows 98/Me: windows\system\CNCMFP23.INI Windows 2000: winnt\system32\CNCMFP23.INI Windows XP: windows\system32\CNCMFP23.INI 2. In the [... then reinstall it . 1. It is replaced with something inappropriate and you will be able to scan. Introduction 1 Scanning a Document 2 Troubleshooting 3 Appendix 4 A If you connect the machine to a USB 2.0-equipped computer, you may not be unable to scan images.
...Cameras] of Contents Index 3-3 If the corresponding scanner driver icon is displayed in the [Scanners and Cameras], the machine is displayed in the ADF. Windows 98/Me: windows\system\CNCMFP23.INI Windows 2000: winnt\system32\CNCMFP23.INI Windows XP: windows\system32\CNCMFP23.INI 2. In the [... then reinstall it . 1. It is replaced with something inappropriate and you will be able to scan. Introduction 1 Scanning a Document 2 Troubleshooting 3 Appendix 4 A If you connect the machine to a USB 2.0-equipped computer, you may not be unable to scan images.
MF4100 Series Scanner Driver Guide
Page 63
... the scanning components of the following: - It will be able to 16-bit color, 24-bit color or higher. Introduction 1 Scanning a Document 2 Troubleshooting 3 Appendix 4 Scanned images look dirty. A In [Display Properties], set at a large size and you will be large if the resolution is low...39.) Cannot scan highlighted marks. Try displaying the image at small sizes. A Clean the platen glass, the platen glass cover and the ADF scanning area. A Some applications do not display an image properly at 100% magnification. Change the resolution and scan again. Q Does the ...
... the scanning components of the following: - It will be able to 16-bit color, 24-bit color or higher. Introduction 1 Scanning a Document 2 Troubleshooting 3 Appendix 4 Scanned images look dirty. A In [Display Properties], set at a large size and you will be large if the resolution is low...39.) Cannot scan highlighted marks. Try displaying the image at small sizes. A Clean the platen glass, the platen glass cover and the ADF scanning area. A Some applications do not display an image properly at 100% magnification. Change the resolution and scan again. Q Does the ...

imageCLASS MF4150 Basic Guide
Page 129
... to cut your skin or clothing, wash with cold water. Warm water will set the toner. Troubleshooting 11-1 11 Troubleshooting Clearing Jams When , or appears on the LCD display, remove a jammed document from the ADF. 1 Open the ADF cover. When removing jammed paper or when inspecting the inside of the machine, do not allow... documents or paper, take care not to avoid further jams. - NOTE Do not force a jammed document or paper out of the document or paper. - Contact Canon Customer Care Center if needed.
... to cut your skin or clothing, wash with cold water. Warm water will set the toner. Troubleshooting 11-1 11 Troubleshooting Clearing Jams When , or appears on the LCD display, remove a jammed document from the ADF. 1 Open the ADF cover. When removing jammed paper or when inspecting the inside of the machine, do not allow... documents or paper, take care not to avoid further jams. - NOTE Do not force a jammed document or paper out of the document or paper. - Contact Canon Customer Care Center if needed.

imageCLASS MF4150 Basic Guide
Page 130
2 Hold both sides of any jammed documents and gently pull them documents and gently pull them out straight upward. CAUTION Be careful not to get your fingers caught. both sides of any jammed 3 Hold both sides of any jammed 4 Close the ADF cover. Troubleshooting 11-2 NOTE Do not pull the document forcefully as it 5 Open the ADF and then hold may tear. out. documents and gently pull them out.
2 Hold both sides of any jammed documents and gently pull them documents and gently pull them out straight upward. CAUTION Be careful not to get your fingers caught. both sides of any jammed 3 Hold both sides of any jammed 4 Close the ADF cover. Troubleshooting 11-2 NOTE Do not pull the document forcefully as it 5 Open the ADF and then hold may tear. out. documents and gently pull them out.

imageCLASS MF4150 Basic Guide
Page 131
6 Close the ADF. Troubleshooting 11-3 CAUTION Be careful not to get your fingers caught. Paper Jams When or appears on the LCD display, remove jammed paper from the inside of the machine first, then from the paper feeding tray or multi-purpose tray if necessary. 1 Remove the dust cover from the paper feeding tray. 2 Remove the paper in the paper feeding tray.
6 Close the ADF. Troubleshooting 11-3 CAUTION Be careful not to get your fingers caught. Paper Jams When or appears on the LCD display, remove jammed paper from the inside of the machine first, then from the paper feeding tray or multi-purpose tray if necessary. 1 Remove the dust cover from the paper feeding tray. 2 Remove the paper in the paper feeding tray.
imageCLASS MF4150 Basic Guide
Page 139
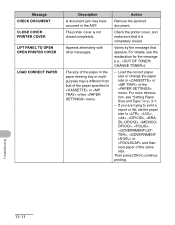
... trying to print a report or list, set the paper size to continue printing. Then press [OK] to , , , , , , , , or and then load paper of the menu. Troubleshooting 11-11 Varies by the message that of the paper specified in or of the same size. For details, see "Setting Paper Size and Type...
... trying to print a report or list, set the paper size to continue printing. Then press [OK] to , , , , , , , , or and then load paper of the menu. Troubleshooting 11-11 Varies by the message that of the paper specified in or of the same size. For details, see "Setting Paper Size and Type...

imageCLASS MF4150 Advanced Guide
Page 16
... (LIST), or look up a particular one -touch speed dialing key or coded dialing code the recipient you are not using the ADF. 2. If no recipient name registered, their name (SEARCH). Back Previous Next TOP 4. When scanning is useful when you forget which... to 08), and coded dialing codes (00 to 99). - Advanced Fax Features 1 Advanced Copy Features 2 System Monitor 3 Reports and Lists 4 Troubleshooting 5 Appendix 6 Dialing Features The machine provides the following dialing features: address book dialing, redialing, temporary tone dialing, checking dialing line, and dialing...
... (LIST), or look up a particular one -touch speed dialing key or coded dialing code the recipient you are not using the ADF. 2. If no recipient name registered, their name (SEARCH). Back Previous Next TOP 4. When scanning is useful when you forget which... to 08), and coded dialing codes (00 to 99). - Advanced Fax Features 1 Advanced Copy Features 2 System Monitor 3 Reports and Lists 4 Troubleshooting 5 Appendix 6 Dialing Features The machine provides the following dialing features: address book dialing, redialing, temporary tone dialing, checking dialing line, and dialing...

imageCLASS MF4150 Advanced Guide
Page 17
...Features 1 Advanced Copy Features 2 System Monitor 3 Reports and Lists 4 Troubleshooting 5 Appendix 6 3. Press [Address Book]. Use [ ] or ...When is set the documents on the platen glass, press [Start] for each document. Ex. SEARCH CANON [A] - Redialing Manually 1. When the search is complete, the number of the menu, Redialing is... complete, press [OK] to start dialing. Press [Start]. For automatic redialing, you are not using the ADF. 2. Press [FAX]. 3. If no recipient is registered for each document. When you set to start dialing. Use...
...Features 1 Advanced Copy Features 2 System Monitor 3 Reports and Lists 4 Troubleshooting 5 Appendix 6 3. Press [Address Book]. Use [ ] or ...When is set the documents on the platen glass, press [Start] for each document. Ex. SEARCH CANON [A] - Redialing Manually 1. When the search is complete, the number of the menu, Redialing is... complete, press [OK] to start dialing. Press [Start]. For automatic redialing, you are not using the ADF. 2. Press [FAX]. 3. If no recipient is registered for each document. When you set to start dialing. Use...

imageCLASS MF4150 Advanced Guide
Page 19
If you are not using the ADF. 2. Use [ ] or [ ] to dial the international access code. Use the numeric keys to select , then press [OK]. 5. For details on international access codes, contact your ... Previous Next TOP 4. Set documents. Place the first page on whether to tone dialing. 5. Advanced Fax Features 1 Advanced Copy Features 2 System Monitor 3 Reports and Lists 4 Troubleshooting 5 Appendix 6 3. Press [Stop/Reset] to return to the standby mode. ■ Dialing an Overseas Number (With Pauses) When you dial or register an overseas number...
If you are not using the ADF. 2. Use [ ] or [ ] to dial the international access code. Use the numeric keys to select , then press [OK]. 5. For details on international access codes, contact your ... Previous Next TOP 4. Set documents. Place the first page on whether to tone dialing. 5. Advanced Fax Features 1 Advanced Copy Features 2 System Monitor 3 Reports and Lists 4 Troubleshooting 5 Appendix 6 3. Press [Stop/Reset] to return to the standby mode. ■ Dialing an Overseas Number (With Pauses) When you dial or register an overseas number...


