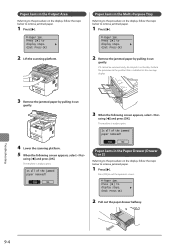
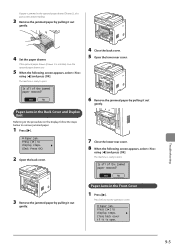
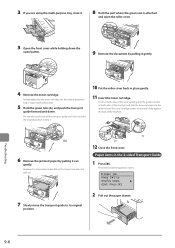
imageCLASS D1370/D1350/D1320 Basic Operation Guide
Page 10
...Specifications Machine Specifications Copy Specifications Printer Specification Scanner Specifications Fax Specifications (D1370/D1350 Only) Telephone Specifications (D1370/D1350 Only) Transmission Specification (D1370 Only) Optional Drawer For Macintosh Users Displaying...8-11 8-12 8-13 8-14 8-15 Troubleshooting Clearing Jams Document Jams in the Feeder Paper Jams in the Output Area Paper Jams in the Multi-Purpose Tray Paper Jams in the Paper Drawer (Drawer 1 or 2) Paper Jams in the Back Cover and Duplex Unit Paper Jams in the Front Cover Paper Jams in the sleep mode? Has the power switch been...
imageCLASS D1370/D1350/D1320 Basic Operation Guide
Page 15
...If toner gets into your eyes or mouth, wash them immediately with cold water and consult a physician. • When loading paper or removing jammed documents or paper, be careful not to allow necklaces, bracelets, or other than indicated areas, as this may cause the toner remaining inside the ... or mouth. The power is loosened. -- Doing so may result in an aisle. -- If flammable substances come into your local authorized Canon dealer or the Canon help line. -- The following manner. Also, do not put in low temperature burns, even though you inhale the toner, consult a ...
imageCLASS D1370/D1350/D1320 Basic Operation Guide
Page 17
When the room where the machine is installed is liable to sink. This can result in paper jams or poor print quality. Air conditioner -- Miscellaneous precautions • The maximum power consumption of the machine is 1,100 W or less. • Electrical noise or a dramatic ...
imageCLASS D1370/D1350/D1320 Basic Operation Guide
Page 18
... machine is also available at 1-800-OK-CANON between the hours of 8:00 A.M. Maintenance and Inspections IMPORTANT • Follow the instructions in the caution label attached to this machine. • Avoid shaking or applying a shock to this machine. • To prevent a paper jam, do not turn the power ON/OFF,... open/close the operation panel or rear cover, and load/ unload paper in the middle of printing operation. • Be sure to remove the toner cartridge from the...
imageCLASS D1370/D1350/D1320 Basic Operation Guide
Page 26
...output tray. (10) Output tray Printed paper such as copies, prints and faxes come out from the output tray. (16) (15) (14) (13) (11) Open Button Push to open the front cover. (12) Front Cover Open this cover to replace the toner cartridge or clear paper jams. (13) Power Switch Turns the ...power ON or OFF. (14) Paper drawer Load paper here. (15) Cassette Feeding Unit-U1 (drawer 2) It is an optional paper drawer. (16) USB memory port Used to save scanned documents in USB memory...
imageCLASS D1370/D1350/D1320 Basic Operation Guide
Page 27
... the telephone cable. (5) Power socket Connect the power cord. (6) Lower rear cover (3) Open this guide to clear paper jams. (4) (7) Sub-output tray Printed paper is output to insert the toner cartridge so that the protrusion on the side of the toner cartridge fits into these ... switch lever Used for use when printing transparencies, labels, or envelopes that curl easily, because the printed paper remains flat when output. (8) Back cover Open this guide to clear paper jams. (2) (4) (5) (4) (1) Scanning area Used to scan documents from the feeder. (2) Platen glass Place your...
imageCLASS D1370/D1350/D1320 Basic Operation Guide
Page 35
... is displayed, or when is displayed when there are no jobs (D1370/D1350 Only)). • the machine is in one minute interval. NOTE To set the auto sleep timer between and minutes, in the middle of adjustment or cleaning • a paper jam occurs • the handset of time. Before Using the Machine Setting...
imageCLASS D1370/D1350/D1320 Basic Operation Guide
Page 38
... sure any of the following. • Wrinkled or creased paper • Carbon paper or carbon-backed paper • Curled or rolled paper • Coated paper • Torn paper • Onion skin or thin paper • Stapled or clipped documents • Paper printed by a thermal transfer printer • Transparencies Scan Area...Area" (→P. 2-8) if you would like to place the documents face down on the platen glass or into the feeder. To prevent paper jams in the feeder Do not use any glue, ink, or correction fluid on the document is completely dry before placing it on the platen...
imageCLASS D1370/D1350/D1320 Basic Operation Guide
Page 41
... occur, or the document may not be loaded. IMPORTANT Up to 50 documents can become folded or torn, which may result in misfeeds or paper jams. 2-5 When scanned repeatedly, the document can be scanned. When scanning is ready to copy or scan the document. The machine is complete Remove the document... from the document delivery tray to avoid paper jams. Avoid scanning the same document more than 30 times. If more than 51 documents are too loose or too tight, this may cause...
imageCLASS D1370/D1350/D1320 Basic Operation Guide
Page 43
... dry place until ready to use may lead to a fire or electrical shock. 2-7 To prevent paper jams, do not print well: • Highly textured paper • Very smooth paper • Glossy paper Make sure that toner may occur. • Steam is free of dust, lint, and oil ... your local authorized Canon dealer or the Canon help line. CAUTION To print on damp paper The following paper types do not use the following paper types. • Wrinkled or creased paper • Curled or rolled paper • Torn paper • Damp paper • Very thin paper • Paper printed by using ...
imageCLASS D1370/D1350/D1320 Basic Operation Guide
Page 46
... are loose or tight, this may result in misfeeds or paper jams. In the Multi-Purpose Tray Before loading paper in the multi-purpose tray, see "Precautions when Loading Paper" (→P. 2-12). Document and Paper Handling IMPORTANT Adjust the paper guides to copy or print on a different paper size or type from the one loaded in the...
imageCLASS D1370/D1350/D1320 Basic Operation Guide
Page 47
...14) (2) Loosen any stiff corners of the envelope and flatten curls as shown in misfeeds or paper jams. 2-11 purpose tray with the print side face up . If the paper guides are too loose or too tight, this may result in the figure. (3) Gently insert the... envelope into the multi- IMPORTANT Adjust the paper guides to the paper width without space. "Paper Loading Capacity" (→P. 2-12) "Paper Loading Orientation" (→P. 2-13) 5 Be sure that the paper stack is loaded under the load limit guides (A). (A) When loading envelopes (1) Fold...
imageCLASS D1370/D1350/D1320 Basic Operation Guide
Page 48
... may result in misfeeds or paper jams. When using paper that has been poorly cut your hands with the front side (non-glued side) facing up. Approx. 320 sheets 320 sheets - - You cannot print on the paper guides inside the paper drawer Paper size Legal Letter Executive Paper guide LGL LTR EXEC Paper Source Paper Type (A) (B) Multi-purpose Drawer...
imageCLASS D1370/D1350/D1320 Basic Operation Guide
Page 60
... Settings 1 2-Sided 2 2-Sided 2 1-Sided Finishing Format Book Type Calendar Type (3) Select the orientation of the output. If the paper size switch lever is not securely attached, documents may not be fed properly or jammed. using [ ] or [ ] and press [OK]. 2-Sided 1 2-Sided 2 2-Sided 2 1-Sided Format Settings (2) Select 2-Sided> using [ ] or [ ] and press [OK...]. Copying Copy Settings 2-Sided Copying Copy mode screen Setting screen* * Y ou can display the setting screen also by placing on 2-Sided copying Accurately attach the paper size switch lever.
imageCLASS D1370/D1350/D1320 Basic Operation Guide
Page 70
... in the multi-purpose tray to the operating system, as well as the type and version of the printer driver. (2) Securely place the blue color paper size switch lever (A). • A4: Pull • Letter, Legal: Push (A) (A) (3) Close the lower rear cover. 4-4 If the machine you do ... Although there may be performed manually using , do , printing may not be executed correctly. • The display may not be fed properly, or jammed. (1) Open the lower rear cover. NOTE If you want to close the sub-output tray before making 2-sided printing until the process is 2-sided printing...
imageCLASS D1370/D1350/D1320 Basic Operation Guide
Page 139
... paper jam and when problems are not solved. Clearing Jams 9-2 Document Jams in the Feeder 9-2 Paper Jams in the Output Area 9-4 Paper Jams in the Multi-Purpose Tray 9-4 Paper Jams in the Paper Drawer (Drawer 1 or 2) 9-4 Paper Jams in the Back Cover and Duplex Unit 9-5 Paper Jams in the Front Cover 9-5 Paper Jams in...the telephone line connected or configured properly? (D1370/D1350 Only) 9-13 If You Cannot Solve a Problem 9-13 When a Power Failure Occurs 9-14 Printing Results Are Not Good 9-15 Paper Curls 9-15 Paper Creases 9-16 Vertical Streaks Appear on the Output ...
imageCLASS D1370/D1350/D1320 Basic Operation Guide
Page 140
... paper out of the machine. Paper jam. Clearing Jams See "Maintenance and Inspections" (→P. Press [ ] to remove jammed documents. 1 Press [ ]. Keys to be erased. If the jammed paper is printing will be used for assistance, if needed. Do not touch the feeder roller (D) This may result in the feeder. (B) 3 Open the feeder cover. (A) 9-2 Contact your local authorized Canon...
imageCLASS D1370/D1350/D1320 Basic Operation Guide
Page 142
... Pull out the paper drawer halfway. Paper jam. Troubleshooting 9-4 Paper Jams in the Output Area Referring to the procedure on the display, follow the steps below to remove jammed paper. 1 Press [ ]. Is all of the jammed paper removed? Is all of the jammed paper removed? Paper jam. Press [ ]... display steps. (End: Press OK) 2 Lift the scanning platform. Press [ ] to remove jammed paper. 1 Press [ ]. Press [ ] to remove jammed paper. 1 Press [ ]. Paper Jams in the Paper Drawer (Drawer 1 or 2) Referring to the procedure on the display, follow the steps below to...
imageCLASS D1370/D1350/D1320 Basic Operation Guide
Page 143
... it out gently. If the optional paper drawer (Drawer 2) is open. 9-5 Paper jam. Yes No Paper Jams in the Front Cover 1 Press [ ]. Paper Jams in the Back Cover and Duplex Unit Referring to the procedure on the display, follow the steps below to remove jammed paper. 1 Press [ ]. The machine is jammed in the optional paper drawer (Drawer 2), also pull out this...
imageCLASS D1370/D1350/D1320 Basic Operation Guide
Page 144
... using the multi-purpose tray, close it. 8 Hold the part where the green seal is held against the back of the machine. (A) 6 Remove the jammed paper by pulling it has reached the original position in Step 7. 10 Put the roller cover back in the 2-sided Transport Guide 1 Press [ ]. Do not ... loose toner does not spill out. 7 Slowly move the transport guide to its original position. (A) (A) 12 Close the front cover. Remove it out gently. Paper Jams in place gently. 11 Insert the toner cartridge. Fit (A) on both sides of the toner cartridge into the guides located on both sides of the...