
iP4500 series Quick Start Guide
Page 2
...) support is available at www.canonesp.com. Extended Service and Support - CarePAK offers toll-free Canon technical support and includes Canon's superb InstantExchange product replacement program. For further information about extending your product's 1 year limited warranty period. CarePAK must be... purchased during your Canon service and support, call (1-800-385-2155), or visit our Web site at (1-...
...) support is available at www.canonesp.com. Extended Service and Support - CarePAK offers toll-free Canon technical support and includes Canon's superb InstantExchange product replacement program. For further information about extending your product's 1 year limited warranty period. CarePAK must be... purchased during your Canon service and support, call (1-800-385-2155), or visit our Web site at (1-...
iP4500 series Quick Start Guide
Page 5
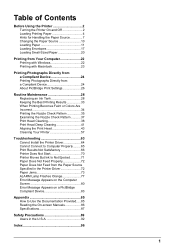
...24 Printing Photographs Directly from a Compliant Device 24 About PictBridge Print Settings 26 Routine Maintenance 28 Replacing an Ink Tank 28 Keeping the Best Printing Results 33 When Printing Becomes Faint or Colors Are Incorrect 34 Printing the Nozzle Check Pattern 35 Examining the Nozzle Check Pattern ...........37 Print Head... But Ink Is Not Ejected 71 Paper Does Not Feed Properly 72 Paper Does Not Feed from the Paper Source Specified in the Printer Driver 72 Paper Jams 73 ALARM Lamp Flashes Orange 77 Error Message Appears on the Computer Screen 80 Error Message Appears on a ...
...24 Printing Photographs Directly from a Compliant Device 24 About PictBridge Print Settings 26 Routine Maintenance 28 Replacing an Ink Tank 28 Keeping the Best Printing Results 33 When Printing Becomes Faint or Colors Are Incorrect 34 Printing the Nozzle Check Pattern 35 Examining the Nozzle Check Pattern ...........37 Print Head... But Ink Is Not Ejected 71 Paper Does Not Feed Properly 72 Paper Does Not Feed from the Paper Source Specified in the Printer Driver 72 Paper Jams 73 ALARM Lamp Flashes Orange 77 Error Message Appears on the Computer Screen 80 Error Message Appears on a ...
iP4500 series Quick Start Guide
Page 32
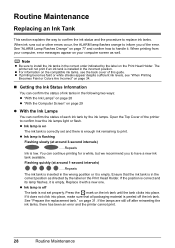
.... If it is low. z If printing becomes faint or white streaks appear despite sufficient ink levels, see "When Printing Becomes Faint or Colors Are Incorrect" on page 34. „ Getting the Ink Status Information You can confirm the status of ink tanks in the correct order ...is empty. z Ink lamp is off after reinserting the ink tanks, there has been an error and the printer cannot print. 28 Routine Maintenance See "Prepare the replacement tank." Routine Maintenance Replacing an Ink Tank This section explains the way to confirm the ink status and the procedure to print. on ...
.... If it is low. z If printing becomes faint or white streaks appear despite sufficient ink levels, see "When Printing Becomes Faint or Colors Are Incorrect" on page 34. „ Getting the Ink Status Information You can confirm the status of ink tanks in the correct order ...is empty. z Ink lamp is off after reinserting the ink tanks, there has been an error and the printer cannot print. 28 Routine Maintenance See "Prepare the replacement tank." Routine Maintenance Replacing an Ink Tank This section explains the way to confirm the ink status and the procedure to print. on ...
iP4500 series Quick Start Guide
Page 34
...printer with new ones. z Replace empty tanks with ink tanks removed. To maintain optimal printing quality, use an ink tank within six months of first use of consumables. Important z Handle ink tanks carefully to the center. Important Handling Ink z To maintain optimal printing quality, we recommend the use . Color...right. z Once you when to the local laws and regulations regarding disposal of specified Canon brand ink tanks. z Once an ink tank has been installed, do not remove it from the printer and leave it is flashing fast. (1) Push the tab and remove the ink tank....
...printer with new ones. z Replace empty tanks with ink tanks removed. To maintain optimal printing quality, use an ink tank within six months of first use of consumables. Important z Handle ink tanks carefully to the center. Important Handling Ink z To maintain optimal printing quality, we recommend the use . Color...right. z Once you when to the local laws and regulations regarding disposal of specified Canon brand ink tanks. z Once an ink tank has been installed, do not remove it from the printer and leave it is flashing fast. (1) Push the tab and remove the ink tank....
iP4500 series Quick Start Guide
Page 35
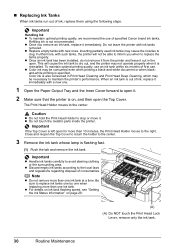
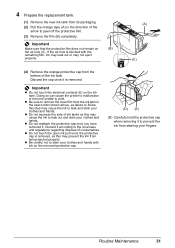
Important z Do not touch the electrical contacts (E) on (B) the air hole (C). Doing so can cause the printer to malfunction or become unable to the local laws and regulations regarding disposal of consumables. z Do not reattach the protective cap once you have removed ... stain your clothes and hands. z Do not squeeze the side of ink tanks as this may prevent the ink from staining your fingers. 4 Prepare the replacement tank. (1) Remove the new ink tank from the ink tank in the direction of the arrow to peel off the protective film. (3) Remove the film...
Important z Do not touch the electrical contacts (E) on (B) the air hole (C). Doing so can cause the printer to malfunction or become unable to the local laws and regulations regarding disposal of consumables. z Do not reattach the protective cap once you have removed ... stain your clothes and hands. z Do not squeeze the side of ink tanks as this may prevent the ink from staining your fingers. 4 Prepare the replacement tank. (1) Remove the new ink tank from the ink tank in the direction of the arrow to peel off the protective film. (3) Remove the film...
iP4500 series Quick Start Guide
Page 36
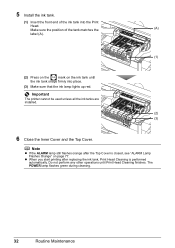
Make sure the position of the ink tank into place. (3) Make sure that the ink lamp lights up red. Important The printer cannot be used unless all the ink tanks are installed. (2) (3) 6 Close the Inner Cover and the Top Cover. The POWER lamp flashes green during cleaning. ...32 Routine Maintenance Note z If the ALARM lamp still flashes orange after replacing the ink tank, Print Head Cleaning is closed, see "ALARM Lamp Flashes Orange" on the ink tank until Print Head Cleaning finishes. z When you start...
Make sure the position of the ink tank into place. (3) Make sure that the ink lamp lights up red. Important The printer cannot be used unless all the ink tanks are installed. (2) (3) 6 Close the Inner Cover and the Top Cover. The POWER lamp flashes green during cleaning. ...32 Routine Maintenance Note z If the ALARM lamp still flashes orange after replacing the ink tank, Print Head Cleaning is closed, see "ALARM Lamp Flashes Orange" on the ink tank until Print Head Cleaning finishes. z When you start...
iP4500 series Quick Start Guide
Page 38
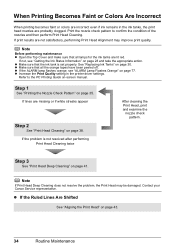
...not, see "ALARM Lamp Flashes Orange" on page 30. Contact your Canon Service representative. Refer to confirm the condition of the nozzles and then ... head nozzles are probably clogged. When Printing Becomes Faint or Colors Are Incorrect When printing becomes faint or colors are incorrect even if ink remains in the printer driver settings. z If the ALARM lamp flashes orange, see...Print Head Cleaning twice After cleaning the Print Head, print and examine the nozzle check pattern. See "Replacing Ink Tanks" on page 77. If the problem is set properly. z Make sure that all the...
...not, see "ALARM Lamp Flashes Orange" on page 30. Contact your Canon Service representative. Refer to confirm the condition of the nozzles and then ... head nozzles are probably clogged. When Printing Becomes Faint or Colors Are Incorrect When printing becomes faint or colors are incorrect even if ink remains in the printer driver settings. z If the ALARM lamp flashes orange, see...Print Head Cleaning twice After cleaning the Print Head, print and examine the nozzle check pattern. See "Replacing Ink Tanks" on page 77. If the problem is set properly. z Make sure that all the...
iP4500 series Quick Start Guide
Page 41
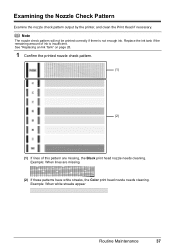
Replace the ink tank if the remaining amount of this pattern are missing (2) If these patterns have white streaks, the Color print head nozzle needs cleaning. Example: When lines are missing, the Black print head nozzle needs cleaning. Example: When white streaks... appear Routine Maintenance 37 Examining the Nozzle Check Pattern Examine the nozzle check pattern output by the printer, and clean the Print Head if necessary. See "Replacing ...
Replace the ink tank if the remaining amount of this pattern are missing (2) If these patterns have white streaks, the Color print head nozzle needs cleaning. Example: When lines are missing, the Black print head nozzle needs cleaning. Example: When white streaks... appear Routine Maintenance 37 Examining the Nozzle Check Pattern Examine the nozzle check pattern output by the printer, and clean the Print Head if necessary. See "Replacing ...

iP4500 series Quick Start Guide
Page 43
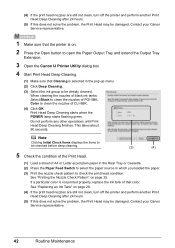
...Check Pattern. This takes about 60 seconds. Do not perform any other operations until Print (4) Head Cleaning finishes. Replace the ink tank if the remaining amount of ink is printed. The nozzle check pattern is insufficient. Do not ...plain paper in the following procedure will not be checked before cleaning. (5) Load a sheet of PGI-5BK, Color to be cleaned. Note If the problem is not resolved after printing the nozzle check pattern, the Print Head...to open the Paper Output Tray and extend the Output Tray Extension. 3 Open the Canon IJ Printer Utility dialog box.
...Check Pattern. This takes about 60 seconds. Do not perform any other operations until Print (4) Head Cleaning finishes. Replace the ink tank if the remaining amount of ink is printed. The nozzle check pattern is insufficient. Do not ...plain paper in the following procedure will not be checked before cleaning. (5) Load a sheet of PGI-5BK, Color to be cleaned. Note If the problem is not resolved after printing the nozzle check pattern, the Print Head...to open the Paper Output Tray and extend the Output Tray Extension. 3 Open the Canon IJ Printer Utility dialog box.
iP4500 series Quick Start Guide
Page 44
...select the paper source in the pop-up menu. (2) Click Cleaning. (3) Select the ink group to clean the nozzles of PGI-5BK, Color to be cleaned. The nozzle check pattern is selected in which you loaded the paper. (7) Confirm the displayed message and click Print Check .... Print Head Cleaning starts when the POWER (3) lamp starts flashing green. Do not perform any other operations until Print Head Cleaning finishes. See "Replacing an Ink Tank" on page 41. 40 Routine Maintenance See "Examining the Nozzle Check Pattern" on page 37. 4 Start Print Head Cleaning. ...
...select the paper source in the pop-up menu. (2) Click Cleaning. (3) Select the ink group to clean the nozzles of PGI-5BK, Color to be cleaned. The nozzle check pattern is selected in which you loaded the paper. (7) Confirm the displayed message and click Print Check .... Print Head Cleaning starts when the POWER (3) lamp starts flashing green. Do not perform any other operations until Print Head Cleaning finishes. See "Replacing an Ink Tank" on page 41. 40 Routine Maintenance See "Examining the Nozzle Check Pattern" on page 37. 4 Start Print Head Cleaning. ...
iP4500 series Quick Start Guide
Page 45
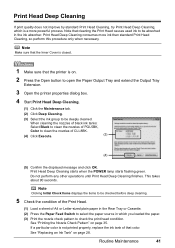
...Cleaning, try Print Head Deep Cleaning, which you loaded the paper. (3) Print the nozzle check pattern to be deeply cleaned. Note that the printer is on. 2 Press the Open button to open the Paper Output Tray and extend the Output Tray Extension. 3 Open the...(1) Load a sheet of CLI-8BK. (4) Click Execute. (3) (4) (5) Confirm the displayed message and click OK. This takes about 90 seconds. See "Replacing an Ink Tank" on page 35. If a particular color is a more ink than standard Print Head Cleaning, so perform this procedure only when necessary. Note Make sure that the Inner...
...Cleaning, try Print Head Deep Cleaning, which you loaded the paper. (3) Print the nozzle check pattern to be deeply cleaned. Note that the printer is on. 2 Press the Open button to open the Paper Output Tray and extend the Output Tray Extension. 3 Open the...(1) Load a sheet of CLI-8BK. (4) Click Execute. (3) (4) (5) Confirm the displayed message and click OK. This takes about 90 seconds. See "Replacing an Ink Tank" on page 35. If a particular color is a more ink than standard Print Head Cleaning, so perform this procedure only when necessary. Note Make sure that the Inner...
iP4500 series Quick Start Guide
Page 46
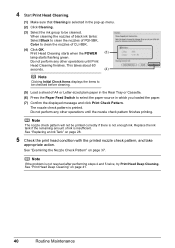
... to open the Paper Output Tray and extend the Output Tray Extension. 3 Open the Canon IJ Printer Utility dialog box. 4 Start Print Head Deep Cleaning. (1) Make sure that Cleaning is not printed properly, replace the ink tank of that color. Note Clicking Initial Check Items displays the items to be checked before deep cleaning...
... to open the Paper Output Tray and extend the Output Tray Extension. 3 Open the Canon IJ Printer Utility dialog box. 4 Start Print Head Deep Cleaning. (1) Make sure that Cleaning is not printed properly, replace the ink tank of that color. Note Clicking Initial Check Items displays the items to be checked before deep cleaning...
iP4500 series Quick Start Guide
Page 74
... in queue. / Computer problems. Restarting your printer in the Dock to delete them. (1)Open the printer properties dialog box. Open the Top Cover of the account. (5)When the confirmation message is displayed, click Yes. See "Replacing an Ink Tank" on the Printer menu. Ink tank is empty. The ink ...lamp lights up the Print Center and double-click the name of the printer. In Mac OS X v.10.2.8, click the printer icon in the Printer List. (2)Select the print job to ...
... in queue. / Computer problems. Restarting your printer in the Dock to delete them. (1)Open the printer properties dialog box. Open the Top Cover of the account. (5)When the confirmation message is displayed, click Yes. See "Replacing an Ink Tank" on the Printer menu. Ink tank is empty. The ink ...lamp lights up the Print Center and double-click the name of the printer. In Mac OS X v.10.2.8, click the printer icon in the Printer List. (2)Select the print job to ...
iP4500 series Quick Start Guide
Page 81
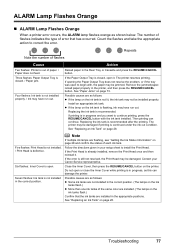
... the RESUME/CANCEL button. See "Paper Jams" on the printer. Replacing the ink tank is not installed properly. / Ink may be damaged. The printer may have run out. Five flashes: Print Head is not... lamps are as this can continue. Follow the directions given in your Canon Service representative. Action Reload paper in the printer, and then press the RESUME/CANCEL button. If the error is open...position. (The lamps on the ink tanks flash.) z More than one ink tanks of the same color are installed. (The lamps on the ink tanks flash.) Confirm that has occurred. The number of ...
... the RESUME/CANCEL button. See "Paper Jams" on the printer. Replacing the ink tank is not installed properly. / Ink may be damaged. The printer may have run out. Five flashes: Print Head is not... lamps are as this can continue. Follow the directions given in your Canon Service representative. Action Reload paper in the printer, and then press the RESUME/CANCEL button. If the error is open...position. (The lamps on the ink tanks flash.) z More than one ink tanks of the same color are installed. (The lamps on the ink tanks flash.) Confirm that has occurred. The number of ...

iP4500 series Quick Start Guide
Page 82
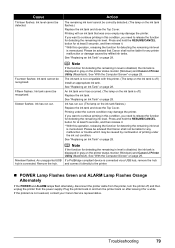
...Print Head Alignment, see "Manual Print Head Alignment" on page 35. Press the RESUME/CANCEL button to the printer for example. Cause Action Eight flashes: Ink absorber is replaced. For Automatic Print Head Alignment, always load paper in ink absorber to dismiss the error, and then perform ... the Print Head again, press the RESUME/CANCEL button to hold the ink used during Print Head Cleaning, for direct printing. Important Canon recommends that the ink absorber is not supported by this error occurs. Eight flashes indicates that you are clogged. See "Printing the ...
...Print Head Alignment, see "Manual Print Head Alignment" on page 35. Press the RESUME/CANCEL button to the printer for example. Cause Action Eight flashes: Ink absorber is replaced. For Automatic Print Head Alignment, always load paper in ink absorber to dismiss the error, and then perform ... the Print Head again, press the RESUME/CANCEL button to hold the ink used during Print Head Cleaning, for direct printing. Important Canon recommends that the ink absorber is not supported by this error occurs. Eight flashes indicates that you are clogged. See "Printing the ...
iP4500 series Quick Start Guide
Page 83
... USB hub is not resolved, contact your Canon Service representative. Press and hold the RESUME/CANCEL button for at least 5 seconds, and then release it directly to continue printing in and turn the printer off .) Replace the ink tank. See "Replacing an Ink Tank" on page 29. Note...any malfunction or trouble which may damage the printer. See "With the Computer Screen" on page 28. Please be advised that Canon shall not be correctly detected. (The lamp on the printer status monitor (Windows) and Canon IJ Printer Utility (Macintosh). See "Replacing an Ink Tank" on page 29. Ink...
... USB hub is not resolved, contact your Canon Service representative. Press and hold the RESUME/CANCEL button for at least 5 seconds, and then release it directly to continue printing in and turn the printer off .) Replace the ink tank. See "Replacing an Ink Tank" on page 29. Note...any malfunction or trouble which may damage the printer. See "With the Computer Screen" on page 28. Please be advised that Canon shall not be correctly detected. (The lamp on the printer status monitor (Windows) and Canon IJ Printer Utility (Macintosh). See "Replacing an Ink Tank" on page 29. Ink...
iP4500 series Quick Start Guide
Page 84
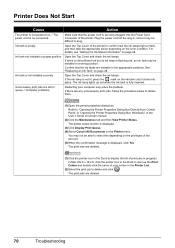
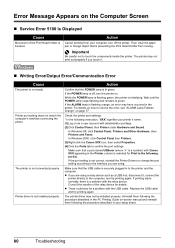
... your setup sheet. 80 Troubleshooting Printer driver is not connected properly. Check the printer port settings. * In the following instruction, "XXX" signifies your printer's name. (1)Log on . If the port setting is securely plugged in the printer. Replace the USB cable and try printing... Error/Output Error/Communication Error Cause The printer is off, turn the printer on as a user account with Canon XXX appearing in your computer, turn off the printer. In Windows XP, click Control Panel, Printers and Other Hardware, then Printers and Faxes. z There could also be...
... your setup sheet. 80 Troubleshooting Printer driver is not connected properly. Check the printer port settings. * In the following instruction, "XXX" signifies your printer's name. (1)Log on . If the port setting is securely plugged in the printer. Replace the USB cable and try printing... Error/Output Error/Communication Error Cause The printer is off, turn the printer on as a user account with Canon XXX appearing in your computer, turn off the printer. In Windows XP, click Control Panel, Printers and Other Hardware, then Printers and Faxes. z There could also be...
iP4500 series Quick Start Guide
Page 85
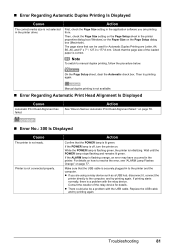
...printer driver. Then try printing again. on the Page Setup dialog box (Macintosh). Make sure that the page size of the relay device for Automatic Duplex Printing are Letter, A4, B5, A5, and 5" x 7" / 127.0 x 177.8 mm. Consult the reseller of the loaded paper is a problem with the USB cable. Replace... problem with the relay device. z If you are using a relay device such as a USB hub, disconnect it, connect the printer directly to the printer and the computer. z There could also be used for details. For details on how to manual duplex printing, follow the procedure below...
...printer driver. Then try printing again. on the Page Setup dialog box (Macintosh). Make sure that the page size of the relay device for Automatic Duplex Printing are Letter, A4, B5, A5, and 5" x 7" / 127.0 x 177.8 mm. Consult the reseller of the loaded paper is a problem with the USB cable. Replace... problem with the relay device. z If you are using a relay device such as a USB hub, disconnect it, connect the printer directly to the printer and the computer. z There could also be used for details. For details on how to manual duplex printing, follow the procedure below...

iP4500 series Quick Start Guide
Page 88
... requiring servicing may have occurred. If the same error occurs, contact your Canon Service representative. 84 Troubleshooting Error Message On PictBridge Compliant Device "No ink" / "Ink cassette error" "Ink Error" "Hardware Error" "Printer error" Action The ink tank is installed. Ink tank errors have occurred... alternately.) Disconnect the USB cable between the printer and the PictBridge compliant device, turn on page 77. Check the number of the printer from the power supply. Replace the ink tank. on page 79 in , turn off the printer, and unplug the power cord of how ...
... requiring servicing may have occurred. If the same error occurs, contact your Canon Service representative. 84 Troubleshooting Error Message On PictBridge Compliant Device "No ink" / "Ink cassette error" "Ink Error" "Hardware Error" "Printer error" Action The ink tank is installed. Ink tank errors have occurred... alternately.) Disconnect the USB cable between the printer and the PictBridge compliant device, turn on page 77. Check the number of the printer from the power supply. Replace the ink tank. on page 79 in , turn off the printer, and unplug the power cord of how ...

iP4500 series Quick Start Guide
Page 96
... and workmanship under normal use and service (a) for refurbished Products. If this requirement. One Canon Plaza Lake Success, NY 11042 1-516-328-5600 „ Canon U.S.A., INC. Warranty repair or replacement shall not extend the original warranty period of warranty service. A copy of your dated bill... the equipment into an outlet on , the user is connected. Canon U.S.A., Inc. Note: This equipment has been tested and found to comply with Part 15 of the FCC Rules. The Product is no warranty or replacement. 92 z Consult the dealer or an experienced radio/TV technician ...
... and workmanship under normal use and service (a) for refurbished Products. If this requirement. One Canon Plaza Lake Success, NY 11042 1-516-328-5600 „ Canon U.S.A., INC. Warranty repair or replacement shall not extend the original warranty period of warranty service. A copy of your dated bill... the equipment into an outlet on , the user is connected. Canon U.S.A., Inc. Note: This equipment has been tested and found to comply with Part 15 of the FCC Rules. The Product is no warranty or replacement. 92 z Consult the dealer or an experienced radio/TV technician ...


