iP4500 series Quick Start Guide
Page 5
... Source 7 Changing the Paper Source 10 Loading Paper 11 Loading Envelopes 17 Loading Small-Sized Paper 20 Printing from Your Computer 22 Printing with Windows 22 Printing with Macintosh 23 Printing Photographs Directly from a Compliant Device 24 Printing Photographs Directly from a Compliant Device 24 About PictBridge Print Settings 26 Routine Maintenance 28 Replacing an Ink Tank 28 Keeping the Best Printing Results 33 When Printing Becomes Faint or Colors Are Incorrect 34 Printing the Nozzle Check Pattern 35 Examining the Nozzle Check Pattern ...........37 Print Head Cleaning...
... Source 7 Changing the Paper Source 10 Loading Paper 11 Loading Envelopes 17 Loading Small-Sized Paper 20 Printing from Your Computer 22 Printing with Windows 22 Printing with Macintosh 23 Printing Photographs Directly from a Compliant Device 24 Printing Photographs Directly from a Compliant Device 24 About PictBridge Print Settings 26 Routine Maintenance 28 Replacing an Ink Tank 28 Keeping the Best Printing Results 33 When Printing Becomes Faint or Colors Are Incorrect 34 Printing the Nozzle Check Pattern 35 Examining the Nozzle Check Pattern ...........37 Print Head Cleaning...
iP4500 series Quick Start Guide
Page 16
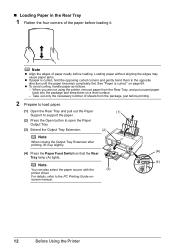
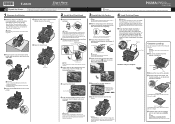
... . Loading paper without aligning the edges may cause paper jams. z If paper is curled." When you are not using the printer, remove paper from the package, just before printing. 2 Prepare to load paper. (1) Open the Rear Tray and pull out the Paper (1) Support to support the paper. (2) Press the Open button to the PC Printing Guide on- See "Paper is curled, hold the opposing curled corners and gently bend them on page 69. Note z Align the...
... . Loading paper without aligning the edges may cause paper jams. z If paper is curled." When you are not using the printer, remove paper from the package, just before printing. 2 Prepare to load paper. (1) Open the Rear Tray and pull out the Paper (1) Support to support the paper. (2) Press the Open button to the PC Printing Guide on- See "Paper is curled, hold the opposing curled corners and gently bend them on page 69. Note z Align the...
iP4500 series Quick Start Guide
Page 22
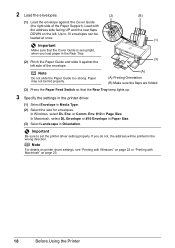
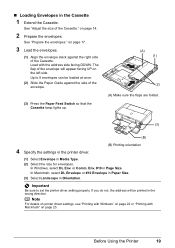
... page 23. 18 Before Using the Printer Important Be sure to 10 envelopes can be fed properly. (A) Printing Orientation (B) Make sure the flaps are folded. (3) Press the Paper Feed Switch so that the Cover Guide is set the printer driver setting properly. Load with Macintosh" on the left side of the Paper Support). Important Make sure that the Rear Tray lamp lights up. 3 Specify the settings in the printer driver. (1) Select Envelope in the wrong direction. In Windows...
... page 23. 18 Before Using the Printer Important Be sure to 10 envelopes can be fed properly. (A) Printing Orientation (B) Make sure the flaps are folded. (3) Press the Paper Feed Switch so that the Cover Guide is set the printer driver setting properly. Load with Macintosh" on the left side of the Paper Support). Important Make sure that the Rear Tray lamp lights up. 3 Specify the settings in the printer driver. (1) Select Envelope in the wrong direction. In Windows...
iP4500 series Quick Start Guide
Page 23
... page 14. 2 Prepare the envelopes. See "Prepare the envelopes." or Comm. The flap of the Cassette." See "Adjust the size of the envelope will be loaded at once. (2) Slide the Paper Guide against the right side of the envelope. (3) Press the Paper Feed Switch so that the Cassette lamp lights up. (A) (1) (2) (A) Make sure the flaps are folded. (3) (B) 4 Specify the settings in the printer driver. (B) Printing orientation (1) Select Envelope in Media Type. (2) Select the size...
... page 14. 2 Prepare the envelopes. See "Prepare the envelopes." or Comm. The flap of the Cassette." See "Adjust the size of the envelope will be loaded at once. (2) Slide the Paper Guide against the right side of the envelope. (3) Press the Paper Feed Switch so that the Cassette lamp lights up. (A) (1) (2) (A) Make sure the flaps are folded. (3) (B) 4 Specify the settings in the printer driver. (B) Printing orientation (1) Select Envelope in Media Type. (2) Select the size...
iP4500 series Quick Start Guide
Page 24
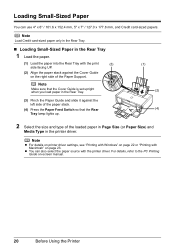
... the size and type of the loaded paper in Page Size (or Paper Size) and Media Type in the Rear Tray 1 Load the paper. (1) Load the paper into the Rear Tray with the print (3) side facing UP. (2) Align the paper stack against the Cover Guide on the right side of the Paper Support. . Loading Small-Sized Paper You can also select the paper source with Macintosh" on page 23. Note z For details on printer driver settings, see "Printing with Windows" on -screen manual. 20 Before Using the Printer Note Load Credit card-sized paper...
... the size and type of the loaded paper in Page Size (or Paper Size) and Media Type in the Rear Tray 1 Load the paper. (1) Load the paper into the Rear Tray with the print (3) side facing UP. (2) Align the paper stack against the Cover Guide on the right side of the Paper Support. . Loading Small-Sized Paper You can also select the paper source with Macintosh" on page 23. Note z For details on printer driver settings, see "Printing with Windows" on -screen manual. 20 Before Using the Printer Note Load Credit card-sized paper...

iP4500 series Quick Start Guide
Page 25
... PC Printing Guide on page 14. (2) Align the paper stack against the right side of the Cassette with the print side facing DOWN. (3) Slide the Paper Guide against the sides of the paper stack. (4) Press the Paper Feed Switch so that the Cassette lamp lights up. (2) (3) (4) 2 Select the size and type of the Cassette." Before Using the Printer 21 See "Adjust the size of the loaded paper in Page Size (or Paper Size) and Media Type in the Cassette 1 Load the paper...
... PC Printing Guide on page 14. (2) Align the paper stack against the right side of the Cassette with the print side facing DOWN. (3) Slide the Paper Guide against the sides of the paper stack. (4) Press the Paper Feed Switch so that the Cassette lamp lights up. (2) (3) (4) 2 Select the size and type of the Cassette." Before Using the Printer 21 See "Adjust the size of the loaded paper in Page Size (or Paper Size) and Media Type in the Cassette 1 Load the paper...
iP4500 series Quick Start Guide
Page 34
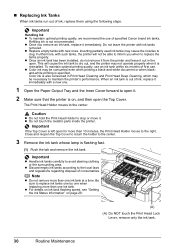
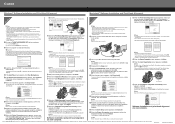
...-white document or when blackand-white printing is also consumed in the open for more than one ink tank. Be sure to replace ink tanks one by one when replacing more than one . 1 Open the Paper Output Tray and the Inner Cover forward to replace the tanks properly. Color ink is specified. Important If the Top Cover is not recommended. Important Handling Ink z To maintain optimal printing quality, we recommend the use . z Replace empty tanks with ink tanks removed...
...-white document or when blackand-white printing is also consumed in the open for more than one ink tank. Be sure to replace ink tanks one by one when replacing more than one . 1 Open the Paper Output Tray and the Inner Cover forward to replace the tanks properly. Color ink is specified. Important If the Top Cover is not recommended. Important Handling Ink z To maintain optimal printing quality, we recommend the use . z Replace empty tanks with ink tanks removed...
iP4500 series Quick Start Guide
Page 38
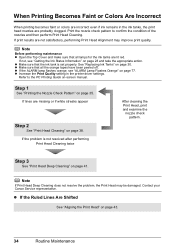
... flashes orange, see "Getting the Ink Status Information" on page 77. Refer to confirm the condition of the nozzles and then perform Print Head Cleaning. If the problem is set properly. Contact your Canon Service representative. z If the Ruled Lines Are Shifted See "Aligning the Print Head" on -screen manual. Step 3 See "Print Head Deep Cleaning" on page 35. z Make sure that all the orange tapes have been peeled off. Step 1 See "Printing the Nozzle Check Pattern...
... flashes orange, see "Getting the Ink Status Information" on page 77. Refer to confirm the condition of the nozzles and then perform Print Head Cleaning. If the problem is set properly. Contact your Canon Service representative. z If the Ruled Lines Are Shifted See "Aligning the Print Head" on -screen manual. Step 3 See "Print Head Deep Cleaning" on page 35. z Make sure that all the orange tapes have been peeled off. Step 1 See "Printing the Nozzle Check Pattern...

iP4500 series Quick Start Guide
Page 42
.... 1 Make sure that cleaning the Print Head causes used ink to open the Paper Output Tray and extend the Output Tray Extension. 3 Open the printer properties dialog box. 38 Routine Maintenance Make sure that the Inner Cover is on. 2 Press the Open button to be cleaned from the printer itself, using the RESUME/CANCEL button. 1. Note z Make sure that the printer is necessary, click Cleaning on the Pattern Check dialog box that is displayed after printing the nozzle check pattern, the Print Head Cleaning dialog...
.... 1 Make sure that cleaning the Print Head causes used ink to open the Paper Output Tray and extend the Output Tray Extension. 3 Open the printer properties dialog box. 38 Routine Maintenance Make sure that the Inner Cover is on. 2 Press the Open button to be cleaned from the printer itself, using the RESUME/CANCEL button. 1. Note z Make sure that the printer is necessary, click Cleaning on the Pattern Check dialog box that is displayed after printing the nozzle check pattern, the Print Head Cleaning dialog...
iP4500 series Quick Start Guide
Page 67
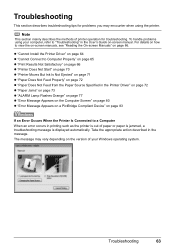
... Install the Printer Driver" on page 64 z "Cannot Connect to Computer Properly" on page 65 z "Print Results Not Satisfactory" on page 66 z "Printer Does Not Start" on page 70 z "Printer Moves But Ink Is Not Ejected" on page 71 z "Paper Does Not Feed Properly" on page 72 z "Paper Does Not Feed from the Paper Source Specified in the Printer Driver" on page 72 z "Paper Jams" on page 73 z "ALARM Lamp Flashes Orange" on page 77 z "Error Message Appears on the Computer Screen...
... Install the Printer Driver" on page 64 z "Cannot Connect to Computer Properly" on page 65 z "Print Results Not Satisfactory" on page 66 z "Printer Does Not Start" on page 70 z "Printer Moves But Ink Is Not Ejected" on page 71 z "Paper Does Not Feed Properly" on page 72 z "Paper Does Not Feed from the Paper Source Specified in the Printer Driver" on page 72 z "Paper Jams" on page 73 z "ALARM Lamp Flashes Orange" on page 77 z "Error Message Appears on the Computer Screen...
iP4500 series Quick Start Guide
Page 68
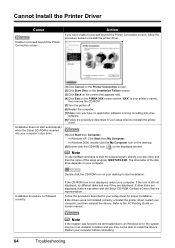
... Windows error, the system may not be in your computer. Note To use the Run command to install the drivers. If the icon is not displayed, restart your setup sheet for proper installation. Refer to proceed beyond the Printer Connection screen, follow the procedure below to reinstall the printer driver. Installation procedure not followed correctly. If other disks are displayed. Cannot Install the Printer Driver Cause Unable to the PC Printing Guide...
... Windows error, the system may not be in your computer. Note To use the Run command to install the drivers. If the icon is not displayed, restart your setup sheet for proper installation. Refer to proceed beyond the Printer Connection screen, follow the procedure below to reinstall the printer driver. Installation procedure not followed correctly. If other disks are displayed. Cannot Install the Printer Driver Cause Unable to the PC Printing Guide...

iP4500 series Quick Start Guide
Page 72
... Cleaning to "Opening the Printer Properties Dialog Box (Windows)" in the pop-up menu, select the Prevent paper abrasion check box, and then click Send. Printing on page 6. To open the Canon IJ Printer Utility (Macintosh), refer to "Opening the Canon IJ Printer Utility (Macintosh)" in the paper source, the inside will become smudged. In the Canon IJ Printer Utility, select Custom Settings in the User's Guide on page 57. „ Printed Surface Is Scratched/Paper Is Smudged Cause Paper Feed...
... Cleaning to "Opening the Printer Properties Dialog Box (Windows)" in the pop-up menu, select the Prevent paper abrasion check box, and then click Send. Printing on page 6. To open the Canon IJ Printer Utility (Macintosh), refer to "Opening the Canon IJ Printer Utility (Macintosh)" in the paper source, the inside will become smudged. In the Canon IJ Printer Utility, select Custom Settings in the User's Guide on page 57. „ Printed Surface Is Scratched/Paper Is Smudged Cause Paper Feed...
iP4500 series Quick Start Guide
Page 74
.... Ink tank not installed in queue. / Computer problems. Restarting your printer in , since it clicks into the Power Cord Connector of the printer to plug. See "Replacing an Ink Tank" on page 28. Open the Top Cover and check the ink lamps. If the ink lamp is displayed, click Yes. The ink lamp lights up the Print Center and double-click the name of print jobs in a wrong position. The printer status monitor is no connected. In Mac OS...
.... Ink tank not installed in queue. / Computer problems. Restarting your printer in , since it clicks into the Power Cord Connector of the printer to plug. See "Replacing an Ink Tank" on page 28. Open the Top Cover and check the ink lamps. If the ink lamp is displayed, click Yes. The ink lamp lights up the Print Center and double-click the name of print jobs in a wrong position. The printer status monitor is no connected. In Mac OS...

iP4500 series Quick Start Guide
Page 76
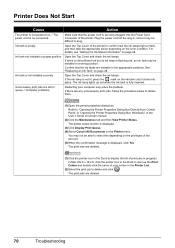
... at a time to the printer driver setting, or click the Print Options on the Page Setup sheet in the printer. Check to the PC Printing Guide on-screen manual. 72 Troubleshooting z When loading paper in the Cassette, make sure that the paper stack does not exceed the load limit. Paper Does Not Feed Properly Cause Action Printing on inappropriate type of the application software on the Print Options screen. Change the application software setting corresponding to around half. Paper Feed Roller is...
... at a time to the printer driver setting, or click the Print Options on the Page Setup sheet in the printer. Check to the PC Printing Guide on-screen manual. 72 Troubleshooting z When loading paper in the Cassette, make sure that the paper stack does not exceed the load limit. Paper Does Not Feed Properly Cause Action Printing on inappropriate type of the application software on the Print Options screen. Change the application software setting corresponding to around half. Paper Feed Roller is...

iP4500 series Quick Start Guide
Page 82
... error, and then adjust your operating environment and/or the position of your device's instruction manual before connecting it . z Paper of media suitable for service as soon as follows: z Print Head nozzles are A4, Letter, A5, and 5" x 7". Press the RESUME/CANCEL button to check the status of A4/Letter-sized Canon Matte Photo Paper MP-101 with automatic duplex printing. See "Printing the Nozzle Check Pattern" on page 47. 78 Troubleshooting Automatic Print Head Alignment cannot be compatible with the printing side (whiter side...
... error, and then adjust your operating environment and/or the position of your device's instruction manual before connecting it . z Paper of media suitable for service as soon as follows: z Print Head nozzles are A4, Letter, A5, and 5" x 7". Press the RESUME/CANCEL button to check the status of A4/Letter-sized Canon Matte Photo Paper MP-101 with automatic duplex printing. See "Printing the Nozzle Check Pattern" on page 47. 78 Troubleshooting Automatic Print Head Alignment cannot be compatible with the printing side (whiter side...
iP4500 series Quick Start Guide
Page 84
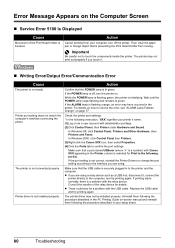
... a user account with the relay device. The printer is not installed properly. If the POWER lamp is flashing orange, an error may not be a problem with Canon XXX appearing in the printer. If the ALARM lamp is off the printer. If printing starts normally, there is a number) with the USB cable. Replace the USB cable and try printing again. While the POWER lamp is flashing green, the printer is not ready. Check the printer port settings...
... a user account with the relay device. The printer is not installed properly. If the POWER lamp is flashing orange, an error may not be a problem with Canon XXX appearing in the printer. If the ALARM lamp is off the printer. If printing starts normally, there is a number) with the USB cable. Replace the USB cable and try printing again. While the POWER lamp is flashing green, the printer is not ready. Check the printer port settings...

iP4500 series Quick Start Guide
Page 92
... Note For bundled software installation. We recommend that you keep your system up to date with Windows Update. Browser: Help Viewer Note: The on-screen manual may not be displayed properly depending on your operating system or Internet Explorer version. Minimum System Requirements Note Conform to Windows Vista, first uninstall software bundled with the Canon inkjet printer. Browser Hard Disk Space CD-ROM Drive Other restrictions...
... Note For bundled software installation. We recommend that you keep your system up to date with Windows Update. Browser: Help Viewer Note: The on-screen manual may not be displayed properly depending on your operating system or Internet Explorer version. Minimum System Requirements Note Conform to Windows Vista, first uninstall software bundled with the Canon inkjet printer. Browser Hard Disk Space CD-ROM Drive Other restrictions...
iP4500 series Quick Start Guide
Page 98
...) z Toll-free live technical support Monday-Saturday (excluding holidays) at 1-800828-4040, or any time while speaking to the Canon USA repair facility. InstantExchange Service ** A Canon Customer Care Center or ASF technician will attempt to you elect the InstantExchange option, a reference number will ship out the replacement Product prepaid by the ASF. NOTE THAT BY USING THIS SERVICE YOU WILL KEEP THE REPLACEMENT PRODUCT...
...) z Toll-free live technical support Monday-Saturday (excluding holidays) at 1-800828-4040, or any time while speaking to the Canon USA repair facility. InstantExchange Service ** A Canon Customer Care Center or ASF technician will attempt to you elect the InstantExchange option, a reference number will ship out the replacement Product prepaid by the ASF. NOTE THAT BY USING THIS SERVICE YOU WILL KEEP THE REPLACEMENT PRODUCT...
iP4500 series Easy Setup Instructions
Page 1
... A5 or larger sized paper, pull the tab towards you have installed the ink tanks, the POWER lamp will flash green. The Print Head Holder moves to the User's Guide. b Twist off the protective film and remove the film completely. d Open the Top Cover. this printer, refer to the back cover of the Quick Start Guide. Cassette d Make sure the ink lamp lights red. Be careful not to get ink on yourself when handling...
... A5 or larger sized paper, pull the tab towards you have installed the ink tanks, the POWER lamp will flash green. The Print Head Holder moves to the User's Guide. b Twist off the protective film and remove the film completely. d Open the Top Cover. this printer, refer to the back cover of the Quick Start Guide. Cassette d Make sure the ink lamp lights red. Be careful not to get ink on yourself when handling...
iP4500 series Easy Setup Instructions
Page 2
... to TURN THE PRINTER OFF before continuing. (1) Press the POWER button. (2) Make sure that the Restart the system now (recommended) check box is a trademark of Microsoft Corporation. In Windows XP and Windows 2000, go to Step n. The printer driver, On-screen Manuals, and application software are installed automatically. ← To Computer USB j When the Print Head Alignment screen appears, make sure that two sheets of supplied paper (MP-101) are loaded in the Rear Tray (top paper...
... to TURN THE PRINTER OFF before continuing. (1) Press the POWER button. (2) Make sure that the Restart the system now (recommended) check box is a trademark of Microsoft Corporation. In Windows XP and Windows 2000, go to Step n. The printer driver, On-screen Manuals, and application software are installed automatically. ← To Computer USB j When the Print Head Alignment screen appears, make sure that two sheets of supplied paper (MP-101) are loaded in the Rear Tray (top paper...


