Quick Start Guide
Page 4
...countries. About Consumables Consumables (ink tanks / FINE Cartridges) are office equipment such as computers, monitors, printers, faxes and copiers. Copyright This manual is a global program that it will be an easy-to your Canon PIXMA iP3300 series Photo Printer. Under the copyright laws.... The International ENERGY STAR® Office Equipment Program is copyrighted by Canon U.S.A., Inc. z "Macintosh" and "Mac" are uniform among participating nations. and other countries. Canon PIXMA iP3300 series Photo Printer Quick Start Guide. As an ENERGY STAR® Partner...
...countries. About Consumables Consumables (ink tanks / FINE Cartridges) are office equipment such as computers, monitors, printers, faxes and copiers. Copyright This manual is a global program that it will be an easy-to your Canon PIXMA iP3300 series Photo Printer. Under the copyright laws.... The International ENERGY STAR® Office Equipment Program is copyrighted by Canon U.S.A., Inc. z "Macintosh" and "Mac" are uniform among participating nations. and other countries. Canon PIXMA iP3300 series Photo Printer Quick Start Guide. As an ENERGY STAR® Partner...

Quick Start Guide
Page 5
... 22 Replacing an Ink Tank 22 Keeping the Best Printing Results 30 When Printing Becomes Faint or Colors Are Incorrect 31 Printing the Nozzle Check Pattern 32 Examining the Nozzle Check Pattern ...........34 Print Head Cleaning 35 Print Head Deep Cleaning 38 Aligning the Print Head 40 Cleaning Your Printer 45 Troubleshooting 52...
... 22 Replacing an Ink Tank 22 Keeping the Best Printing Results 30 When Printing Becomes Faint or Colors Are Incorrect 31 Printing the Nozzle Check Pattern 32 Examining the Nozzle Check Pattern ...........34 Print Head Cleaning 35 Print Head Deep Cleaning 38 Aligning the Print Head 40 Cleaning Your Printer 45 Troubleshooting 52...
Quick Start Guide
Page 6
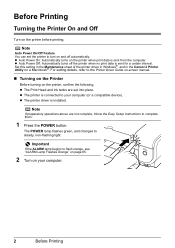
z Auto Power Off: Automatically turns off automatically. z The Print Head and ink tanks are not complete, follow the Easy Setup Instructions to your computer. 2 Before Printing z The printer is installed. The POWER lamp flashes green, and changes to flash orange, see "ALARM Lamp Flashes ...the Maintenance sheet of the printer driver in Windows®, and in the Canon IJ Printer Utility on the printer, confirm the following. Note If preparatory operations above are set the printer to the Printer Driver Guide on-screen manual. „ Turning on the Printer Before turning on a ...
z Auto Power Off: Automatically turns off automatically. z The Print Head and ink tanks are not complete, follow the Easy Setup Instructions to your computer. 2 Before Printing z The printer is installed. The POWER lamp flashes green, and changes to flash orange, see "ALARM Lamp Flashes ...the Maintenance sheet of the printer driver in Windows®, and in the Canon IJ Printer Utility on the printer, confirm the following. Note If preparatory operations above are set the printer to the Printer Driver Guide on-screen manual. „ Turning on the Printer Before turning on a ...

Quick Start Guide
Page 10
...protect them to heat or direct sunlight. z Images may cause the edges of the paper to turn yellow. „ Using Specialty Media Canon recommends that you place printouts in an album before placing your printouts in dark images may not be able to ensure optimal print quality. Note... completely dry. z Do not attempt to dry the ink with glitter, etc. Never expose them from direct exposure to air or sunlight. z Paper with adhesives z Paper decorated with a hair dryer or by exposing printouts to direct sunlight. Colors in an album. z Do not mount printouts in hot or humid conditions...
...protect them to heat or direct sunlight. z Images may cause the edges of the paper to turn yellow. „ Using Specialty Media Canon recommends that you place printouts in an album before placing your printouts in dark images may not be able to ensure optimal print quality. Note... completely dry. z Do not attempt to dry the ink with glitter, etc. Never expose them from direct exposure to air or sunlight. z Paper with adhesives z Paper decorated with a hair dryer or by exposing printouts to direct sunlight. Colors in an album. z Do not mount printouts in hot or humid conditions...
Quick Start Guide
Page 26
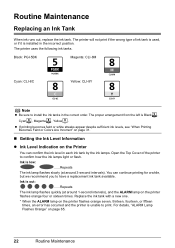
... a new one. * When the ALARM lamp on the printer flashes orange four or sixteen times. z If printing becomes faint or white streaks appear despite sufficient ink levels, see "When Printing Becomes Faint or Colors Are Incorrect" on page 31. „ Getting the Ink Level Information z Ink Level Indication on page 65. 22 Routine Maintenance Routine...
... a new one. * When the ALARM lamp on the printer flashes orange four or sixteen times. z If printing becomes faint or white streaks appear despite sufficient ink levels, see "When Printing Becomes Faint or Colors Are Incorrect" on page 31. „ Getting the Ink Level Information z Ink Level Indication on page 65. 22 Routine Maintenance Routine...
Quick Start Guide
Page 27
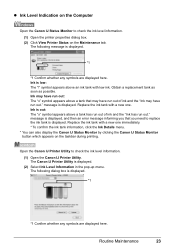
... low: The "!" The following message is displayed. (2) Select Ink Level Information in the pop-up menu. Replace the ink tank with low ink. z Ink Level Indication on the Computer Open the Canon IJ Status Monitor to check the ink level information. (1) Open the Canon IJ Printer Utility. The Canon IJ Printer Utility is displayed. *1 *1 Confirm whether any symbols are displayed...
... low: The "!" The following message is displayed. (2) Select Ink Level Information in the pop-up menu. Replace the ink tank with low ink. z Ink Level Indication on the Computer Open the Canon IJ Status Monitor to check the ink level information. (1) Open the Canon IJ Printer Utility. The Canon IJ Printer Utility is displayed. *1 *1 Confirm whether any symbols are displayed...

Quick Start Guide
Page 28
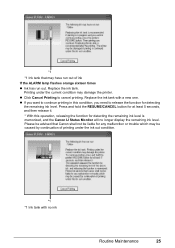
... replace it with the ink tank installed. Obtain a replacement tank as soon as possible. z Click Cancel Printing to resume printing. z If printing is displayed on your computer. The printer may have run out of the following messages is in the Canon IJ Status Monitor. When ink has run out or ...may have run out in an ink tank, the ALARM lamp flashes orange four or sixteen times. If ...
... replace it with the ink tank installed. Obtain a replacement tank as soon as possible. z Click Cancel Printing to resume printing. z If printing is displayed on your computer. The printer may have run out of the following messages is in the Canon IJ Status Monitor. When ink has run out or ...may have run out in an ink tank, the ALARM lamp flashes orange four or sixteen times. If ...
Quick Start Guide
Page 29
.... Please be advised that may have run out of printing under the current condition may damage the printer. Replace the ink tank. Press and hold the RESUME/CANCEL button for at least 5 seconds, and then release it. * With this condition, you want to continue ...printing in this operation, releasing the function for detecting the remaining ink level is memorized, and the Canon IJ Status Monitor will no ink Routine Maintenance 25 z If you need to cancel printing. *1 *1 Ink tank that Canon shall not be liable for any malfunction or trouble which may be caused by...
.... Please be advised that may have run out of printing under the current condition may damage the printer. Replace the ink tank. Press and hold the RESUME/CANCEL button for at least 5 seconds, and then release it. * With this condition, you want to continue ...printing in this operation, releasing the function for detecting the remaining ink level is memorized, and the Canon IJ Status Monitor will no ink Routine Maintenance 25 z If you need to cancel printing. *1 *1 Ink tank that Canon shall not be liable for any malfunction or trouble which may be caused by...
Quick Start Guide
Page 30
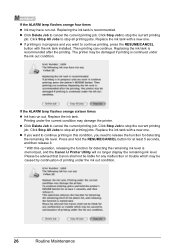
... job. Click Stop All Jobs to stop the current printing job. If the ALARM lamp flashes orange four times z Ink may be damaged if printing is memorized, and the Canon IJ Printer Utility will no longer display the remaining ink level. Replacing the ink tank is recommended. z Click Delete Job to stop all printing jobs.
... job. Click Stop All Jobs to stop the current printing job. If the ALARM lamp flashes orange four times z Ink may be damaged if printing is memorized, and the Canon IJ Printer Utility will no longer display the remaining ink level. Replacing the ink tank is recommended. z Click Delete Job to stop all printing jobs.
Quick Start Guide
Page 31
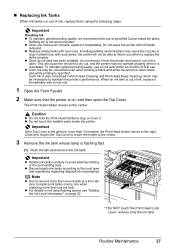
...the nozzles to maintain the printer's performance. Color ink is out of ink, replace them using the following steps. z Discard empty ink tanks according to the right. Note z Do not remove more than one ink tank. Refilling ink is left open . Inserting partially used ink tanks may be consumed even... area. z Once an ink tank has been installed, do not remove it from the printer and leave it immediately. Do not leave the printer with new ones. To maintain optimal printing quality, use of specified Canon brand ink tanks. Important Handling Ink z To maintain optimal printing...
...the nozzles to maintain the printer's performance. Color ink is out of ink, replace them using the following steps. z Discard empty ink tanks according to the right. Note z Do not remove more than one ink tank. Refilling ink is left open . Inserting partially used ink tanks may be consumed even... area. z Once an ink tank has been installed, do not remove it from the printer and leave it immediately. Do not leave the printer with new ones. To maintain optimal printing quality, use of specified Canon brand ink tanks. Important Handling Ink z To maintain optimal printing...

Quick Start Guide
Page 32
... when printing. (A) (B) (2) Remove the orange protective cap from staining your fingers. 28 Routine Maintenance Doing so can cause the printer to malfunction or become ink on the ink tank. Discard the cap once it according to leak out and stain your clothes and hands. z Do not squeeze the side ... remove the clear film from its packaging, (1) then pull the orange tape in step 4-(1), as failure to follow this step may cause the ink to leak and stain your clothes and hands. Important Make sure that the protective film does not remain on the air hole (B). z Be ...
... when printing. (A) (B) (2) Remove the orange protective cap from staining your fingers. 28 Routine Maintenance Doing so can cause the printer to malfunction or become ink on the ink tank. Discard the cap once it according to leak out and stain your clothes and hands. z Do not squeeze the side ... remove the clear film from its packaging, (1) then pull the orange tape in step 4-(1), as failure to follow this step may cause the ink to leak and stain your clothes and hands. Important Make sure that the protective film does not remain on the air hole (B). z Be ...
Quick Start Guide
Page 33
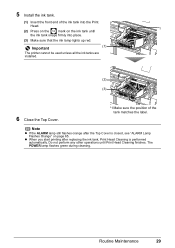
...Maintenance 29 Important (1) The printer cannot be used unless all the ink tanks are installed. (2) (3) 6 Close the Top Cover. *1 Make sure the position of the ink tank into place. (3) Make sure that the ink lamp lights up red. Do not perform any other operations until the ink tank snaps firmly into the ... tank matches the label. Note z If the ALARM lamp still flashes orange after replacing the ink tank, Print Head Cleaning is closed, see "ALARM Lamp Flashes Orange" on the ink tank until Print Head Cleaning finishes. z When you start printing after the Top Cover is ...
...Maintenance 29 Important (1) The printer cannot be used unless all the ink tanks are installed. (2) (3) 6 Close the Top Cover. *1 Make sure the position of the ink tank into place. (3) Make sure that the ink lamp lights up red. Do not perform any other operations until the ink tank snaps firmly into the ... tank matches the label. Note z If the ALARM lamp still flashes orange after replacing the ink tank, Print Head Cleaning is closed, see "ALARM Lamp Flashes Orange" on the ink tank until Print Head Cleaning finishes. z When you start printing after the Top Cover is ...
Quick Start Guide
Page 34
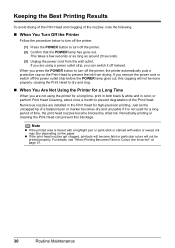
... the Print Head can switch it is traced with a highlight pen or paint-stick or stained with water or sweat, ink may blur depending on the Print Head to prevent the ink from the wall outlet. Note z If the printed area is not used for a long period of time, the print ...head nozzles become faint or particular colors will not be printed properly. For details, see "When Printing Becomes Faint or Colors Are Incorrect" on page 31. 30 Routine Maintenance Numerous nozzles are using the printer for a long time, print in both black & white and in the Print...
... the Print Head can switch it is traced with a highlight pen or paint-stick or stained with water or sweat, ink may blur depending on the Print Head to prevent the ink from the wall outlet. Note z If the printed area is not used for a long period of time, the print ...head nozzles become faint or particular colors will not be printed properly. For details, see "When Printing Becomes Faint or Colors Are Incorrect" on page 31. 30 Routine Maintenance Numerous nozzles are using the printer for a long time, print in both black & white and in the Print...

Quick Start Guide
Page 35
... your Canon service representative. Routine Maintenance 31 Note Before performing maintenance z Open the Top Cover and make sure that all lamps for a while, but we recommend you to confirm the condition of the correct color is inserted in the wrong position. Make sure that ink tank, it is inserted in the printer driver settings...
... your Canon service representative. Routine Maintenance 31 Note Before performing maintenance z Open the Top Cover and make sure that all lamps for a while, but we recommend you to confirm the condition of the correct color is inserted in the wrong position. Make sure that ink tank, it is inserted in the printer driver settings...
Quick Start Guide
Page 36
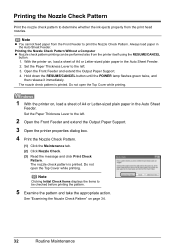
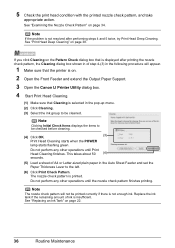
...check pattern is printed. Set the Paper Thickness Lever to the left . 2 Open the Front Feeder and extend the Output Paper Support. 3 Open the printer properties dialog box. 4 Print the Nozzle Check Pattern. (1) Click the Maintenance tab. (2) Click Nozzle Check. (3) Read the message and click Print Check... Pattern. Note z You cannot feed paper from the Front Feeder to determine whether the ink ejects properly from the printer itself using the RESUME/CANCEL button. 1. Hold down the RESUME/CANCEL button until the POWER lamp flashes green twice, and then...
...check pattern is printed. Set the Paper Thickness Lever to the left . 2 Open the Front Feeder and extend the Output Paper Support. 3 Open the printer properties dialog box. 4 Print the Nozzle Check Pattern. (1) Click the Maintenance tab. (2) Click Nozzle Check. (3) Read the message and click Print Check... Pattern. Note z You cannot feed paper from the Front Feeder to determine whether the ink ejects properly from the printer itself using the RESUME/CANCEL button. 1. Hold down the RESUME/CANCEL button until the POWER lamp flashes green twice, and then...

Quick Start Guide
Page 38
...there is insufficient. See "Replacing an Ink Tank" on page 35. If no lines of ink is not enough ink. Examining the Nozzle Check Pattern Examine the nozzle check pattern output by the printer, and clean the Print Head if necessary. Replace the ink tank if the remaining amount of the... group (1) pattern are missing and the group (2) patterns have white streaks, the Color print head nozzle needs cleaning. Example: When white ...
...there is insufficient. See "Replacing an Ink Tank" on page 35. If no lines of ink is not enough ink. Examining the Nozzle Check Pattern Examine the nozzle check pattern output by the printer, and clean the Print Head if necessary. Replace the ink tank if the remaining amount of the... group (1) pattern are missing and the group (2) patterns have white streaks, the Color print head nozzle needs cleaning. Example: When white ...
Quick Start Guide
Page 39
...streaks appear in the following procedure will not be cleaned from the printer itself, using the RESUME/CANCEL button. 1. Cleaning unclogs the nozzles and restores the print head condition. Note that the printer is not enough ink. Hold down the RESUME/CANCEL button until Print Head Cleaning finishes.... If you click Cleaning on page 22. See "Replacing an Ink Tank" on the Pattern Check dialog box that is displayed after ...
...streaks appear in the following procedure will not be cleaned from the printer itself, using the RESUME/CANCEL button. 1. Cleaning unclogs the nozzles and restores the print head condition. Note that the printer is not enough ink. Hold down the RESUME/CANCEL button until Print Head Cleaning finishes.... If you click Cleaning on page 22. See "Replacing an Ink Tank" on the Pattern Check dialog box that is displayed after ...
Quick Start Guide
Page 40
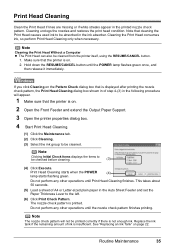
... selected in the following procedure will not be cleaned. See "Replacing an Ink Tank" on . 2 Open the Front Feeder and extend the Output Paper Support. 3 Open the Canon IJ Printer Utility dialog box. 4 Start Print Head Cleaning. (1) Make sure that the printer is insufficient. Note If the problem is printed. Do not perform any...
... selected in the following procedure will not be cleaned. See "Replacing an Ink Tank" on . 2 Open the Front Feeder and extend the Output Paper Support. 3 Open the Canon IJ Printer Utility dialog box. 4 Start Print Head Cleaning. (1) Make sure that the printer is insufficient. Note If the problem is printed. Do not perform any...
Quick Start Guide
Page 42
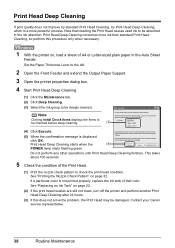
...print quality does not improve by standard Print Head Cleaning, try Print Head Deep Cleaning, which is displayed, click OK. Contact your Canon service representative. 38 Routine Maintenance This takes about 100 seconds. 5 Check the condition of the Print Head. (1) Print the nozzle ... the ink absorber. Note that color. Set the Paper Thickness Lever to the left. 2 Open the Front Feeder and extend the Output Paper Support. 3 Open the printer properties dialog box. 4 Start Print Head Deep Cleaning. (1) Click the Maintenance tab. (2) Click Deep Cleaning. (3) Select the ink group ...
...print quality does not improve by standard Print Head Cleaning, try Print Head Deep Cleaning, which is displayed, click OK. Contact your Canon service representative. 38 Routine Maintenance This takes about 100 seconds. 5 Check the condition of the Print Head. (1) Print the nozzle ... the ink absorber. Note that color. Set the Paper Thickness Lever to the left. 2 Open the Front Feeder and extend the Output Paper Support. 3 Open the printer properties dialog box. 4 Start Print Head Deep Cleaning. (1) Click the Maintenance tab. (2) Click Deep Cleaning. (3) Select the ink group ...
Quick Start Guide
Page 43
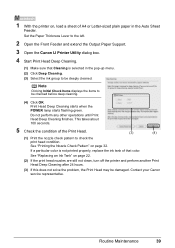
... the left. 2 Open the Front Feeder and extend the Output Paper Support. 3 Open the Canon IJ Printer Utility dialog box. 4 Start Print Head Deep Cleaning. (1) Make sure that Cleaning is not printed properly, replace the ink tank of that color. Do not perform any other operations until Print Head Deep Cleaning finishes. See "Printing...
... the left. 2 Open the Front Feeder and extend the Output Paper Support. 3 Open the Canon IJ Printer Utility dialog box. 4 Start Print Head Deep Cleaning. (1) Make sure that Cleaning is not printed properly, replace the ink tank of that color. Do not perform any other operations until Print Head Deep Cleaning finishes. See "Printing...


