
Quick Start Guide
Page 5
... Replacing an Ink Tank 22 Keeping the Best Printing Results 30 When Printing Becomes Faint or Colors Are Incorrect 31 Printing the Nozzle Check Pattern 32 Examining the Nozzle Check Pattern ...........34 Print Head Cleaning 35 Print Head Deep Cleaning 38 Aligning the Print Head 40 Cleaning Your Printer 45 Troubleshooting 52 Cannot Install the Printer Driver 53 Cannot Connect to Computer Properly.........55 Print Results Not Satisfactory 56 Printer Does Not Start 59 Paper Does Not Feed Properly 60 Paper Jams 62 ALARM Lamp Flashes Orange 65 Error Message...
... Replacing an Ink Tank 22 Keeping the Best Printing Results 30 When Printing Becomes Faint or Colors Are Incorrect 31 Printing the Nozzle Check Pattern 32 Examining the Nozzle Check Pattern ...........34 Print Head Cleaning 35 Print Head Deep Cleaning 38 Aligning the Print Head 40 Cleaning Your Printer 45 Troubleshooting 52 Cannot Install the Printer Driver 53 Cannot Connect to Computer Properly.........55 Print Results Not Satisfactory 56 Printer Does Not Start 59 Paper Does Not Feed Properly 60 Paper Jams 62 ALARM Lamp Flashes Orange 65 Error Message...
Quick Start Guide
Page 18
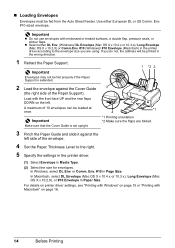
... details on printer driver settings, see "Printing with Windows" on page 15 or "Printing with Macintosh" on the left side of 10 envelopes can be printed in Media Type. (2) Select the size for envelopes. A maximum of the envelope. 4 Set the Paper Thickness Lever to the envelope size you do not, the address will be loaded at once. Important Make sure that the Cover Guide is extended. 1 *2 2 2 Load the envelope against the left . Use either DL Env. (Windows)/ DL Envelope (Mac OS X v.10...
... details on printer driver settings, see "Printing with Windows" on page 15 or "Printing with Macintosh" on the left side of 10 envelopes can be printed in Media Type. (2) Select the size for envelopes. A maximum of the envelope. 4 Set the Paper Thickness Lever to the envelope size you do not, the address will be loaded at once. Important Make sure that the Cover Guide is extended. 1 *2 2 2 Load the envelope against the left . Use either DL Env. (Windows)/ DL Envelope (Mac OS X v.10...

Quick Start Guide
Page 19
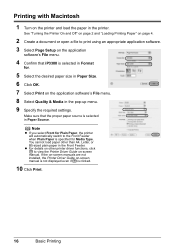
... for Media Type. See "Turning the Printer On and Off" on page 2 and "Loading Printing Paper" on page 4. 2 Create a document or open a file to view the online help or the Printer Driver Guide on the printer and load the paper in the Front Feeder. You cannot load paper other printer driver functions, click Help or Instructions to print using an appropriate application software. 3 Select Print on the application software's File menu. 4 Make sure that the proper paper source is specified for basic printing. Make sure that Canon iP3300 is only displayed...
... for Media Type. See "Turning the Printer On and Off" on page 2 and "Loading Printing Paper" on page 4. 2 Create a document or open a file to view the online help or the Printer Driver Guide on the printer and load the paper in the Front Feeder. You cannot load paper other printer driver functions, click Help or Instructions to print using an appropriate application software. 3 Select Print on the application software's File menu. 4 Make sure that the proper paper source is specified for basic printing. Make sure that Canon iP3300 is only displayed...
Quick Start Guide
Page 20
... desired paper size in Paper Size. 6 Click OK. 7 Select Print on other than A4, Letter, or B5-sized plain paper in the pop-up menu. 9 Specify the required settings. z For details on the application software's File menu. 8 Select Quality & Media in the Front Feeder. If the on-screen manuals are not installed, the Printer Driver Guide on the printer and load the paper in Paper Source. Note z If you select Front for Media Type. Make sure that iP3300 is...
... desired paper size in Paper Size. 6 Click OK. 7 Select Print on other than A4, Letter, or B5-sized plain paper in the pop-up menu. 9 Specify the required settings. z For details on the application software's File menu. 8 Select Quality & Media in the Front Feeder. If the on-screen manuals are not installed, the Printer Driver Guide on the printer and load the paper in Paper Source. Note z If you select Front for Media Type. Make sure that iP3300 is...
Quick Start Guide
Page 25
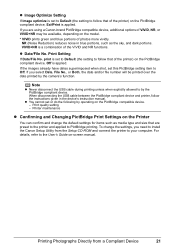
... follow that of photos more vividly. For details, refer to follow the instructions given in blue portions, such as media type and size that of the VIVID and NR functions. z Image Optimize Setting If Image optimize is set to Default (the setting to the User's Guide on-screen manual. Printer maintenance z Confirming and Changing PictBridge Print Settings on the Printer You can confirm and change the settings, you need to install the Canon Setup Utility from a Compliant Device...
... follow that of photos more vividly. For details, refer to follow the instructions given in blue portions, such as media type and size that of the VIVID and NR functions. z Image Optimize Setting If Image optimize is set to Default (the setting to the User's Guide on-screen manual. Printer maintenance z Confirming and Changing PictBridge Print Settings on the Printer You can confirm and change the settings, you need to install the Canon Setup Utility from a Compliant Device...
Quick Start Guide
Page 26
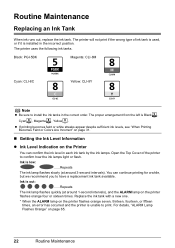
... ink tank. Replace the ink tank with a new one. * When the ALARM lamp on the printer flashes orange four or sixteen times. z If printing becomes faint or white streaks appear despite sufficient ink levels, see "When Printing Becomes Faint or Colors Are Incorrect" on page 31. „ Getting the Ink Level Information z Ink Level Indication on page 65. 22 Routine Maintenance The printer will not print if the wrong type of the printer to have a replacement ink tank available. The printer uses...
... ink tank. Replace the ink tank with a new one. * When the ALARM lamp on the printer flashes orange four or sixteen times. z If printing becomes faint or white streaks appear despite sufficient ink levels, see "When Printing Becomes Faint or Colors Are Incorrect" on page 31. „ Getting the Ink Level Information z Ink Level Indication on page 65. 22 Routine Maintenance The printer will not print if the wrong type of the printer to have a replacement ink tank available. The printer uses...
Quick Start Guide
Page 31
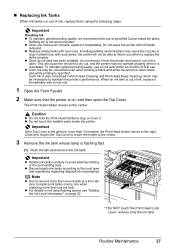
... you remove an ink tank, replace it . z For details on ink lamp flashing speed, see "Getting the Ink Level Information" on , and then open the Top Cover. Important Handling Ink z To maintain optimal printing quality, we recommend the use . This will not be consumed even when printing a black-and-white document or when blackand-white printing is not recommended. To maintain optimal printing quality, use an ink tank within six months of first use of ink, replace them using...
... you remove an ink tank, replace it . z For details on ink lamp flashing speed, see "Getting the Ink Level Information" on , and then open the Top Cover. Important Handling Ink z To maintain optimal printing quality, we recommend the use . This will not be consumed even when printing a black-and-white document or when blackand-white printing is not recommended. To maintain optimal printing quality, use an ink tank within six months of first use of ink, replace them using...

Quick Start Guide
Page 35
... Print Head, print and examine the nozzle check pattern. Replace the ink tank. See "Prepare the replacement tank." See "Print Results Not Satisfactory" on page 27. See "Replacing Ink Tanks" on page 56. z Increase the Print Quality setting in the printer driver settings. Contact your Canon service representative. If any one of the lamps is flashing slowly, the associated ink tank is inserted in each position, matching the label. See "Replacing an Ink Tank" on page 32. Step 1 See "Printing the Nozzle Check Pattern" on page 22. - Make...
... Print Head, print and examine the nozzle check pattern. Replace the ink tank. See "Prepare the replacement tank." See "Print Results Not Satisfactory" on page 27. See "Replacing Ink Tanks" on page 56. z Increase the Print Quality setting in the printer driver settings. Contact your Canon service representative. If any one of the lamps is flashing slowly, the associated ink tank is inserted in each position, matching the label. See "Replacing an Ink Tank" on page 32. Step 1 See "Printing the Nozzle Check Pattern" on page 22. - Make...
Quick Start Guide
Page 56
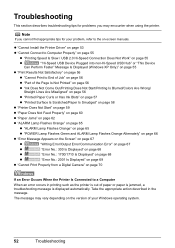
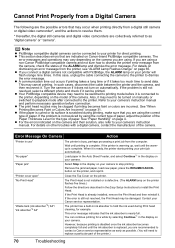
... Printer Is Connected to the on page 56 z "Part of your problem, refer to a Computer When an error occurs in the message. The message may encounter when using the printer. Take the appropriate action described in printing such as the printer is out of paper or paper is jammed, a troubleshooting message is displayed automatically. z "Cannot Install the Printer Driver" on page 53 z "Cannot Connect to Computer Properly" on page 55 z "Printing Speed Is Slow / USB 2.0 Hi-Speed Connection...
... Printer Is Connected to the on page 56 z "Part of your problem, refer to a Computer When an error occurs in the message. The message may encounter when using the printer. Take the appropriate action described in printing such as the printer is out of paper or paper is jammed, a troubleshooting message is displayed automatically. z "Cannot Install the Printer Driver" on page 53 z "Cannot Connect to Computer Properly" on page 55 z "Printing Speed Is Slow / USB 2.0 Hi-Speed Connection...
Quick Start Guide
Page 60
... printer. Ink tank is not installed securely. / Part of the orange tape is fully inserted. Note For details on different flashing speeds, see "Getting the Ink Level Information" on the Page Setup sheet. The ink lamp lights up red when the ink tank is remaining. In Windows XP and Windows 2000, click Print Options on page 22. If the ink lamp is empty. Check the page size setting in the displayed dialog. Open the Top Cover and check the ink...
... printer. Ink tank is not installed securely. / Part of the orange tape is fully inserted. Note For details on different flashing speeds, see "Getting the Ink Level Information" on the Page Setup sheet. The ink lamp lights up red when the ink tank is remaining. In Windows XP and Windows 2000, click Print Options on page 22. If the ink lamp is empty. Check the page size setting in the displayed dialog. Open the Top Cover and check the ink...

Quick Start Guide
Page 61
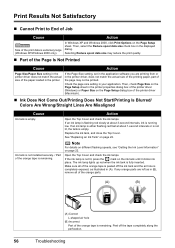
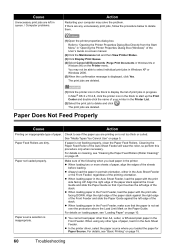
... or images in deep color, we recommend using Photo Paper Pro or other Canon specialty paper. Media Type setting in the printer driver Make sure that the Media Type set Print Quality to be printed misaligned. Troubleshooting 57 The media is too thin. See "Aligning the Print Head" on the wrong side may be printed on page 5. Set the Print Quality setting to High in Windows or Fine in Macintosh. (1)Open the printer properties dialog box. (2)On the Main sheet, click High for uneven ink output. When printing data...
... or images in deep color, we recommend using Photo Paper Pro or other Canon specialty paper. Media Type setting in the printer driver Make sure that the Media Type set Print Quality to be printed misaligned. Troubleshooting 57 The media is too thin. See "Aligning the Print Head" on the wrong side may be printed on page 5. Set the Print Quality setting to High in Windows or Fine in Macintosh. (1)Open the printer properties dialog box. (2)On the Main sheet, click High for uneven ink output. When printing data...
Quick Start Guide
Page 64
... of the User's Guide on-screen manual. (2)Click the Maintenance tab and then View Printer Status. (3)Click Display Print Queue. (4)Select Cancel All Documents (Purge Print Documents in Windows XP or Windows 2000. (5)When the confirmation message is not set over the protrusion above the Load Limit Mark on page 5. Align the right edge of the paper stack against the left edge of paper. If paper is inappropriate. Cause Unnecessary print jobs are left...
... of the User's Guide on-screen manual. (2)Click the Maintenance tab and then View Printer Status. (3)Click Display Print Queue. (4)Select Cancel All Documents (Purge Print Documents in Windows XP or Windows 2000. (5)When the confirmation message is not set over the protrusion above the Load Limit Mark on page 5. Align the right edge of the paper stack against the left edge of paper. If paper is inappropriate. Cause Unnecessary print jobs are left...
Quick Start Guide
Page 66
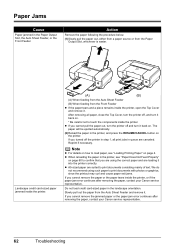
.... (1)Slowly pull the paper out, either from a paper source or from the Auto Sheet Feeder and remove it back on page 4. If you are using the correct paper and are suited to touch the components inside the printer, open the Top Cover and remove it into the printer correctly. Paper Jams Cause Paper jammed in the landscape orientation. Landscape credit card-sized paper jammed inside the printer. (A) (B) (A) When feeding from the Auto Sheet Feeder (B) When feeding from the Front...
.... (1)Slowly pull the paper out, either from a paper source or from the Auto Sheet Feeder and remove it back on page 4. If you are using the correct paper and are suited to touch the components inside the printer, open the Top Cover and remove it into the printer correctly. Paper Jams Cause Paper jammed in the landscape orientation. Landscape credit card-sized paper jammed inside the printer. (A) (B) (A) When feeding from the Auto Sheet Feeder (B) When feeding from the Front...
Quick Start Guide
Page 71
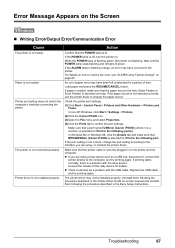
... the RESUME/CANCEL button. In non-XP Windows, click Start > Settings > Printers. (2)Click the Canon iP3300 icon. (3)Open the File menu and select Properties. (4)Click the Ports tab to the computer, and try printing again. If the port setting is selected for Print to the following port. Consult the reseller of time. Replace the USB cable and try printing again. While the POWER lamp is flashing green, the printer is not connected properly. An out of paper error...
... the RESUME/CANCEL button. In non-XP Windows, click Start > Settings > Printers. (2)Click the Canon iP3300 icon. (3)Open the File menu and select Properties. (4)Click the Ports tab to the computer, and try printing again. If the port setting is selected for Print to the following port. Consult the reseller of time. Replace the USB cable and try printing again. While the POWER lamp is flashing green, the printer is not connected properly. An out of paper error...
Quick Start Guide
Page 72
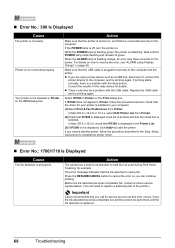
... stops flashing and remains lit green. Replace the USB cable and try printing again. Action Make sure that the printer is turned on, and that it , connect the printer directly to reinstall the printer driver. „ Error No.: 1700/1710 Is Displayed Cause The ink absorber is installed to replace a particular part of the printer.) Important Canon recommends that you cannot add the printer, follow the procedure below to check that the USB cable...
... stops flashing and remains lit green. Replace the USB cable and try printing again. Action Make sure that the printer is turned on, and that it , connect the printer directly to reinstall the printer driver. „ Error No.: 1700/1710 Is Displayed Cause The ink absorber is installed to replace a particular part of the printer.) Important Canon recommends that you cannot add the printer, follow the procedure below to check that the USB cable...
Quick Start Guide
Page 74
... camcorders are using the correct type of paper, adjust the position of the printer.) 70 Troubleshooting This may be damaged. Turn the camera on if it can continue printing for example. z Your PictBridge compatible device may need to be switched to your printer will flash orange nine times. If the problem is still not resolved, the Print Head may cancel printing. Remove the jammed paper, load new paper, press the RESUME/CANCEL button on the model of...
... camcorders are using the correct type of paper, adjust the position of the printer.) 70 Troubleshooting This may be damaged. Turn the camera on if it can continue printing for example. z Your PictBridge compatible device may need to be switched to your printer will flash orange nine times. If the problem is still not resolved, the Print Head may cancel printing. Remove the jammed paper, load new paper, press the RESUME/CANCEL button on the model of...

Quick Start Guide
Page 77
...-screen manual, double-click the iP3300 On-screen Manual shortcut icon on your system up to view the HTML format on -screen manuals are also supplied with Windows Update. For detailed instructions on installing the on -screen manual may not be displayed properly depending on the desktop. Appendix 73 website and install it from the Manual folder in the Setup CD-ROM, open the folder in which you keep your computer, download...
...-screen manual, double-click the iP3300 On-screen Manual shortcut icon on your system up to view the HTML format on -screen manuals are also supplied with Windows Update. For detailed instructions on installing the on -screen manual may not be displayed properly depending on the desktop. Appendix 73 website and install it from the Manual folder in the Setup CD-ROM, open the folder in which you keep your computer, download...
Quick Start Guide
Page 86
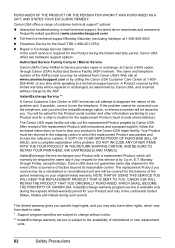
... Service ** A Canon Customer Care Center or ASF technician will attempt to a technical support person. DO NOT INCLUDE ANY OTHER ITEMS WITH THE YOUR PRODUCT IN THE RETURN SHIPPING CARTON, AND BE SURE TO RETAIN YOUR PRINTHEAD, INK CARTRIDGE(S) AND TANK(S). NOTE THAT BY USING THIS SERVICE YOU WILL KEEP THE REPLACEMENT PRODUCT THAT IS SENT TO YOU. The Canon USA repair facility will be covered...
... Service ** A Canon Customer Care Center or ASF technician will attempt to a technical support person. DO NOT INCLUDE ANY OTHER ITEMS WITH THE YOUR PRODUCT IN THE RETURN SHIPPING CARTON, AND BE SURE TO RETAIN YOUR PRINTHEAD, INK CARTRIDGE(S) AND TANK(S). NOTE THAT BY USING THIS SERVICE YOU WILL KEEP THE REPLACEMENT PRODUCT THAT IS SENT TO YOU. The Canon USA repair facility will be covered...
Easy Setup Instructions
Page 1
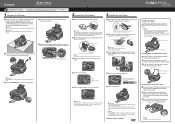
... Lever carefully. Paper Guide Print side facing UP. Caution Before turning on the bottom of the ink tank. e Write down the serial number located inside of the bag the print head comes in front of the printer. series Photo Printer Loading Paper This printer offers two paper sources to the center. b Align the paper stack against the Cover Guide on the lid of the packing box. • A USB cable is left edges with the Paper Size Mark. Start Here Easy Setup Instructions...
... Lever carefully. Paper Guide Print side facing UP. Caution Before turning on the bottom of the ink tank. e Write down the serial number located inside of the bag the print head comes in front of the printer. series Photo Printer Loading Paper This printer offers two paper sources to the center. b Align the paper stack against the Cover Guide on the lid of the packing box. • A USB cable is left edges with the Paper Size Mark. Start Here Easy Setup Instructions...
Easy Setup Instructions
Page 2
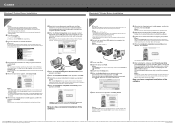
... are trademarks of the USB cable to be installed. d Double-click the Setup icon. If the printer name is restarted automatically. Note Restarting the computer while connected to the printer may vary depending on -screen instructions to restart your product serial number, which is turned on the operating system you are using Mac OS X v.10.2.8) and then check that the POWER lamp stops flashing. b Turn the computer on...
... are trademarks of the USB cable to be installed. d Double-click the Setup icon. If the printer name is restarted automatically. Note Restarting the computer while connected to the printer may vary depending on -screen instructions to restart your product serial number, which is turned on the operating system you are using Mac OS X v.10.2.8) and then check that the POWER lamp stops flashing. b Turn the computer on...


