i560 PictBridge Instructions
Page 1
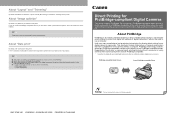
... called a digital camera or camera. Regardless of the printer or camera brand, printing photos without a computer. PictBridge-compatible Digital Camera Canon PictBridge-compatible Printer QA7-2746-V01 XX2003XX ©CANON INC.2003 PRINTED IN THAILAND This mark indicates that these... options cannot be selected for some camera models. G This printer can easily control the print setting using ...
... called a digital camera or camera. Regardless of the printer or camera brand, printing photos without a computer. PictBridge-compatible Digital Camera Canon PictBridge-compatible Printer QA7-2746-V01 XX2003XX ©CANON INC.2003 PRINTED IN THAILAND This mark indicates that these... options cannot be selected for some camera models. G This printer can easily control the print setting using ...
i560 PictBridge Instructions
Page 2
... selected in the description given below cannot be selected only for Canon PictBridge-compatible cameras. (Note that the camera is advisable to use the USB cable supplied with the camera. (3) Set up the printer. The print head cannot be made depending on the brand or... it cannot be sure to charge it is turned off. (2) Connect the camera to turn on Canon PictBridge-compatible cameras are used . G Depending on the printer. 3 Connect the digital camera to select a mode of the printer. Layout Borderless - About "Paper Size" and "Paper Type" By default, 4" × ...
... selected in the description given below cannot be selected only for Canon PictBridge-compatible cameras. (Note that the camera is advisable to use the USB cable supplied with the camera. (3) Set up the printer. The print head cannot be made depending on the brand or... it cannot be sure to charge it is turned off. (2) Connect the camera to turn on Canon PictBridge-compatible cameras are used . G Depending on the printer. 3 Connect the digital camera to select a mode of the printer. Layout Borderless - About "Paper Size" and "Paper Type" By default, 4" × ...
i860_spec.pdf
Page 1
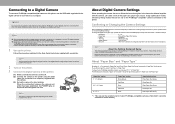
... speed will vary based on Mac OS 8.6, Windows® 95 or Windows NT® 4.0. i860 Desktop Photo Printer Outstanding Performance. Canon launches the next evolutionary step in . The i860 printer also enables you can be placed with a minimum pitch of select Canon digital cameras and camcorders featuring BubbleJet Direct or PictBridge direct printing technology visit www...
... speed will vary based on Mac OS 8.6, Windows® 95 or Windows NT® 4.0. i860 Desktop Photo Printer Outstanding Performance. Canon launches the next evolutionary step in . The i860 printer also enables you can be placed with a minimum pitch of select Canon digital cameras and camcorders featuring BubbleJet Direct or PictBridge direct printing technology visit www...
i860_spec.pdf
Page 2
...with InstantExchange warranty program Ordering Information Printer and Accessories i860 Desktop Photo Printer Auto Duplex Printing Unit Paper Feed Cassette Unit Ink Tanks BCI-6Bk Black BCI-6C Cyan BCI-6M Magenta BCI-6Y Yellow BCI-3eBk Black Canon Specialty Papers Glossy Photo Cards ...change without notice. ** PPM print speed based on the highest speed printer driver setting. 4" x 6" photo print speed based on printer driver setting. As an ENERGY STAR® partner, Canon U.S.A., Inc. i860 Desktop Photo Printer Technical Information* Print Speed (up to) OS Compatibility† 600 x...
...with InstantExchange warranty program Ordering Information Printer and Accessories i860 Desktop Photo Printer Auto Duplex Printing Unit Paper Feed Cassette Unit Ink Tanks BCI-6Bk Black BCI-6C Cyan BCI-6M Magenta BCI-6Y Yellow BCI-3eBk Black Canon Specialty Papers Glossy Photo Cards ...change without notice. ** PPM print speed based on the highest speed printer driver setting. 4" x 6" photo print speed based on printer driver setting. As an ENERGY STAR® partner, Canon U.S.A., Inc. i860 Desktop Photo Printer Technical Information* Print Speed (up to) OS Compatibility† 600 x...
i860 Quick Start Guide
Page 1
... Start Guide Table of Contents Preface 1 Shipping Materials 1 Introduction 1 Setting Up 2 Preparing the Printer 2 Connecting the Printer to the Computer 2 Installing the Print Head 4 Loading Paper 7 Installing the Printer Driver 8 Aligning the Print Head 12 Basic Operations 15 Printing with Windows 15 Printing with Macintosh 18 Print Head Maintenance 21 Appendix 22 Printing...
... Start Guide Table of Contents Preface 1 Shipping Materials 1 Introduction 1 Setting Up 2 Preparing the Printer 2 Connecting the Printer to the Computer 2 Installing the Print Head 4 Loading Paper 7 Installing the Printer Driver 8 Aligning the Print Head 12 Basic Operations 15 Printing with Windows 15 Printing with Macintosh 18 Print Head Maintenance 21 Appendix 22 Printing...
i860 Quick Start Guide
Page 2
... as follows: AC 100-127V, 50-60Hz AC 220-240V, 50-60Hz Printer Model: K10231 (i860/i865) The correct power supply voltages and frequencies are as computers, monitors, printers, faxes and copiers. It is a global program that supplied in the interference...-causing equipment standard entitled "Digital Apparatus," ICES-003 of purchase. International ENERGY STAR® Program As an ENERGY STAR® Partner, Canon...
... as follows: AC 100-127V, 50-60Hz AC 220-240V, 50-60Hz Printer Model: K10231 (i860/i865) The correct power supply voltages and frequencies are as computers, monitors, printers, faxes and copiers. It is a global program that supplied in the interference...-causing equipment standard entitled "Digital Apparatus," ICES-003 of purchase. International ENERGY STAR® Program As an ENERGY STAR® Partner, Canon...
i860 Quick Start Guide
Page 3
...important information. and other trademarks and registered trademarks appearing in this publication may be observed for purchasing a Canon Bubble Jet Printer. Instructions that all the following symbols to the i865. All rights reserved. For details on cable specifications, refer to ...the printer. Always observe the instructions indicated by incorrect operation of their respective owners. Copyright ©2003 CANON INC. No part of this Quick Start Guide are exactly the same with the i860. Check that , if ignored, could result...
...important information. and other trademarks and registered trademarks appearing in this publication may be observed for purchasing a Canon Bubble Jet Printer. Instructions that all the following symbols to the i865. All rights reserved. For details on cable specifications, refer to ...the printer. Always observe the instructions indicated by incorrect operation of their respective owners. Copyright ©2003 CANON INC. No part of this Quick Start Guide are exactly the same with the i860. Check that , if ignored, could result...
i860 Quick Start Guide
Page 4
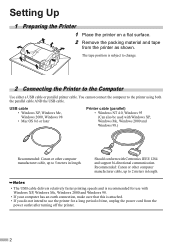
...both the parallel cable AND the USB cable. Setting Up 1 Preparing the Printer 1 Place the printer on a flat surface. 2 Remove the packing material and tape from the power outlet after turning off the printer. 2 Recommended: Canon or other computer manufacturer cable, up to 2 meters in length. USB... cable • Windows XP, Windows Me, Windows 2000, Windows 98 • Mac OS 8.6 or later Printer cable (parallel) • Windows NT 4.0, ...
...both the parallel cable AND the USB cable. Setting Up 1 Preparing the Printer 1 Place the printer on a flat surface. 2 Remove the packing material and tape from the power outlet after turning off the printer. 2 Recommended: Canon or other computer manufacturer cable, up to 2 meters in length. USB... cable • Windows XP, Windows Me, Windows 2000, Windows 98 • Mac OS 8.6 or later Printer cable (parallel) • Windows NT 4.0, ...
i860 Quick Start Guide
Page 5
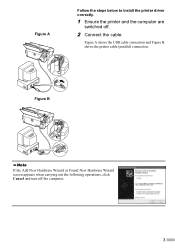
Figure B If the Add New Hardware Wizard or Found New Hardware Wizard screen appears when carrying out the following operations, click Cancel and turn off . 2 Connect the cable. Figure A shows the USB cable connection and Figure B shows the printer cable (parallel) connection. Figure A Follow the steps below to install the printer driver correctly. 1 Ensure the printer and the computer are switched off the computer. 3
Figure B If the Add New Hardware Wizard or Found New Hardware Wizard screen appears when carrying out the following operations, click Cancel and turn off . 2 Connect the cable. Figure A shows the USB cable connection and Figure B shows the printer cable (parallel) connection. Figure A Follow the steps below to install the printer driver correctly. 1 Ensure the printer and the computer are switched off the computer. 3
i860 Quick Start Guide
Page 6
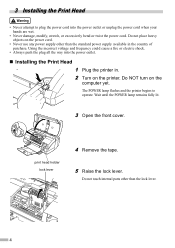
Do NOT turn on the power cord. • Never use any power supply other than the standard power supply available in . 2 Turn on the printer. Wait until the POWER lamp remains fully lit. 3 Open the front cover. 3 Installing the Print Head • Never attempt to operate. Do not touch ...internal parts other than the lock lever. 4 The POWER lamp flashes and the printer begins to plug the power cord into the power outlet. „ Installing the Print Head 1 Plug the printer in the country of purchase. print head holder lock lever 4 Remove the tape. 5 Raise the ...
Do NOT turn on the power cord. • Never use any power supply other than the standard power supply available in . 2 Turn on the printer. Wait until the POWER lamp remains fully lit. 3 Open the front cover. 3 Installing the Print Head • Never attempt to operate. Do not touch ...internal parts other than the lock lever. 4 The POWER lamp flashes and the printer begins to plug the power cord into the power outlet. „ Installing the Print Head 1 Plug the printer in the country of purchase. print head holder lock lever 4 Remove the tape. 5 Raise the ...
i860 Quick Start Guide
Page 7
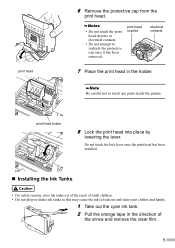
... from the print head. • Do not touch the print head nozzles or electrical contacts. • Do not attempt to touch any parts inside the printer. print head holder 8 Lock the print head into place by lowering the lever. Do not touch the lock lever once the print head has been...
... from the print head. • Do not touch the print head nozzles or electrical contacts. • Do not attempt to touch any parts inside the printer. print head holder 8 Lock the print head into place by lowering the lever. Do not touch the lock lever once the print head has been...
i860 Quick Start Guide
Page 9
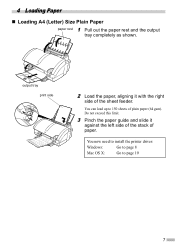
You can load up to page 10 7 output tray print side 2 Load the paper, aligning it against the left side of the stack of paper. You now need to install the printer driver: Windows: Go to page 8 Mac OS X: Go to 150 sheets of the sheet feeder. 4 Loading Paper „ Loading A4 (Letter) Size Plain Paper paper rest 1 Pull out the paper rest and the output tray completely as shown. Do not exceed this limit. 3 Pinch the paper guide and slide it with the right side of plain paper (64 gsm).
You can load up to page 10 7 output tray print side 2 Load the paper, aligning it against the left side of the stack of paper. You now need to install the printer driver: Windows: Go to page 8 Mac OS X: Go to 150 sheets of the sheet feeder. 4 Loading Paper „ Loading A4 (Letter) Size Plain Paper paper rest 1 Pull out the paper rest and the output tray completely as shown. Do not exceed this limit. 3 Pinch the paper guide and slide it with the right side of plain paper (64 gsm).
i860 Quick Start Guide
Page 10
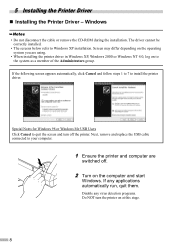
... quit them. The driver cannot be correctly installed. • The screens below refer to install the printer driver. Screen may differ depending on the operating system you are switched off the printer. If the following screen appears automatically, click Cancel and follow steps 1 to 7 to Windows XP ... for Windows 98 or Windows Me USB Users Click Cancel to the system as a member of the Administrators group. 5 Installing the Printer Driver „ Installing the Printer Driver - Windows • Do not disconnect the cable or remove the CD-ROM during the installation.
... quit them. The driver cannot be correctly installed. • The screens below refer to install the printer driver. Screen may differ depending on the operating system you are switched off the printer. If the following screen appears automatically, click Cancel and follow steps 1 to 7 to Windows XP ... for Windows 98 or Windows Me USB Users Click Cancel to the system as a member of the Administrators group. 5 Installing the Printer Driver „ Installing the Printer Driver - Windows • Do not disconnect the cable or remove the CD-ROM during the installation.
i860 Quick Start Guide
Page 11
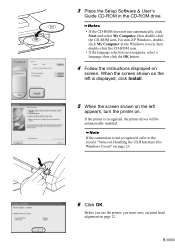
...displayed, click Install. 5 When the screen shown on the left is recognized, the printer driver will be automatically installed. For non-XP Windows, doubleclick My Computer in the ...click Start and select My Computer, then double-click the CD-ROM icon. Before you use the printer, you must carry out print head alignment on page 23. 6 Click OK. When the screen shown on the left ...appears, turn the printer on. 3 Place the Setup Software & User's Guide CD-ROM in the Windows screen, then double-click the...
...displayed, click Install. 5 When the screen shown on the left is recognized, the printer driver will be automatically installed. For non-XP Windows, doubleclick My Computer in the ...click Start and select My Computer, then double-click the CD-ROM icon. Before you use the printer, you must carry out print head alignment on page 23. 6 Click OK. When the screen shown on the left ...appears, turn the printer on. 3 Place the Setup Software & User's Guide CD-ROM in the Windows screen, then double-click the...
i860 Quick Start Guide
Page 12
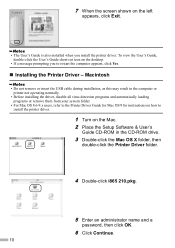
.... To view the User's Guide, double-click the User's Guide short-cut icon on how to restart the computer appears, click Yes. „ Installing the Printer Driver - Macintosh • Do not remove or insert the USB cable during installation, as this may result in the CD-ROM drive. 3 Double-click the... Mac OS X folder, then double-click the Printer Driver folder. 4 Double-click i865 210.pkg. 5 Enter an administrator name and a password, then click OK. 6 Click Continue. 10
.... To view the User's Guide, double-click the User's Guide short-cut icon on how to restart the computer appears, click Yes. „ Installing the Printer Driver - Macintosh • Do not remove or insert the USB cable during installation, as this may result in the CD-ROM drive. 3 Double-click the... Mac OS X folder, then double-click the Printer Driver folder. 4 Double-click i865 210.pkg. 5 Enter an administrator name and a password, then click OK. 6 Click Continue. 10
i860 Quick Start Guide
Page 13
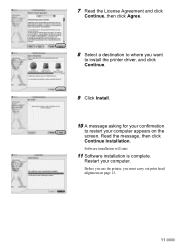
7 Read the License Agreement and click Continue, then click Agree. 8 Select a destination to where you must carry out print head alignment on the screen. Before you use the printer, you want to install the printer driver, and click Continue. 9 Click Install. 10 A message asking for your confirmation to restart your computer. Read the message, then click Continue Installation. Software installation will start. 11 Software installation is complete. Restart your computer appears on page 13. 11
7 Read the License Agreement and click Continue, then click Agree. 8 Select a destination to where you must carry out print head alignment on the screen. Before you use the printer, you want to install the printer driver, and click Continue. 9 Click Install. 10 A message asking for your confirmation to restart your computer. Read the message, then click Continue Installation. Software installation will start. 11 Software installation is complete. Restart your computer appears on page 13. 11
i860 Quick Start Guide
Page 14
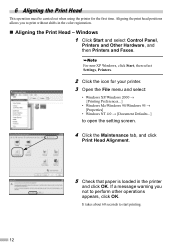
... Faxes. If a message warning you to print without shifts in the printer and click OK. It takes about 60 seconds to perform other operations appears, click OK. For non-XP Windows, click Start, then select Settings, Printers. 2 Click the icon for the first time. 6 Aligning the Print Head This ...operation must be carried out when using the printer for your printer. 3 Open the File menu and select: • Windows XP/Windows 2000 → [Printing Preferences...] • Windows Me/Windows 98/Windows 95 → [Properties] •...
... Faxes. If a message warning you to print without shifts in the printer and click OK. It takes about 60 seconds to perform other operations appears, click OK. For non-XP Windows, click Start, then select Settings, Printers. 2 Click the icon for the first time. 6 Aligning the Print Head This ...operation must be carried out when using the printer for your printer. 3 Open the File menu and select: • Windows XP/Windows 2000 → [Printing Preferences...] • Windows Me/Windows 98/Windows 95 → [Properties] •...

i860 Quick Start Guide
Page 15
...is not printed successfully, open the front cover and ensure that the ink tanks are correctly installed. Macintosh For Mac OS 8.6-9.x users, refer to the Printer Driver Guide for Mac OS 9 for instructions on the left is not displayed, refer to Troubleshooting of the User's Guide. „ Aligning the ...Print Head - If the pattern is aligned automatically. The printer is printed, click Yes. If the pattern on how to use. 6 After the pattern is now ready to align the print head. 1 Open the...
...is not printed successfully, open the front cover and ensure that the ink tanks are correctly installed. Macintosh For Mac OS 8.6-9.x users, refer to the Printer Driver Guide for Mac OS 9 for instructions on the left is not displayed, refer to Troubleshooting of the User's Guide. „ Aligning the ...Print Head - If the pattern is aligned automatically. The printer is printed, click Yes. If the pattern on how to use. 6 After the pattern is now ready to align the print head. 1 Open the...
i860 Quick Start Guide
Page 16
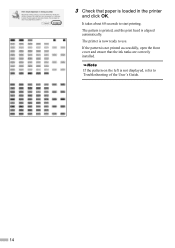
The printer is not printed successfully, open the front cover and ensure that paper is aligned automatically. If the pattern is now ready to use. 3 Check that the ink tanks are correctly installed. The pattern is printed, and the print head is loaded in the printer and click OK. If the pattern on the left is not displayed, refer to start printing. It takes about 60 seconds to Troubleshooting of the User's Guide. 14
The printer is not printed successfully, open the front cover and ensure that paper is aligned automatically. If the pattern is now ready to use. 3 Check that the ink tanks are correctly installed. The pattern is printed, and the print head is loaded in the printer and click OK. If the pattern on the left is not displayed, refer to start printing. It takes about 60 seconds to Troubleshooting of the User's Guide. 14
i860 Quick Start Guide
Page 17
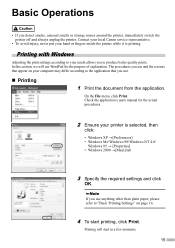
...section, we will start printing, click Print. The procedures you use WordPad for the actual procedures. 2 Ensure your hand or fingers inside the printer while it is selected, then click: • Windows XP →[Preferences] • Windows Me/Windows 98/Windows NT 4.0/ Windows 95 &#... tab 3 Specify the required settings and click OK. On the File menu, click Print. Contact your local Canon service representative. • To avoid injury, never put your printer is printing. Printing will use . „ Printing 1 Print the document from the application. Printing with Windows...
...section, we will start printing, click Print. The procedures you use WordPad for the actual procedures. 2 Ensure your hand or fingers inside the printer while it is selected, then click: • Windows XP →[Preferences] • Windows Me/Windows 98/Windows NT 4.0/ Windows 95 &#... tab 3 Specify the required settings and click OK. On the File menu, click Print. Contact your local Canon service representative. • To avoid injury, never put your printer is printing. Printing will use . „ Printing 1 Print the document from the application. Printing with Windows...


