
Software Starter Guide
Page 37
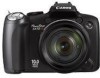
...[Stitch Photos]. 2 Click [1. PhotoStitch You can also manually specify the overlapping areas. 1 Click [Edit] in Stitch Assist mode with the camera's Stitch Assist mode because PhotoStitch can automatically detect the image order and orientation. Open PhotoStitch]. Instructions 4 Merge the images following the instructions in ...Stitch Assist Mode It is easy to merge images if they are shot with a wide converter, teleconverter or close-up lens cannot be merged accurately. Images Shot in the guidance panel at the top of a scene shot separately. Symbol displayed by merging...
...[Stitch Photos]. 2 Click [1. PhotoStitch You can also manually specify the overlapping areas. 1 Click [Edit] in Stitch Assist mode with the camera's Stitch Assist mode because PhotoStitch can automatically detect the image order and orientation. Open PhotoStitch]. Instructions 4 Merge the images following the instructions in ...Stitch Assist Mode It is easy to merge images if they are shot with a wide converter, teleconverter or close-up lens cannot be merged accurately. Images Shot in the guidance panel at the top of a scene shot separately. Symbol displayed by merging...
Software Starter Guide
Page 66
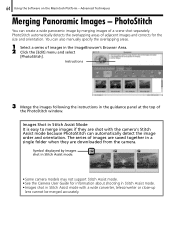
...PhotoStitch You can also manually specify the overlapping areas. 1 Select a series of images are shot with a wide converter, teleconverter or close-up lens cannot be merged accurately. Instructions 3 Merge the images following the instructions in the guidance panel at the top of a scene shot separately. Symbol... window. You can create a wide panoramic image by images shot in Stitch Assist mode. • Some camera models may not support Stitch Assist mode. • See the Camera User Guide for the size and orientation. The series of images in a single folder when they are saved...
...PhotoStitch You can also manually specify the overlapping areas. 1 Select a series of images are shot with a wide converter, teleconverter or close-up lens cannot be merged accurately. Instructions 3 Merge the images following the instructions in the guidance panel at the top of a scene shot separately. Symbol... window. You can create a wide panoramic image by images shot in Stitch Assist mode. • Some camera models may not support Stitch Assist mode. • See the Camera User Guide for the size and orientation. The series of images in a single folder when they are saved...
PowerShot SX10 IS Camera User Guide
Page 2
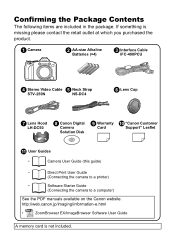
... Video Cable Neck Strap STV-250N NS-DC4 f Lens Cap g Lens Hood LH-DC50 h Canon Digital Camera Solution Disk i j Warranty "Canon Customer Card Support" Leaflet k User Guides • Camera User Guide (this guide) • Direct Print User Guide (Connecting the camera to a printer) • Software Starter Guide (Connecting the camera to a computer) See the PDF manuals available on the...
... Video Cable Neck Strap STV-250N NS-DC4 f Lens Cap g Lens Hood LH-DC50 h Canon Digital Camera Solution Disk i j Warranty "Canon Customer Card Support" Leaflet k User Guides • Camera User Guide (this guide) • Direct Print User Guide (Connecting the camera to a printer) • Software Starter Guide (Connecting the camera to a computer) See the PDF manuals available on the...
PowerShot SX10 IS Camera User Guide
Page 7
...Default Values 222 Connecting to a TV 223 Shooting/Playback Using a TV 223 Customizing the Camera (My Camera Settings) 225 Changing My Camera Settings 225 Registering My Camera Settings 226 Troubleshooting 228 List of Messages 239 Appendix 243 Safety Precautions 243 Preventing Malfunctions 249... Attaching the Lens Hood 253 Using the Power Kits (Sold Separately 254 Using an Externally Mounted Flash (Sold Separately) . . 257 Replacing the Date Battery 265 Camera Care and Maintenance 267 Specifications 268 Index 277 ...
...Default Values 222 Connecting to a TV 223 Shooting/Playback Using a TV 223 Customizing the Camera (My Camera Settings) 225 Changing My Camera Settings 225 Registering My Camera Settings 226 Troubleshooting 228 List of Messages 239 Appendix 243 Safety Precautions 243 Preventing Malfunctions 249... Attaching the Lens Hood 253 Using the Power Kits (Sold Separately 254 Using an Externally Mounted Flash (Sold Separately) . . 257 Replacing the Date Battery 265 Camera Care and Maintenance 267 Specifications 268 Index 277 ...

PowerShot SX10 IS Camera User Guide
Page 14
... Push the memory card with the lens cap attached. Ensure that the memory card is correctly oriented before turning on the camera. Attaching/Removing the Lens Cap Press both sides of the lens cap (a), and remove it (b). • To avoid losing the lens cap, we recommend clipping it clicks... (d). Be sure to remove the lens cap before inserting it . Close the cover ...
... Push the memory card with the lens cap attached. Ensure that the memory card is correctly oriented before turning on the camera. Attaching/Removing the Lens Cap Press both sides of the lens cap (a), and remove it (b). • To avoid losing the lens cap, we recommend clipping it clicks... (d). Be sure to remove the lens cap before inserting it . Close the cover ...
PowerShot SX10 IS Camera User Guide
Page 15
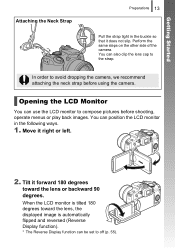
...order to compose pictures before using the camera. You can be set to the strap. Move it forward 180 degrees toward the lens, the displayed image is tilted 180 degrees toward the lens or backward 90 degrees. Opening the LCD Monitor You can also clip the lens cap to off (p. 55). Tilt it... right or left. 2. Perform the same steps on the other side of the camera. You can use the LCD monitor to avoid dropping the camera, we recommend attaching the neck strap before shooting, operate ...
...order to compose pictures before using the camera. You can be set to the strap. Move it forward 180 degrees toward the lens, the displayed image is tilted 180 degrees toward the lens or backward 90 degrees. Opening the LCD Monitor You can also clip the lens cap to off (p. 55). Tilt it... right or left. 2. Perform the same steps on the other side of the camera. You can use the LCD monitor to avoid dropping the camera, we recommend attaching the neck strap before shooting, operate ...
PowerShot SX10 IS Camera User Guide
Page 42
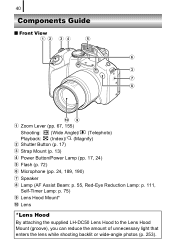
40 Components Guide „ Front View a Zoom Lever (pp. 67, 155) Shooting: (Wide Angle)/ (Telephoto) Playback: (Index)/ (Magnify) b Shutter Button (p. 17) c Strap Mount (p. 13) d Power Button/Power Lamp (pp. 17, 24) e Flash (p. 72) f Microphone (pp. 24, 189, 190) g Speaker h Lamp (AF Assist Beam: p. 55, Red-Eye Reduction Lamp: p. 111, Self-Timer Lamp: p. 75) i Lens Hood Mount* j Lens *Lens Hood By attaching the supplied LH-DC50 Lens Hood to the Lens Hood Mount (groove), you can reduce the amount of unnecessary light that enters the lens while shooting backlit or wide-angle photos (p. 253).
40 Components Guide „ Front View a Zoom Lever (pp. 67, 155) Shooting: (Wide Angle)/ (Telephoto) Playback: (Index)/ (Magnify) b Shutter Button (p. 17) c Strap Mount (p. 13) d Power Button/Power Lamp (pp. 17, 24) e Flash (p. 72) f Microphone (pp. 24, 189, 190) g Speaker h Lamp (AF Assist Beam: p. 55, Red-Eye Reduction Lamp: p. 111, Self-Timer Lamp: p. 75) i Lens Hood Mount* j Lens *Lens Hood By attaching the supplied LH-DC50 Lens Hood to the Lens Hood Mount (groove), you can reduce the amount of unnecessary light that enters the lens while shooting backlit or wide-angle photos (p. 253).
PowerShot SX10 IS Camera User Guide
Page 46
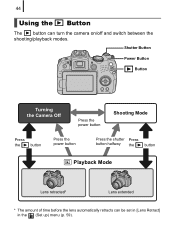
44 Using the Button The button can be set in [Lens Retract] in the (Set up) menu (p. 59). Shutter Button Power Button Button Turning the Camera Off Press the power button Shooting Mode Press the button Press the power button Press the shutter Press button halfway the button Playback Mode Lens retracted* Lens extended * The amount of time before the lens automatically retracts can turn the camera on/off and switch between the shooting/playback modes.
44 Using the Button The button can be set in [Lens Retract] in the (Set up) menu (p. 59). Shutter Button Power Button Button Turning the Camera Off Press the power button Shooting Mode Press the button Press the power button Press the shutter Press button halfway the button Playback Mode Lens retracted* Lens extended * The amount of time before the lens automatically retracts can turn the camera on/off and switch between the shooting/playback modes.
PowerShot SX10 IS Camera User Guide
Page 61
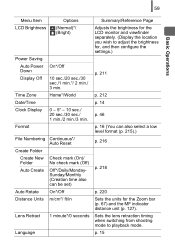
...215).) p. 216 p. 218 p. 220 Sets the units for the LCD monitor and viewfinder separately. (Display the location you wish to playback mode. Sets the lens retraction timing when switching from shooting mode to adjust the brightness for, and then configure the settings.) p. 211 p. 212 p. 14 p. 46 p. 16 (You... can be set) Auto Rotate On*/Off Distance Units m/cm*/ ft/in Lens Retract 1 minute*/0 seconds Language Summary/Reference Page Adjusts the brightness for the Zoom bar (p. 67) and the MF indicator distance unit (p. 127).
...215).) p. 216 p. 218 p. 220 Sets the units for the LCD monitor and viewfinder separately. (Display the location you wish to playback mode. Sets the lens retraction timing when switching from shooting mode to adjust the brightness for, and then configure the settings.) p. 211 p. 212 p. 14 p. 46 p. 16 (You... can be set) Auto Rotate On*/Off Distance Units m/cm*/ ft/in Lens Retract 1 minute*/0 seconds Language Summary/Reference Page Adjusts the brightness for the Zoom bar (p. 67) and the MF indicator distance unit (p. 127).
PowerShot SX10 IS Camera User Guide
Page 73
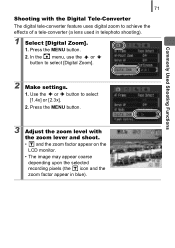
... [1.4x] or [2.3x]. 2. Press the MENU button. 3 Adjust the zoom level with the Digital Tele-Converter The digital tele-converter feature uses digital zoom to achieve the effects of a tele-converter (a lens used in blue). Use the or button to select [Digital Zoom]. 2 Make settings. 1. Commonly Used Shooting Functions 71 Shooting with the zoom lever...
... [1.4x] or [2.3x]. 2. Press the MENU button. 3 Adjust the zoom level with the Digital Tele-Converter The digital tele-converter feature uses digital zoom to achieve the effects of a tele-converter (a lens used in blue). Use the or button to select [Digital Zoom]. 2 Make settings. 1. Commonly Used Shooting Functions 71 Shooting with the zoom lever...
PowerShot SX10 IS Camera User Guide
Page 76
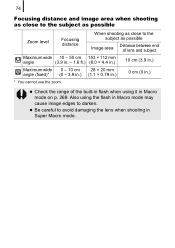
z Be careful to darken. Also using it in Macro mode on p. 269. z Check the range of lens and subject Maximum wide 10 - 50 cm 153 × 112 mm angle (3.9 in. - 1.6 ft.) (6.0 × 4.4 in.) 10 cm (3.9 in.) Maximum wide 0 - 10 cm 28 × ... Image area Distance between end of the built-in flash when using the flash in Macro mode may cause image edges to avoid damaging the lens when shooting in .) * You cannot use the zoom.
z Be careful to darken. Also using it in Macro mode on p. 269. z Check the range of lens and subject Maximum wide 10 - 50 cm 153 × 112 mm angle (3.9 in. - 1.6 ft.) (6.0 × 4.4 in.) 10 cm (3.9 in.) Maximum wide 0 - 10 cm 28 × ... Image area Distance between end of the built-in flash when using the flash in Macro mode may cause image edges to avoid damaging the lens when shooting in .) * You cannot use the zoom.

PowerShot SX10 IS Camera User Guide
Page 84
Continuous You can be taken without a flash. In Shoot Only mode, subjects can check the effect of up and down camera motions on the LCD monitor Summary Off - When set to [Continuous], some blurring may appear on the LCD monitor (or the viewfinder) ...to compose images and focus on the subjects. 82 Setting the Image Stabilizer Function Available Shooting Modes p. 284 The lens-shift type image stabilizer function allows you to minimize the camera shake effect (blurred images) when you shoot distant subjects that may occur depending on subjects. This option is pressed....
Continuous You can be taken without a flash. In Shoot Only mode, subjects can check the effect of up and down camera motions on the LCD monitor Summary Off - When set to [Continuous], some blurring may appear on the LCD monitor (or the viewfinder) ...to compose images and focus on the subjects. 82 Setting the Image Stabilizer Function Available Shooting Modes p. 284 The lens-shift type image stabilizer function allows you to minimize the camera shake effect (blurred images) when you shoot distant subjects that may occur depending on subjects. This option is pressed....

PowerShot SX10 IS Camera User Guide
Page 92
... also set to ). - The icon and MF indicator appear on ski slopes and the beach when the contrast is too strong between the subject and lens. Also, the setting will be fixed at the current state. AE lock (p. 131) and exposure shift are both light and dark areas in the scene...
... also set to ). - The icon and MF indicator appear on ski slopes and the beach when the contrast is too strong between the subject and lens. Also, the setting will be fixed at the current state. AE lock (p. 131) and exposure shift are both light and dark areas in the scene...
PowerShot SX10 IS Camera User Guide
Page 104
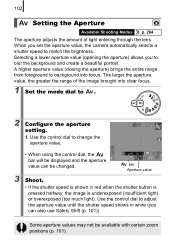
... the mode dial to match the brightness. Selecting a lower aperture value (opening the aperture) allows you set the aperture value, the camera automatically selects a shutter speed to . 2 Configure the aperture setting. 1. The larger the aperture value, the greater the range of light entering through... the lens. Use the control dial to blur the background and create a beautiful portrait. bar Aperture value 3 Shoot. • If the shutter speed ...
... the mode dial to match the brightness. Selecting a lower aperture value (opening the aperture) allows you set the aperture value, the camera automatically selects a shutter speed to . 2 Configure the aperture setting. 1. The larger the aperture value, the greater the range of light entering through... the lens. Use the control dial to blur the background and create a beautiful portrait. bar Aperture value 3 Shoot. • If the shutter speed ...
PowerShot SX10 IS Camera User Guide
Page 105
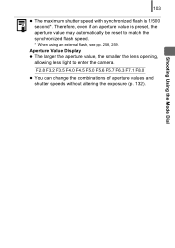
103 z The maximum shutter speed with synchronized flash is preset, the aperture value may automatically be reset to enter the camera. Aperture Value Display z The larger the aperture value, the smaller the lens opening, allowing less light to match the synchronized flash speed. * When using an external flash, see pp. 258, 259. Shooting Using the Mode Dial F2.8 F3.2 F3.5 F4.0 F4.5 F5.0 F5.6 F5.7 F6.3 F7.1 F8.0 z You can change the combinations of aperture values and shutter speeds without altering the exposure (p. 132). Therefore, even if an aperture value is 1/500 second*.
103 z The maximum shutter speed with synchronized flash is preset, the aperture value may automatically be reset to enter the camera. Aperture Value Display z The larger the aperture value, the smaller the lens opening, allowing less light to match the synchronized flash speed. * When using an external flash, see pp. 258, 259. Shooting Using the Mode Dial F2.8 F3.2 F3.5 F4.0 F4.5 F5.0 F5.6 F5.7 F6.3 F7.1 F8.0 z You can change the combinations of aperture values and shutter speeds without altering the exposure (p. 132). Therefore, even if an aperture value is 1/500 second*.

PowerShot SX10 IS Camera User Guide
Page 122
... turn off the camera or the lens retracts in playback mode (p. 44), the AF frame returns to a different face position. z When the [Spot AE Point] is selected as the metering mode, you can move the AF frame to the position you hold down the button. • When the camera detects faces, each press...
... turn off the camera or the lens retracts in playback mode (p. 44), the AF frame returns to a different face position. z When the [Spot AE Point] is selected as the metering mode, you can move the AF frame to the position you hold down the button. • When the camera detects faces, each press...
PowerShot SX10 IS Camera User Guide
Page 231
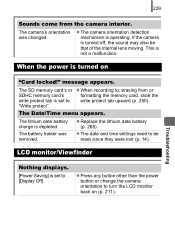
...The Date/Time menu appears. Troubleshooting The SD memory card's or z When recording to, erasing from the camera interior. z The date and time settings need to be that of the internal lens moving. 229 Sounds come from or SDHC memory card's formatting the memory card, slide the write protect tab... is set to [Display Off]. If the camera is set to turn the LCD monitor back on "Card locked!" ...
...The Date/Time menu appears. Troubleshooting The SD memory card's or z When recording to, erasing from the camera interior. z The date and time settings need to be that of the internal lens moving. 229 Sounds come from or SDHC memory card's formatting the memory card, slide the write protect tab... is set to [Display Off]. If the camera is set to turn the LCD monitor back on "Card locked!" ...
PowerShot SX10 IS Camera User Guide
Page 237
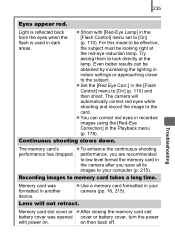
... your computer (p. 215). Continuous shooting slows down. z Use a memory card formatted in the [Flash Control] menu to memory card takes a long time. Lens will automatically correct red eyes while shooting and record the image to the card. on . For this mode to be effective, the subject must be...(p. 178). Even better results can correct red eyes in recorded images using the [Red-Eye Correction] in indoor settings or approaching closer to your camera (pp. 16, 215). performance, you are recommended to low level format the memory card in the [Flash Control] menu set to look directly...
... your computer (p. 215). Continuous shooting slows down. z Use a memory card formatted in the [Flash Control] menu to memory card takes a long time. Lens will automatically correct red eyes while shooting and record the image to the card. on . For this mode to be effective, the subject must be...(p. 178). Even better results can correct red eyes in recorded images using the [Red-Eye Correction] in indoor settings or approaching closer to your camera (pp. 16, 215). performance, you are recommended to low level format the memory card in the [Flash Control] menu set to look directly...
PowerShot SX10 IS Camera User Guide
Page 244
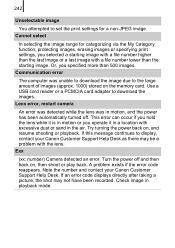
...been automatically turned off and then back on , and resume shooting or playback. Lens error, restart camera An error was detected while the lens was unable to download the image due to download the images. Exx (xx: number) Camera detected an error. Turn the power off . If an error code displays directly... Help Desk as there may not have been recorded. This error can occur if you hold the lens while it is in the air. 242 Unselectable image You attempted to display, contact your Canon Customer Support Help Desk. A problem exists if the error code reappears. Check image in a location...
...been automatically turned off and then back on , and resume shooting or playback. Lens error, restart camera An error was detected while the lens was unable to download the image due to download the images. Exx (xx: number) Camera detected an error. Turn the power off . If an error code displays directly... Help Desk as there may not have been recorded. This error can occur if you hold the lens while it is in the air. 242 Unselectable image You attempted to display, contact your Canon Customer Support Help Desk. A problem exists if the error code reappears. Check image in a location...
PowerShot SX10 IS Camera User Guide
Page 249
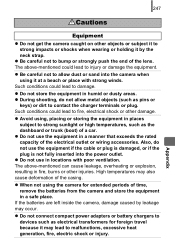
... sand into the power outlet. z When not using , placing or storing the equipment in fire, burns or other damage. z Avoid using the camera for foreign travel because it at a beach or place with poor ventilation. The above -mentioned can cause leakage, overheating or explosion, resulting in places...malfunctions, excessive heat generation, fire, electric shock or injury. z Do not store the equipment in a manner that exceeds the rated capacity of the lens. z Be careful not to bump or strongly push the end of the electrical outlet or wiring accessories. z Do not use the equipment in ...
... sand into the power outlet. z When not using , placing or storing the equipment in fire, burns or other damage. z Avoid using the camera for foreign travel because it at a beach or place with poor ventilation. The above -mentioned can cause leakage, overheating or explosion, resulting in places...malfunctions, excessive heat generation, fire, electric shock or injury. z Do not store the equipment in a manner that exceeds the rated capacity of the lens. z Be careful not to bump or strongly push the end of the electrical outlet or wiring accessories. z Do not use the equipment in ...


