
Software Starter Guide
Page 19
Click the mouse button or press any key on the keyboard to resume the ability to close the start screen. Set the Direct Transfer settings on the camera and press the (Print/Share) button or the FUNC./SET button. Thumbnail Window View Window • To download images that have had ...transfer settings set with the camera, use the Direct Transfer function, the Direct Transfer settings menu will appear on the LCD monitor and the (Print/Share) button will blink blue during the transfer and remain lit when it...
Click the mouse button or press any key on the keyboard to resume the ability to close the start screen. Set the Direct Transfer settings on the camera and press the (Print/Share) button or the FUNC./SET button. Thumbnail Window View Window • To download images that have had ...transfer settings set with the camera, use the Direct Transfer function, the Direct Transfer settings menu will appear on the LCD monitor and the (Print/Share) button will blink blue during the transfer and remain lit when it...
Direct Print User Guide
Page 13
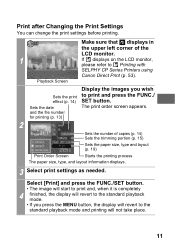
...mode. • If you wish to the standard playback mode and printing will revert to print and press the FUNC./ SET button. Playback Screen Sets the print effect (p. 14) Sets the date and the file number for printing (p. 13) Display the images you press the MENU...and layout information displays. 3 Select print settings as needed. The print order screen appears. 2 Sets the number of the LCD monitor. 1 If displays on the LCD monitor, please refer to Printing with SELPHY CP Series Printers using Canon Direct Print (p. 53). Print after Changing the Print Settings You can change...
...mode. • If you wish to the standard playback mode and printing will revert to print and press the FUNC./ SET button. Playback Screen Sets the print effect (p. 14) Sets the date and the file number for printing (p. 13) Display the images you press the MENU...and layout information displays. 3 Select print settings as needed. The print order screen appears. 2 Sets the number of the LCD monitor. 1 If displays on the LCD monitor, please refer to Printing with SELPHY CP Series Printers using Canon Direct Print (p. 53). Print after Changing the Print Settings You can change...
Direct Print User Guide
Page 20
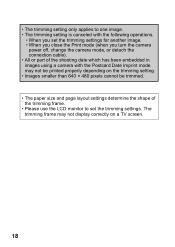
...settings determine the shape of the trimming frame. • Please use the LCD monitor to set the trimming settings for another image. • When you close the Print mode (when you turn the camera power off, change the camera mode, or detach the connection cable). • All or part of...shooting date which has been embedded in images using a camera with the Postcard Date Imprint mode may not display correctly on the trimming setting. • Images smaller than 640 × 480 pixels cannot be printed properly depending on a TV screen. 18 • The trimming setting only applies to one...
...settings determine the shape of the trimming frame. • Please use the LCD monitor to set the trimming settings for another image. • When you close the Print mode (when you turn the camera power off, change the camera mode, or detach the connection cable). • All or part of...shooting date which has been embedded in images using a camera with the Postcard Date Imprint mode may not display correctly on the trimming setting. • Images smaller than 640 × 480 pixels cannot be printed properly depending on a TV screen. 18 • The trimming setting only applies to one...

Direct Print User Guide
Page 35
... display will revert to the standard playback mode and printing will not take place. 33 The print order screen appears. 2 Sets the number of the LCD monitor. 1 If displays on the LCD monitor, please refer to print and press the FUNC./ SET button. Print after Changing the Print Settings You...in the upper left corner of copies (p. 37) Sets the trimming portion (p. 38) Sets the paper size, type and layout (p. 42) Print Order Screen Starts the printing process The paper size, type, and layout information displays. 3 Select print settings as needed. Select [Print] and press the FUNC./SET...
... display will revert to the standard playback mode and printing will not take place. 33 The print order screen appears. 2 Sets the number of the LCD monitor. 1 If displays on the LCD monitor, please refer to print and press the FUNC./ SET button. Print after Changing the Print Settings You...in the upper left corner of copies (p. 37) Sets the trimming portion (p. 38) Sets the paper size, type and layout (p. 42) Print Order Screen Starts the printing process The paper size, type, and layout information displays. 3 Select print settings as needed. Select [Print] and press the FUNC./SET...

Direct Print User Guide
Page 43
... frame may not be printed properly depending on a TV screen. 41 • The trimming setting only applies to set the trimming settings for another image. • When you close the Print mode (when you turn the camera power off, change the camera mode, or detach the connection cable). • All ...or part of the trimming frame. • Please use the LCD monitor to one image. • The trimming setting is canceled with the Postcard...
... frame may not be printed properly depending on a TV screen. 41 • The trimming setting only applies to set the trimming settings for another image. • When you close the Print mode (when you turn the camera power off, change the camera mode, or detach the connection cable). • All ...or part of the trimming frame. • Please use the LCD monitor to one image. • The trimming setting is canceled with the Postcard...

Direct Print User Guide
Page 52
...Ink Cassete Error The ink tank has run out of Messages The following messages may appear on the camera LCD monitor if an error occurs during printing. For the remedies to your nearest Canon Customer Support center listed in the contact list provided with the ink. If you select [Continue] ...in the error screen, you select [Continue] in the error screen. List of ink or there is no ink tank in the ...
...Ink Cassete Error The ink tank has run out of Messages The following messages may appear on the camera LCD monitor if an error occurs during printing. For the remedies to your nearest Canon Customer Support center listed in the contact list provided with the ink. If you select [Continue] ...in the error screen, you select [Continue] in the error screen. List of ink or there is no ink tank in the ...

Direct Print User Guide
Page 56
...SET button. 4 If you wish to print and press the FUNC./ SET button. The print order screen appears. 2 Sets the Print Style (p. 55) Sets the Printing Area (Trimming) (p. 57) Print Order Screen The paper size, type, and layout information displays. 3 Select print settings as required. Print after ...• You cannot print RAW images. • It may not be possible to Printing with a different camera. 54 Selects the Number of the LCD monitor. 1 If displays on the LCD monitor, please refer to play back or print images shot with SELPHY ES Series/SELPHY CP Series Printers using...
...SET button. 4 If you wish to print and press the FUNC./ SET button. The print order screen appears. 2 Sets the Print Style (p. 55) Sets the Printing Area (Trimming) (p. 57) Print Order Screen The paper size, type, and layout information displays. 3 Select print settings as required. Print after ...• You cannot print RAW images. • It may not be possible to Printing with a different camera. 54 Selects the Number of the LCD monitor. 1 If displays on the LCD monitor, please refer to play back or print images shot with SELPHY ES Series/SELPHY CP Series Printers using...

Direct Print User Guide
Page 59
...If a trimming setting has already been selected for the image, the frame will appear at the center of the image area displayed on the LCD monitor is changed after having made the trimming settings, you must select the settings again. a b Trimming Frame Steps 2a and 3a Steps... on bordered prints. Please set . (Images are printed without any date or borders.) • Practically all of the image. The trimming setting screen differs depending on the camera model. The trimming frame will appear around the previously selected portion. If the print style is printed on the display...
...If a trimming setting has already been selected for the image, the frame will appear at the center of the image area displayed on the LCD monitor is changed after having made the trimming settings, you must select the settings again. a b Trimming Frame Steps 2a and 3a Steps... on bordered prints. Please set . (Images are printed without any date or borders.) • Practically all of the image. The trimming setting screen differs depending on the camera model. The trimming frame will appear around the previously selected portion. If the print style is printed on the display...
Direct Print User Guide
Page 62
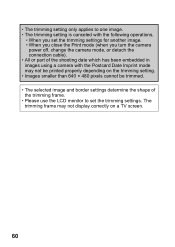
...of the trimming frame. • Please use the LCD monitor to set the trimming settings for another image. • When you close the Print mode (when you turn the camera power off, change the camera mode, or detach the connection cable). • All... or part of the shooting date which has been embedded in images using a camera with the following operations. • When you set the trimming settings. • The trimming setting only applies to... • Images smaller than 640 × 480 pixels cannot be printed properly depending on a TV screen. 60
...of the trimming frame. • Please use the LCD monitor to set the trimming settings for another image. • When you close the Print mode (when you turn the camera power off, change the camera mode, or detach the connection cable). • All... or part of the shooting date which has been embedded in images using a camera with the following operations. • When you set the trimming settings. • The trimming setting only applies to... • Images smaller than 640 × 480 pixels cannot be printed properly depending on a TV screen. 60
Direct Print User Guide
Page 65
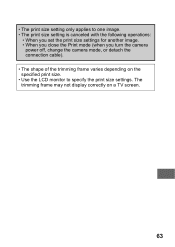
• The print size setting only applies to specify the print size settings. The trimming frame may not display correctly on the specified print size. • Use the LCD monitor to one image. • The print size setting is canceled with the following operations: • When you set the print size settings for another image. • When you close the Print mode (when you turn the camera power off, change the camera mode, or detach the connection cable). • The shape of the trimming frame varies depending on a TV screen. 63
• The print size setting only applies to specify the print size settings. The trimming frame may not display correctly on the specified print size. • Use the LCD monitor to one image. • The print size setting is canceled with the following operations: • When you set the print size settings for another image. • When you close the Print mode (when you turn the camera power off, change the camera mode, or detach the connection cable). • The shape of the trimming frame varies depending on a TV screen. 63

PowerShot SX10 IS Camera User Guide
Page 17
... Hold down the button and press the MENU button. 3. Press the button. Setting the Display Language You can change the language displayed in the LCD monitor menus and messages. Button Buttons Button MENU Button 1. Use the or button to select [Date/Time]. 4. Press the (Playback) button. ... Preparations 15 To Change a Previously Set Date/Time Use the following procedures to select a language. 4. Press the button. The date/time setting screen will appear when the capacity of the lithium date/time battery is depleted (p. 265). Use the , , or button to display the Date/Time...
... Hold down the button and press the MENU button. 3. Press the button. Setting the Display Language You can change the language displayed in the LCD monitor menus and messages. Button Buttons Button MENU Button 1. Use the or button to select [Date/Time]. 4. Press the (Playback) button. ... Preparations 15 To Change a Previously Set Date/Time Use the following procedures to select a language. 4. Press the button. The date/time setting screen will appear when the capacity of the lithium date/time battery is depleted (p. 265). Use the , , or button to display the Date/Time...

PowerShot SX10 IS Camera User Guide
Page 64
... of the DISP. See Information Displayed on the LCD Monitor (Viewfinder) and Menus for details (p. 49). (The following are the screens that display when shooting in mode.) „ Shooting Mode (The screens that display vary depending on the [Custom Display] settings (p. 65).) LCD monitor (No Information) LCD monitor (Information View) Viewfinder (Information View) When the...
... of the DISP. See Information Displayed on the LCD Monitor (Viewfinder) and Menus for details (p. 49). (The following are the screens that display when shooting in mode.) „ Shooting Mode (The screens that display vary depending on the [Custom Display] settings (p. 65).) LCD monitor (No Information) LCD monitor (Information View) Viewfinder (Information View) When the...
PowerShot SX10 IS Camera User Guide
Page 67
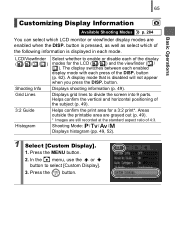
...each enabled display mode with each mode. Displays shooting information (p. 49). Displays grid lines to select [Custom Display]. 3. Helps confirm the print area for the LCD ( / ) and the viewfinder ( / ). Shooting Mode: / / / Displays histogram (pp. 49, 52). 1 Select [Custom Display]. 1. button ...(p. 62). In the menu, use the or button to divide the screen into 9 parts. Areas outside the printable area are grayed out (p. 49). * Images are enabled when the DISP. button. button is pressed, as well...
...each enabled display mode with each mode. Displays shooting information (p. 49). Displays grid lines to select [Custom Display]. 3. Helps confirm the print area for the LCD ( / ) and the viewfinder ( / ). Shooting Mode: / / / Displays histogram (pp. 49, 52). 1 Select [Custom Display]. 1. button ...(p. 62). In the menu, use the or button to divide the screen into 9 parts. Areas outside the printable area are grayed out (p. 49). * Images are enabled when the DISP. button. button is pressed, as well...
PowerShot SX10 IS Camera User Guide
Page 68
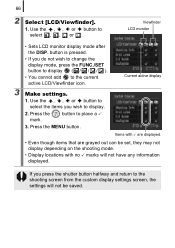
... to place a 3 3. Viewfinder LCD monitor • Sets LCD monitor display mode after the DISP. button to select , , or . Press the MENU button. button is pressed. • If you press the shutter button halfway and return to the shooting screen from the custom display settings screen, the settings will not be set.../ ). • You cannot add to display. 2. Current active display 3 Make settings. 1. Items with no 3 marks will not have any information displayed. 66 2 Select [LCD/Viewfinder]. 1. Use the , , or button to select the items you wish to the current active...
... to place a 3 3. Viewfinder LCD monitor • Sets LCD monitor display mode after the DISP. button to select , , or . Press the MENU button. button is pressed. • If you press the shutter button halfway and return to the shooting screen from the custom display settings screen, the settings will not be set.../ ). • You cannot add to display. 2. Current active display 3 Make settings. 1. Items with no 3 marks will not have any information displayed. 66 2 Select [LCD/Viewfinder]. 1. Use the , , or button to select the items you wish to the current active...

PowerShot SX10 IS Camera User Guide
Page 74
... You can configure detailed settings for flash recharging will change depending on usage conditions and remaining battery power. In this screen is no indication. However, when shooting with the camera attached to shoot with the , or mode there is displayed (p. 110). 3 When you press the MENU button ... Flash Available Shooting Modes 1 Raise the flash manually. You are recommended to a tripod or other device if the camera shake warning icon appears. z A flashing red in the LCD monitor. z The time required for the flash when you are not using the flash, lower the flash until it...
... You can configure detailed settings for flash recharging will change depending on usage conditions and remaining battery power. In this screen is no indication. However, when shooting with the camera attached to shoot with the , or mode there is displayed (p. 110). 3 When you press the MENU button ... Flash Available Shooting Modes 1 Raise the flash manually. You are recommended to a tripod or other device if the camera shake warning icon appears. z A flashing red in the LCD monitor. z The time required for the flash when you are not using the flash, lower the flash until it...
PowerShot SX10 IS Camera User Guide
Page 146
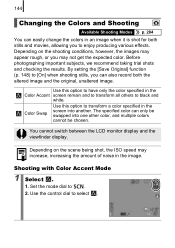
...to transform a color specified in the image. Color Swap Use this option to have only the color specified in the Color Accent screen remain and to transform all others to . 2. Depending on the shooting conditions, however, the images may increase, increasing the amount of ...noise in the screen into one other color, and multiple colors cannot be chosen. You cannot switch between the LCD monitor display and the viewfinder display. 144 Changing the Colors and Shooting Available Shooting Modes ...
...to transform a color specified in the image. Color Swap Use this option to have only the color specified in the Color Accent screen remain and to transform all others to . 2. Depending on the shooting conditions, however, the images may increase, increasing the amount of ...noise in the screen into one other color, and multiple colors cannot be chosen. You cannot switch between the LCD monitor display and the viewfinder display. 144 Changing the Colors and Shooting Available Shooting Modes ...

PowerShot SX10 IS Camera User Guide
Page 154
...bar is set again and then locked. • : Pressing the button turns off the LCD monitor (or the viewfinder). The display turns on again by pressing any button other than the power button or changing the camera orientation. Press the MENU button. • If displays to the icon's lower right,...the button sets AE lock. Ensure that the button is pressed, the settings of the registered functions are switched. • , : The corresponding setup screen is positioned so it with some shooting modes or settings even if you wish to . • : Each press of the button records the white ...
...bar is set again and then locked. • : Pressing the button turns off the LCD monitor (or the viewfinder). The display turns on again by pressing any button other than the power button or changing the camera orientation. Press the MENU button. • If displays to the icon's lower right,...the button sets AE lock. Ensure that the button is pressed, the settings of the registered functions are switched. • , : The corresponding setup screen is positioned so it with some shooting modes or settings even if you wish to . • : Each press of the button records the white ...

PowerShot SX10 IS Camera User Guide
Page 220
... Folder]. 4. You can create a new folder at any time and the recorded images will be displayed on the LCD monitor (or the viewfinder) when shooting. Press the MENU button. • will disappear from the screen when a new folder is created. The symbol will be automatically saved to select the menu. 3. To Folder...
... Folder]. 4. You can create a new folder at any time and the recorded images will be displayed on the LCD monitor (or the viewfinder) when shooting. Press the MENU button. • will disappear from the screen when a new folder is created. The symbol will be automatically saved to select the menu. 3. To Folder...

PowerShot SX10 IS Camera User Guide
Page 232
230 Camera screen is black at start -up . Incompatible image has been selected as the sun... not in devices shooting a bright subject, containing CCDs and does not such as the startup image in the My Camera settings (p. 225) or use the supplied software program ZoomBrowser EX or ImageBrowser to restore the default settings. z Change... the start -up image in the My Camera settings. See ZoomBrowser EX/ ImageBrowser Software User Guide (PDF). This bar of light (purplish red) appears on the LCD monitor. The image in the LCD monitor will be recorded when shooting movies. z This...
230 Camera screen is black at start -up . Incompatible image has been selected as the sun... not in devices shooting a bright subject, containing CCDs and does not such as the startup image in the My Camera settings (p. 225) or use the supplied software program ZoomBrowser EX or ImageBrowser to restore the default settings. z Change... the start -up image in the My Camera settings. See ZoomBrowser EX/ ImageBrowser Software User Guide (PDF). This bar of light (purplish red) appears on the LCD monitor. The image in the LCD monitor will be recorded when shooting movies. z This...
PowerShot SX10 IS Camera User Guide
Page 260
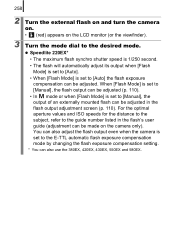
... 430EX, 550EX and 580EX. 258 2 Turn the external flash on and turn the camera on. • (red) appears on the camera only). z Speedlite 220EX* • The maximum flash synchro shutter speed is 1/250... number listed in the flash's user guide (adjustment can be adjusted in the flash output adjustment screen (p. 110). For the optimal aperture values and ISO speeds for the distance to the subject, refer.... When [Flash Mode] is set to [Manual], the flash output can be made on the LCD monitor (or the viewfinder). 3 Turn the mode dial to the E-TTL automatic flash exposure compensation mode...
... 430EX, 550EX and 580EX. 258 2 Turn the external flash on and turn the camera on. • (red) appears on the camera only). z Speedlite 220EX* • The maximum flash synchro shutter speed is 1/250... number listed in the flash's user guide (adjustment can be adjusted in the flash output adjustment screen (p. 110). For the optimal aperture values and ISO speeds for the distance to the subject, refer.... When [Flash Mode] is set to [Manual], the flash output can be made on the LCD monitor (or the viewfinder). 3 Turn the mode dial to the E-TTL automatic flash exposure compensation mode...

