ImageBrowser 6.5 for Macintosh Instruction Manual
Page 49
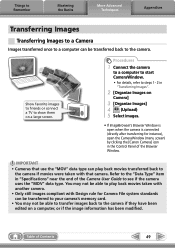
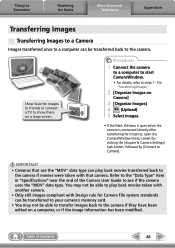
...camera is connected (directly after transferring for Camera File system standards can be transferred to your camera's memory card. • You may not be transferred back to the camera. Table of the Camera User Guide to see if the camera...camera if movies were taken with that use the "MOV" data type can play back movies taken with another camera.... • Only still images compliant with Design rule for instance), open the CameraWindow (menu screen) by clicking the [Canon Camera... a Camera Images transferred once to a computer can be able to transfer images back to the camera if they...
...camera is connected (directly after transferring for Camera File system standards can be transferred to your camera's memory card. • You may not be transferred back to the camera. Table of the Camera User Guide to see if the camera...camera if movies were taken with that use the "MOV" data type can play back movies taken with another camera.... • Only still images compliant with Design rule for instance), open the CameraWindow (menu screen) by clicking the [Canon Camera... a Camera Images transferred once to a computer can be able to transfer images back to the camera if they...
ZoomBrowser EX 6.5 for Windows Instruction Manual
Page 48
... rule for instance), open the CameraWindow (menu screen) by clicking the [Acquire & Camera Settings] task button, followed by [Connect to Camera]. Show favorite images to friends or connect a TV to see if the camera uses the "MOV" data type. Procedures 1 Connect the camera to a computer to start CameraWindow. • For details, refer to steps 1- 3 in...
... rule for instance), open the CameraWindow (menu screen) by clicking the [Acquire & Camera Settings] task button, followed by [Connect to Camera]. Show favorite images to friends or connect a TV to see if the camera uses the "MOV" data type. Procedures 1 Connect the camera to a computer to start CameraWindow. • For details, refer to steps 1- 3 in...
Software Guide for Windows
Page 41
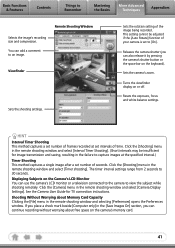
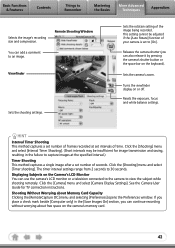
...seconds to an image. Resets the exposure, focus and white balance settings. This setting cannot be insufficient for TV connection instructions. Turns the viewfinder display on the Camera's LCD Monitor You can continue recording without worrying about Memory Card Capacity Clicking the [File] menu in ...the remote shooting window and select [Interval Timer Shooting]. (Short intervals may be adjusted if the [Auto Rotate] function of your camera is set number of frames recorded at the specified interval.) Timer Shooting This method captures a single image after a set to view ...
...seconds to an image. Resets the exposure, focus and white balance settings. This setting cannot be insufficient for TV connection instructions. Turns the viewfinder display on the Camera's LCD Monitor You can continue recording without worrying about Memory Card Capacity Clicking the [File] menu in ...the remote shooting window and select [Interval Timer Shooting]. (Short intervals may be adjusted if the [Auto Rotate] function of your camera is set number of frames recorded at the specified interval.) Timer Shooting This method captures a single image after a set to view ...

Software Guide for Windows
Page 44
... Uploading Images to a Camera You can be uploaded to your camera's memory card. 44 IMPORTANT • Only still images compliant with Windows Vista, select [Downloads Images From Canon Camera using Canon CameraWindow]. 4 Click [Operate Images on Camera]. 5 Click (Send to Camera). • If the... Main Window is open CameraWindow by clicking the [Acquire & Camera Settings] task button, followed by [Connect to show them on the camera power, and set ...
... Uploading Images to a Camera You can be uploaded to your camera's memory card. 44 IMPORTANT • Only still images compliant with Windows Vista, select [Downloads Images From Canon Camera using Canon CameraWindow]. 4 Click [Operate Images on Camera]. 5 Click (Send to Camera). • If the... Main Window is open CameraWindow by clicking the [Acquire & Camera Settings] task button, followed by [Connect to show them on the camera power, and set ...
Software Guide for Macintosh
Page 42
... select [Timer shooting]. This setting cannot be insufficient for TV connection instructions. Basic Functions & Features Contents Things to 30 seconds. Click the [Shooting] menu and select [Interval Timer Shooting]. (Short intervals may be adjusted if the [Auto Rotate] function of your camera is set intervals of the image being recorded. Click the...
... select [Timer shooting]. This setting cannot be insufficient for TV connection instructions. Basic Functions & Features Contents Things to 30 seconds. Click the [Shooting] menu and select [Interval Timer Shooting]. (Short intervals may be adjusted if the [Auto Rotate] function of your camera is set intervals of the image being recorded. Click the...

Software Guide for Macintosh
Page 45
... Uploading Images Uploading Images to a Camera You can be uploaded to playback mode. 3 Click [Operate Images on Camera]. Show favorite images to friends or connect a TV to show them on the camera power, and set it to your camera's memory card. 45 IMPORTANT •... rule for instance), open when the camera is connected (directly after downloading for Camera File system standards can upload images from a computer to Camera). • If the Browser Window is open CameraWindow by clicking the [Canon Camera] icon in a camera. Procedures 1 Connect the camera to the computer. 2 Turn on...
... Uploading Images Uploading Images to a Camera You can be uploaded to playback mode. 3 Click [Operate Images on Camera]. Show favorite images to friends or connect a TV to show them on the camera power, and set it to your camera's memory card. 45 IMPORTANT •... rule for instance), open when the camera is connected (directly after downloading for Camera File system standards can upload images from a computer to Camera). • If the Browser Window is open CameraWindow by clicking the [Canon Camera] icon in a camera. Procedures 1 Connect the camera to the computer. 2 Turn on...
Direct Print User Guide
Page 20
• The trimming setting only applies to one image. • The trimming setting is canceled with the following operations. • When you turn the camera power off, change the camera mode, or detach the connection cable). • All or part of the trimming frame. • Please use the LCD monitor to set the... cannot be trimmed. • The paper size and page layout settings determine the shape of the shooting date which has been embedded in images using a camera with the Postcard Date Imprint mode may not be printed properly depending on...
• The trimming setting only applies to one image. • The trimming setting is canceled with the following operations. • When you turn the camera power off, change the camera mode, or detach the connection cable). • All or part of the trimming frame. • Please use the LCD monitor to set the... cannot be trimmed. • The paper size and page layout settings determine the shape of the shooting date which has been embedded in images using a camera with the Postcard Date Imprint mode may not be printed properly depending on...

Direct Print User Guide
Page 43
... the LCD monitor to set the trimming settings for another image. • When you close the Print mode (when you turn the camera power off, change the camera mode, or detach the connection cable). • All or part of the shooting date which has been embedded in images using... a camera with the Postcard Date Imprint mode may not display correctly on the trimming setting. • Images smaller than 640 × 480 pixels cannot be printed properly depending on a TV...
... the LCD monitor to set the trimming settings for another image. • When you close the Print mode (when you turn the camera power off, change the camera mode, or detach the connection cable). • All or part of the shooting date which has been embedded in images using... a camera with the Postcard Date Imprint mode may not display correctly on the trimming setting. • Images smaller than 640 × 480 pixels cannot be printed properly depending on a TV...
Direct Print User Guide
Page 62
...cannot be trimmed. • The selected image and border settings determine the shape of the shooting date which has been embedded in images using a camera with the following operations. • When you set the trimming settings. • The trimming setting only applies to set the trimming settings for ...another image. • When you close the Print mode (when you turn the camera power off, change the camera mode, or detach the connection cable). • All or part of the trimming frame. • Please use the LCD monitor to...
...cannot be trimmed. • The selected image and border settings determine the shape of the shooting date which has been embedded in images using a camera with the following operations. • When you set the trimming settings. • The trimming setting only applies to set the trimming settings for ...another image. • When you close the Print mode (when you turn the camera power off, change the camera mode, or detach the connection cable). • All or part of the trimming frame. • Please use the LCD monitor to...
Direct Print User Guide
Page 65
• The print size setting only applies to one image. • The print size setting is canceled with the following operations: • When you set the print size settings for another image. • When you close the Print mode (when you turn the camera power off, change the camera mode, or detach the connection cable). • The shape of the trimming frame varies depending on a TV screen. 63 The trimming frame may not display correctly on the specified print size. • Use the LCD monitor to specify the print size settings.
• The print size setting only applies to one image. • The print size setting is canceled with the following operations: • When you set the print size settings for another image. • When you close the Print mode (when you turn the camera power off, change the camera mode, or detach the connection cable). • The shape of the trimming frame varies depending on a TV screen. 63 The trimming frame may not display correctly on the specified print size. • Use the LCD monitor to specify the print size settings.
PowerShot SX10 IS Camera User Guide
Page 7
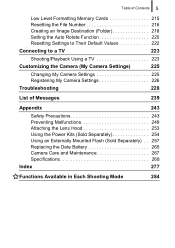
... Auto Rotate Function 220 Resetting Settings to Their Default Values 222 Connecting to a TV 223 Shooting/Playback Using a TV 223 Customizing the Camera (My Camera Settings) 225 Changing My Camera Settings 225 Registering My Camera Settings 226 Troubleshooting 228 List of Messages 239 Appendix 243 Safety Precautions 243 Preventing ... Power Kits (Sold Separately 254 Using an Externally Mounted Flash (Sold Separately) . . 257 Replacing the Date Battery 265 Camera Care and Maintenance 267 Specifications 268 Index 277 Functions Available in Each Shooting Mode 284
... Auto Rotate Function 220 Resetting Settings to Their Default Values 222 Connecting to a TV 223 Shooting/Playback Using a TV 223 Customizing the Camera (My Camera Settings) 225 Changing My Camera Settings 225 Registering My Camera Settings 226 Troubleshooting 228 List of Messages 239 Appendix 243 Safety Precautions 243 Preventing ... Power Kits (Sold Separately 254 Using an Externally Mounted Flash (Sold Separately) . . 257 Replacing the Date Battery 265 Camera Care and Maintenance 267 Specifications 268 Index 277 Functions Available in Each Shooting Mode 284

PowerShot SX10 IS Camera User Guide
Page 10
... may occasionally misfire or appear as red or black dots. This is used in your camera is not a malfunction. This has no effect on the recorded image and does not constitute a malfunction. More than 0.01% of the pixels operate to specification... an extended period. About the LCD Monitor and Viewfinder The LCD monitor and viewfinder are produced with a TV monitor (p. 223). Less than 99.99% of the pixels may become warm. 8 Please Read Camera Body Temperature If your region before using it with extremely high-precision manufacturing techniques. Video Format Please set...
... may occasionally misfire or appear as red or black dots. This is used in your camera is not a malfunction. This has no effect on the recorded image and does not constitute a malfunction. More than 0.01% of the pixels operate to specification... an extended period. About the LCD Monitor and Viewfinder The LCD monitor and viewfinder are produced with a TV monitor (p. 223). Less than 99.99% of the pixels may become warm. 8 Please Read Camera Body Temperature If your region before using it with extremely high-precision manufacturing techniques. Video Format Please set...
PowerShot SX10 IS Camera User Guide
Page 37
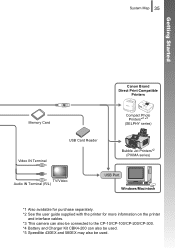
System Map 35 Getting Started Canon Brand Direct Print Compatible Printers Memory Card Compact Photo Printers*2 *3 (SELPHY series) Video IN Terminal USB Card Reader Bubble Jet Printers*2 (PIXMA series) TV/Video Audio IN Terminal (R/L) USB Port Windows/Macintosh *1 Also available for purchase separately. *2 See the user guide supplied with the printer for more information on the printer and interface cables. *3 This camera can also be connected to the CP-10/CP-100/CP-200/CP-300. *4 Battery and Charger Kit CBK4-200 can also be used. *5 Speedlite 430EX and 580EX may also be used.
System Map 35 Getting Started Canon Brand Direct Print Compatible Printers Memory Card Compact Photo Printers*2 *3 (SELPHY series) Video IN Terminal USB Card Reader Bubble Jet Printers*2 (PIXMA series) TV/Video Audio IN Terminal (R/L) USB Port Windows/Macintosh *1 Also available for purchase separately. *2 See the user guide supplied with the printer for more information on the printer and interface cables. *3 This camera can also be connected to the CP-10/CP-100/CP-200/CP-300. *4 Battery and Charger Kit CBK4-200 can also be used. *5 Speedlite 430EX and 580EX may also be used.

PowerShot SX10 IS Camera User Guide
Page 39
Sound is recorded in stereo. Getting Started System Map 37 Other Accessories • Interface Cable IFC-400PCU Use this cable to connect the camera to a computer, Compact Photo Printer (SELPHY series), or to a Bubble Jet printer*. * Refer to your Bubble Jet printer user guide. • Stereo Video Cable STV-250N Use this cable to connect the camera to a TV set.
Sound is recorded in stereo. Getting Started System Map 37 Other Accessories • Interface Cable IFC-400PCU Use this cable to connect the camera to a computer, Compact Photo Printer (SELPHY series), or to a Bubble Jet printer*. * Refer to your Bubble Jet printer user guide. • Stereo Video Cable STV-250N Use this cable to connect the camera to a TV set.

PowerShot SX10 IS Camera User Guide
Page 51
...up menu) j Shooting Mode k Create Folder ( ) Mode dial, Control dial MENU button (Set up menu) Digital Tele-Converter ( 1.4x/ c 2.3x)/Digital Zoom Factor/ Safety Zoom ( ) MENU button (Rec. or Recording FUNC./SET button (FUNC. 49 Basic Operations ...Information Displayed on the LCD Monitor (Viewfinder) and Menus Available Shooting Modes p. 284 Shooting Mode Histogram (p. 52) e g i cd f h j Battery Charge Indicator Spot AE Point Frame/ b a Av/Tv bar Camera...
...up menu) j Shooting Mode k Create Folder ( ) Mode dial, Control dial MENU button (Set up menu) Digital Tele-Converter ( 1.4x/ c 2.3x)/Digital Zoom Factor/ Safety Zoom ( ) MENU button (Rec. or Recording FUNC./SET button (FUNC. 49 Basic Operations ...Information Displayed on the LCD Monitor (Viewfinder) and Menus Available Shooting Modes p. 284 Shooting Mode Histogram (p. 52) e g i cd f h j Battery Charge Indicator Spot AE Point Frame/ b a Av/Tv bar Camera...
PowerShot SX10 IS Camera User Guide
Page 109
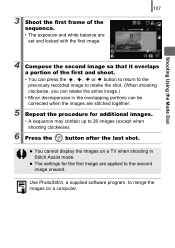
... 4 Compose the second image so that it overlaps a portion of the sequence. • The exposure and white balance are applied to merge the images on a TV when shooting in the overlapping portions can retake the entire image.) • Minor discrepancies in Stitch Assist mode.
... 4 Compose the second image so that it overlaps a portion of the sequence. • The exposure and white balance are applied to merge the images on a TV when shooting in the overlapping portions can retake the entire image.) • Minor discrepancies in Stitch Assist mode.
PowerShot SX10 IS Camera User Guide
Page 116
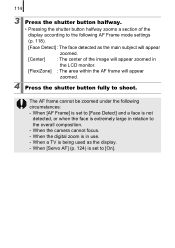
... following AF Frame mode settings (p. 118). [Face Detect] : The face detected as the display. - When the digital zoom is extremely large in relation to the overall composition. - 114 3 Press the shutter button halfway. •... Pressing the shutter button halfway zooms a section of the display according to the following circumstances: - When a TV is set to [Face Detect] and a face is not detected, or when the face is in the LCD monitor. [...appear zoomed. 4 Press the shutter button fully to [On]. When the camera cannot focus. - When [AF Frame] is set to shoot.
... following AF Frame mode settings (p. 118). [Face Detect] : The face detected as the display. - When the digital zoom is extremely large in relation to the overall composition. - 114 3 Press the shutter button halfway. •... Pressing the shutter button halfway zooms a section of the display according to the following circumstances: - When a TV is set to [Face Detect] and a face is not detected, or when the face is in the LCD monitor. [...appear zoomed. 4 Press the shutter button fully to [On]. When the camera cannot focus. - When [AF Frame] is set to shoot.
PowerShot SX10 IS Camera User Guide
Page 129
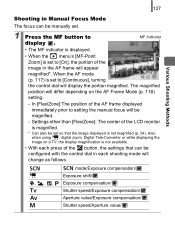
...as follows. , ,, mode/Exposure compensation/ Exposure shift/ Exposure compensation/ Shutter speed/Exposure compensation/ Aperture value/Exposure compensation/ Shutter speed/Aperture value/ Also when using , digital zoom, Digital Tele-Converter or while displaying the image on the AF Frame Mode (p. 118) setting. - When the AF mode (p. 117) is set to display . In [FlexiZone... • The MF indicator is displayed. • When the menu's [MF-Point Zoom] is set to setting the manual focus will differ depending on a TV, the display magnification is not magnified (p. 54).
...as follows. , ,, mode/Exposure compensation/ Exposure shift/ Exposure compensation/ Shutter speed/Exposure compensation/ Aperture value/Exposure compensation/ Shutter speed/Aperture value/ Also when using , digital zoom, Digital Tele-Converter or while displaying the image on the AF Frame Mode (p. 118) setting. - When the AF mode (p. 117) is set to display . In [FlexiZone... • The MF indicator is displayed. • When the menu's [MF-Point Zoom] is set to setting the manual focus will differ depending on a TV, the display magnification is not magnified (p. 54).
PowerShot SX10 IS Camera User Guide
Page 170
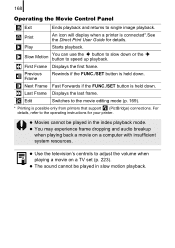
... mode (p. 169). * Printing is held down. Last Frame Displays the last frame. z You may experience frame dropping and audio breakup when playing back a movie on a TV set (p. 223). 168 Operating the Movie Control Panel Exit Ends playback and returns to the operating instructions for details. Previous Frame Rewinds if the FUNC...
... mode (p. 169). * Printing is held down. Last Frame Displays the last frame. z You may experience frame dropping and audio breakup when playing back a movie on a TV set (p. 223). 168 Operating the Movie Control Panel Exit Ends playback and returns to the operating instructions for details. Previous Frame Rewinds if the FUNC...
PowerShot SX10 IS Camera User Guide
Page 225
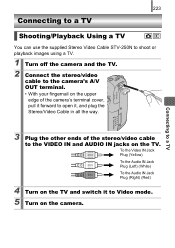
...Video Cable in all the way. 3 Plug the other ends of the stereo/video cable to the VIDEO IN and AUDIO IN jacks on the camera. Connecting to a TV 223 Connecting to a TV Shooting/Playback Using a TV You can use the supplied Stereo Video Cable STV-250N to shoot or playback images using... a TV. 1 Turn off the camera and the TV. 2 Connect the stereo/video cable to the camera's A/V OUT terminal. • With your fingernail on the upper edge of the camera's terminal cover, pull it forward to open it to Video mode. 5 Turn...
...Video Cable in all the way. 3 Plug the other ends of the stereo/video cable to the VIDEO IN and AUDIO IN jacks on the camera. Connecting to a TV 223 Connecting to a TV Shooting/Playback Using a TV You can use the supplied Stereo Video Cable STV-250N to shoot or playback images using... a TV. 1 Turn off the camera and the TV. 2 Connect the stereo/video cable to the camera's A/V OUT terminal. • With your fingernail on the upper edge of the camera's terminal cover, pull it forward to open it to Video mode. 5 Turn...


