User Guide
Page 2
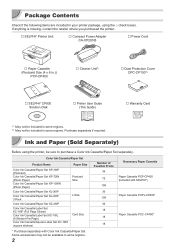
... SELPHY) Paper Cassette PCPL-CP400* Paper Cassette PCC-CP400* * Purchase separately with Color Ink Cassette/Paper Set. Ink and Paper (Sold Separately) Before using the □ check boxes. If anything is missing, contact the retailer where you purchased the printer. □ SELPHY Printer Unit □ Compact Power Adapter CA-CP200 B □ Power Cord □ Paper Cassette (Postcard Size (4 x 6 in.)) PCP-CP400 □ Cleaner Unit*1 □ Dust Protection Cover DPC-CP100*2 □ SELPHY CP900 Solution Disk □ Printer User Guide (This Guide) □ Warranty Card...
... SELPHY) Paper Cassette PCPL-CP400* Paper Cassette PCC-CP400* * Purchase separately with Color Ink Cassette/Paper Set. Ink and Paper (Sold Separately) Before using the □ check boxes. If anything is missing, contact the retailer where you purchased the printer. □ SELPHY Printer Unit □ Compact Power Adapter CA-CP200 B □ Power Cord □ Paper Cassette (Postcard Size (4 x 6 in.)) PCP-CP400 □ Cleaner Unit*1 □ Dust Protection Cover DPC-CP100*2 □ SELPHY CP900 Solution Disk □ Printer User Guide (This Guide) □ Warranty Card...
User Guide
Page 3
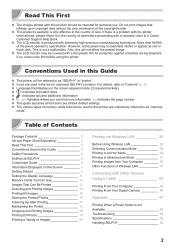
... page number. xx): Indicates where you can be used in the text to as "memory cards". Table of the pixels operate to "Controls" (p. 6). If there is not Available 48 Troubleshooting 49 Specifications 52 Handling SELPHY 54 3 More than 99.99% of Contents Package Contents 2 Ink and Paper (Sold Separately 2 Read This First 3 Conventions Used in this Guide 3 Safety Precautions 4 Setting Up SELPHY 5 Component Guide 6 Information Displayed on the screen...
... page number. xx): Indicates where you can be used in the text to as "memory cards". Table of the pixels operate to "Controls" (p. 6). If there is not Available 48 Troubleshooting 49 Specifications 52 Handling SELPHY 54 3 More than 99.99% of Contents Package Contents 2 Ink and Paper (Sold Separately 2 Read This First 3 Conventions Used in this Guide 3 Safety Precautions 4 Setting Up SELPHY 5 Component Guide 6 Information Displayed on the screen...
User Guide
Page 6
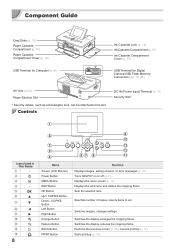
...) Ink Cassette Compartment (p. 10) Ink Cassette Compartment Cover (p. 10) USB Terminal for Digital Camera/USB Flash Memory Connection (pp. 15, 46) Air Vent (p. 54) Paper Ejection Slot * Security cables, such as a Kensington lock, can be attached to set. Switches the display, reduces the cropping frame. Displays the edit menu and rotates the cropping frame. Switches images, changes settings. Starts printing (p. 14). Specifies number of copies, selects items to this slot. Controls DC IN (Power Input) Terminal (p. 10) Security Slot* Icons Used...
...) Ink Cassette Compartment (p. 10) Ink Cassette Compartment Cover (p. 10) USB Terminal for Digital Camera/USB Flash Memory Connection (pp. 15, 46) Air Vent (p. 54) Paper Ejection Slot * Security cables, such as a Kensington lock, can be attached to set. Switches the display, reduces the cropping frame. Displays the edit menu and rotates the cropping frame. Switches images, changes settings. Starts printing (p. 14). Specifies number of copies, selects items to this slot. Controls DC IN (Power Input) Terminal (p. 10) Security Slot* Icons Used...

User Guide
Page 7
... cause lines on the ink cassette (Postcard (4x6in) Size), Card Size, etc.). Information Displayed on the Screen File number Memory card slot (p. 12) Shooting date of copies Switching the screen display You can display 4 images on the screen by pressing the - Take care not to get any dust on the paper since this example) Print settings (pp. 21 - 24) (Settings that the ink sheet is inserted into SELPHY. A Postcard size (4 x 6 in.) Color Ink Cassette/Paper Set (sold separately) (p. 2 ) will run out before completing a photo print...
... cause lines on the ink cassette (Postcard (4x6in) Size), Card Size, etc.). Information Displayed on the Screen File number Memory card slot (p. 12) Shooting date of copies Switching the screen display You can display 4 images on the screen by pressing the - Take care not to get any dust on the paper since this example) Print settings (pp. 21 - 24) (Settings that the ink sheet is inserted into SELPHY. A Postcard size (4 x 6 in.) Color Ink Cassette/Paper Set (sold separately) (p. 2 ) will run out before completing a photo print...
User Guide
Page 9
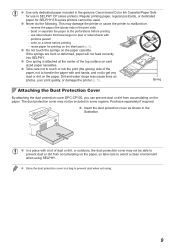
... blank part (p. 5). OO Do not touch the springs on photos, poor print quality, or damage the printer (p. 5). OO In a place with wet hands, and not to malfunction. -- OO Never do the following. OO Use only dedicated paper included in the genuine Canon brand Color Ink Cassette/Paper Sets for use label sheets that have begun to prevent dust when not using SELPHY. Regular printing paper, regular postcards, or dedicated paper for SELPHY ES series printers...
... blank part (p. 5). OO Do not touch the springs on photos, poor print quality, or damage the printer (p. 5). OO In a place with wet hands, and not to malfunction. -- OO Never do the following. OO Use only dedicated paper included in the genuine Canon brand Color Ink Cassette/Paper Sets for use label sheets that have begun to prevent dust when not using SELPHY. Regular printing paper, regular postcards, or dedicated paper for SELPHY ES series printers...
User Guide
Page 14
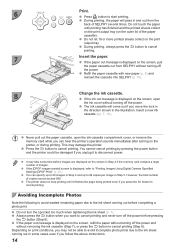
... avoid incomplete photo prints due to cancel printing. However, the total number of images. OO Press thep button to "Printing Images Using Digital Camera Specified Settings (DPOF Print)" (p . 46). OO It may take some cases even if you can specify up to cancel printing. 7 Insert the paper. OO If the ink out message is displayed, refer to start printing. Insert a new ink cassette (pp. 7, 10). Depending on the screen, open the ink cassette compartment cover, or remove the memory card while...
... avoid incomplete photo prints due to cancel printing. However, the total number of images. OO Press thep button to "Printing Images Using Digital Camera Specified Settings (DPOF Print)" (p . 46). OO It may take some cases even if you can specify up to cancel printing. 7 Insert the paper. OO If the ink out message is displayed, refer to start printing. Insert a new ink cassette (pp. 7, 10). Depending on the screen, open the ink cassette compartment cover, or remove the memory card while...
User Guide
Page 17
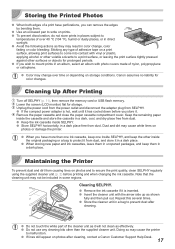
... white lines on photos and to ensure the print quality, clean SELPHY regularly using the supplied cleaner unit (p. 2) before you have perforations, you wish to mount prints in a dark place. OO Remove the ink cassette if it in a bag to protect it from causing lines on photos or damage the printer. Dust and dirt may cause the printer to malfunction. Canon assumes no liability for color changes. Keep the remaining paper inside SELPHY. OO Use...
... white lines on photos and to ensure the print quality, clean SELPHY regularly using the supplied cleaner unit (p. 2) before you have perforations, you wish to mount prints in a dark place. OO Remove the ink cassette if it in a bag to protect it from causing lines on photos or damage the printer. Dust and dirt may cause the printer to malfunction. Canon assumes no liability for color changes. Keep the remaining paper inside SELPHY. OO Use...
User Guide
Page 21
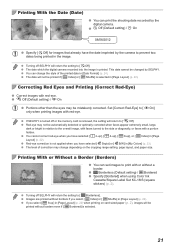
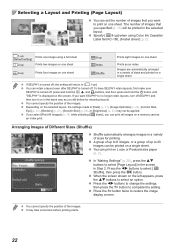
... change depending on card sized paper (p. 2), images will return to [ Off]. OO Borderless (Default setting) / Bordered OO Specify [Bordered] when using Color Ink Cassette/Square Label Set KC-18IS (square stickers) (p. 2). OO The date which the digital camera recorded into the image is selected in [Page Layout] (p. 22). OO You cannot correct red-eye when you have selected [ 2-up], [ 4-up], [ 8-up ] in [Page Layout] (p. 22) when printing on the cropping range setting, page layout, and paper size. OO Red-eye correction...
... change depending on card sized paper (p. 2), images will return to [ Off]. OO Borderless (Default setting) / Bordered OO Specify [Bordered] when using Color Ink Cassette/Square Label Set KC-18IS (square stickers) (p. 2). OO The date which the digital camera recorded into the image is selected in [Page Layout] (p. 22). OO You cannot correct red-eye when you have selected [ 2-up], [ 4-up], [ 8-up ] in [Page Layout] (p. 22) when printing on the cropping range setting, page layout, and paper size. OO Red-eye correction...
User Guide
Page 22
... "Making Settings" (p. 20), press the ud buttons to restore the image display screen. OO Press the v button twice to select [Page Layout] in the screen in the same way as you want SELPHY to no longer retain layouts, turn it on in Step 2. Press the lr buttons to 20 images can be applied. OO Specify [ 8-up] when using Color Ink Cassette/ Label Set KC-18IL (8-label sheet) (p. 2). 1-up (Default setting) 2-up Prints one image using a full sheet Prints two images...
... "Making Settings" (p. 20), press the ud buttons to restore the image display screen. OO Press the v button twice to select [Page Layout] in the screen in the same way as you want SELPHY to no longer retain layouts, turn it on in Step 2. Press the lr buttons to 20 images can be applied. OO Specify [ 8-up] when using Color Ink Cassette/ Label Set KC-18IL (8-label sheet) (p. 2). 1-up (Default setting) 2-up Prints one image using a full sheet Prints two images...
User Guide
Page 23
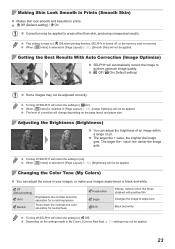
... Changes the image to sepia tone Black and white OO Turning off SELPHY will return the setting to [±0]. Getting the Best Results With Auto Correction (Image Optimize) OO SELPHY will not be adjusted correctly. OO The level of ±3. OO Depending on the page layout and paper size. OO Off (Default setting) / On OO Correction may not be applied. The larger the - OO When [ Index] is turned off SELPHY will change...
... Changes the image to sepia tone Black and white OO Turning off SELPHY will return the setting to [±0]. Getting the Best Results With Auto Correction (Image Optimize) OO SELPHY will not be adjusted correctly. OO The level of ±3. OO Depending on the page layout and paper size. OO Off (Default setting) / On OO Correction may not be applied. The larger the - OO When [ Index] is turned off SELPHY will change...
User Guide
Page 30
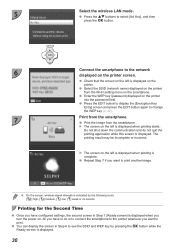
... you have configured settings, the second screen in Step 6 to the printer whenever you turn the power on the left is displayed when printing is displayed on the printer into the password field. OO Check that the screen on the left is complete. OO Press the EDIT button to display the [Encryption Key Entry] screen and press the EDIT button again to print. 5 Select the wireless LAN mode. Do not...
... you have configured settings, the second screen in Step 6 to the printer whenever you turn the power on the left is displayed when printing is displayed on the printer into the password field. OO Check that the screen on the left is complete. OO Press the EDIT button to display the [Encryption Key Entry] screen and press the EDIT button again to print. 5 Select the wireless LAN mode. Do not...
User Guide
Page 31
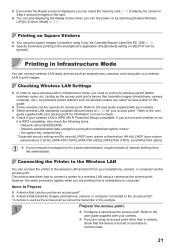
... displaying the Ready screen when you can be ignored). OO Specify borderless printing in the card. This section describes how to connect a printer to display the screen in Step 4 and print images in the smartphone's application (the [Borders] setting on by the system administrator, request details of network settings from a smartphone or computer. Items to Prepare OO A device that can insert the memory card p. 13 to a wireless LAN using Color Ink Cassette...
... displaying the Ready screen when you can be ignored). OO Specify borderless printing in the card. This section describes how to connect a printer to display the screen in Step 4 and print images in the smartphone's application (the [Borders] setting on by the system administrator, request details of network settings from a smartphone or computer. Items to Prepare OO A device that can insert the memory card p. 13 to a wireless LAN using Color Ink Cassette...

User Guide
Page 40
... image to start printing. XX The background color changes and the image is complete. OO Once images are canceled. OO Select the number of the screen. OO For Macintosh, click [Print menu], then click [Print] in an index within the [Pictures] You can check the actual layout by clicking [Preview] in another folder by clicking this button and selecting a folder from the actual layout. Macintosh OO When all printing is displayed...
... image to start printing. XX The background color changes and the image is complete. OO Once images are canceled. OO Select the number of the screen. OO For Macintosh, click [Print menu], then click [Print] in an index within the [Pictures] You can check the actual layout by clicking [Preview] in another folder by clicking this button and selecting a folder from the actual layout. Macintosh OO When all printing is displayed...
User Guide
Page 41
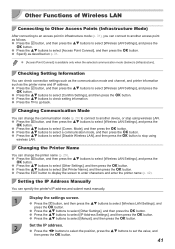
... ud buttons to select [Confirm Settings], and then press the o button. Mode], and then press the o button. OO Press the ud buttons to select [Disable Wireless LAN], and then press the o button to stop using wireless LAN. Changing the Printer Name You can connect to another device, or stop using wireless LAN. OO Press the EDIT button to display the screen to select [Wireless LAN Settings], and press the o button. Other Functions of Wireless LAN Connecting...
... ud buttons to select [Confirm Settings], and then press the o button. Mode], and then press the o button. OO Press the ud buttons to select [Disable Wireless LAN], and then press the o button to stop using wireless LAN. Changing the Printer Name You can connect to another device, or stop using wireless LAN. OO Press the EDIT button to display the screen to select [Wireless LAN Settings], and press the o button. Other Functions of Wireless LAN Connecting...

User Guide
Page 45
... the menu, and click [System Preferences] r [Print & Fax] to the user guide included with the cable and computer for handling instructions. OO Print as described in Steps 2 to turn SELPHY on p. 39. OO Turn off SELPHY and remove the memory card or USB flash memory. OO When the installation finishes, click [Restart] to a computer via a USB hub. OO SELPHY may not operate correctly if it is connected to [On] in the screen displayed by setting [Start SELPHY Photo Print automatically] to...
... the menu, and click [System Preferences] r [Print & Fax] to the user guide included with the cable and computer for handling instructions. OO Print as described in Steps 2 to turn SELPHY on p. 39. OO Turn off SELPHY and remove the memory card or USB flash memory. OO When the installation finishes, click [Restart] to a computer via a USB hub. OO SELPHY may not operate correctly if it is connected to [On] in the screen displayed by setting [Start SELPHY Photo Print automatically] to...
User Guide
Page 46
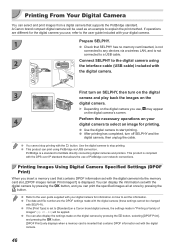
... DPOF information set with the digital camera into the memory card slot, [DPOF images remain Print images?] is inserted that supports the PictBridge standard. Use the digital camera to explain the print method. PictBridge is compliant with the digital camera. 46 OO If the [Print Type] is not connected to a USB cable. 2 Connect SELPHY to the user guide included with the v button. OO Check that allows the use , refer to the digital camera using PictBridge via a wireless LAN, and...
... DPOF information set with the digital camera into the memory card slot, [DPOF images remain Print images?] is inserted that supports the PictBridge standard. Use the digital camera to explain the print method. PictBridge is compliant with the digital camera. 46 OO If the [Print Type] is not connected to a USB cable. 2 Connect SELPHY to the user guide included with the v button. OO Check that allows the use , refer to the digital camera using PictBridge via a wireless LAN, and...
User Guide
Page 49
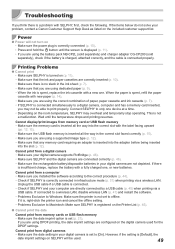
... USB flash memory is inserted all the way in infrastructure mode (p. 31) when printing via a USB cable. Power OOPower will be able to Windows: Make sure the printer is set (p. 21). Wait until the screen is displayed (p. 11). • If you are using a supported image type (p. 12). • Make sure that you are using the correct combination of paper, paper cassette and ink cassette (p. 7). • If SELPHY is connected simultaneously to the correct procedure (p. 44). • Check if SELPHY is correctly connected in the correct slot...
... USB flash memory is inserted all the way in infrastructure mode (p. 31) when printing via a USB cable. Power OOPower will be able to Windows: Make sure the printer is set (p. 21). Wait until the screen is displayed (p. 11). • If you are using a supported image type (p. 12). • Make sure that you are using the correct combination of paper, paper cassette and ink cassette (p. 7). • If SELPHY is connected simultaneously to the correct procedure (p. 44). • Check if SELPHY is correctly connected in the correct slot...
User Guide
Page 51
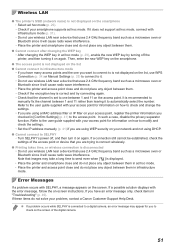
... on your problem, contact a Canon Customer Support Help Desk. Then, enter the new WEP key on again. Refer to the user guide supplied with infrastructure mode (p. 31). • Do not use wireless LAN near a device that images may appear for information on how to check and change the settings. • If you to automatically select the number. If a possible solution displays with SELPHY, a message appears on the screen. OOPrinting takes time, or wireless connection is...
... on your problem, contact a Canon Customer Support Help Desk. Then, enter the new WEP key on again. Refer to the user guide supplied with infrastructure mode (p. 31). • Do not use wireless LAN near a device that images may appear for information on how to check and change the settings. • If you to automatically select the number. If a possible solution displays with SELPHY, a message appears on the screen. OOPrinting takes time, or wireless connection is...
User Guide
Page 52
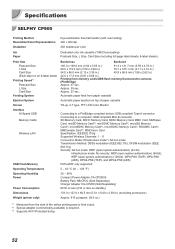
... WPA2-PSK (AES) FAT/exFAT only supported 5 - 40 °C (41 - 104 °F) 20 - 80% Compact Power Adapter CA-CP200 B Battery Pack NB-CP2L (Sold Separately) Charger Adapter CG-CP200 (Sold Separately) 60 W or less (4 W or less on an 8-label sheet) Printing Speed*1 Postcard Size L Size Card Size Feeding System Ejection System Screen Interface Hi-Speed USB Memory Cards Wireless LAN USB Flash Memory Operating Temperatures Operating Humidity Power Power Consumption Dimensions Weight (printer only) Borderless Bordered 100.0 x 148.0 mm (3.94...
... WPA2-PSK (AES) FAT/exFAT only supported 5 - 40 °C (41 - 104 °F) 20 - 80% Compact Power Adapter CA-CP200 B Battery Pack NB-CP2L (Sold Separately) Charger Adapter CG-CP200 (Sold Separately) 60 W or less (4 W or less on an 8-label sheet) Printing Speed*1 Postcard Size L Size Card Size Feeding System Ejection System Screen Interface Hi-Speed USB Memory Cards Wireless LAN USB Flash Memory Operating Temperatures Operating Humidity Power Power Consumption Dimensions Weight (printer only) Borderless Bordered 100.0 x 148.0 mm (3.94...
User Guide
Page 54
... vent (p. 6), remove the ink cassette (p. 14) and clean away the dust. Do not make any interference received, including interference that interference will temporarily stop operation of the following two conditions: (1) This device may cause undesired operation. Tel No. (516) 328-5600 Canadian Radio Interference Regulations This Class B digital apparatus complies with the instructions, may cause paper jams or the printer to insect...
... vent (p. 6), remove the ink cassette (p. 14) and clean away the dust. Do not make any interference received, including interference that interference will temporarily stop operation of the following two conditions: (1) This device may cause undesired operation. Tel No. (516) 328-5600 Canadian Radio Interference Regulations This Class B digital apparatus complies with the instructions, may cause paper jams or the printer to insect...


