User Guide
Page 6
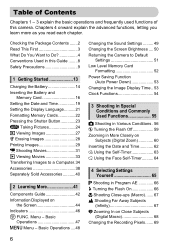
... 29 E Shooting Movies 31 1 Viewing Movies 33 Transferring Images to Default Settings 51 Low Level Memory Card Formatting 52 Power Saving Function (Auto Power Down 53 Changing the Image Display Time .. 53 Clock Functions 54 3 Shooting in Special Conditions and Commonly Used Functions... Sound Settings ......... 49 Changing the Screen Brightness .... 50 Returning the Camera to a Computer.34 Accessories 38 Separately Sold Accessories ...........40 2 Learning More 41 Components Guide 42 Information Displayed on Subjects (Digital Zoom 60 Inserting the Date and Time 62 Ò Using the ...
... 29 E Shooting Movies 31 1 Viewing Movies 33 Transferring Images to Default Settings 51 Low Level Memory Card Formatting 52 Power Saving Function (Auto Power Down 53 Changing the Image Display Time .. 53 Clock Functions 54 3 Shooting in Special Conditions and Commonly Used Functions... Sound Settings ......... 49 Changing the Screen Brightness .... 50 Returning the Camera to a Computer.34 Accessories 38 Separately Sold Accessories ...........40 2 Learning More 41 Components Guide 42 Information Displayed on Subjects (Digital Zoom 60 Inserting the Date and Time 62 Ò Using the ...

User Guide
Page 8
... about. • : Supplemental information. • (p. Conventions Used in this Guide 8 Customizing the Camera ..131 Changing Functions 132 Changing Shooting Functions........136 Changing Playback Functions .......139 Changing the Start-up Image or Sound 139 9 Useful Information 141 Using Household Power 142 Troubleshooting 143 List of Messages that Appear on the Screen ...... 146 Functions...
... about. • : Supplemental information. • (p. Conventions Used in this Guide 8 Customizing the Camera ..131 Changing Functions 132 Changing Shooting Functions........136 Changing Playback Functions .......139 Changing the Start-up Image or Sound 139 9 Useful Information 141 Using Household Power 142 Troubleshooting 143 List of Messages that Appear on the Screen ...... 146 Functions...
User Guide
Page 9
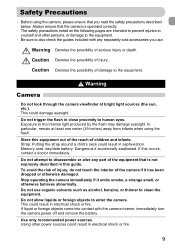
...• Be sure to also check the guides included with the camera interior, immediately turn the camera power off and remove the battery. • Use only recommended power sources. Caution Denotes the possibility of the camera if it has been dropped or otherwise damaged. • Stop operating...; Do not attempt to yourself and other power sources could result in close proximity to enter the camera. Warning Camera • Do not look through the camera viewfinder at least one meter (39 inches) away from infants when using the camera, please ensure that is operated correctly. &#...
...• Be sure to also check the guides included with the camera interior, immediately turn the camera power off and remove the battery. • Use only recommended power sources. Caution Denotes the possibility of the camera if it has been dropped or otherwise damaged. • Stop operating...; Do not attempt to yourself and other power sources could result in close proximity to enter the camera. Warning Camera • Do not look through the camera viewfinder at least one meter (39 inches) away from infants when using the camera, please ensure that is operated correctly. &#...

User Guide
Page 10
...alter or place heavy items on the lens. It is also possible to suffer hearing loss from the outlet and consult your camera distributor or the closest Canon Customer Support Help Desk. • Use only the specified battery charger to the surroundings. This could result in electrical shock or... flame. • Do not let the battery come into the outlet. This may also cause deformation of the power outlet, and the surrounding area. • Do not handle the power cord with water and seek medical assistance. Places subject to temperatures above 40 °C (104 °F). - ...
...alter or place heavy items on the lens. It is also possible to suffer hearing loss from the outlet and consult your camera distributor or the closest Canon Customer Support Help Desk. • Use only the specified battery charger to the surroundings. This could result in electrical shock or... flame. • Do not let the battery come into the outlet. This may also cause deformation of the power outlet, and the surrounding area. • Do not handle the power cord with water and seek medical assistance. Places subject to temperatures above 40 °C (104 °F). - ...

User Guide
Page 11
...a beach or at bright light sources (the sun, etc.). If the battery is left inside the camera, damage caused by leakage may cause the camera to malfunction. • Unplug the battery charger from the power outlet after recharging is covered by your bag, ensure that hard objects do not come into contact... with dirt, dust or other metal materials in your fingers or clothing. This may occur. • Before you are not using the camera on top of time ...
...a beach or at bright light sources (the sun, etc.). If the battery is left inside the camera, damage caused by leakage may cause the camera to malfunction. • Unplug the battery charger from the power outlet after recharging is covered by your bag, ensure that hard objects do not come into contact... with dirt, dust or other metal materials in your fingers or clothing. This may occur. • Before you are not using the camera on top of time ...

User Guide
Page 14
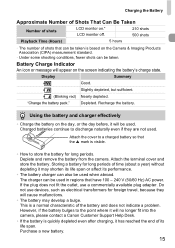
... Charge the battery. ● For CB-2LV: Flip out the plug and plug the charger into a power outlet . ● For CB-2LVE: Plug the power cord into the charger, then plug the other end into a power outlet. The charge lamp lights red and charging starts. ● The charge lamp will light green when... it in and down . Charging the Battery Use the included charger to charge the battery. Remove the battery. ● Unplug the battery charger from the power outlet, then remove the battery by sliding it in and up .
... Charge the battery. ● For CB-2LV: Flip out the plug and plug the charger into a power outlet . ● For CB-2LVE: Plug the power cord into the charger, then plug the other end into a power outlet. The charge lamp lights red and charging starts. ● The charge lamp will light green when... it in and down . Charging the Battery Use the included charger to charge the battery. Remove the battery. ● Unplug the battery charger from the power outlet, then remove the battery by sliding it in and up .
User Guide
Page 15
... can be used in regions that the mark is visible. • How to the point where it will no longer fit into the camera, please contact a Canon Customer Support Help Desk. • If the battery is quickly depleted even after charging, it will be used. However, if the battery...sufficient. (Blinking red) Nearly depleted. Recharge the battery. Charged batteries continue to a charged battery so that have 100 - 240 V (50/60 Hz) AC power. Attach the terminal cover and store the battery. Charging the Battery Approximate Number of Shots That Can Be Taken Number of shots LCD monitor on...
... can be used in regions that the mark is visible. • How to the point where it will no longer fit into the camera, please contact a Canon Customer Support Help Desk. • If the battery is quickly depleted even after charging, it will be used. However, if the battery...sufficient. (Blinking red) Nearly depleted. Recharge the battery. Charged batteries continue to a charged battery so that have 100 - 240 V (50/60 Hz) AC power. Attach the terminal cover and store the battery. Charging the Battery Approximate Number of Shots That Can Be Taken Number of shots LCD monitor on...

User Guide
Page 19
If you have been set, the Date/Time screen will close. ● Pressing the power button will turn on the camera. ● Press the power button. Since the dates and times recorded into your images are based on . The Date/Time screen will set 19 Make the setting. ● Press ...the m button. Setting the Date and Time The Date/Time settings screen will appear the first time the camera is turned...
If you have been set, the Date/Time screen will close. ● Pressing the power button will turn on the camera. ● Press the power button. Since the dates and times recorded into your images are based on . The Date/Time screen will set 19 Make the setting. ● Press ...the m button. Setting the Date and Time The Date/Time settings screen will appear the first time the camera is turned...

User Guide
Page 24
..., a white frame appears on other detected faces. Even if the detected faces move, the camera will turn the camera off. The start-up sound will play, and the startup screen will appear. ● Pressing the power button again will follow the faces within a certain range. Select the A mode. ●... Set the mode switch to A. ● When you can also detect and focus on the camera. ● Press the power button. The camera focuses on your subject, making it appear larger. Moving the lever toward i will zoom in the upper left of the main subject, ...
..., a white frame appears on other detected faces. Even if the detected faces move, the camera will turn the camera off. The start-up sound will play, and the startup screen will appear. ● Pressing the power button again will follow the faces within a certain range. Select the A mode. ●... Set the mode switch to A. ● When you can also detect and focus on the camera. ● Press the power button. The camera focuses on your subject, making it appear larger. Moving the lever toward i will zoom in the upper left of the main subject, ...
User Guide
Page 25
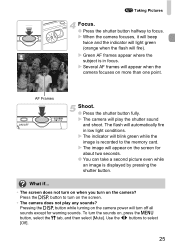
... the qr buttons to focus. Several AF frames will appear on the screen. • The camera does not play the shutter sound and shoot. The image will appear when the camera focuses on the camera? Press the l button to the memory card. Green AF frames appear where the subject is ...displayed by pressing the shutter button. The camera will turn the sounds on the camera power will play any sounds? Pressing the l button while turning on , press the n button, select the 3 tab, and then select [Mute]. A ...
... the qr buttons to focus. Several AF frames will appear on the screen. • The camera does not play the shutter sound and shoot. The image will appear when the camera focuses on the camera? Press the l button to the memory card. Green AF frames appear where the subject is ...displayed by pressing the shutter button. The camera will turn the sounds on the camera power will play any sounds? Pressing the l button while turning on , press the n button, select the 3 tab, and then select [Mute]. A ...

User Guide
Page 27
...Pressing the 1 button while the lens is off turns the camera on the screen. The last image you press the 1 button with the lens retracted, the power will retract after approximately 1 minute elapses. Pressing it again turns the camera off . Switching to and from playback mode Pressing the 1... button while the camera is extended will appear. 1 Viewing Images You can view your ...
...Pressing the 1 button while the lens is off turns the camera on the screen. The last image you press the 1 button with the lens retracted, the power will retract after approximately 1 minute elapses. Pressing it again turns the camera off . Switching to and from playback mode Pressing the 1... button while the camera is extended will appear. 1 Viewing Images You can view your ...

User Guide
Page 38
Accessories Supplied with Camera AV Cable AVC-DC400*1 Interface Cable IFC-400PCU*1 Wrist Strap WS-DC7 Battery Pack NB-4L (with Terminal Cover)*1 Battery Charger CB-2LV/CB-2LVE*1 DIGITAL CAMERA Solution Disk AC Adapter Kit ACK-DC10 DC Coupler DR-DC10 Power Cord Compact Power Adapter CA-DC10 Waterproof Case WP-DC31 *1 Also available for purchase separately. *2 See the user guide supplied with the printer for more information on the printer and interface cables. 38
Accessories Supplied with Camera AV Cable AVC-DC400*1 Interface Cable IFC-400PCU*1 Wrist Strap WS-DC7 Battery Pack NB-4L (with Terminal Cover)*1 Battery Charger CB-2LV/CB-2LVE*1 DIGITAL CAMERA Solution Disk AC Adapter Kit ACK-DC10 DC Coupler DR-DC10 Power Cord Compact Power Adapter CA-DC10 Waterproof Case WP-DC31 *1 Also available for purchase separately. *2 See the user guide supplied with the printer for more information on the printer and interface cables. 38
User Guide
Page 39
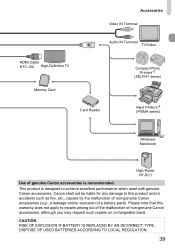
.... Please note that this product and/or accidents such as fire, etc., caused by the malfunction of non-genuine Canon accessories (e.g., a leakage and/or explosion of a battery pack). DISPOSE OF USED BATTERIES ACCORDING TO LOCAL REGULATION. 39 CAUTION RISK OF EXPLOSION IF BATTERY IS REPLACED ... TV/Video HDMI Cable HTC-100 High-Definition TV Memory Card Card Reader Compact Photo Printers*2 (SELPHY series) Inkjet Printers*2 (PIXMA series) Windows/ Macintosh High-Power HF-DC1 Use of genuine Canon accessories is designed to repairs arising out of the malfunction of non-genuine...
.... Please note that this product and/or accidents such as fire, etc., caused by the malfunction of non-genuine Canon accessories (e.g., a leakage and/or explosion of a battery pack). DISPOSE OF USED BATTERIES ACCORDING TO LOCAL REGULATION. 39 CAUTION RISK OF EXPLOSION IF BATTERY IS REPLACED ... TV/Video HDMI Cable HTC-100 High-Definition TV Memory Card Card Reader Compact Photo Printers*2 (SELPHY series) Inkjet Printers*2 (PIXMA series) Windows/ Macintosh High-Power HF-DC1 Use of genuine Canon accessories is designed to repairs arising out of the malfunction of non-genuine...
User Guide
Page 40
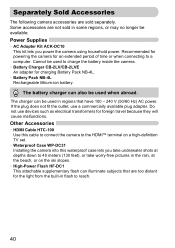
...high-definition TV set. • Waterproof Case WP-DC31 Installing the camera into this waterproof case lets you power the camera using household power. Do not use a commercially available plug adapter. Separately Sold Accessories The following camera accessories are sold in some regions, or may no longer be ... or when connecting to 40 meters (130 feet), or take underwater shots at depths down to a computer. Recommended for powering the camera for foreign travel because they will cause malfunctions. The battery charger can be used when abroad. Some accessories are too distant...
...high-definition TV set. • Waterproof Case WP-DC31 Installing the camera into this waterproof case lets you power the camera using household power. Do not use a commercially available plug adapter. Separately Sold Accessories The following camera accessories are sold in some regions, or may no longer be ... or when connecting to 40 meters (130 feet), or take underwater shots at depths down to a computer. Recommended for powering the camera for foreign travel because they will cause malfunctions. The battery charger can be used when abroad. Some accessories are too distant...
User Guide
Page 42
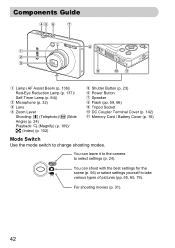
... yourself to take various types of pictures (pp. 55, 65, 79). For shooting movies (p. 31). 42 You can leave it to the camera to change shooting modes. Components Guide Lamp (AF Assist Beam (p. 136)/ Red-Eye Reduction Lamp (p. 137)/ Self-Timer Lamp (p. 64)) Microphone... (p. 32) Lens Zoom Lever Shooting: i (Telephoto)/ j (Wide Angle) (p. 24) Playback: k (Magnify) (p. 109)/ g (Index) (p. 102) Shutter Button (p. 23) Power Button Speaker Flash (pp. 59, 66) Tripod Socket DC Coupler Terminal Cover (p. 142) Memory Card / Battery Cover (p. 16) Mode Switch Use the mode switch to...
... yourself to take various types of pictures (pp. 55, 65, 79). For shooting movies (p. 31). 42 You can leave it to the camera to change shooting modes. Components Guide Lamp (AF Assist Beam (p. 136)/ Red-Eye Reduction Lamp (p. 137)/ Self-Timer Lamp (p. 64)) Microphone... (p. 32) Lens Zoom Lever Shooting: i (Telephoto)/ j (Wide Angle) (p. 24) Playback: k (Magnify) (p. 109)/ g (Index) (p. 102) Shutter Button (p. 23) Power Button Speaker Flash (pp. 59, 66) Tripod Socket DC Coupler Terminal Cover (p. 142) Memory Card / Battery Cover (p. 16) Mode Switch Use the mode switch to...
User Guide
Page 46
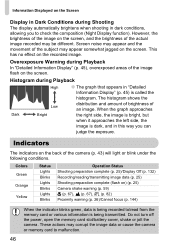
... Lights Blinks Lights Blinks Operation Status Shooting preparation complete (p. 25)/Display Off (p. 132) Recording/reading/transmitting image data (p. 25) Shooting preparation complete (flash on) (p. 25) Camera shake warning (p. 59) e (p. 67), u (p. 67), % (p. 82) Proximity warning (p. 26)/Cannot focus (p. 144) When the indicator blinks green, data is dark... brightens when shooting in this way you to check the composition (Night Display function). Do not turn off the power, open the memory card slot/battery cover, shake or jolt the camera. This has no effect on the recorded image.
... Lights Blinks Lights Blinks Operation Status Shooting preparation complete (p. 25)/Display Off (p. 132) Recording/reading/transmitting image data (p. 25) Shooting preparation complete (flash on) (p. 25) Camera shake warning (p. 59) e (p. 67), u (p. 67), % (p. 82) Proximity warning (p. 26)/Cannot focus (p. 144) When the indicator blinks green, data is dark... brightens when shooting in this way you to check the composition (Night Display function). Do not turn off the power, open the memory card slot/battery cover, shake or jolt the camera. This has no effect on the recorded image.

User Guide
Page 53
...Hold], the image displays until you press the shutter button halfway. 53 Power Saving Function (Auto Power Down) To save battery power, the camera shuts down automatically when it is last operated. • You can turn off the Power Saving Function (p. 132). • You can adjust the time before... the monitor turns off (p. 132). After about 2 more minutes, the lens will retract and the power will turn off approximately 5 minutes after the camera is not operated for a certain time. Select [Review]. ● Press the qr buttons to select the 4 tab. ●...
...Hold], the image displays until you press the shutter button halfway. 53 Power Saving Function (Auto Power Down) To save battery power, the camera shuts down automatically when it is last operated. • You can turn off the Power Saving Function (p. 132). • You can adjust the time before... the monitor turns off (p. 132). After about 2 more minutes, the lens will retract and the power will turn off approximately 5 minutes after the camera is not operated for a certain time. Select [Review]. ● Press the qr buttons to select the 4 tab. ●...

User Guide
Page 54
Press and hold the m button, then press the power button to cancel the clock display. A screen like that on the left appears showing the current time. ● You can check the current time. ● Hold the m button pressed. Clock Functions You can change the display color by changing the camera's orientation and pressing the qr buttons. ● Press the m button to display the clock. 54
Press and hold the m button, then press the power button to cancel the clock display. A screen like that on the left appears showing the current time. ● You can check the current time. ● Hold the m button pressed. Clock Functions You can change the display color by changing the camera's orientation and pressing the qr buttons. ● Press the m button to display the clock. 54

User Guide
Page 77
... recompose the scene. Compose and shoot. ● Use the viewfinder to turn off the screen. Focus. ● Center the subject you want to save battery power, you can now recompose and shoot. The view in focus, and press the shutter button halfway. ● Confirm that the AF Frame on the subject..., it will not use the viewfinder for shooting, instead of the screen. You can use face detection to focus. The camera will automatically focus on the subject is called Focus Lock. Shoot. ● Press the shutter button fully.
... recompose the scene. Compose and shoot. ● Use the viewfinder to turn off the screen. Focus. ● Center the subject you want to save battery power, you can now recompose and shoot. The view in focus, and press the shutter button halfway. ● Confirm that the AF Frame on the subject..., it will not use the viewfinder for shooting, instead of the screen. You can use face detection to focus. The camera will automatically focus on the subject is called Focus Lock. Shoot. ● Press the shutter button fully.

User Guide
Page 90
.... ● The unchanged image and the Color Swap image will both display. ● The default setting is filled with the color you turn off the power. Changing the Color and Shooting • Using the flash may cause unexpected results in an image for another when recording it is to change green...
.... ● The unchanged image and the Color Swap image will both display. ● The default setting is filled with the color you turn off the power. Changing the Color and Shooting • Using the flash may cause unexpected results in an image for another when recording it is to change green...


