Software Starter Guide
Page 12
... all of the terms of Microsoft .Net Framework displays. 8 When the installation is no need to restart the computer, the [Finish] screen will start. Preparations 6 Review the installation settings and click [Install]. At this stage, do NOT remove the Solution Disk from the CD-ROM drive yet. 12 Using the Software...
... all of the terms of Microsoft .Net Framework displays. 8 When the installation is no need to restart the computer, the [Finish] screen will start. Preparations 6 Review the installation settings and click [Install]. At this stage, do NOT remove the Solution Disk from the CD-ROM drive yet. 12 Using the Software...
Software Starter Guide
Page 35
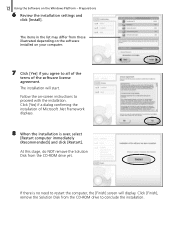
... installer panel and remove the disk from the CD-ROM drive. Continue by downloading images to all of the terms of the software license agreement. 7 Review the installation settings and click [Next]. Preparations 5 Select [Easy Installation] and click [Next].
... installer panel and remove the disk from the CD-ROM drive. Continue by downloading images to all of the terms of the software license agreement. 7 Review the installation settings and click [Next]. Preparations 5 Select [Easy Installation] and click [Next].
User Guide
Page 43
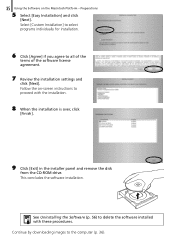
..., 101) Shooting Date and Time (p. 58) Switching the Display You can also switch the display by pressing the n button, selecting the 4 tab, and selecting the [Review Info] menu item. 43 No Information Display Simple Information Detailed Information Display Display Focus Check Display (p. 93) • You can change the display using the...
..., 101) Shooting Date and Time (p. 58) Switching the Display You can also switch the display by pressing the n button, selecting the 4 tab, and selecting the [Review Info] menu item. 43 No Information Display Simple Information Detailed Information Display Display Focus Check Display (p. 93) • You can change the display using the...

User Guide
Page 112
Changing the Image Display Right After Shooting You can change the length of time the images display directly after shooting. ● Select [Review Info], then press the qr buttons to select an option. Both grid lines, and the 3:2 guide will not print when printing on paper ...with a 3:2 aspect ratio. Changing Shooting Functions Changing the Image Display Time You can change the image display that appears after shooting. ● Select [Review], then press the qr buttons to select an option. ● If you select [Off], the image will not display. ● If you select [...
Changing the Image Display Right After Shooting You can change the length of time the images display directly after shooting. ● Select [Review Info], then press the qr buttons to select an option. Both grid lines, and the 3:2 guide will not print when printing on paper ...with a 3:2 aspect ratio. Changing Shooting Functions Changing the Image Display Time You can change the image display that appears after shooting. ● Select [Review], then press the qr buttons to select an option. ● If you select [Off], the image will not display. ● If you select [...
User Guide
Page 124
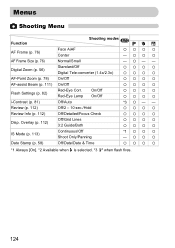
... (p. 58) Off/Date/Date & Time { {{ { *1 Always [On]. *2 Available when h is selected. *3 when flash fires. 124 Review (p. 112) Off/2 - 10 sec./Hold { {{ { Review Info (p. 112) Off/Detailed/Focus Check { {{ { Disp. Menus 4 Shooting Menu Function Shooting modes A G I F AF Frame (p. 76...) Face AiAF Center { {{ { -{{ { AF Frame Size (p. 76) Normal/Small - {- - Digital Zoom (p. 56) Standard/Off Digital Tele-converter (1.4x/2.3x...
... (p. 58) Off/Date/Date & Time { {{ { *1 Always [On]. *2 Available when h is selected. *3 when flash fires. 124 Review (p. 112) Off/2 - 10 sec./Hold { {{ { Review Info (p. 112) Off/Detailed/Focus Check { {{ { Disp. Menus 4 Shooting Menu Function Shooting modes A G I F AF Frame (p. 76...) Face AiAF Center { {{ { -{{ { AF Frame Size (p. 76) Normal/Small - {- - Digital Zoom (p. 56) Standard/Off Digital Tele-converter (1.4x/2.3x...


